Ok, for beach bases -
sketch out about what you want to do, I would save more 'involved' bases for the characters or bigger models, and keep your slightly more plain ones for the troops. It makes less work, less cost, but keeps it interesting while keeping the army cohesive.
Some of the ones I've done:
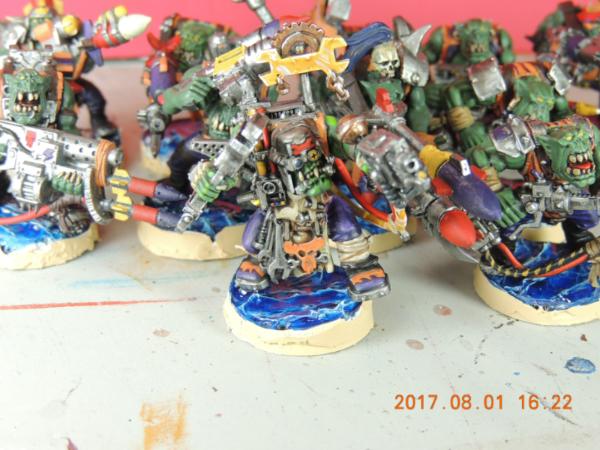
These ones are made from using a gel medium (you can pretty easily use anything from spackle, to woodfiller really). The gel medium formed the basis of the 'seafloor'. I decided to use it because it was more opaque than other material which would have required painting. Then I put a small bit of different grade sands on the valleys formed between the peaks, glued down with simple PVA. After that I painted it a bit, mostly some shade ad simple drybrushing (agrax and zandri dust, followed by a small bit of kkaki or light tan).
Then I built the dam to contain the water effects - this is honestly one of the most important steps period. If it leaks, all your work goes to hell. Easiest way I've found to get a good leak proof barrier is to hotglue some plasticard strips around the base's sides. Since the base sides are angled it can make it a bit hard to work with but it's important to keep them level, so the water effects dry level as well.
Once that's all ready, I mixed some blue ink with the water effects I used. There are several versions you can use, I highly recommend using a two part epoxy however. Stuff like Woodland scenics, usually good for small bases, can leave more bubbles and react strangely I've found (that can also be down to the humidity of my climate). Also it's important to mix in a figure 8 shape - this introduces less bubbles generally. Once you have your mix, start pouring into your dammed bases. Allow to dry 24hrs (possibly more depending on climate, I've not had a problem usually they're dry before 12
hrs)
Note that if you want your critters standing on your base, in the water. Make sure you position them and affix them before pouring the water effects! And be ready to wipe some off. I've found using a large syringe to place the water effects helps immensely keep you from getting any on areas of your mini you don't want it on.
This guy was done pretty similarily on the main base. I built up the seafloor base, as though he were near the edge of the sea where the waves made ripples in the sandy bottom. I used the same gel medium to do this, same sand effect etc.
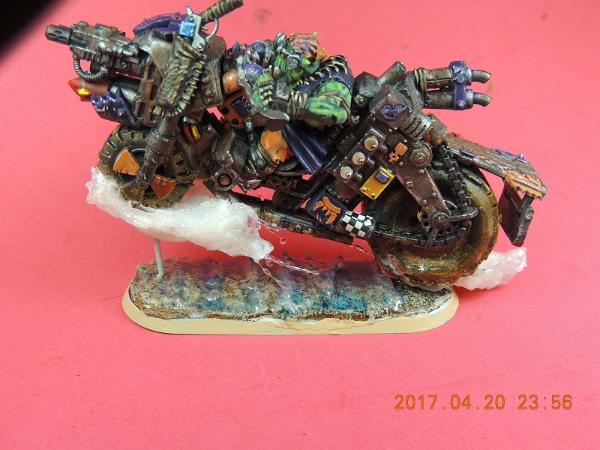
To get the water on the wheel I used the method described in this video:
https://www.youtube.com/watch?v=WGF9_c08Z3g&t=176s
there are several others if you give it a look see - but basically you're taking gloss modge podge and cotton ball material (make sure you stretch it out) to form the wave or water in the shape you wish. For the droplets - I used a thin nylon sewing thread to hold some Vallejo Still Water which I dripped onto the thread very slowly. This takes a good bit of time, but you can slowly build up droplets doing this, which you can then pose with the thread, in ways that seem natural.
Some people also will use the still water dripped onto wax paper of another non stick surface, but that tends to flatten.
You can also melt the plastic from clear packaging (or such as the flying stands) to make 'glass', 'ice' or 'water droplets' as well. Be careful of the vapors if you choose to try this method! The fumes from such are not good for you and you should only do it in a well ventilated area, wearing your mask (And also because frankly melting plastic just stinks

)
For just showing your critters as "wet" a simple gloss coat - say around areas that are standing in or near the water - can be enough to show this. You can also use 'ardcoat, or the still water.
If you have some extra money the vallejo water effects (which come in colours) are also very useful to make 'waves' - kind of a do it in one step, rather than using gel medium etc. I quite like it as well.
RE: your colours - eh, I'm not sure I can really help there except to say, take the picture with you when you look at some colours, and try to pick some close ones. Then, get a few units of your army built, and experiment. Practice makes perfect =D
Hope this helps! Good luck =D


