| Author |
Message |
 |
|
|
|
|
Advert
|
Forum adverts like this one are shown to any user who is not logged in. Join us by filling out a tiny 3 field form and you will get your own, free, dakka user account which gives a good range of benefits to you:
- No adverts like this in the forums anymore.
- Times and dates in your local timezone.
- Full tracking of what you have read so you can skip to your first unread post, easily see what has changed since you last logged in, and easily see what is new at a glance.
- Email notifications for threads you want to watch closely.
- Being a part of the oldest wargaming community on the net.
If you are already a member then feel free to login now. |
|
 |
2017/10/31 16:48:49
Subject: Malanthrope Conversion & Greenstuff Sculpt Questions WiP
|
|

Lone Wolf Sentinel Pilot
|
I am needing to make a base for a model and don't want to use solid green stuff. I was going to use Das Clay to make the general shape and then use the green stuff over it to get the detail work.
Has anyone used Das clay before? Did it work well? Will it work/stick well with the greenstuff over it as well?
Any tips or tricks to be aware of. I am new to sculpting and am doing this to fill the gap on a Malanthrope.
I am trying to make one large piece of carapace in this "gap area." I was going to fill this gap area with the Das, then put greenstuff all around it. Basically from the bottom of the actual carapace to the top of the tail, and cover up/trim the two spikes down. to get it too look more like the forge world model.
Thanks
|
|
This message was edited 1 time. Last update was at 2017/11/10 15:33:20
 10000+ 10000+
 10000+ 10000+
 8500+ 8500+
 3000+ 3000+
 8000+ 8000+
 3500+ IK Plus 1x Warhound, Reaver, Warlord Titans 3500+ IK Plus 1x Warhound, Reaver, Warlord Titans
DakkaSwap Successful Transactions: cormadepanda, pretre x3, LibertineIX, Lbcwanabe, privateer4hire, Cruentus (swap), Scatwick2 (swap), boneheadracer (swap), quickfuze (swap), Captain Brown (swap) x2, luftsb, Forgottonson, WillvonDoom, bocatt (swap)
*I'm on Bartertown as Dynas |
|
|
 |
|
2017/11/01 10:53:29
Subject: Das Clay and Greenstuff Sculpt question
|
|

Mekboy Hammerin' Somethin'
|
I haven't used Das in around 15 years, so I'm no expert...but, as it is an air-drying clay, I would say it should work just fine for a basic bulk/substructure to then go over with greenstuff to add proper detail to it...just make sure you give it plenty of time to properly dry, and I guess you might have an issue with surface cracks, but that shouldn't be a problem if you're going over it with greenstuff anyway 
|
    ...it's good to be green! ...it's good to be green! |
|
|
|
|
2017/11/01 11:51:25
Subject: Das Clay and Greenstuff Sculpt question
|
|

Pulsating Possessed Space Marine of Slaanesh
|
I have used das clay to make some terrain recently, never used it in combination with greenstuff though.
Not sure it would be a good idea to use on directly on a model. To smooth it you need to use water and it gets really messy. Also it is not as smooth as greenstuff or sculpey, it feels kinda fiberous.
And when it dries it shrinks and deform alot. And it doesnt stick to the model, It might stick when wet but when it dries it will get loose.
Can not say i would recommend it.
However if you have to use it the best thing would be to make what you are making as a seperate piece and then glue it on. Using it to fill it will crack, deform and shrink is my guess.
|
|
|
|
|
2017/11/01 12:05:52
Subject: Das Clay and Greenstuff Sculpt question
|
|

Longtime Dakkanaut
|
I tend to use milliput for larger areas of gap filling. It's easy to smooth in (and cheaper!), then use greenstuff for detailing over the top once that's cured.
|
|
|
|
|
|
2017/11/01 12:09:41
Subject: Re:Das Clay and Greenstuff Sculpt question
|
|
Nasty Nob
|
I like building terrain up with wood and then filling and smoothing the edges with spackcle better, but the 'Terrain Tutor' on youtube uses DAS clay so it can't be too bad!
|
|
|
|
|
2017/11/06 20:42:53
Subject: Das Clay and Greenstuff Sculpt question
|
|
Lone Wolf Sentinel Pilot
|
Thanks all. I decided to pass on the Das clay. I just tried the greenstuff and man I suck as scuplting carapace.
I tried to scuplt the pieces on my board then transfer it to the model .The problem came with all the bends, curves, crevices, etc... It looks like gak!
To fix this I might just try and blend a solid piece of greenstuff over it then scuplt the plates again on a more level and smooth surface.
Then I might make one flat piece of greenstuff, shape it like a diamond, then carve my V's into it. Afterward then place that entire sheet of greenstuff on the now smoother surface.
Not sure if this will work, but trying out stuff.
Anyone have any good tutorials for scuplting carapace. I have found pics, and only 1 video on youtube and it wasn't that good?
|
10000+
10000+
8500+
3000+
8000+
3500+ IK Plus 1x Warhound, Reaver, Warlord Titans
DakkaSwap Successful Transactions: cormadepanda, pretre x3, LibertineIX, Lbcwanabe, privateer4hire, Cruentus (swap), Scatwick2 (swap), boneheadracer (swap), quickfuze (swap), Captain Brown (swap) x2, luftsb, Forgottonson, WillvonDoom, bocatt (swap)
*I'm on Bartertown as Dynas |
|
|
|
|
2017/11/06 21:58:06
Subject: Das Clay and Greenstuff Sculpt question
|
|
Mekboy Hammerin' Somethin'
|
yeah greenstuff is very tricky to work with in large amounts...you really need a basic substructure first (blob of cured greenstuff/other sculpting putty/clay, plastic, resin, metal, etc), and then add a small layer of greenstuff over it to sculpt details from...also sculpting tool - both the metal kind, and the silicone-tipped kind...I mostly find myself using the silicone-tipped tools when I'm trying to sculpt anything, greenstuff doesn't stick to them, and they're great for smoothing out fingerprints etc, and they don't leave anywhere near as harsh edge-marks/gouges as the metal ones do, so they're better for large smooth, soft details, whereas metal tools are better for small, crisp details
so, build up the basic shape with whatever you want basically, then finish it by adding small amounts of greenstuff over it, blend it in, sculpt detail.
|
...it's good to be green! |
|
|
|
|
2017/11/07 14:07:50
Subject: Das Clay and Greenstuff Sculpt question
|
|
Lone Wolf Sentinel Pilot
|
Yeah i went nuts and bought metal tools, dental picks and the silicone clay shapers. I really like the silcone ones. They are like paint brushes for Greenstuff.
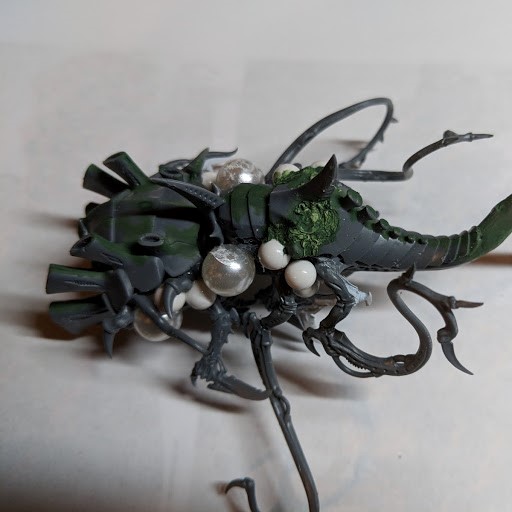
Here is a few pics of where I am at. Not bad for a first attempt at some heavy conversion and sculpting. I have done this on 3 different ones. I am happy with the eggs, tentacles and skin, but that carapace is horrible.
The plan is to put some greenstuff on and smooth all the plate lines into one giant smooth back plate. Then sculpt new plates over it. Thoughts?

 https://imgur.com/XhpQq9d
https://imgur.com/ga5IJsa
https://imgur.com/XhpQq9d
https://imgur.com/ga5IJsa
|
|
This message was edited 3 times. Last update was at 2017/11/07 14:15:49
10000+
10000+
8500+
3000+
8000+
3500+ IK Plus 1x Warhound, Reaver, Warlord Titans
DakkaSwap Successful Transactions: cormadepanda, pretre x3, LibertineIX, Lbcwanabe, privateer4hire, Cruentus (swap), Scatwick2 (swap), boneheadracer (swap), quickfuze (swap), Captain Brown (swap) x2, luftsb, Forgottonson, WillvonDoom, bocatt (swap)
*I'm on Bartertown as Dynas |
|
|
|
|
2017/11/07 15:40:54
Subject: Das Clay and Greenstuff Sculpt question
|
|
Mekboy Hammerin' Somethin'
|
I agree, all's looking good so far except the carapace, that's still a bit rough...I don't think you'd need to worry about making one big plate and resculpting over it, I think you could save the existing plates with a little more greenstuff added on and sculpted more carefully to neaten up the plate edges and make them more uniform...overall smooth them out a bit, and add a peaked ridge along the spine, like the plastic plates have...just go at it with a bit of patience, tackle each plate one at a time, I think you could do it
the front-most greenstuff plate, the lower corners of it slope toward the front of the model currently...maybe have them sweep toward the rear of the model a little...I think that would bring them in line with the rest of the plates...that one feels a little off as-is
|
...it's good to be green! |
|
|
|
|
2017/11/07 17:24:33
Subject: Das Clay and Greenstuff Sculpt question
|
|
Lone Wolf Sentinel Pilot
|
How would i lower the corners on the top plate that rounds forward. Just cut it off? Should i not round it up and over? Just have it point strait up?
I like the ridge idea, that would help.
|
10000+
10000+
8500+
3000+
8000+
3500+ IK Plus 1x Warhound, Reaver, Warlord Titans
DakkaSwap Successful Transactions: cormadepanda, pretre x3, LibertineIX, Lbcwanabe, privateer4hire, Cruentus (swap), Scatwick2 (swap), boneheadracer (swap), quickfuze (swap), Captain Brown (swap) x2, luftsb, Forgottonson, WillvonDoom, bocatt (swap)
*I'm on Bartertown as Dynas |
|
|
|
|
2017/11/07 18:20:52
Subject: Das Clay and Greenstuff Sculpt question
|
|

Longtime Dakkanaut
|
Do you have a dremel with sand paper?
I would recommend just sanding it down some.
|
|
This message was edited 1 time. Last update was at 2017/11/07 18:25:34
I need to go to work every day.
Millions of people on welfare depend on me. |
|
|
|
|
2017/11/07 18:32:34
Subject: Das Clay and Greenstuff Sculpt question
|
|
Mekboy Hammerin' Somethin'
|
 Dynas wrote: Dynas wrote:How would i lower the corners on the top plate that rounds forward. Just cut it off? Should i not round it up and over? Just have it point strait up?
I like the ridge idea, that would help.
ah, I'm no good at explaining things properly  ...here's a visual aid! - see, I just meant take that edge there, and bring it more towards the rear of the model...I feel like it would give it a bit more "natural flow" 

|
...it's good to be green! |
|
|
|
|
2017/11/08 04:01:35
Subject: Das Clay and Greenstuff Sculpt question
|
|
Lone Wolf Sentinel Pilot
|
Ah yes I did not get that. Pic definitely helps. I guess I would just carry that shape through to the remain plates? As far as smoothing I tried liquid greenstuff or should I just use small bits of greenstuff and press it into the existing with the silicone brushes?
I do have a dremmel. Would you suggest sanding it all and getting flush and starting over with new plates?
Thanks for the suggestions btw.
|
10000+
10000+
8500+
3000+
8000+
3500+ IK Plus 1x Warhound, Reaver, Warlord Titans
DakkaSwap Successful Transactions: cormadepanda, pretre x3, LibertineIX, Lbcwanabe, privateer4hire, Cruentus (swap), Scatwick2 (swap), boneheadracer (swap), quickfuze (swap), Captain Brown (swap) x2, luftsb, Forgottonson, WillvonDoom, bocatt (swap)
*I'm on Bartertown as Dynas |
|
|
|
|
2017/11/08 09:18:20
Subject: Das Clay and Greenstuff Sculpt question
|
|
Mekboy Hammerin' Somethin'
|
from my experience, proper 2-part greenstuff is generally always better than liquid greenstuff for pretty much any application, even just small gap-filling...it's like trying to sculpt peanut butter, and it shrinks when it cures, and it usually cures with a slight grainy texture (which can be useful for certain effects, but not really for it's intended purpose )
it's a little hard to tell without actually having the model in my hands...does it look like it would end up too bulky if you were to add more greenstuff over it to redefine the edges, smooth out the surfaces, etc?...if so, it may be a good idea to sand it down first
...but if you think you could get away with adding a little more bulk to it, I'd say you should be good to go, just keep adding small amounts of greenstuff, use the silicone brushes to smooth it into the existing greenstuff and just keep working over it until each plate has a nice smooth, flat surface, and more uniform crisp, defined edges.
haha...it's been a few months since I last sculpted anything, and yeah, now I'm starting to clearly remember just how much of a royal pain it is to sculpt large flat, smooth areas...so I sympathise with ya 
|
...it's good to be green! |
|
|
|
|
2017/11/08 14:08:00
Subject: Das Clay and Greenstuff Sculpt question
|
|
Longtime Dakkanaut
|
Liquid greenstuff has its uses and is a pretty good surfacing putty - apply it thickly, then scrub it off with a drybrush to polish it up. Good for tidying up surfaces you want smooth.
In terms of sharpening up edges, don't forget you can work greenstuff into sharper edges the more it's cured, and it carves pretty easily with a sharp knife when fully cured too.
|
|
|
|
|
|
2017/11/08 14:11:13
Subject: Das Clay and Greenstuff Sculpt question
|
|
Lone Wolf Sentinel Pilot
|
winterdyne wrote:Liquid greenstuff has its uses and is a pretty good surfacing putty - apply it thickly, then scrub it off with a drybrush to polish it up. Good for tidying up surfaces you want smooth.
In terms of sharpening up edges, don't forget you can work greenstuff into sharper edges the more it's cured, and it carves pretty easily with a sharp knife when fully cured too.
Thats good to know. I might need to let it cure a bit before I work it. I basically mix it and strat working right away and i push on on side and it shifts the other. Ill try and cut away some as well. I guess at this point its just experimenting.
|
10000+
10000+
8500+
3000+
8000+
3500+ IK Plus 1x Warhound, Reaver, Warlord Titans
DakkaSwap Successful Transactions: cormadepanda, pretre x3, LibertineIX, Lbcwanabe, privateer4hire, Cruentus (swap), Scatwick2 (swap), boneheadracer (swap), quickfuze (swap), Captain Brown (swap) x2, luftsb, Forgottonson, WillvonDoom, bocatt (swap)
*I'm on Bartertown as Dynas |
|
|
|
|
2017/11/08 21:41:37
Subject: Das Clay and Greenstuff Sculpt question
|
|
Longtime Dakkanaut
|
Easiest way I find to do a caprice is to put a layer in a straight line where you want it. Mark the spots where you want each new panel to start.
Let it cure for 10-15 ish mins or when you think it is getting cured enough. Then place a piece of green stuff at the bottom edge where you want it to start/ end. Clean the bottom and pull it backwards so it gets thinner.
|
I need to go to work every day.
Millions of people on welfare depend on me. |
|
|
|
|
2017/11/09 14:10:52
Subject: Das Clay and Greenstuff Sculpt question
|
|
Lone Wolf Sentinel Pilot
|
Cutting away with the hobby knife really helped! Much more strait edges. Simple solutions sometimes. I had to do a little sanding to flatten some of the ridges. Then some touchup work to blend. I tried the ridges on a few plates and it worked out well. Much better than it was I think, still need to add a few more ridges and the protruding spines. Might touch up the topmost plates as well.
The issue I am having is all the different hues/shades of green and its hard to tell what is smooth and what isn't. Any tips on how to tell the smoothness amidst all that different shades of green, its hard to see what I need to work.
This guy I tried to cut in some chip damage on a plate. Notice the 2nd plate ridge I attempted to add.


This plate, 2nd from top, had to be extended to about double it length for proportions.

This guy had the opposite issue. Top plate was way too long. Had to cut it back a bit.

Thanks for all the help, this has been a learning process.
|
|
This message was edited 2 times. Last update was at 2017/11/09 14:17:48
10000+
10000+
8500+
3000+
8000+
3500+ IK Plus 1x Warhound, Reaver, Warlord Titans
DakkaSwap Successful Transactions: cormadepanda, pretre x3, LibertineIX, Lbcwanabe, privateer4hire, Cruentus (swap), Scatwick2 (swap), boneheadracer (swap), quickfuze (swap), Captain Brown (swap) x2, luftsb, Forgottonson, WillvonDoom, bocatt (swap)
*I'm on Bartertown as Dynas |
|
|
|
|
2017/11/09 23:06:28
Subject: Das Clay and Greenstuff Sculpt question
|
|
Longtime Dakkanaut
|
I know this might sound like a dick comment but, Basically to find if it is flat "to your approval" I would just slid your finger over it and eye ball it.
Most of my sculpting is done by feeling it out more then anything else. Your fingers can pick up graininess bumps and damage ect that your eyes sometime cant.
If you do use sand paper use a grit you like I usually go for a finer grit but you tend to be very very slow lol.
|
I need to go to work every day.
Millions of people on welfare depend on me. |
|
|
|
|
2017/11/09 23:55:34
Subject: Das Clay and Greenstuff Sculpt question
|
|
Lone Wolf Sentinel Pilot
|
Ok, ill try the ol' feelers.... Yeah i have a fine grit like 1000 paper i will try as well.
|
10000+
10000+
8500+
3000+
8000+
3500+ IK Plus 1x Warhound, Reaver, Warlord Titans
DakkaSwap Successful Transactions: cormadepanda, pretre x3, LibertineIX, Lbcwanabe, privateer4hire, Cruentus (swap), Scatwick2 (swap), boneheadracer (swap), quickfuze (swap), Captain Brown (swap) x2, luftsb, Forgottonson, WillvonDoom, bocatt (swap)
*I'm on Bartertown as Dynas |
|
|
|
|
2017/11/10 15:39:31
Subject: Re:Malanthrope Conversion & Greenstuff Sculpt Questions WiP
|
|
Lone Wolf Sentinel Pilot
|
Applied the ridge to the last guy. Thinking if I should even bother with the protruding spine up the remaining lower plates or just leave as is.

Here is my first head. 2 more to go.

Thoughts? C&C?
|
|
This message was edited 1 time. Last update was at 2017/11/10 15:40:07
10000+
10000+
8500+
3000+
8000+
3500+ IK Plus 1x Warhound, Reaver, Warlord Titans
DakkaSwap Successful Transactions: cormadepanda, pretre x3, LibertineIX, Lbcwanabe, privateer4hire, Cruentus (swap), Scatwick2 (swap), boneheadracer (swap), quickfuze (swap), Captain Brown (swap) x2, luftsb, Forgottonson, WillvonDoom, bocatt (swap)
*I'm on Bartertown as Dynas |
|
|
|
|
2017/12/04 18:13:29
Subject: Re:Malanthrope Conversion & Greenstuff Sculpt Questions WiP
|
|
Lone Wolf Sentinel Pilot
|
Ok. I finished these guys just in time for the Chapter Approved Point increase. FML. j/k. I still like them, probably only run 1 now though.
Base will be jungle plants and what not, so he is like 95% done.
Carapace came out good IMO. The dark hides some of the blemishes.


|
10000+
10000+
8500+
3000+
8000+
3500+ IK Plus 1x Warhound, Reaver, Warlord Titans
DakkaSwap Successful Transactions: cormadepanda, pretre x3, LibertineIX, Lbcwanabe, privateer4hire, Cruentus (swap), Scatwick2 (swap), boneheadracer (swap), quickfuze (swap), Captain Brown (swap) x2, luftsb, Forgottonson, WillvonDoom, bocatt (swap)
*I'm on Bartertown as Dynas |
|
|
|
|
2017/12/06 13:38:05
Subject: Malanthrope Conversion & Greenstuff Sculpt Questions WiP
|
|
Lurking Gaunt
|
Pretty decent! Came out really nice - especially the face tentacles!
The_Vole
|
You don't need to run faster than the monsters, only faster than your friends... |
|
|
|
|
2017/12/06 14:17:34
Subject: Malanthrope Conversion & Greenstuff Sculpt Questions WiP
|
|
Lone Wolf Sentinel Pilot
|
THanks, yeah i am happy. still need to base them. Paint jobs is a little messy due to lack of texture, and I couldn't figure out what color to do the eggs. I tried the flesh color but it was washed out with the membranes. Then green, which i thought would be good, but nope, did yellow and it was good enough so I left it as i had no idea what other color to do.
Not to shabby for my first scuplting attempt i think.
|
10000+
10000+
8500+
3000+
8000+
3500+ IK Plus 1x Warhound, Reaver, Warlord Titans
DakkaSwap Successful Transactions: cormadepanda, pretre x3, LibertineIX, Lbcwanabe, privateer4hire, Cruentus (swap), Scatwick2 (swap), boneheadracer (swap), quickfuze (swap), Captain Brown (swap) x2, luftsb, Forgottonson, WillvonDoom, bocatt (swap)
*I'm on Bartertown as Dynas |
|
|
|
|
|
|
