| Author |
Message |
 |
|
|
|
|
Advert
|
Forum adverts like this one are shown to any user who is not logged in. Join us by filling out a tiny 3 field form and you will get your own, free, dakka user account which gives a good range of benefits to you:
- No adverts like this in the forums anymore.
- Times and dates in your local timezone.
- Full tracking of what you have read so you can skip to your first unread post, easily see what has changed since you last logged in, and easily see what is new at a glance.
- Email notifications for threads you want to watch closely.
- Being a part of the oldest wargaming community on the net.
If you are already a member then feel free to login now. |
|
 |
2018/02/07 12:36:56
Subject: [Advice] Hazard Stripes
|
|

Spawn of Chaos
UK
|
At present I'm painting up my Iron Warriors and I've decided to attempt to do the hazard stripes along with all other iconography using freehand. As it stands I have no experience with freehand but I've attempted to do the knee pads on the first couple of marines with varied results, none of which I'd call a success.
So does anyone have any general advice? I'd gone into this expecting something as simple as stripes to be... well... simple but dealing surface contours and adapting to the scale in question so that they look "right" has thrown me a bit.
Any advice would be greatly appreciated.
|
 Apostles of Contagion (40K) - 1750 Points Apostles of Contagion (40K) - 1750 Points
 Iron Warriors (30K/40K) - In progress Iron Warriors (30K/40K) - In progress
 Farsight Enclaves (40K) - Planned Farsight Enclaves (40K) - Planned
 352. Infanteriedivision (FoW) - 3000 points 352. Infanteriedivision (FoW) - 3000 points |
|
|
 |
|
2018/02/07 12:49:04
Subject: [Advice] Hazard Stripes
|
|

The Marine Standing Behind Marneus Calgar
|
My experience is limited, and on a larger scale. I used painter’s tape. I cut it to width myself, although I believe Tamya (and probably others) make much thinner tape. I put one strip down as a baseline, and then another two parallel to that one. Then remove the middle. Repeat placing and removing across the surface. This keeps them all aligned. Before when I was just eyeballing parallel, they were all over the place. Paint, remove tape, clean-up, weather. 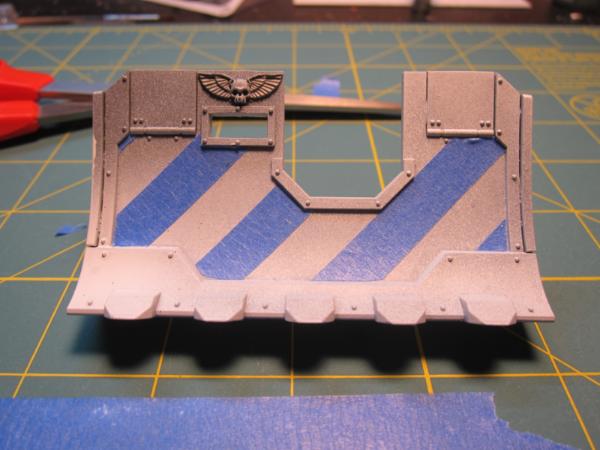 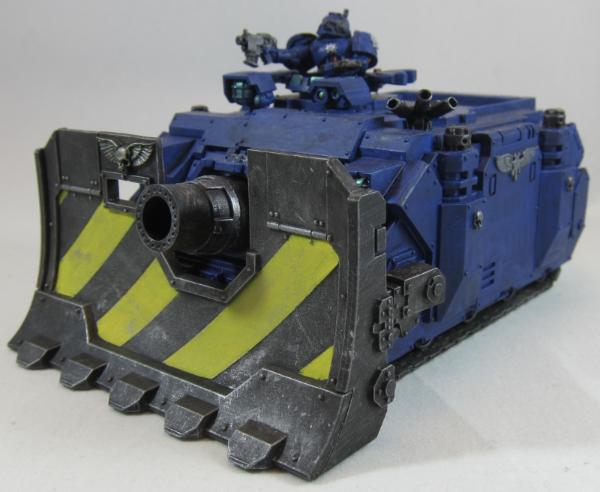
|
|
This message was edited 2 times. Last update was at 2018/02/07 12:52:18
|
|
|
|
|
2018/02/07 13:41:33
Subject: [Advice] Hazard Stripes
|
|
Rotting Sorcerer of Nurgle
|
On larger models, I've made a template from the clear plastic from a blister pack. You cut it into a > shape, the angle being 45 degrees & the thickness of each leg being how wide you want the stripes to be. Because its plastic, it will bend to the curve of a dozer blade & because its clear you can see what your doing. I then use a thin nibbed permanent pento mark out the stripes. You can flip the template front to back & left to right. The pen lines makes it really easy to hit the lines for a good solid set of stripes.
For smaller areas I would also recommend tape. You know those temporary stiches you can get, they might work. Be sure to varnish the yellow before laying these down as I don't know how sticky the glue is.
|
Check out my gallery here
Also I've started taking photos to use as reference for weathering which can be found here. Please send me your photos so they can be found all in one place!! |
|
|
|
|
2018/02/08 17:58:21
Subject: Re:[Advice] Hazard Stripes
|
|
Utilizing Careful Highlighting
|
Practice helps
also I'd try a few on a non-curved surface if you can, a curved surface will be different and harder to do generally
also with something like a knee pad, I'd use painters tape as well, cut to size. Like this:
1. Use a decent ruler (like a metal one) with more exact markings.
2. Make several strips.
3. Place your first strip approximately just off center (I find it helps it look more natural to be off center, than to try to get it perfectly aligned)
4. If you're not comfortable eye balling the spacing, just place subsequent strips down, next to the first, then remove every other one.
5. Get your self an old brush, or a short stencil brush - you're basically doing the same thing here as drybrushing.
6. Get your paint on your brush, wipe/brush most of it off. Dab onto the areas not covered by the strips. Do this at a 90o angle to to the surface (ie - straight down)
Don't worry extraordinarily about the coverage, we're going to neaten it up.
7. Since you're using a drier brush, you can take up the tape without too much of an issue immediately. You also will tend to not get paint under the tape. If you do, don't panick, check you have a good fit and dry paint next time.
8. Clean up: get your base for the stripes and paint it on, where needed.
9. Get the base for the not stripe areas, and use that to clean up any mistakes.
10. Let dry fully.
11. Varnish.
|
|
|
|
|
|
2018/02/10 00:28:09
Subject: Re:[Advice] Hazard Stripes
|
|

Longtime Dakkanaut
|
1. Paint the lighter colour first. It's usually easier to paint over it in the darker colour than the other way around.
2. You can either paint the edges of the stripes or a centre line of the darker stripe first, depending on what area you are working with and how you like to handle things. The main point at this time is get the proportions right.
3. Do the second point in a slightly darker colour of the first colour you used. So if you have yellow and black stripes then use yellow as a basecoat and paint the foundation for your lines/stripes with a tiny bit darker colour (no need to start with black when you'll need to correct a lot). That should make corrections quicker and easier.
4. Once you have established the edges of you stripes you can highlight and shade as needed and then use your darker colour to fill in the darker stripes (and highlight/shade those).
|
|
|
|
|
2018/02/10 07:31:47
Subject: [Advice] Hazard Stripes
|
|

Been Around the Block
|
I paint the area yellow and then use a thin ink pen to draw the lines for the hazard stripes. Then I fill in with black paint. It’s quick and easy.
|
|
|
|
|
2018/02/10 08:51:37
Subject: Re:[Advice] Hazard Stripes
|
|
Kid_Kyoto
|
Things I've done to help my freehand:
1. Use a pencil to draw the line in first.
2. Use a stiff piece of tape to help enforce a straight edge along the surface.
3. If doing yellow, get a decent layer of white (or very light off-white or grey) down where you want the stripe, and then do a thin layer of yellow over it.
I'll almost always do number one. I do number two if it's a tricky stripe or if I'm having issues. For thin strips, I've actually gotten good enough to freehand the yellow without it.
|
|
|
|
|
|
|
|
 Ultramarines, 3rd Co. and friends, 16k+
  4k
4k  4k Points
 Competition Index


