Forum adverts like this one are shown to any user who is not logged in. Join us by filling out a tiny 3 field form and you will get your own, free, dakka user account which gives a good range of benefits to you:
No adverts like this in the forums anymore.
Times and dates in your local timezone.
Full tracking of what you have read so you can skip to your first unread post, easily see what has changed since you last logged in, and easily see what is new at a glance.
Email notifications for threads you want to watch closely.
Being a part of the oldest wargaming community on the net.
If you are already a member then feel free to login now.
2018/07/21 23:45:24
Subject: StarDrop - Heights of Morr (8/20) - Steaming ahead
it has been a while, but I have decided to make my return. I'm going for Kharadron Overlords army, including a full set of terrain. I'll do my best to post content every day, as I'll do my best to work every day. I'm on a tight time frame to finish all the scenery. And the reason why, will be revealed soon.
Stay tuned!
This message was edited 7 times. Last update was at 2018/08/21 03:14:53
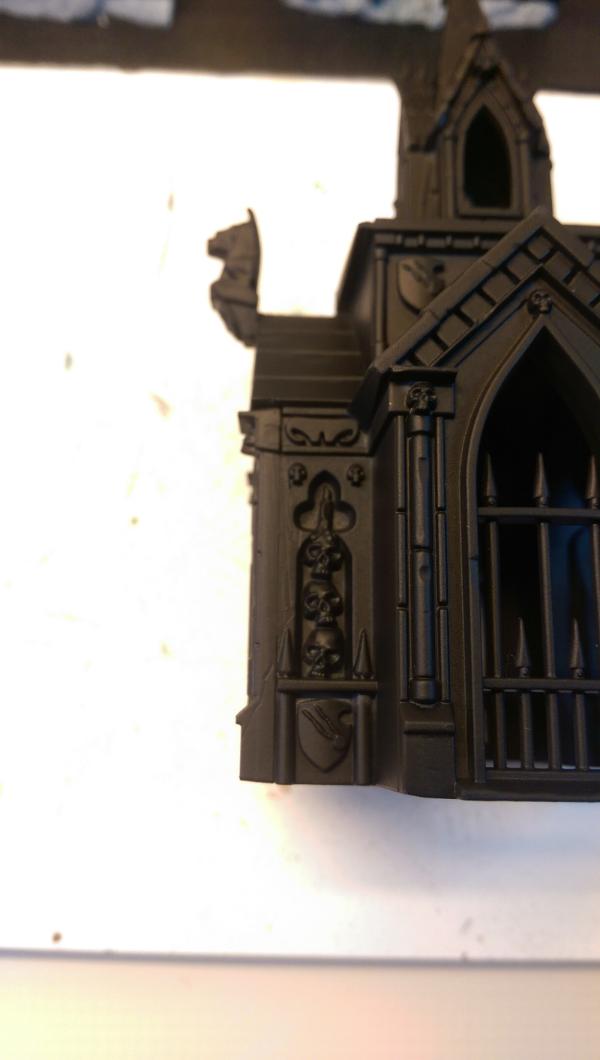
"This is the first expedition that succeeded to find this place", said Admiral Futston to his navigator on board the 'Enchanted' as they pulled deeper into the valley. Hidden in the clouds, this map forgotten settlement was still dominated by two tall buildings. The Eye of the Sun and Deathwatch Keep, overlooking what came out to be a massive graveyard, full of bones, shields and chapels.
As the rest of the feet found its anchor, Arkanaut companies were mustering on the decks, preparing to make a 'cloudfall' and establish their presence. One could never be to sure who is luring beneath the mist of Morr heights.
So, yes. Being a seafarer, I was always attracted to the armies that have vessels that speed over to combat. Starting with my Tau army, that has a massive air wing and solid ground support, to Necrons that skim in their barges and arks, Dark Eldars with their sailboats... After reading Jim Butchers novel 'The Aeronauts Windlass ', I started looking at Kharadron Overlords, but was never ready to go for it, until now.
One night I just made a decision that I'm going to make my Skyfleet, as well as terrain for it. I called my FLGS and got a quote for a full package. Everything I need to get a solid standing KO army. Meanwhile, being away on the sea, I figured I might collect the terrain myself and prepare it. That way I could play both AoS and 40K on that field, while I work on the KOds.
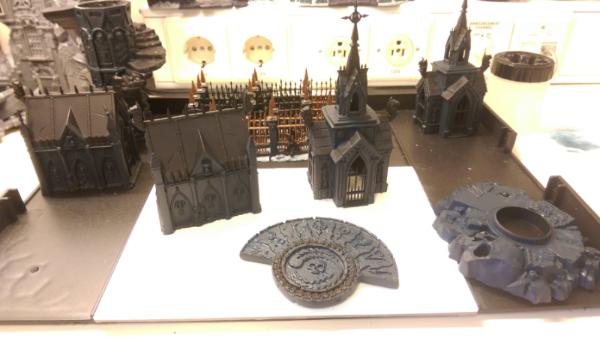
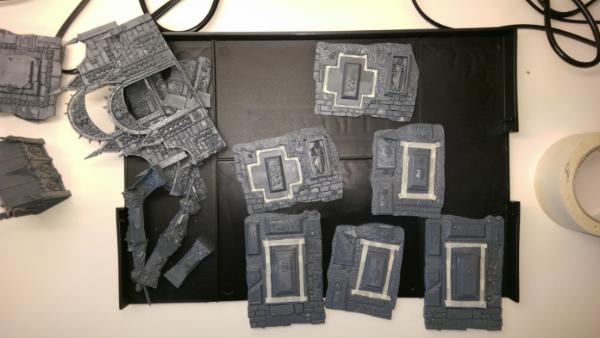
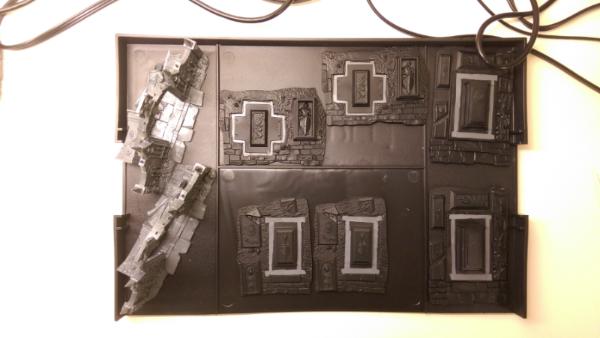
Goal was to make city in the clouds, where airships could dock and look like they are actually flying amongs the peaks of the mountains and buildings. And, after few succesfull Ebay auctions, I got myself this.
Also, got myself some paints and tools to start working. And I'll do my best to make this fast and efficient project blog. One post every day, with pictures and maybe some narration. And some comments on the painting as well. It won't be easy, as Warscryer Citadel and Whichfate Tor are crying for green stuff and very precice work (when you want to make them stand out on the field.) But, there is Sigmarite Mausoleum that will break up nicely the workflow.
Also, I got myself a Dreadfire Portal, which I will use as my main dock for the fleet.
Heights of Morr are a real thing!
This message was edited 2 times. Last update was at 2018/08/02 04:41:01
insaniak wrote: Love that Warscryer Citadel... I've been trying to find some excuse to buy it and turn it into something SciFi...
Good luck with the project!
amazingturtles wrote: It sounds like a fun project, good luck! i find those big terrain pieces quite intimidating
Thanks folks. I did some preliminary assembly and yes. A lot of green stuff will be used to make sure there are no cracks where they should not be. Also, with the GW Creeping Vines and Barbed Bracken sets, you can mask those areas quite nicely, which I intend to do on a Warscryer Citadel. I'll do my best to keep this blog on a daily basis, with detailed pictures and progress/issues notes.
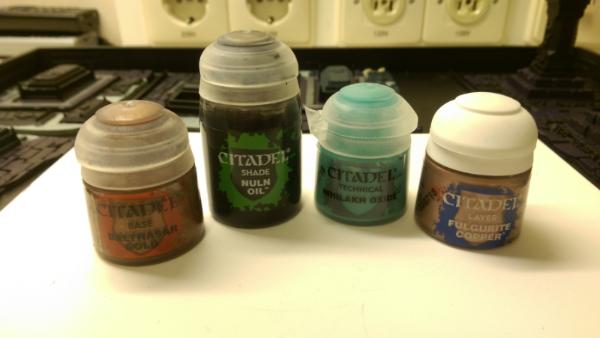
Automatically Appended Next Post: So... Being a seafarer has its pros... And cons. One of the cons is that I do have to travel with all my stuff. And for a project like this, that includes a lot of tools. In order to reduce the baggage, I got myself a project box, and a limited set of paints. Actually, the ones listed on the back of the Sigmarite Mausoleum kit. With some additions, like Ushabti Bone for the sculls and Typhus Corrosion for the 'dirt' on the graves.
I decided to paint the graves 'inside' the buildings as well, so before priming them, I did some painters tape where the buildings are supposed to lay. Not just that, I want to use plastic glue, in order to really seal that building once placed onto the base. I'm debating with myself should I magnetize the buildings in order to get more variety..... Or should I just get another set. We'll see...
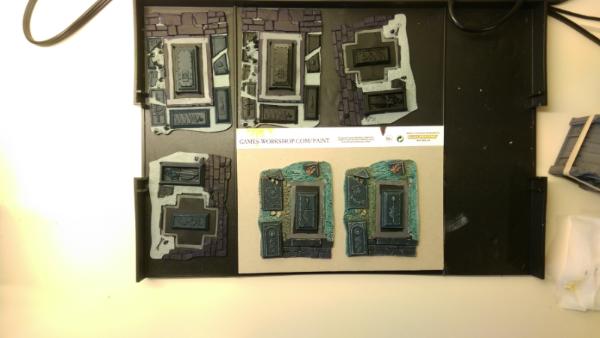
Once primed, I removed the tape, and start layering some base paints onto the bases. Using the provided color scheme for the original model, I made some nice progress.
Also, to keep myself busy, I'm trying to create a production line, so that I can always switch and keep the boring and repetitive part of this process away from me.
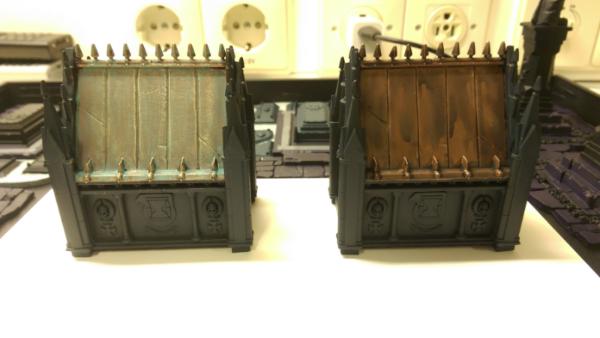
And this is where I ended up after some time. I'm quite happy how the color scheme works, except for one part. PURPLE pavement. I just cannot get the color right. And I know. The colors listed on the back are only a guidelines. And you do not necessarily put them in that order. Or with the technique they are 'labeled' as. But I'll keep trying. I really want to get that purple going for me, as that is how I want to have my Wichfate Tor painted as well.
Time for some more work. Be back tomorrow with more pics and updates.
This message was edited 1 time. Last update was at 2018/07/24 03:22:00
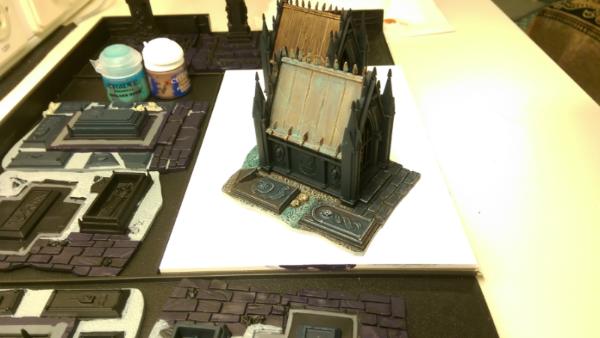
So, developing my production line, I've reached the point where I'm near completion of the first two Mausoleums, the small ones. While gradually working on other parts of the kit.
While trying to be methodical, I had to try to do the roof, because I already did not like how the purple pavement came out. And I wanted to make sure that nothing else goes wrong.
First, green stuff. Mausoleums fit pretty well together. However, if you don't get the geometry right, you end up with a little space on the diagonal joints of the rooftop.
A little bit of a green stuff and thing was nice and ready for base paint.
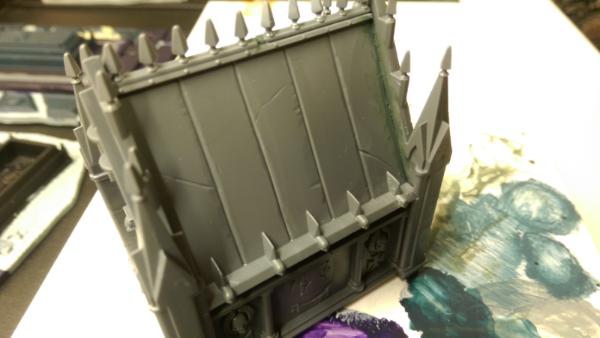
Once that was done, both base colors were put on the model. Incubi Darkness and Balthazar Gold. The Incubi is already super dark, so no shading was needed. However, the roof needed some nuln oil.
And I could not restrain myself. Just poured that Nihilakh Oxide to try and see would I get the result from the box. Guess what? I overdid it with Nihilakh, but with a bit of a dry brush of Fulgrite Copper edges poped out and did the trick.
Now I'm going to work some more on the other parts of the Mausoleums and hopefully get them DONE!
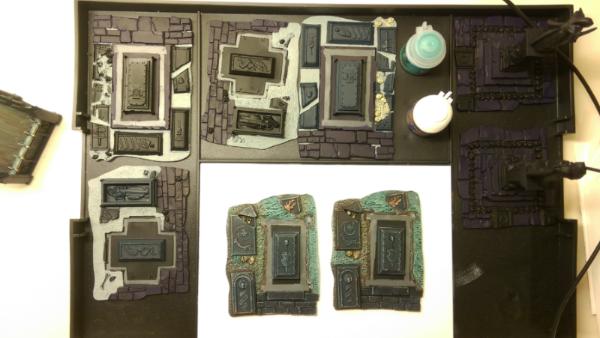
P.S. Tomorrow I'm going to talk about the paints I'm using and the process. But here is a teaser. The TYPHUS CORROSION is doing wonders for this. Check out the picture bellow. You will see the 'dirt' marks, all done with corrosion.
So, today I wanted to briefly mention the color palette I use and the techniques/sequence I'm following.
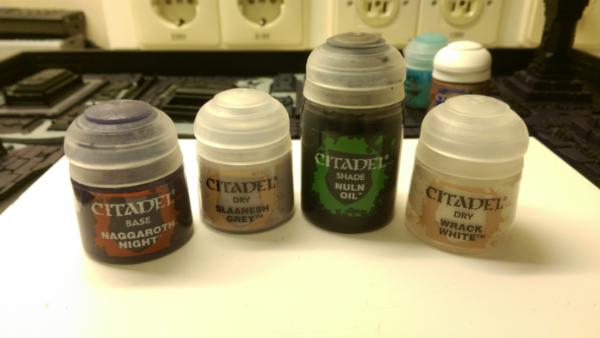
Graves are painted using the following stuff:
This is pretty neutral pallet, and the Coelia Greenshade is only meant for the very bottom of the graves, where they touch the ground. Reason is simple. I use the dry residue of the Typhus Corrosion as my dirt, and I need the green to kinda mush it down a bit. Results are good, being a box suggested pallet. Wrack White is your main edge highlight and it is the key to getting nice look of the graves.
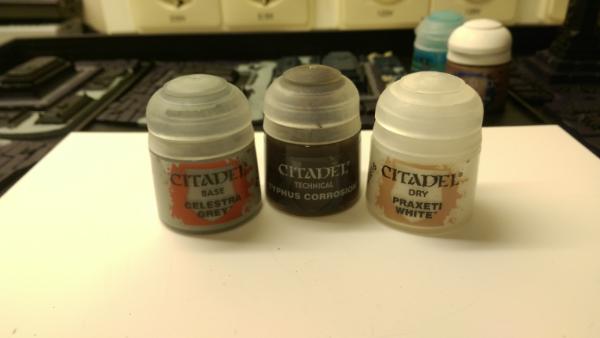
Stone walkway and bricks are painted with:
Now, this is my problem pallet. I cannot get the purple glow that the 'eavy Metal guys painted on terrain pictured on the box. I'll probably eliminate the Nuln Oil, as I'm trying to keep the purpul-ness.
The Mausoleums, walls and Statue base are painted with:
Really good suggestion. Nice, dark stone look. The key ingredient of this step is: Thunderhawk Blue. Be really patient when applying using drybrush technique.
Rooftops, statues and fences are painted with:
Now, this is one of the best parts so far. Why? Because the box doesn't suggest the Fulgrite Copper. The key to this is to have a heavy Nuln Oil wash over that Balthasar Gold. But then watered down Nihilakh Oxide. The watered down version creates really nice streaks. Unlike the box, these look more realistic to me. And on top, Fulgrite Copper is used as a drybrush to pop back out those edges. Man, does it look good. The key ingredient is, again, how you use Nihilakh.
The ground and the grass/turf is done with:
I FORGOT TO PUT THE COELIA GREENSHADE IN THIS PICTURE. But yes, it is the part of this pallete.
As I mentioned again, Typhus Corrosion makes the dirt marks. Try to make it as 'dry' as possible, so that when you drybrush over it, the dirt pops out as well. So far, I do a final dry brush after all my shades (#Standard, #RAW), but I will try to do it before I do my final shade, to see how much of the overall brightness will go away. For me and these elements, this wash is the key step, as that determines everything.
Last, but not least, the SKULLS!
Classic GW pallete for skulls. Works amazing and I'm going to try and count all the skulls I painted for thir terrain. I expect around 200 total. Time will tell. Key to getting this part right is Ushabti bone, that first layer.
Following this, here come the lesson learned and yet to be answered:
I'm doing all my base colors one after another. I make sure I do at least two layers and no weak spots.
Then, as the dry brush colors are pretty similar, I do my dry brushing as my next layer. Even if I mess up here and there, the layer no.3 will fix it all.
Now, ss there are not to many washes included into entire project, I can afford to wash a bit more that intended. With all the dry brush underneath, it evens everything out.
At the very end, careful edge highlight just brings it all together.
[list]Are the new GW paints drying faster and require some sort of medium to keep them going while on the pallet/model??? That is my impression after these few days.
"Admirals Log, 3rd moon of our landing. Arkanaut companies have secured multiple anchorage points along the 'Heights' and established our presence here. There are no indicators of any magic present, yet we can all feel it in our bones. It feels like we are being watched all the time. We are preparing to explore more of the clouds once the AetherKhemists gain control of the Eye of the Sun."
I do apologize for the past few days where I didn't post nothing. It was really crazy at work. But it worked out and client is happy and I'm back to my old routine. I did make some progress, which I'm about to show you.
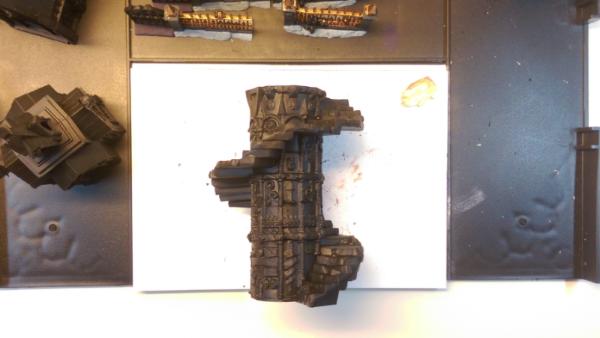
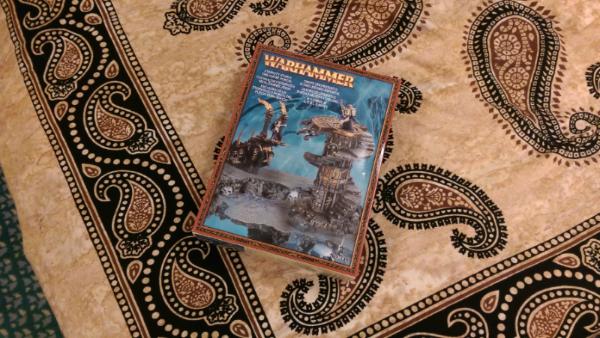
Second to last piece of my scenery is here. This beautiful thing came factory wrapped and I was so fortunate to find it online. I hope it is an easy assembly, so I can get on with painting. Super excited.
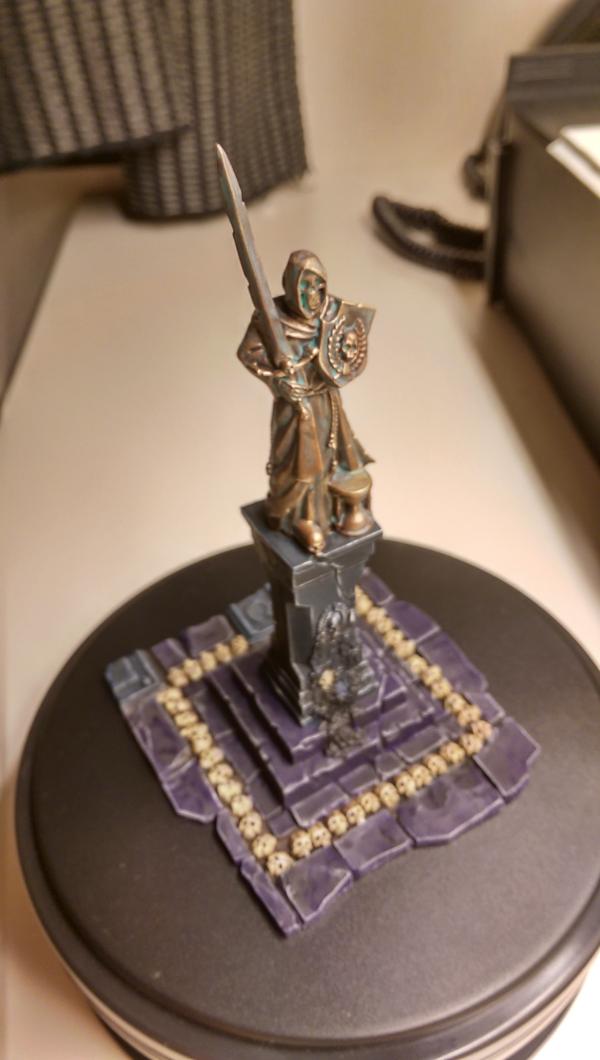
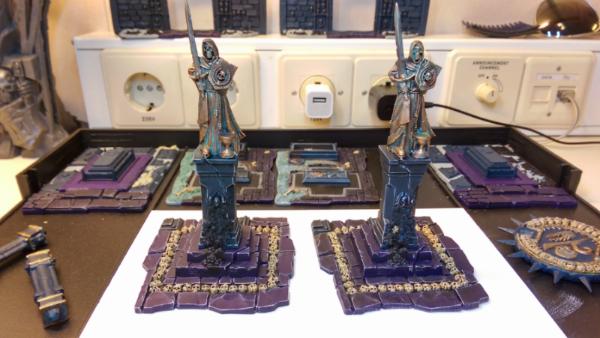
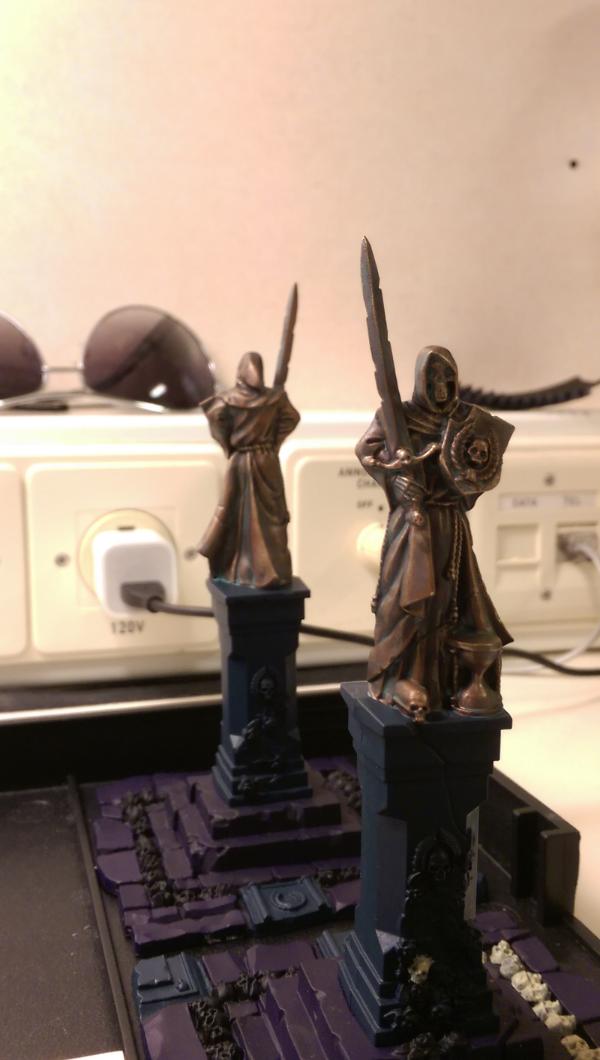
I made quite a progress on the statues. Both figures are painted really nicely with the procedure I explained in the post above.
Now I'm going to work my way down and get the pillars and, eventually, bases done.
Talking about painting sculls, number went up to 10 in total.
So much from me here. Working hard to get you a fresh update tomorrow.
This message was edited 1 time. Last update was at 2018/08/14 17:07:37
Finally, I get to sit down and post some new stuff.
I have to say that workload is pretty high these days. And that is why I'm unable to keep this thread updated on a daily basis. That doesn't mean I don't work on my scenery every day. Just that 24 hours in a day is not enough.
I believe many painters would agree on that.
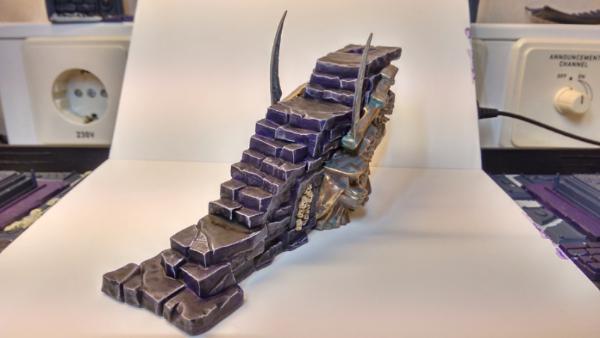
Anyway, to make a quick break from painting, I started working on the DreadFire portal and Eternity Stairs. I have to say that I was convinced that the stairs are much taller, by the way they look on the picture. But, when put together, they seem pretty ... Small compared to other scenery pieces I own.
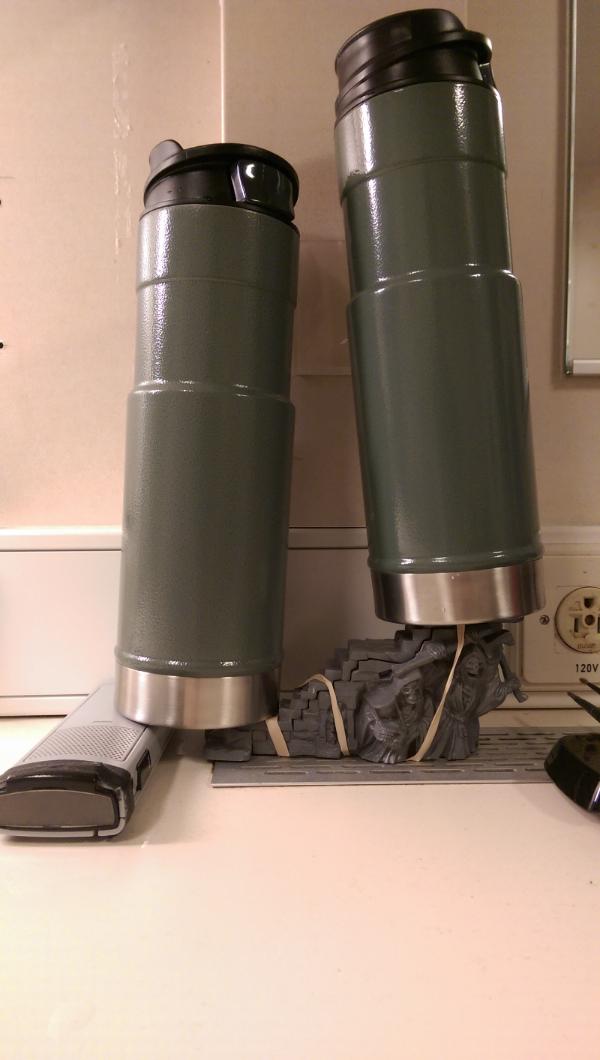
Being a very old kit, made out of "previous edition", green stuff is a must if you want this to look anyway decent. So, I sanded, and glued. And green stuffed. And left it above my fridge (believe it or not, the motor is giving some nice, constant heat ) that helped slow down the drying process and soften the plastics, so it levels it self out. With the help of two 20oz canisters and some rubbers bands.
P.S. The picture shows no green stuff on this side, as I did bit by bit. But all the cracks are filled out now.
And just as a safety measure, I did a break from AOS completely. I picked up an amazing lot from Ebay. TAU LOT. Box full of sprues, that are half full with amazing goodies. Man, this made me so happy, because now I can pretty much finish my army and it's assigned scenery.
Man, I really wish day had more than 24 hours. I could do so much more!!!
Work load is increased, while the satisfaction went down... So I can't wait to be done with work and to go back to my place and just continue working on models.
I call this done.
The Dreadfire portal is coming along nicely. I figured the colors are actually really good. And cannot wait to finish the Portal. Also, bit by bit I'm working on Sigmarite Mausoleum. I just primed all the small pieces, like railings and walls. And I do have to hurry up, as I only have like 37 days before I have to travel back home.
MAN, I HAVE TO FINISH THIS!
^_^
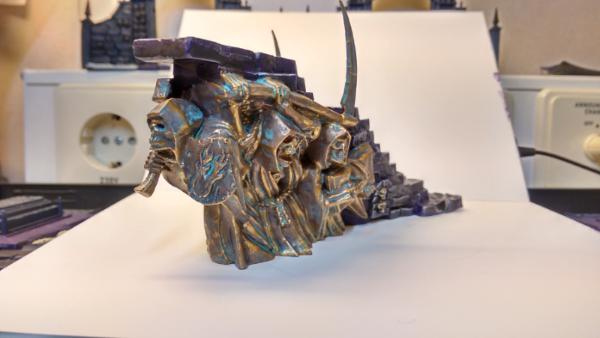
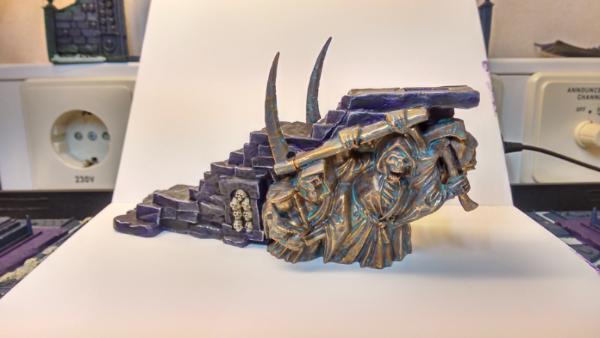
"3rd Arkanaut Company was the first to touch the sacred Grounds of Morr, by mooring their frigate "FyreMot" to what seemed to be platform conveniently placed on the top of the staircase which lead down, under the clouds. No body really stepped of the ship for a while. Crew was standing on the decks, looking around. Not really believing they have made it, and that this could be it. One of the 6 streams of the eathergold. Finally, the captain gave order and the 10 man squad led by lieutenant Red made their way off to the unknown..."
Yup. You guessed it. The Dreadfire portal is almost completed. Staircase is all done, as well as the disc. The pillars I will most likely pass on, as they are just not as detailed. and do not give me the looks I want. I might chop them, so they look damaged and deteriorated. Or I just might skip them all along and replace them with some nice sculls from the Skull kit that came out last year.
Also, another (second one) Mausoleum Statue is gone. With that done, I can move on to completing the other 4 buildings and bases. Which, stupidly enough, takes more time that these big pieces.
Videos will follow, so you get to see the entire 360* view.
Drop a comment bellow, let me know what you think.
Cheers.
This message was edited 1 time. Last update was at 2018/08/14 17:06:45
Kemnon stood behind the viewing glass of the "Eye", baffled by the fact that the "Eye" is always above the clouds. And if his calculations were correct, Eye wouldn't be able to see anything that is on this world. However, they did not call it the Eye for no reason. Every time he would lead his eyes on the viewing glass, he would be able to see every corner of this land underneath them. As intrigued, so scared he was.
The work continues, as my days count falls down to 24. I've made a lot of progress and working on the few last mausoleums and the eternety stairs. The biggest pieces, the Warscryer citadel and the Witchfate Tor are still pending. And that scares me. Because I would like to finish everything before I go home.
Anyway, The Eternity Stairs is an amazing piece of scenery. I chose to assemble mine without the Gargoyles, due to nature of my terrain. Assembly was quick, but green stuff was needed to cover the vertical 'cracks' that exist due to misalignment in the model itself. It is amazing how detailed this kit as, yet it could be so much better if GW would redo it in some 3d software and run it thru modern moulding process.
The other thing are the little cross based mausoleums, which have a problem of sides not really laying flush. And you shouldn't really sand them, but rather use the plastic glue, and then green stuff to fill the empty spaces. As I do not have a proper knife, I could scrape only so little, but still good amount to make it be decent work.
Also, give yourselves some slack. It is 'stone'. It cracks, it deteriorates, it can withstand few imperfections.


 6th Skylight Patrol Contingent
 = 131
= 131 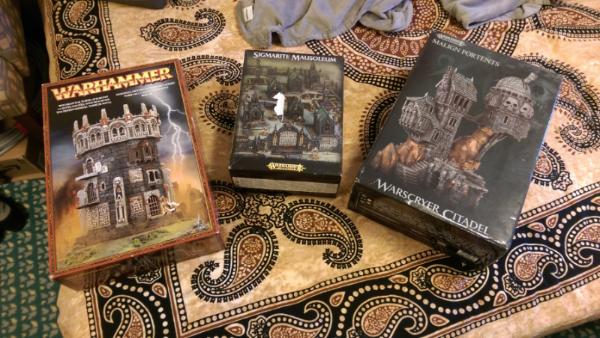


 ) that helped slow down the drying process and soften the plastics, so it levels it self out. With the help of two 20oz canisters and some rubbers bands.