| Author |
Message |
 |
|
|
|
|
Advert
|
Forum adverts like this one are shown to any user who is not logged in. Join us by filling out a tiny 3 field form and you will get your own, free, dakka user account which gives a good range of benefits to you:
- No adverts like this in the forums anymore.
- Times and dates in your local timezone.
- Full tracking of what you have read so you can skip to your first unread post, easily see what has changed since you last logged in, and easily see what is new at a glance.
- Email notifications for threads you want to watch closely.
- Being a part of the oldest wargaming community on the net.
If you are already a member then feel free to login now. |
|
 |
2018/10/28 19:33:12
Subject: Help quickly weathering this model (Leman Russ tank)
|
|

Using Inks and Washes
|
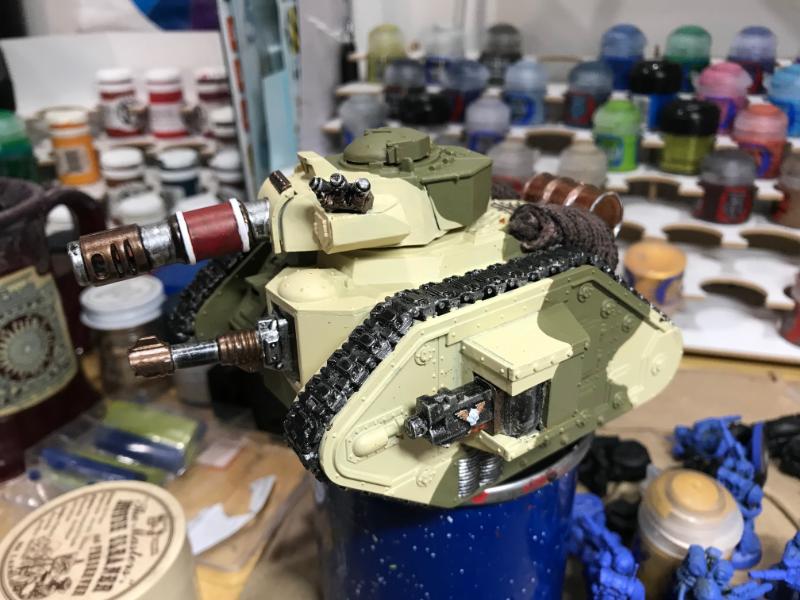
I just inherited this battletank, and the paint job is nice, but it looks a bit too straight-off-the-factory-floor for me. I like the colors. I'd like to give it a very quick weathering job. I don't need my models to look pro-painted, but I do take pride in making sure they look nice.
I was thinking:
- stipple a small amount of Vallejo Brown Earth (sandy paste that's dark brown colored) around the base and treads.
- Wash the whole model with Nuln Oil (I also have Seraphim Sepia, Reikland Fleshade, and Agrax earthshade. Happy to consider any other suggestions!)
- Drybrush with a light gray or beige / white
Nuln oil might be a little harsh, and I don't have the beige background color to fix any "mistakes" I might make. Any suggestions for a color choice? What would you do to quickly give this tank some lived-in-the-field looks?
Thanks!
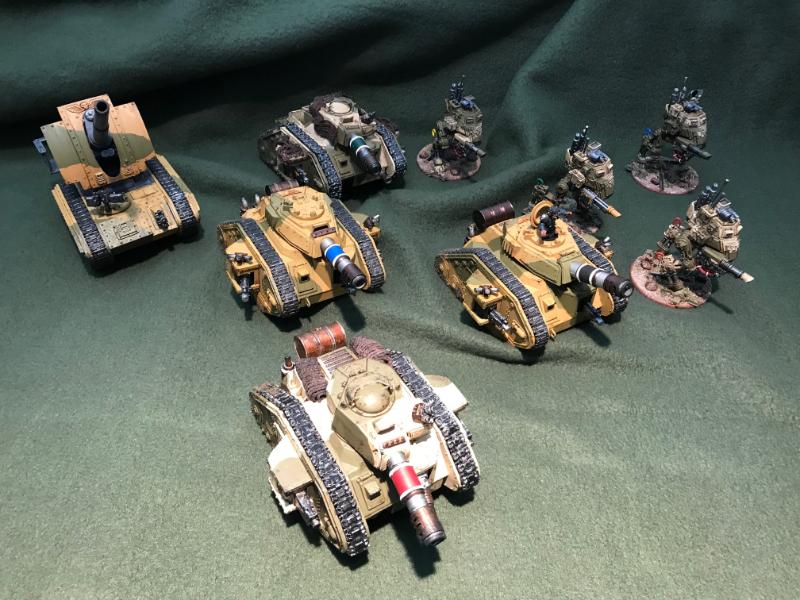
Edit: just in case you're curious, they turned out OK. Unfortunately, there wasn't a great color match readily available for my new tanks (I used Army Painter Desert Yellow) and I liked the AP option better than that garish pale beige, so there you have it: slightly mismatched tanks! That's OK by me (but I suspect might bug more than a few purists!).
This isn't a great shot to show off my quick weathering, but basically slopping a light brown wash (Seraphim Sepia), wicking off any extra with a brush to avoid pooling, then putting some muck along the bottom (Vallejo sandy paste dark earth), washing that a little darker (Agrax Earthshade), dry brushing that a bit with lighter brown, then stippling black with a torn sponge (torn pluck material from foam trays) made these guys look really nice with minimal effort. They're perfectly ready for service!
|
|
This message was edited 1 time. Last update was at 2018/11/12 17:08:25
I play...
Sigh.
Who am I kidding? I only paint these days... |
|
|
 |
|
2018/10/28 19:41:59
Subject: Help quickly weathering this model (Leman Russ tank)
|
|
Powerful Phoenix Lord
|
Definitely needs a wash and potential dry brush - and definitely some sponged dark brown rust/wear on a few spots.
|
|
|
|
|
2018/10/28 20:26:28
Subject: Help quickly weathering this model (Leman Russ tank)
|
|

Longtime Dakkanaut
|
don't use a black wash, earthshade would work.
if you have the texture stuff for mud it could work as well, if not just a second wash coat, and maybe a third on the lower part should work, then a dusty drybush on the top third.
if you have an airbrush a filter of something like burnt umber on the lower quarter would work, if not the washes should do it as a quick job.
the light beige drybrush will work (I use magnolia emulsion...) one you have washed it, will be a totally different model after
|
|
|
|
|
2018/10/28 20:54:08
Subject: Help quickly weathering this model (Leman Russ tank)
|
|
Thane of Dol Guldur
|
Don't wash the whole thing. At least not with anything as dark as agrax. Wash the areas that will accrue dark grime. For the other areas use a light wash. Thin agrax or a light tan to break the colour. Use a duff brush or sponge to stipple a dark brown for chipping. Apply pin washes from the bolts and rivets for streaks. If you want to get more advanced you could use powders and pigments around exhausts and for dried muds and dust. Personally that cream is far too light in my opinion. Should be a tan or grey. And it shouldve been pre shaded with panel lines to help give depth to the mass of cream.
|
  Heresy World Eaters/Emperors Children Heresy World Eaters/Emperors Children 
Instagram: nagrakali_love_songs |
|
|
|
|
2018/10/29 02:12:01
Subject: Help quickly weathering this model (Leman Russ tank)
|
|
Using Inks and Washes
|
So would you recommend a whole-model wash with seraphim sepia (my lightest brown-ish wash), or maybe even a diluted seraphim sepia, before washing more details with Agrax (e.g., pin washes from the bolts and rivets)?
What's a duff brush? Or what would you use a duff brush for?
I don't think I'll go as complex as powders and pigments, as I have six of these and really just want to make them table top nice.
But yea, the cream look is a bit too light, and it needs to be grimed up. Another one I inherited has been washed in black, but it looks like it was an old (or homemade?) wash, with lots of odd high-water marks in weird places; so I'd like to avoid doing something like that to it.
I don't have an airbrush, unfortunately.
Thanks everyone, some great ideas here.
|
I play...
Sigh.
Who am I kidding? I only paint these days... |
|
|
|
|
2018/10/29 10:04:00
Subject: Help quickly weathering this model (Leman Russ tank)
|
|
Thane of Dol Guldur
|
Haha I mean a worn out old brush. Yeah I'd go for a light wash. If you can spend a little more time, use lahmain medium to make a glaze with your sepia and make the shades more precise. That should prevent the water marks.
|
Heresy World Eaters/Emperors Children
Instagram: nagrakali_love_songs |
|
|
|
|
2018/10/29 17:28:21
Subject: Help quickly weathering this model (Leman Russ tank)
|
|

Nurgle Predator Driver with an Infestation
|
Watch Duncan’s video on painting tanks. It doesn’t take very long to creat this effect
|
|
|
|
|
2018/10/29 20:42:25
Subject: Help quickly weathering this model (Leman Russ tank)
|
|
Lone Wolf Sentinel Pilot
|
If your gonna wash the whole thing make sure you thing the wash and wick away the excess. You may want to look at burnt umber oil paint for an oil wash.
Get a sponge for chipping effects. Use pigments or ground up chalk for mud. Mix with alcohol.
If you are doing transfers put them on first, before the weather.
Grime accumulates in recesses, also look at real tanks to see where mud builds up.
|
 10000+ 10000+
 10000+ 10000+
 8500+ 8500+
 3000+ 3000+
 8000+ 8000+
 3500+ IK Plus 1x Warhound, Reaver, Warlord Titans 3500+ IK Plus 1x Warhound, Reaver, Warlord Titans
DakkaSwap Successful Transactions: cormadepanda, pretre x3, LibertineIX, Lbcwanabe, privateer4hire, Cruentus (swap), Scatwick2 (swap), boneheadracer (swap), quickfuze (swap), Captain Brown (swap) x2, luftsb, Forgottonson, WillvonDoom, bocatt (swap)
*I'm on Bartertown as Dynas |
|
|
|
|
2018/11/02 09:20:43
Subject: Help quickly weathering this model (Leman Russ tank)
|
|
Nimble Pistolier
|
I'm not a fan of washing entire tanks in nuln oil/ washes in general. But if you are going to do it I'll only echo what Dynas said. Wash away the majority of it.
For battle damage I like to sponge on black and then sponge over that with a dull and bright silver paint.
Have a look at my blog for a few tanks which have been through some minor wars.
Best of luck getting it to war standards 
|
|
|
|
|
|
2018/11/02 11:51:14
Subject: Help quickly weathering this model (Leman Russ tank)
|
|
Fixture of Dakka
|
A recess shade / pin wash (just paint Agrax Earthshade or Seraphim Sepia into the panel lines, around rivets, into crevices) would work better than an all-over wash. After that I'd give it a light drybrush with that lighter colour, but I'd have done that before doing all the other details. 
for tracks, I'd thin down a mid-brown colour and wash that over the tracks to represent rust - but not too heavily, and wipe it off the raised surfaces. For mud, I'd start with a drybrush of Dryad bark or similar around the bottom of the vehicle. Google pictures of tanks and construction vehicles to see how the mud builds up. You could use Stirland Mud to add lumpier mud deposits on the tracks if you want (and Stirland Mud is the same colour as Dryad bark).
If you do an all-over wash, I'd consider doing a section at a time - do the turret separately if it comes off. Do one side panel and prop the tank up so that panel is horizontal, then do the other side then the hull between the tracks; that might help reduce unwanted pooling.
|
|
This message was edited 1 time. Last update was at 2018/11/02 11:52:26
|
|
|
|
|
|
|