| Author |
Message |
 |
|
|
|
|
Advert
|
Forum adverts like this one are shown to any user who is not logged in. Join us by filling out a tiny 3 field form and you will get your own, free, dakka user account which gives a good range of benefits to you:
- No adverts like this in the forums anymore.
- Times and dates in your local timezone.
- Full tracking of what you have read so you can skip to your first unread post, easily see what has changed since you last logged in, and easily see what is new at a glance.
- Email notifications for threads you want to watch closely.
- Being a part of the oldest wargaming community on the net.
If you are already a member then feel free to login now. |
|
 |
2019/12/05 00:25:02
Subject: Adventures of a 3D printing n00b (Heavy Gear 3d mech models)
|
|

The New Miss Macross!
|
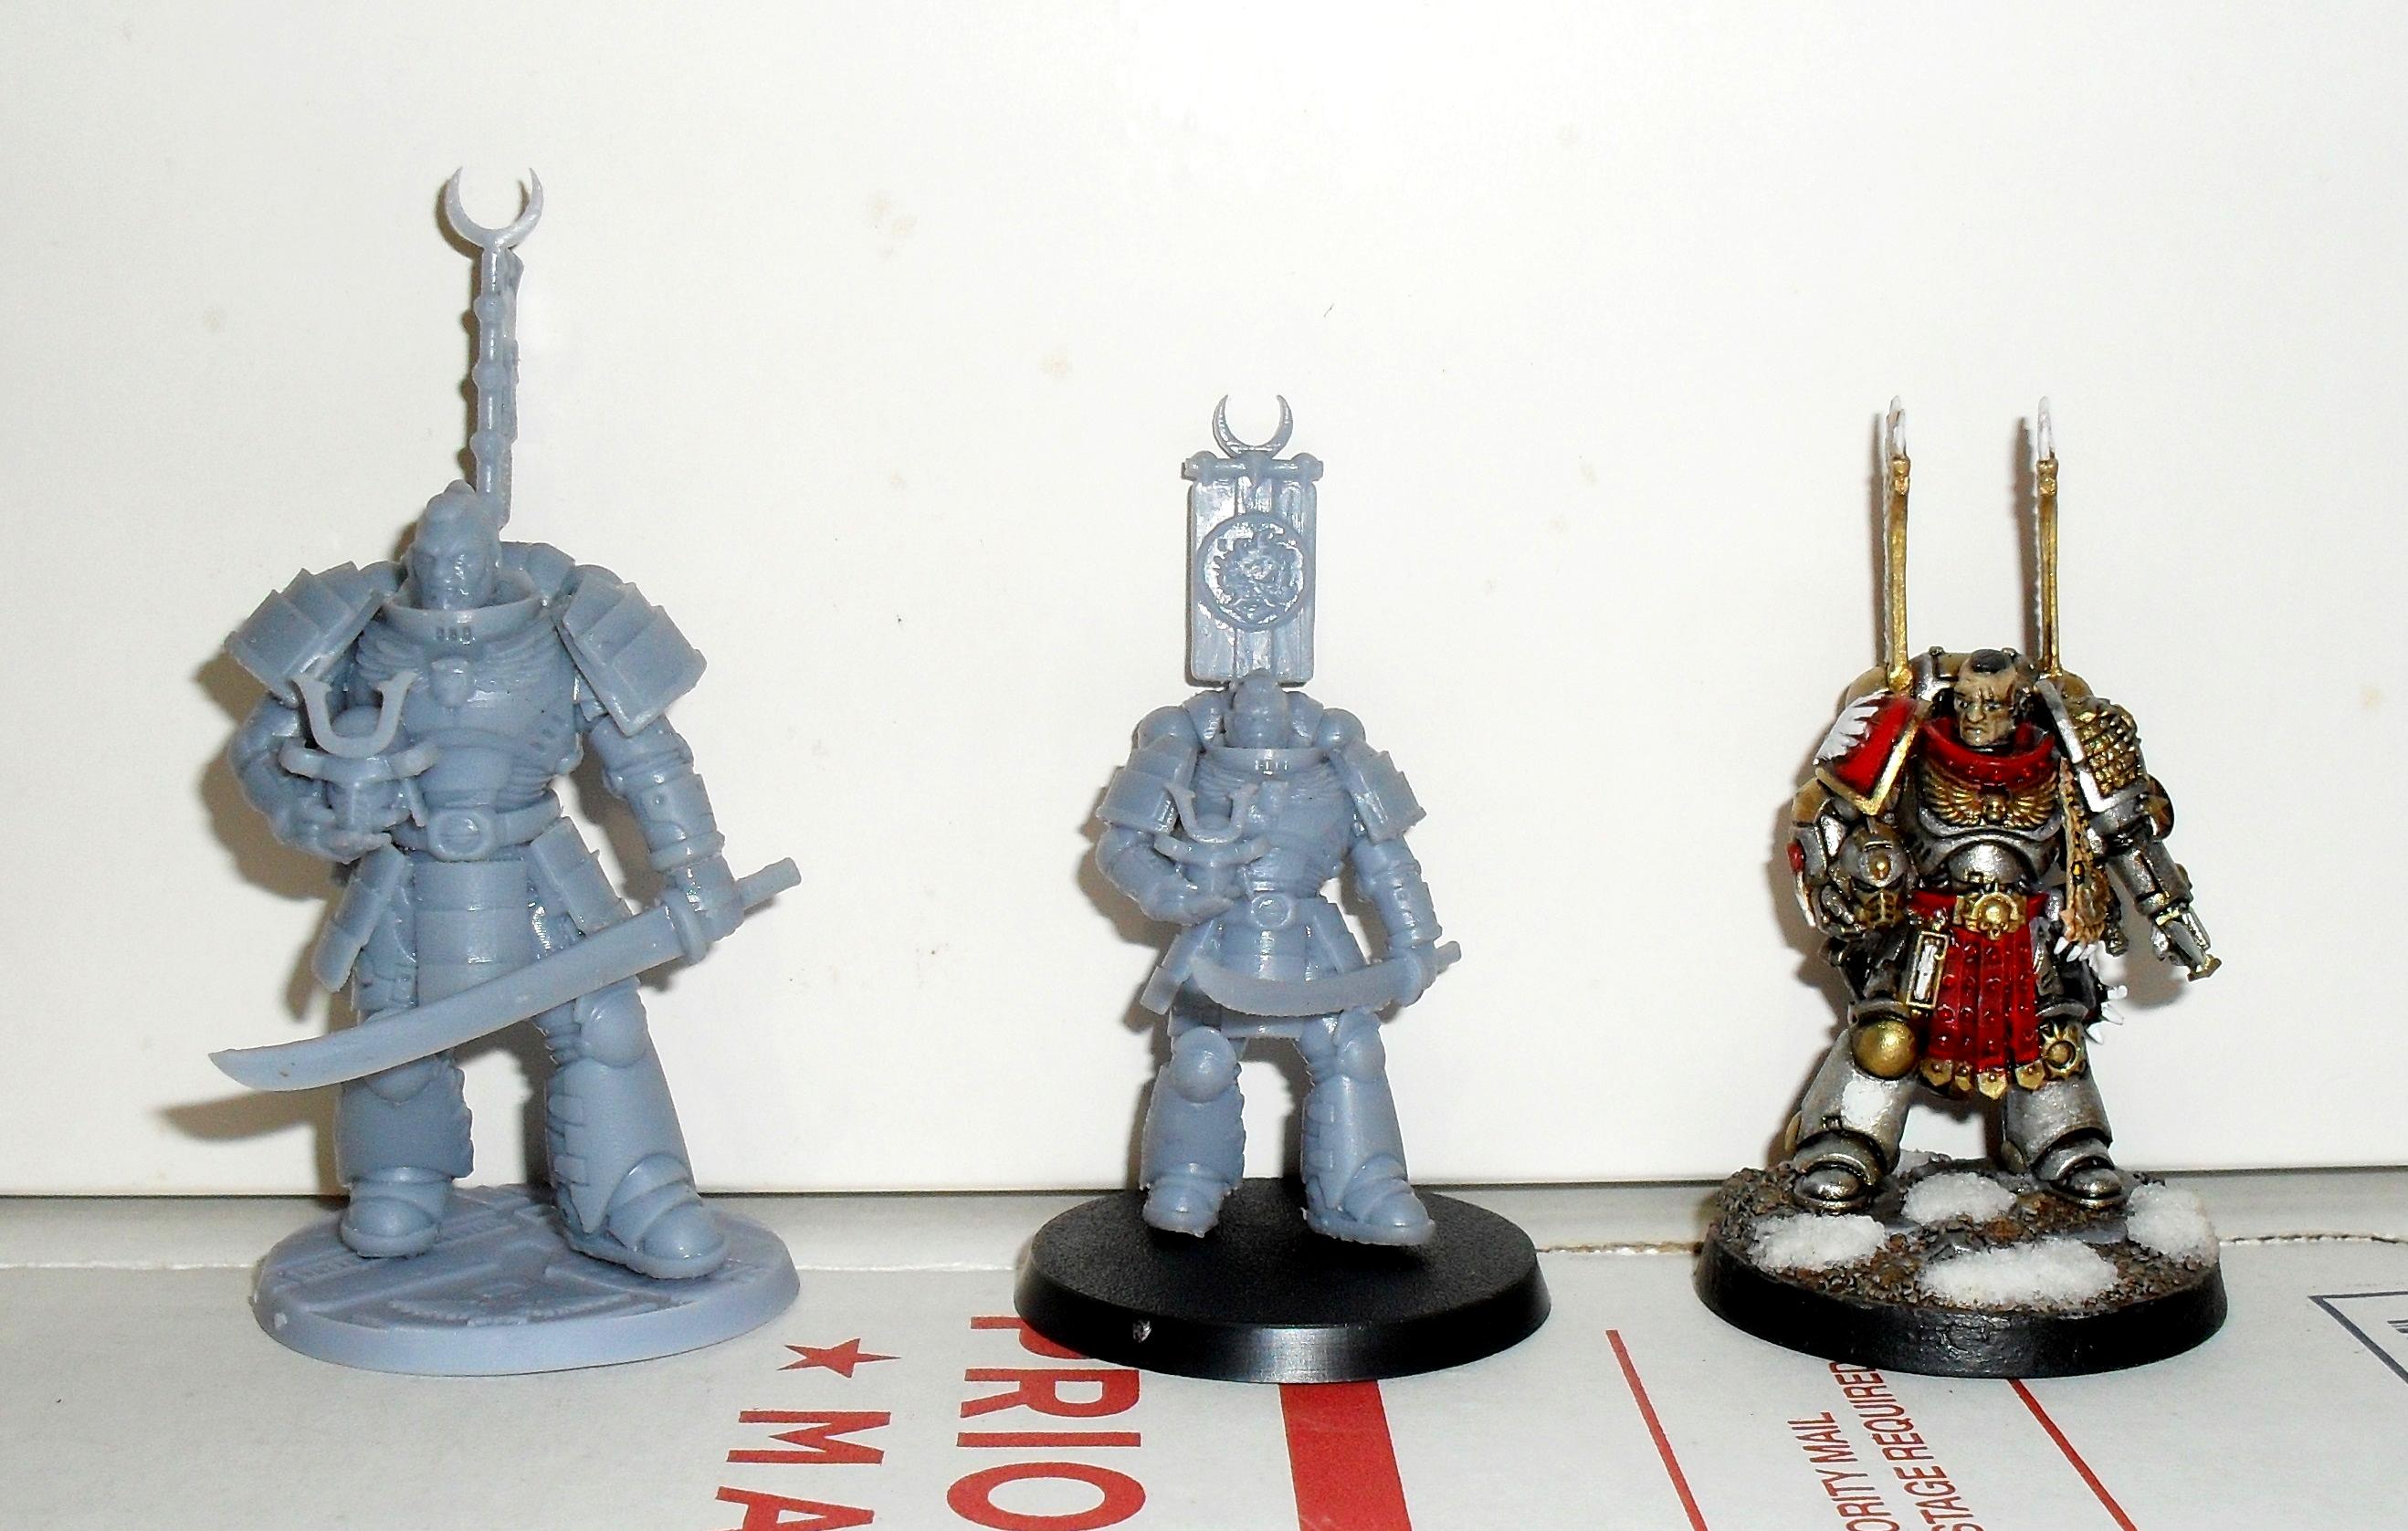
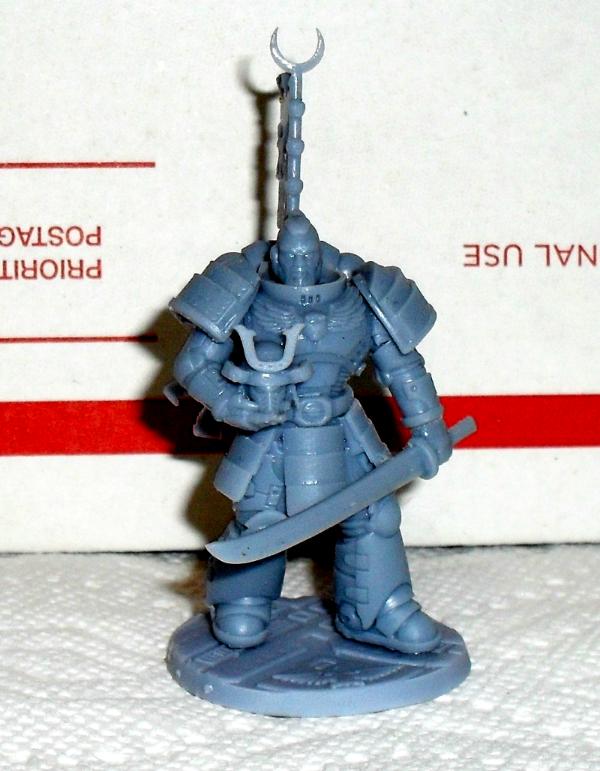
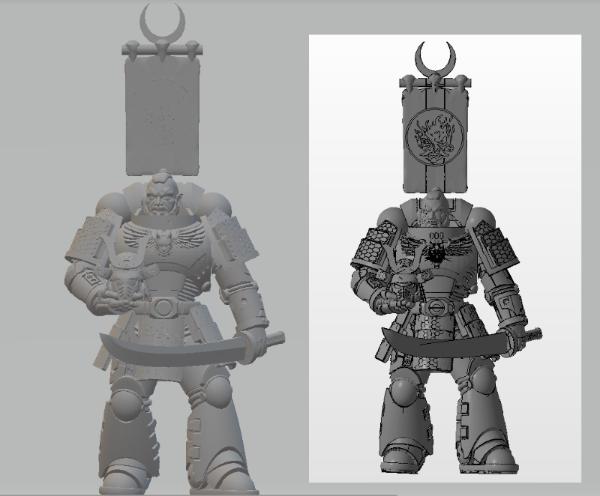
My previous attempt at a historical conversion of Primaris marines into Polish Winged Hussars went well enough ( link here) so I figured I'd give another famous warrior group a shot. In the months since, I got my first 3d printer (a resin SLA Elegoo Mars) and have been experimenting mainly with figs for an RPG campaign I'm in. A whole bunch of high quality primaris style 3D model uploads are on thingiverse so I decided I'd try my hand at a fully virtual conversion and settled on a Samurai motif. I suspect the general familiarity with samurai armor is pretty high so I won't post pics of historical resources used for inspiration like I did with my Winged Hussar project. The main samurai components that sparked my interest were uploaded by indignentshrew on Thingiverse ( link here). I'm still resizing the various parts for primaris and deciding on the various design flourishes I plan to add but this is the initial mock up of my first Rising Sons Intercessor Sergeant. Please note that I can't 3D model anything more than a simple cube or sphere so am limited to the more traditional physical conversion techniques of cutting/pasting from existing sources (3d models in this case instead of from my bitz box!).
It's hard to make out but the icon on his chest aquilla and on his sashimono banner is the Cyberpunk 2077 Samurai logo. I have serious doubts as to both (especially the chest) printing correctly so I do expect to adapt them this week. Additionally, I'm not entirely happy with the size of the sashimono so will likely enlarge that as well as reposition the chainsword katana a bit more at an angle. In case it wasn't obvious, my primaris inspiration for this pose was the recent event exclusive Lieutenant Amulius figure that I also used to convert my Lt. Googely Eyes Winged Hussar. 
|
|
This message was edited 8 times. Last update was at 2020/10/16 13:46:35
|
|
|
 |
|
2019/12/05 14:51:44
Subject: Re:Rising Sons Samurai Space Marines... Adventures of a 3D printing n00b
|
|
The New Miss Macross!
|
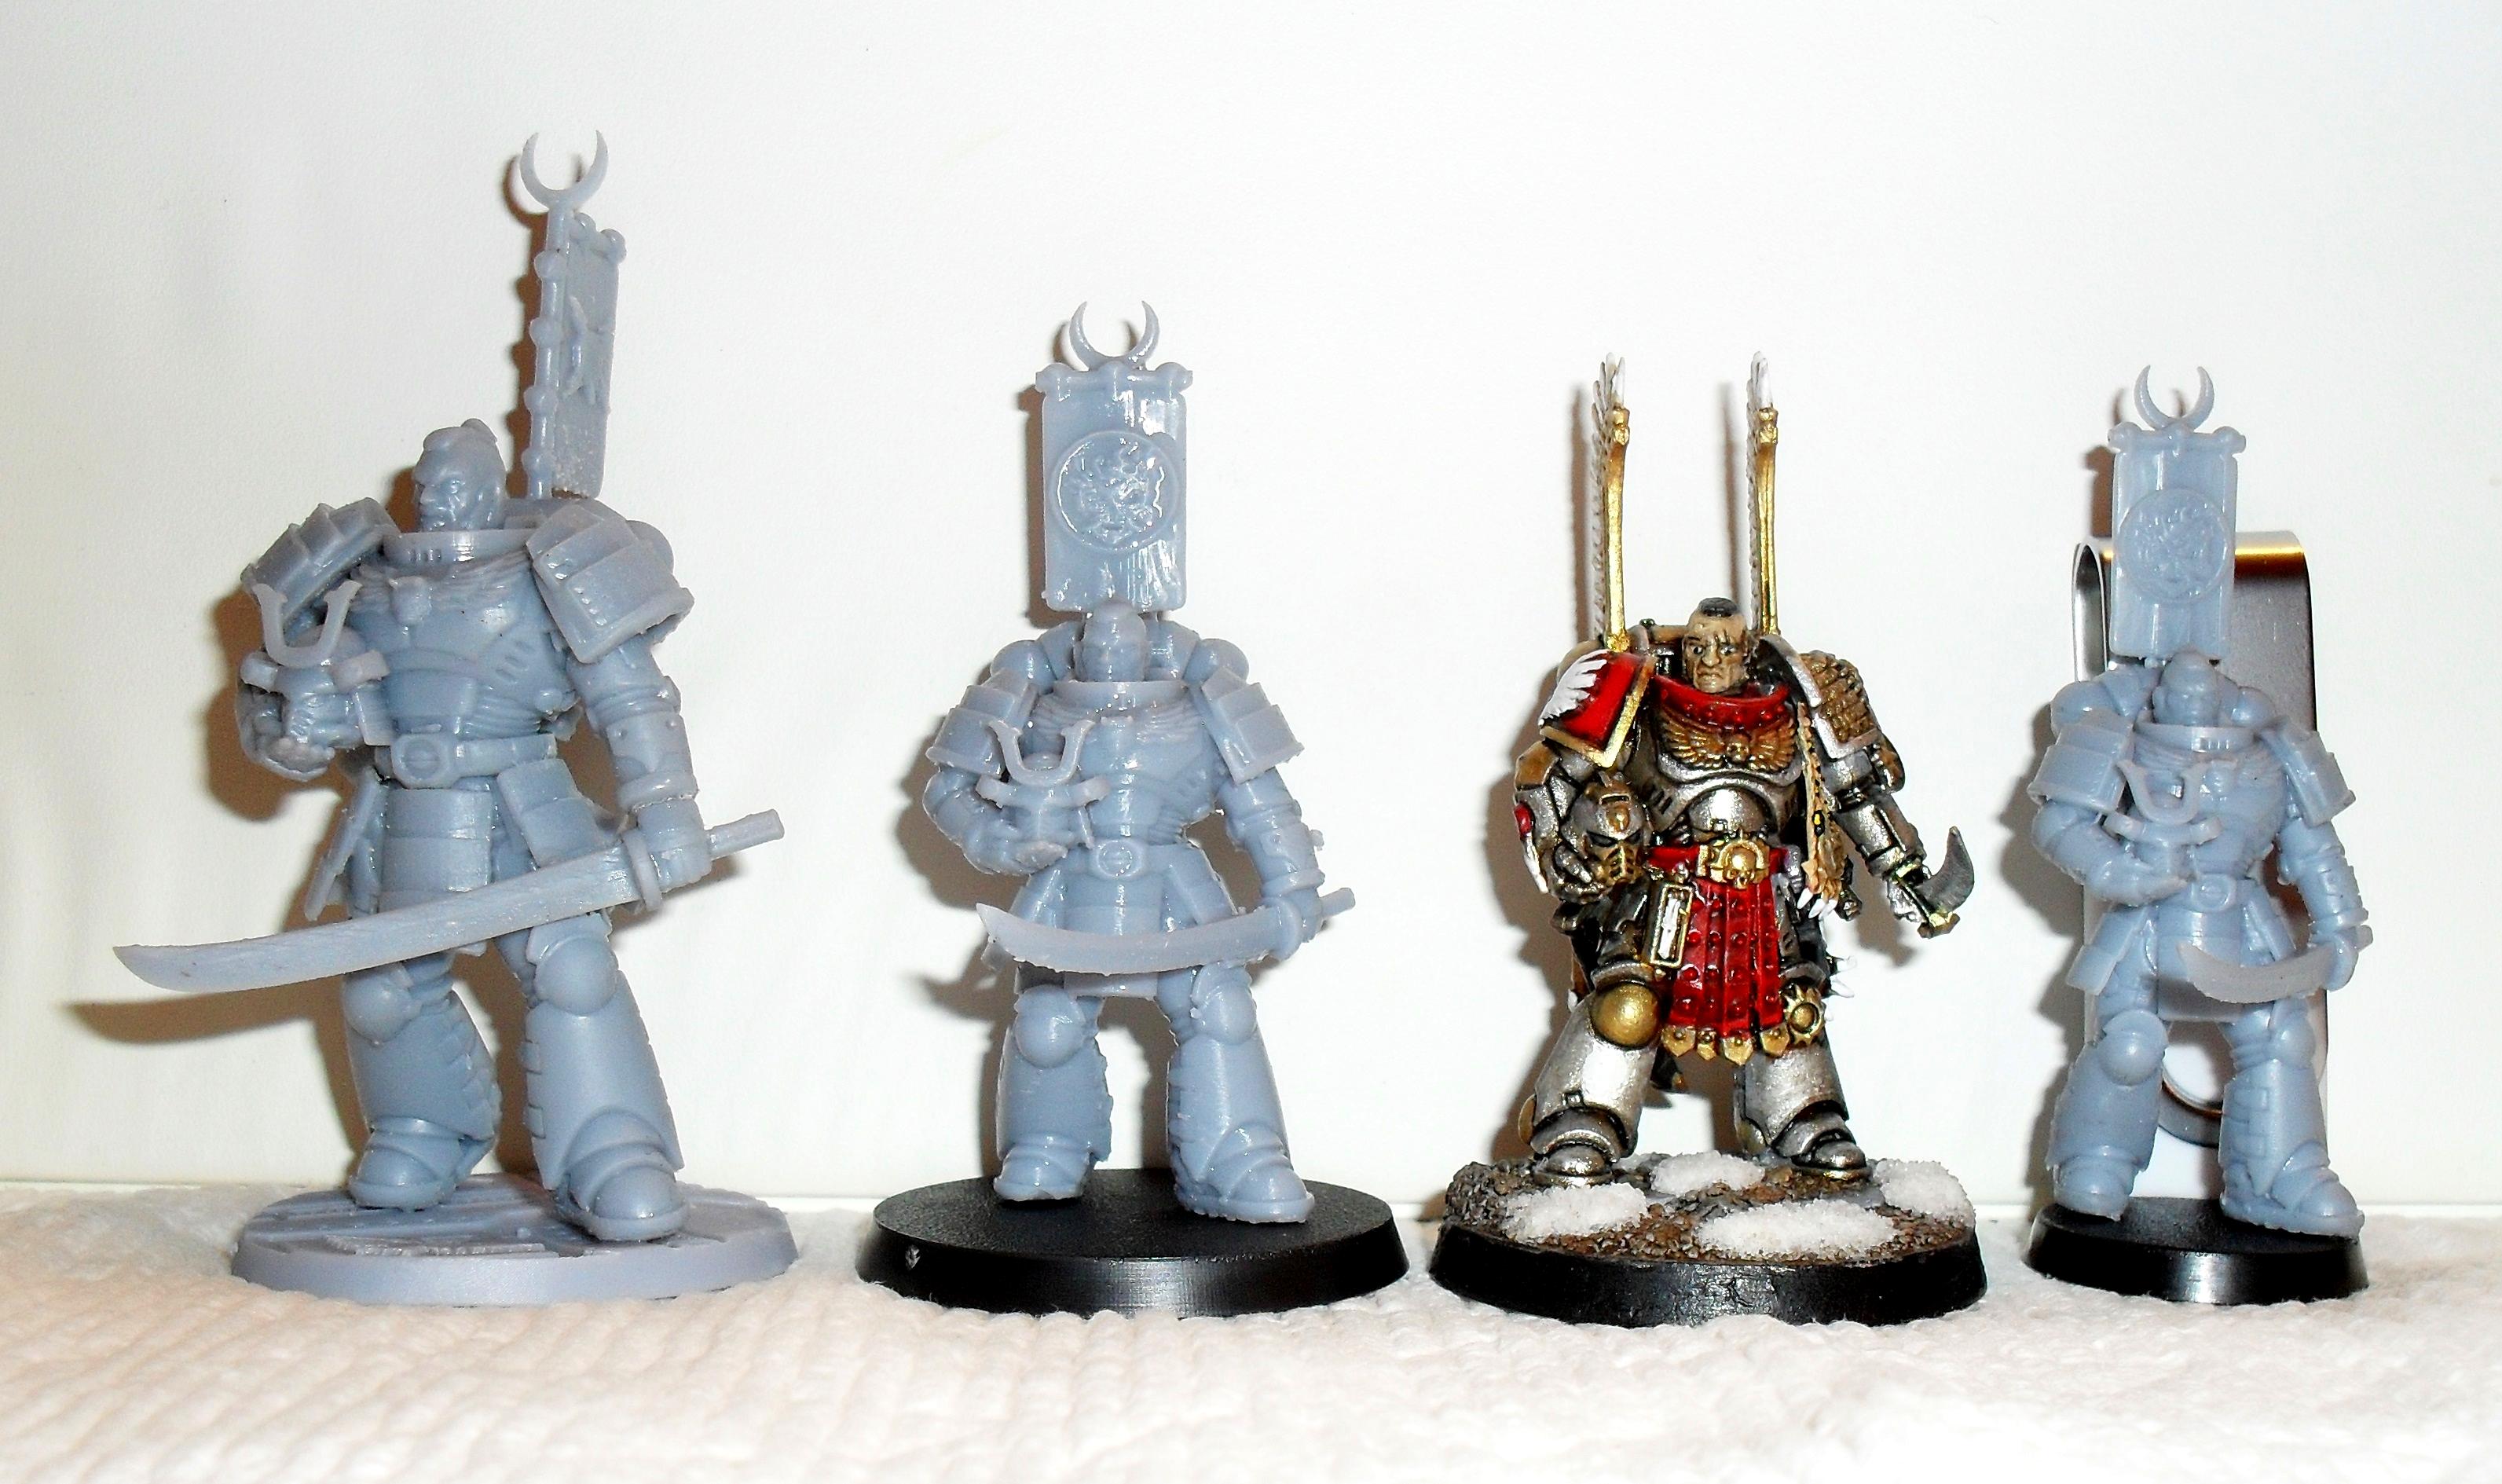
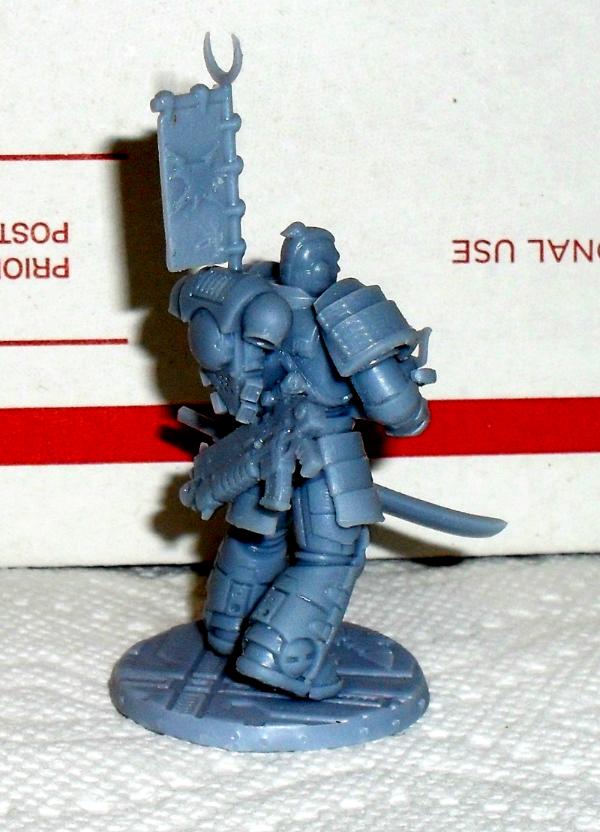
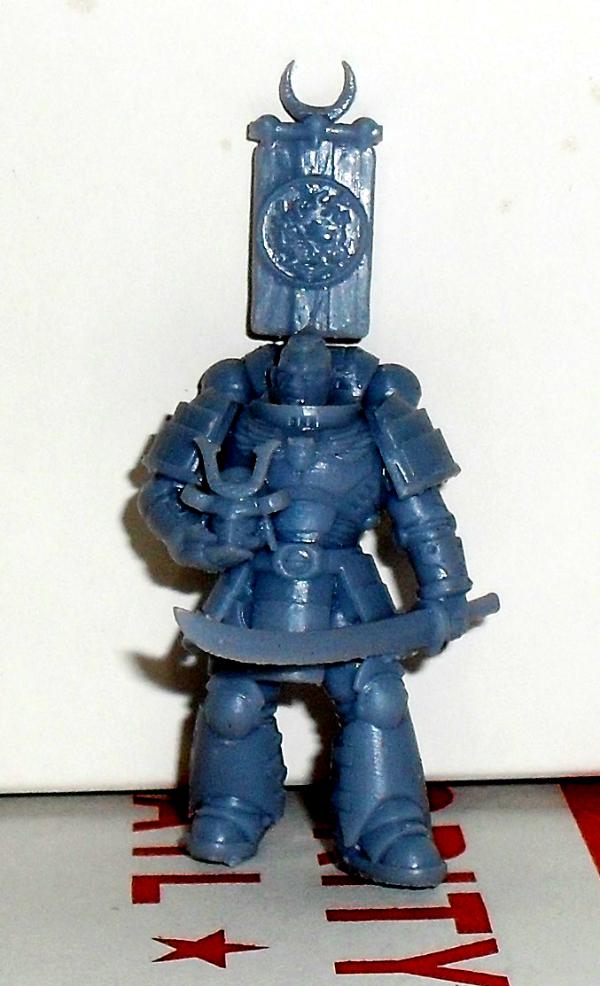
I worked on reposing/resizing a few parts last night after posting and came up with the following. I'm also still trying to figure out which free program I have best displays the 3d model for viewing in thread as I use multiple programs for different reasons.
I redid the sashimono to significantly bigger and made the icon relief deeper so as to hopefully make sure it will be visible after both printing and priming/painting. I slightly reposed the sword hand to be more at an angle but I'm limited by the pommel as I don't want it clipping into the wrist. The helmet is fused a bit with the chest but I don't expect that to be visible unlike with the sword hand. I also redid the chest and removed the cyberpunk logo that I didn't think stood a chance of printing properly and replaced it with an oni mask instead of the normal generic skull you'd find on a marine chest aquilla.
At this point, I think I'm satisfied with the pose and just need to decide a few things like how much normal equipment I plan to add (like a bolt pistol holster, belt pouches, purity seals, and a bolt rifle for example) and also how to divide up the model for 3d printing. I've successfully printed about a half dozen models since getting the printer (with about another dozen or so misprinted or ones that I was simply just not happy with the overall design I came up with) and those were all done in one piece. I might try to instead print this model in one solid piece as well as part it out individually like a traditional GW marine. The benefit to the former is solidity but it would require likely more supports as I couldn't individually pose the parts to print out optimally. The chainsword teeth on both sides of the sword for example means that each individual tooth has to be supported separately on one side of the sword otherwise it won't print out correctly (or worse yet fall off and leave tiny loose fragments of cured resin in my vat that scratch up the FEP film!).
|
|
This message was edited 1 time. Last update was at 2019/12/05 14:53:06
|
|
|
|
|
2019/12/05 18:45:45
Subject: Re:Rising Sons Samurai Space Marines... Adventures of a 3D printing n00b
|
|
Is 'Eavy Metal Calling?
|
I can definitely see more detail in this armor in the grey than in the blue picture. Looking good.
|
LOL, Theo your mind is an amazing place, never change.-camkierhi 9/19/13
I cant believe theo is right.. damn. -comradepanda 9/26/13
None of the strange ideas we had about you involved your sexual orientation..........-Monkeytroll 12/10/13
I'd put you on ignore for that comment, if I could...Alpharius 2/11/14 |
|
|
|
|
2019/12/05 21:59:15
Subject: Rising Sons Samurai Space Marines... Adventures of a 3D printing n00b
|
|
The New Miss Macross!
|
Thanks! I'm not using the new program for anything practical but it's bundled with Windows 10 so it's no big deal to try screenshot'ing it there instead. It's also more reminscent of the final product in color potentially as well in the role of a gauge of how it'll look.
|
|
|
|
|
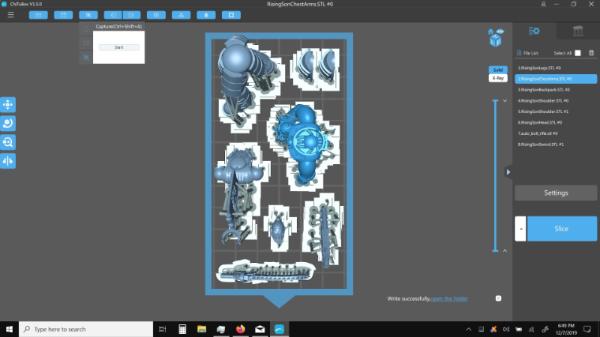
2019/12/08 00:12:06
Subject: Re:Rising Sons Samurai Space Marines... Adventures of a 3D printing n00b
|
|
The New Miss Macross!
|
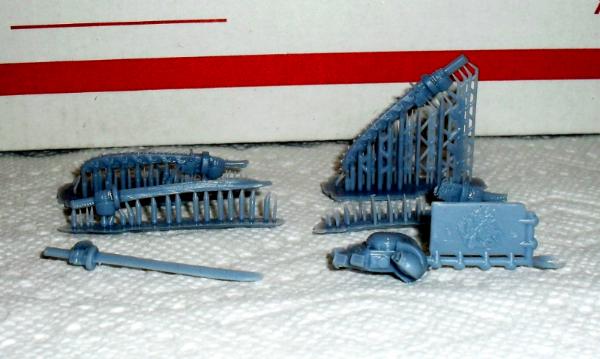
I've decided to try and print the marine out in pieces as I've never done that before and I wanted to keep the printing time reasonable. Normally, I print at 50 micron layer height but I figured I'd try 20 microns for the second time with this. In order to get a reasonable print time, I split him up so the machine doesn't spend a half day doing this. As it stands, this will still take 7 hours and be an overnight print for me. If it doesn't work out then I'll redo it at 50 microns and preassembled except for the backpack and sword. Regardless, here is the layout that I'll be using in a few minutes after I clean the vat and mix the resin.
|
|
This message was edited 1 time. Last update was at 2019/12/08 00:55:25
|
|
|
|
|
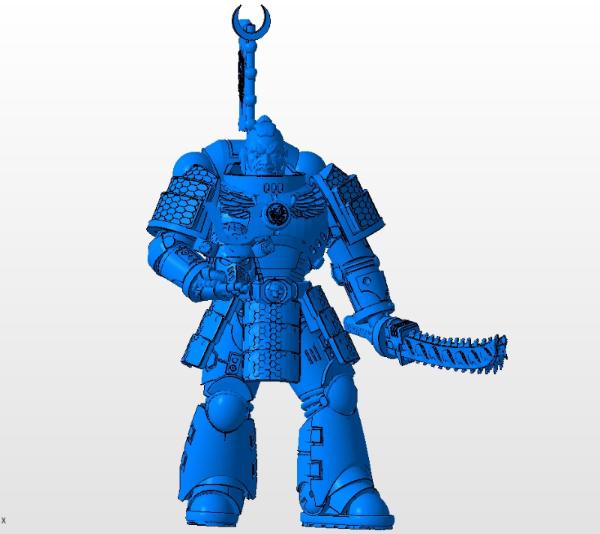
2019/12/12 16:58:25
Subject: Re:Rising Sons Samurai Space Marines... Adventures of a 3D printing n00b
|
|
The New Miss Macross!
|
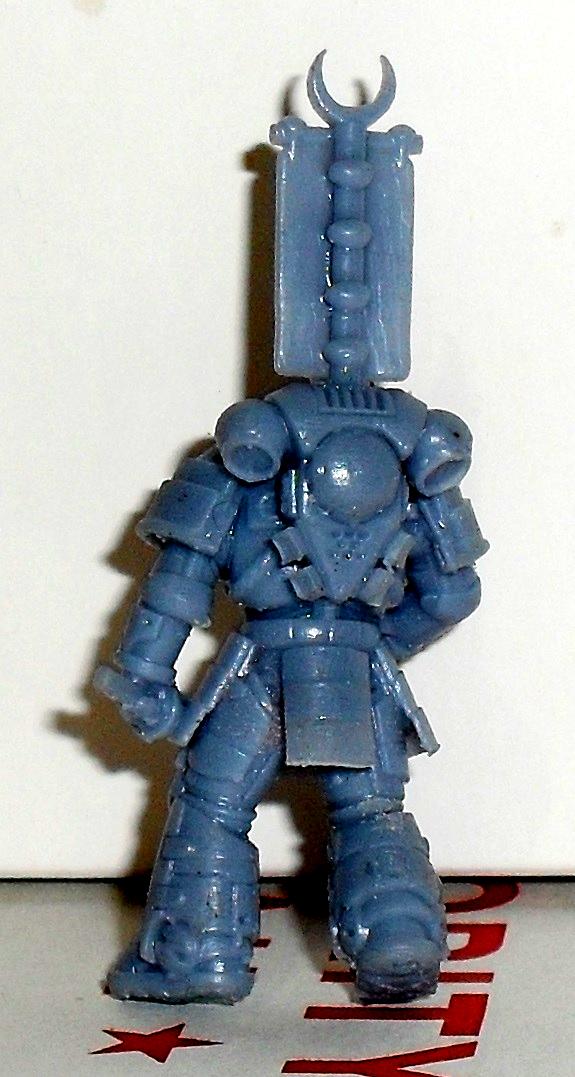
Well, it took a few days of printing due to misprints as well as another couple of days in order to have enough sunshine to post cure the model parts but I finally printed and assembled my first Rising Sons primaris marine. I printed him out bigger (closer to primarch size than primaris) in order to see how the details resolved and overall I'm happy with the results. The actual color of the resin FWIW is a bit lighter than in the size comparison pic below (and much lighter than the additional solo pics) as I increased the contrast to reduce glare and better show the details hopefully.
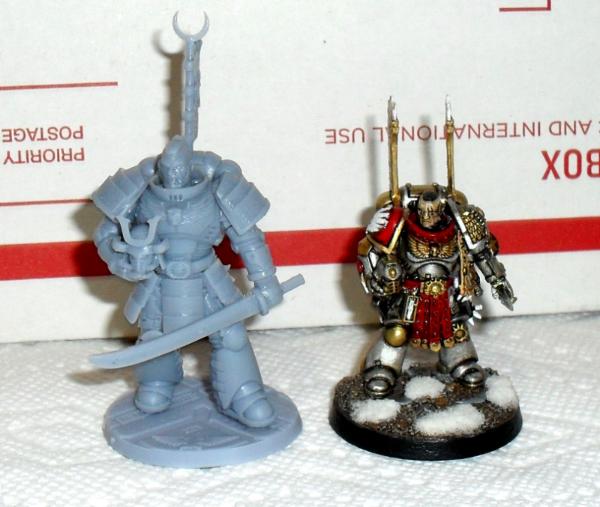
I printed him out in pieces and assembled him as you would a normal marine but I think the next rescaled version I'll attempt to print at the "correct" size. I do see some things that I want to change though to make sure the model will be durable enough to see play on the tabletop potentially. You may notice that he isn't using a chainsword katana as I had many problems trying to get that to print correctly with the teeth on both sides of the sword so I switched it to a power katana instead. I suppose that will necessitate a promotion to Lieutenant as well. Additionally I turned the sword inward for stability reasons as the separately printed parts left a rather fragile wrist; that shouldn't be an issue with the one piece model though but I would like to hear whether the sword position is better like this.
I also had a misprint where the supports weren't solid enough on the exhausts of the backpack so I took the opportunity to redo that as well since the Cyberpunk Oni symbol was too fine to survive priming printing. I'm still not happy with the overall dimensions of the back banner though and will likely redo it again with the rescale. I'm leaning towards using the sashimono style banner but redoing it as a traditional 2nd edition 40k T-shaped sergeant banner. I'll have to thicken up the parts significantly as even at primarch scale (52mm to the top of the head) they're quite fragile. I'm not sure what icon I'll use (aquilla? raptor? oni head?) as well and wouldn't mind some feedback on all of the above. Here are the other pics from different angles.

|
|
|
|
|
2019/12/13 00:08:27
Subject: Rising Sons Samurai Space Marines... Adventures of a 3D printing n00b
|
|

Grisly Ghost Ark Driver
|
The armour plates are fantastic, I can't wait to see the next one!
|
|
|
|
|
|
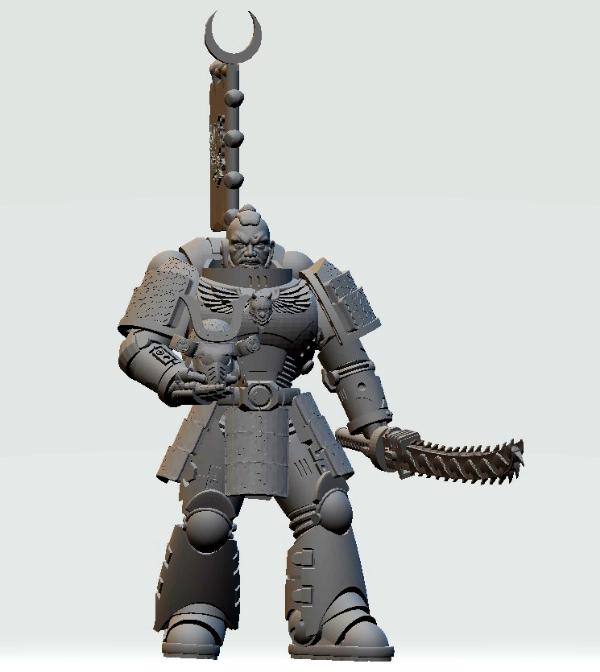
2019/12/13 03:02:14
Subject: Re:Rising Sons Samurai Space Marines... Adventures of a 3D printing n00b
|
|
The New Miss Macross!
|
Thanks! I've done a mockup of what the next will look like. I've kept the repositioned power katana, redid the banner to a mix of 40k 2nd ed style and traditional sashimono, and thickened up potential problematic areas like the helmet horns to survive printing at smaller scale.
For some reason, the better looking viewer doesn't show the banner detail at all.
|
|
|
|
|
2019/12/27 22:41:58
Subject: Re:Rising Sons Samurai Space Marines... Adventures of a 3D printing n00b
|
|
The New Miss Macross!
|
I finally got around to printing the one piece Rising Son marine and the results are definitely interesting. I resized the model from the previously printed one to 85% but it looks visually like it's closer to 66%!!
There are a couple of reasons that could contribute to that seeming discrepancy in size. The first is that previously I printed the parts separately so the little gaps with glue could increase the size of the final model whereas I definitely overlapped them when combined it all digitally. Second, resin does shrink both with printing and temperature and the ambient temperature was 10-15 degrees below my previous print that was done during a relative winter heat wave in my area. It's supposed to only be a 1-2% but maybe it's more. Additionally, this was done with a slightly different resin (same manufacturer but now with an "ABS-like" moniker added to it) so maybe that contributed. I virtually measured the model to the top of the hair and the final result is only about 1mm below what I expected; it was supposed to match the Amulius in height but the picture isn't an exact comparison as Amulius is sculpted onto a small 2mm high rubble platform on top of the 40mm base. The final and biggest difference is likely the various proportions in that the official primaris model while better proportioned than normal marines is still far enough from human shaped to make a difference. With my previous 3d printed models, I noticed that I definitely needed to "thicken" models 10-20% to get them to look good on the tabletop versus good on the screen. When I arrange the next marine pose, I'll probably increase the height by 5% and the width/depth by 10% to give them bulk more consistent with the official models.
The good news is that at least at first glance I don't see any obvious miscasts. The sword edge is a bit chipped and I had to level out the butt plate as it was edge was a bit curved so I sanded it down. The parts that I was worried about ahead of time like the helmet and chest horns and banner actually came out IMO pretty good. I still have to cure the model (which will probably take a few days given the lack of daytime direct sunlight forecast locally) as well as trim a few more nubs but I did what I could with the rubbery flexible resin without damaging it.
I don't want to sound like I'm unhappy with the results as I'm not but just wanted to hit the potential issues first in the post. Regardless of the above, I'm actually happy with the size of this first 1pc model even if I plan to change further prints. This particular model actually fits quite well on a 25mm base and makes for a good RPG model as it's more in scale with other figs compared with official primaris.
|
|
This message was edited 2 times. Last update was at 2020/10/06 12:24:50
|
|
|
|
|
2019/12/28 22:38:32
Subject: Rising Sons Samurai Space Marines... Adventures of a 3D printing n00b
|
|

Ancient Venerable Dreadnought
|
Cool idea, and it looks like the printer is pulling it off nicely! It’s a real shame the chainkatana didn’t work out as the render looked awesome. Really impressive that the printers now can print marines at the correct size. How much more clean up/filing is needed compared to a bought marine? It’d also be good to see a painted up side by side with a Primaris Marine in the same colour scheme to see easier the difference in detail levels. Will watch this closely to see how it develops!
|
Goberts Gubbins - P&M Blog, started with Oldhammer, often Blackstone Fortress and Void Panther Marines, with side projects along the way |
|
|
|
|
2019/12/29 02:45:50
Subject: Rising Sons Samurai Space Marines... Adventures of a 3D printing n00b
|
|
The New Miss Macross!
|
I don't have any primaris painted up other than in my Winged Hussar scheme already shown but this guy is definitely next in my painting queue and will get a side by side pic with them FWIW. I'd say the prep and clean up is a bit more than a normal marine as it involves an alcohol bath to wash off the excess liquid resin, a hot water bath to soften the resin supports further for easy removal, and clipping for resin. Then there is the obvious set up time in prepping the model for printing. I consider that to be hobby work and don't mind it though as the trade off is that the marine is fully customized for about $1 of materials and electricity (obviously not including the price of the printer!).
|
|
|
|
|
2019/12/30 03:52:52
Subject: Re:Rising Sons Samurai Space Marines... Adventures of a 3D printing n00b
|
|
The New Miss Macross!
|
I had some time this weekend and decided to resize the same pose and support structure and reprint the model at 50 microns. I fully admit that this was the easy way out but I figured I'd give it a shot to check out the proportions as well as the more typical 50 micron layer height that I normally print at. At about 6 1/2 hours print time, I'd personally say that the detail and the proportions compared with the official primaris marine are both pretty good though there is a softness on certain parts of the face and aquilla on the more recent print compared with the previous one. We still didn't have any real direct sunshine to speak of with another pair of rainy days so the resin remains a bit rubbery (and wet from the water rinse in the case of the newest print as I took the pics right after!) so it's still a bit hard to make out the details in the pics. After some post curing, it'll be off to painting for the smaller RPG scale and correct scale marine but I think I'll leave the primarch scale print as is. Now I just need to find out what paint scheme I intend to use. I'll definitely do a base of gloss black but I'm not sure of what color highlights and details that I'll end up using.
|
|
This message was edited 1 time. Last update was at 2020/10/06 12:24:10
|
|
|
|
|
2020/01/01 02:24:22
Subject: Re:Rising Sons Samurai Space Marines... Adventures of a 3D printing n00b
|
|
The New Miss Macross!
|
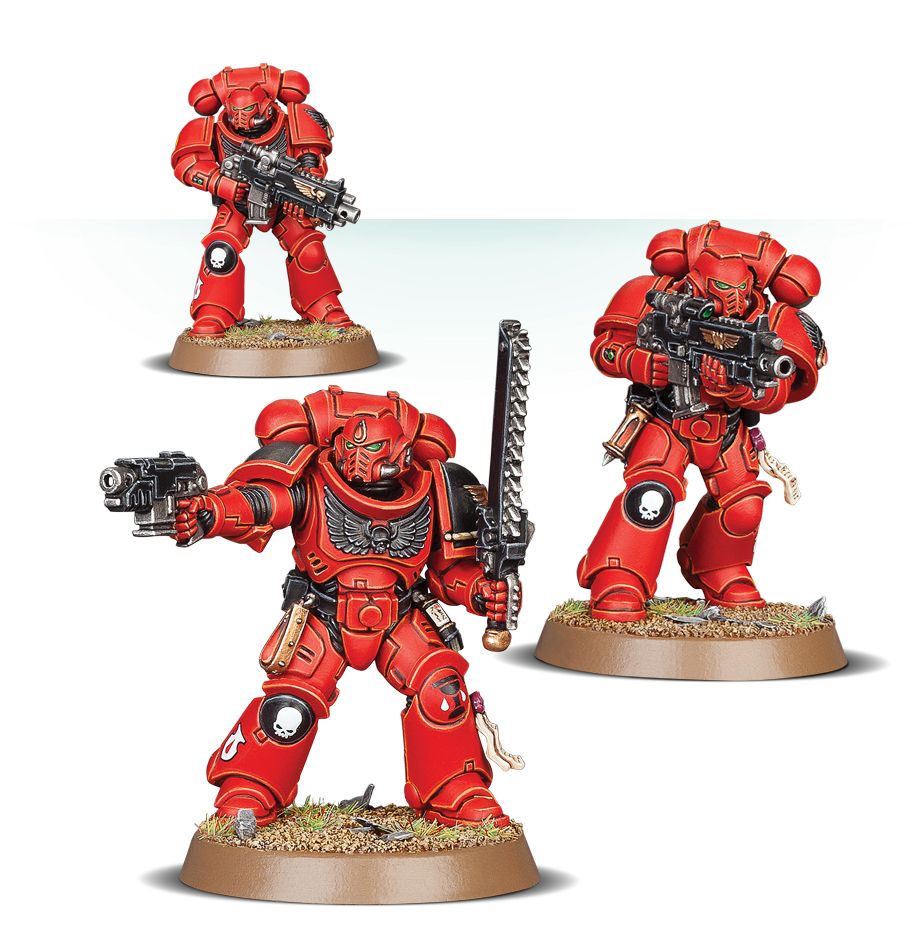
Hope everyone has a happy new year! I figured I'd put one final post in for 2019 regarding this project. I had two (cold!) days of sunlight and was able to post cure the models. I've been thinking about the paint job a bit more as I wasn't entirely settled on the majority black scheme. I did some image searches and came across some pics of primarily cosplay red samurai armor and I might go with that instead. Here is the inspiration link as well as something a bit more GW to give a better idea. If anyone has any thoughts, let me know. My alternate scheme would be basically the inverse of the above with a base black and red detail accents along with some occasional gold details.
Samurai Cosplay Armor: http://www.kultofathena.com/product.asp?item=B006G
|
|
|
|
|
2020/01/01 11:40:37
Subject: Rising Sons Samurai Space Marines... Adventures of a 3D printing n00b
|
|
Ancient Venerable Dreadnought
|
I think the red would work well, but maybe use a bit more black? The belly plate, belt and thighs maybe? Perhaps you could take the blood angels idea of switching the shoulder pads on squad leaders a bit further and switch the entire armour pattern on these guys? Your Primarch sized marine and any captains could be gold too, that would have a Japanese feel to it I think
|
Goberts Gubbins - P&M Blog, started with Oldhammer, often Blackstone Fortress and Void Panther Marines, with side projects along the way |
|
|
|
|
2020/01/01 14:48:52
Subject: Rising Sons Samurai Space Marines... Adventures of a 3D printing n00b
|
|
The New Miss Macross!
|
I agree. If I go with the primarily (pun intended) red scheme above, I'll do the aquilla, shoulder and thigh pads, knee pads, helmet face, and part of the back pack in black. I will be a mix between the sergeant above and a bit of the flesh tearers in terms of the black/red ratio. I did have gold as a detail highlight in my original black scheme though. I hadn't thought of doing the chest itself in a different color so thanks for that idea.
Part of the reason I was reconsidering the base black is for print detail depth. I'm worried that some of the detail may not show up well with a base coat of black that then needs multiple (thin) coats of red on top of it to fully cover up the base model. With a base of red, I'm pretty confident that a single thin coat of black will be ok.
Edit: I've had an hour or two to think about and realized that there isn't any good reason not to try both schemes. I have two models after all and neither are miscast so I could do one in red base and the other in black.

|
|
This message was edited 1 time. Last update was at 2020/01/01 17:06:10
|
|
|
|
|
2020/03/02 15:13:39
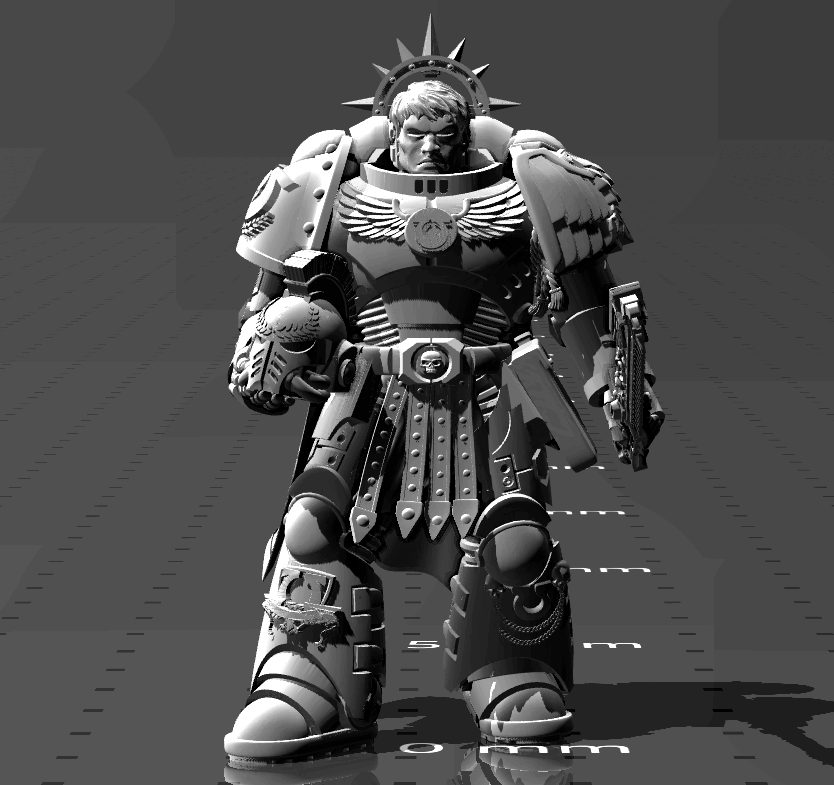
Subject: Re:Adventures of a 3D printing n00b (Latest update: Ultramarine Primaris Captain)
|
|
The New Miss Macross!
|
Hey folks! It's been a while since my last update but I did some more 3d model remixing (i.e. digital converting as I only combine existing parts others create) this weekend. I haven't yet painted my Rising Sons samurai space marine but I did put together a suitably ornate Ultramarine Primaris captain in a similar pose. What can I say? I love that pose/look ever since first seeing the official Lieutenant Amulius model from GW that I converted for my Winged Hussar custom chapter.
3d Model link: https://www.thingiverse.com/thing:4196619
Hopefully this fine and stern gentleman warrior is ornate enough to represent the chapter! I haven't played 40k regularly since 5th edition so the loadout is probably very suboptimal as I chose it all for the visual appeal and practicality. I've come to the conclusion that I mostly prefer digitally tweaking the models rather than printing/painting them so let me know if anyone prints this out!
|
|
This message was edited 1 time. Last update was at 2020/03/02 22:19:42
|
|
|
|
|
2020/03/03 16:50:11
Subject: Re:Adventures of a 3D printing n00b (Latest update: Ultramarine Primaris Captain)
|
|
The New Miss Macross!
|
FWIW, I added a second variant that I'll call the Lion of Ultramar (since the Lions of Macragge is already taken in the lore!). It's at the same link as above and should be the last revision to the model. 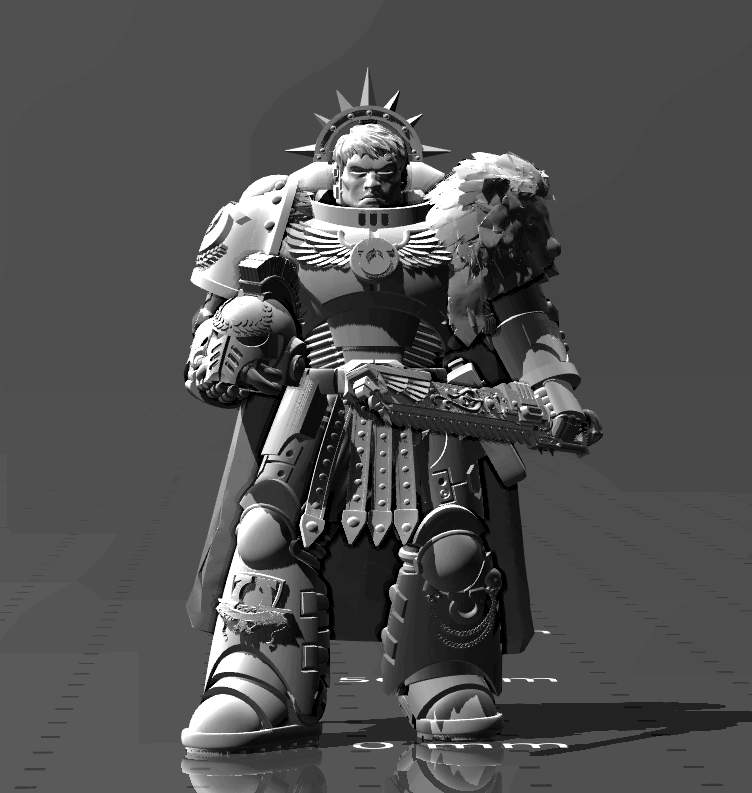
|
|
This message was edited 1 time. Last update was at 2020/03/03 16:52:57
|
|
|
|
|
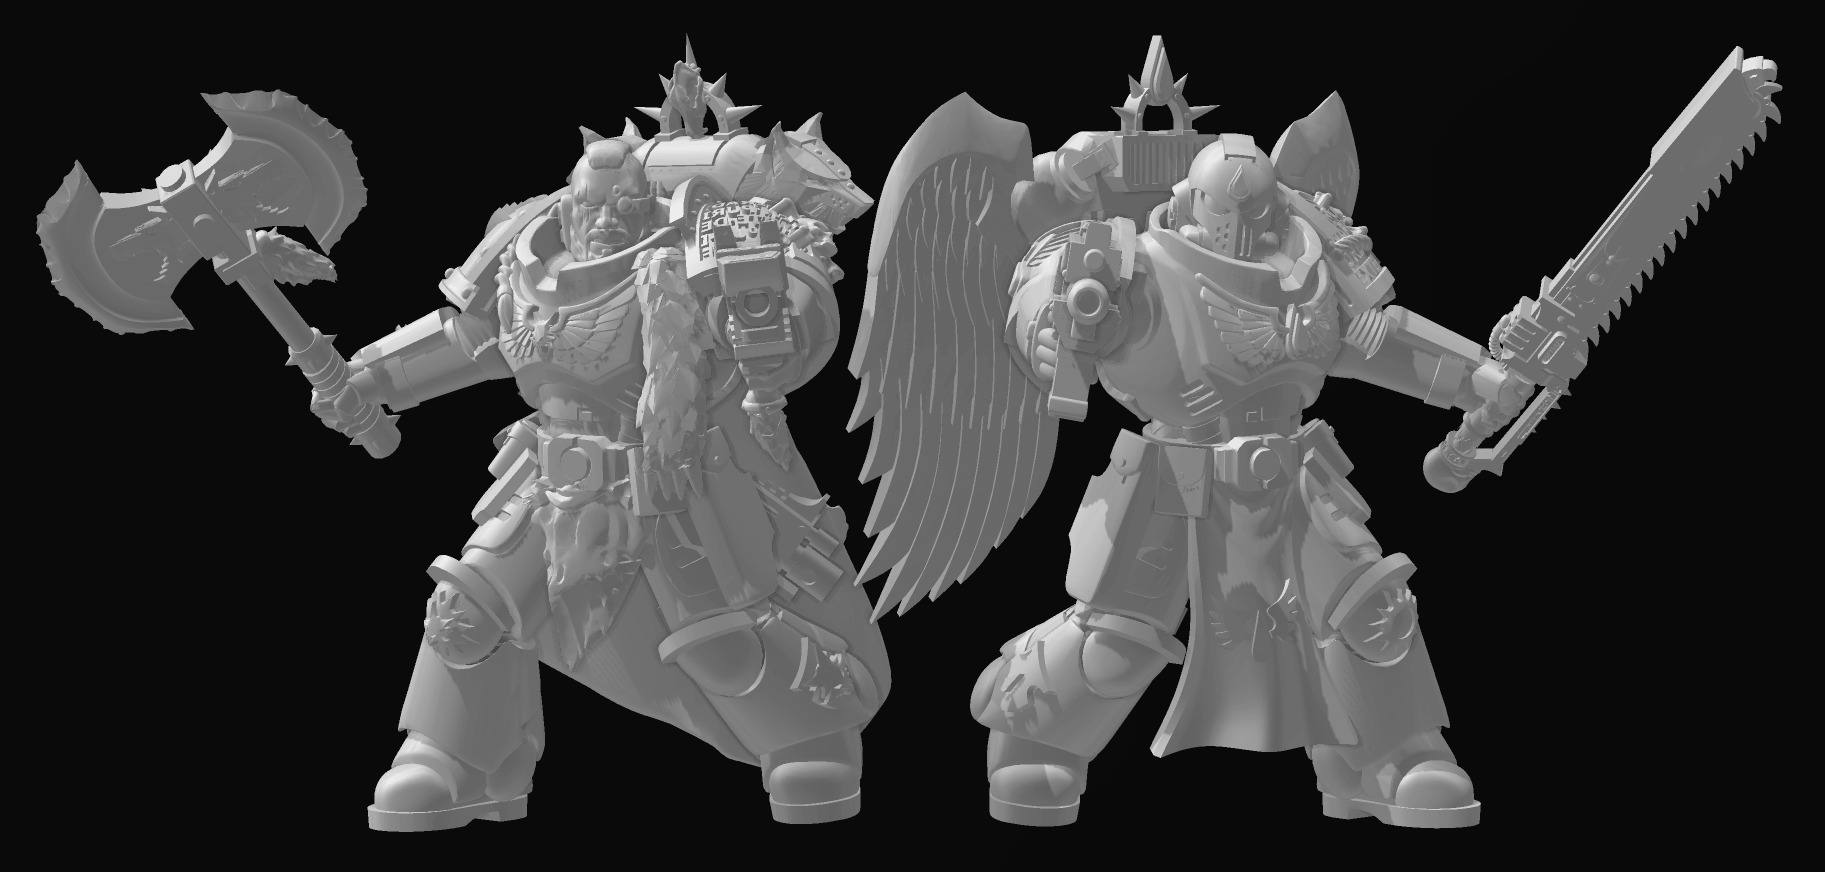
2020/06/08 21:42:24
Subject: Re:Adventures of a 3D printing n00b (Latest update: BA Lieutenant and SW wolfguard)
|
|
The New Miss Macross!
|
It's been a while since I've updated the thread for a variety of reasons. The worldwide pandemic putting a stop to my own printing for the most part due to a shortage of IPA for cleaning being one but the other being that GW took down my Winged Hussar model from Thingiverse with a cease and desist being another big one. Somehow the thousands of space marine parts are still ok and up but they laid claim to my Grimdark Space Pole. Sadly, Thingiverse didn't require anything beyond GW simply submitting a form letter with a few dozen uploads listed and didn't bother responding to my question as to what happened for over a month let alone simply informing me in the first place. So be it... :(
I took a while off of tweaking 3d models but in the past week although I've still visited the various websites to see what others are uploading. There was a recent take on Krom Dragongaze ( https://www.thingiverse.com/thing:4432381) uploaded using the same base model by MrMcAngry ( https://cults3d.com/en/3d-model/game/not-a-prime-bloody-lt) that I previously used for a different Blood Angel Lieutenant so I decided to tweak him as well into something more customized for a potential RPG character. I hope to run a print this upcoming weekend with these two models (probably in smaller true 28mm scale rather than 40mm for primaris) so will update the thread with actual model pics if I do.
It's not really visible above but the space wolf does have a full wolf pelt on his cape visible from the backside whereas the blood angel has a full bolter and not a pistol.
|
|
This message was edited 2 times. Last update was at 2020/10/06 12:26:41
|
|
|
|
|
2020/06/10 17:23:00
Subject: Re:Adventures of a 3D printing n00b (Latest update: Blood Angel and Space Wolf Lieutenants)
|
|
The New Miss Macross!
|
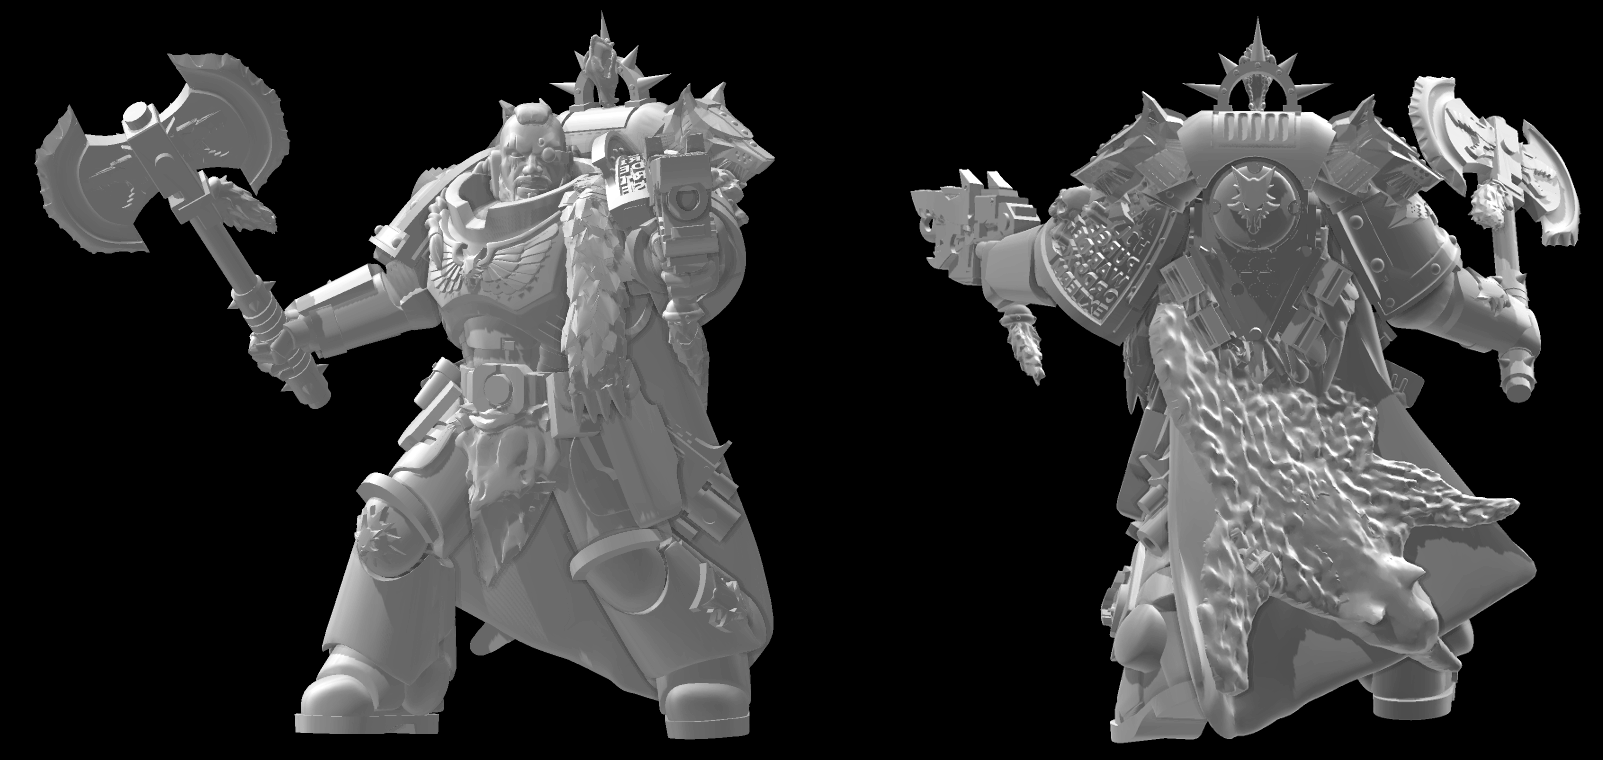
Since initially posting the preview pic above, I've tweaked the model a bit more. I shrunk the head a bit so that it would actually fit inside a helmet and also reduced the size of the axe blades a bit. I'm a bit unsure about the latter as I've found that weapons that look "right" on a 3d model tend to be too fragile and undersized when actually printed but I'll see if that holds true this time. Additionally, I made the pelt on his cape significantly larger as it looked like he decorated his armor with an adolescent wolf's pelt instead of a more fearsome adult's.
|
|
This message was edited 1 time. Last update was at 2020/10/06 12:27:02
|
|
|
|
|
2020/09/10 01:06:04
Subject: Re:Adventures of a 3D printing n00b (Latest update: Blood Angel and Space Wolf Lieutenants)
|
|
The New Miss Macross!
|
It's been a while since I've updated the thread since I've mainly been working on heroclix repaints with some added 3d printed bits rather than full digital models.
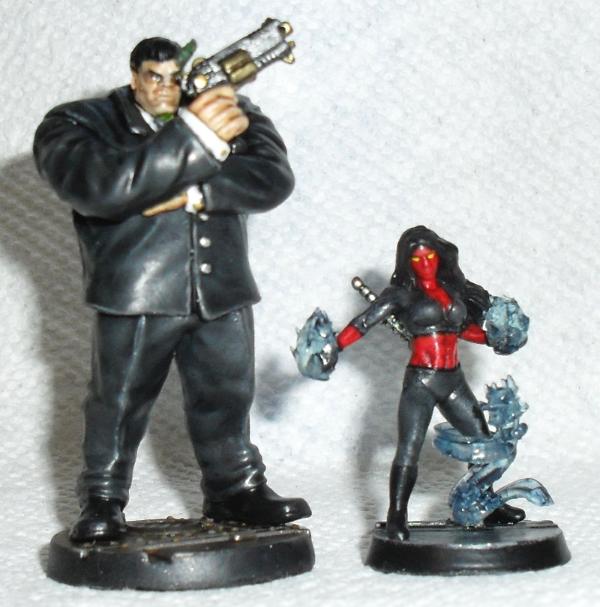
The clear fireball and dragon bits as well as the pistol are 3d printed but otherwise they're Heroclix repaints of the Hulk and Red She Hulk.
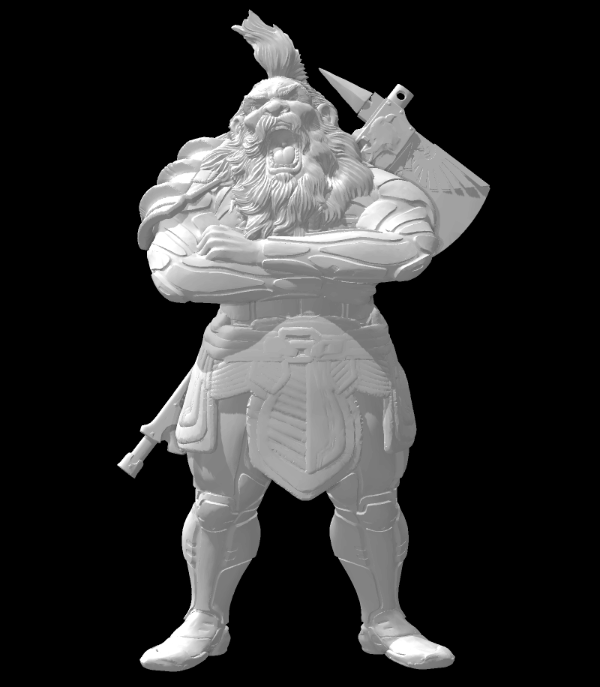
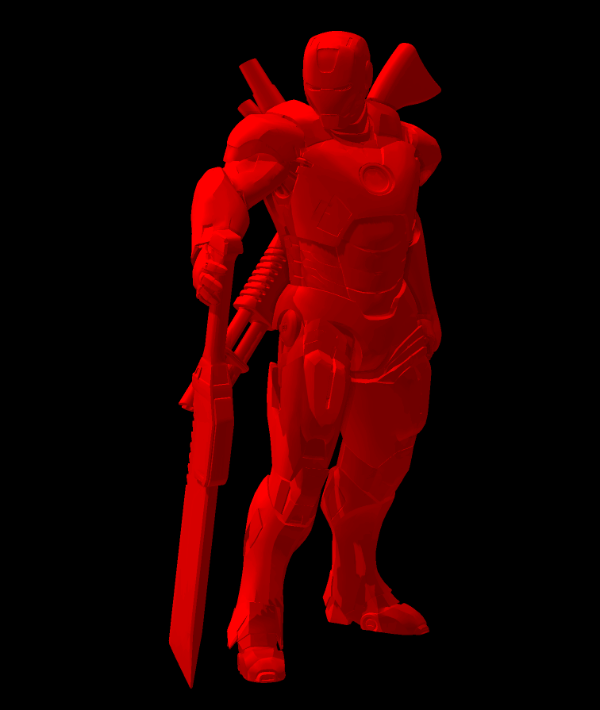
For my next print run, I'm hoping to include these kitbashed models. The first is a scifi/cyberpunk Dwarf Berserker inspired by Warhammer Fantasy Dwarven Slayers. Next is a Rifts full conversion cyborg based off of an Iron Man model. The final pic is a Knight Saber from the 80's Bubblegum Crisis anime modded with a jump pack and a Metroid Samus cannon forearm. I didn't sculpt any of these personally other than the simple pipes on the back of the borg.
|
|
|
|
|
2020/09/22 18:07:59
Subject: Re:Adventures of a 3D printing n00b (Cyberpunk Orc in Nanosuit, Borg, and Sith Stalker)
|
|
The New Miss Macross!
|
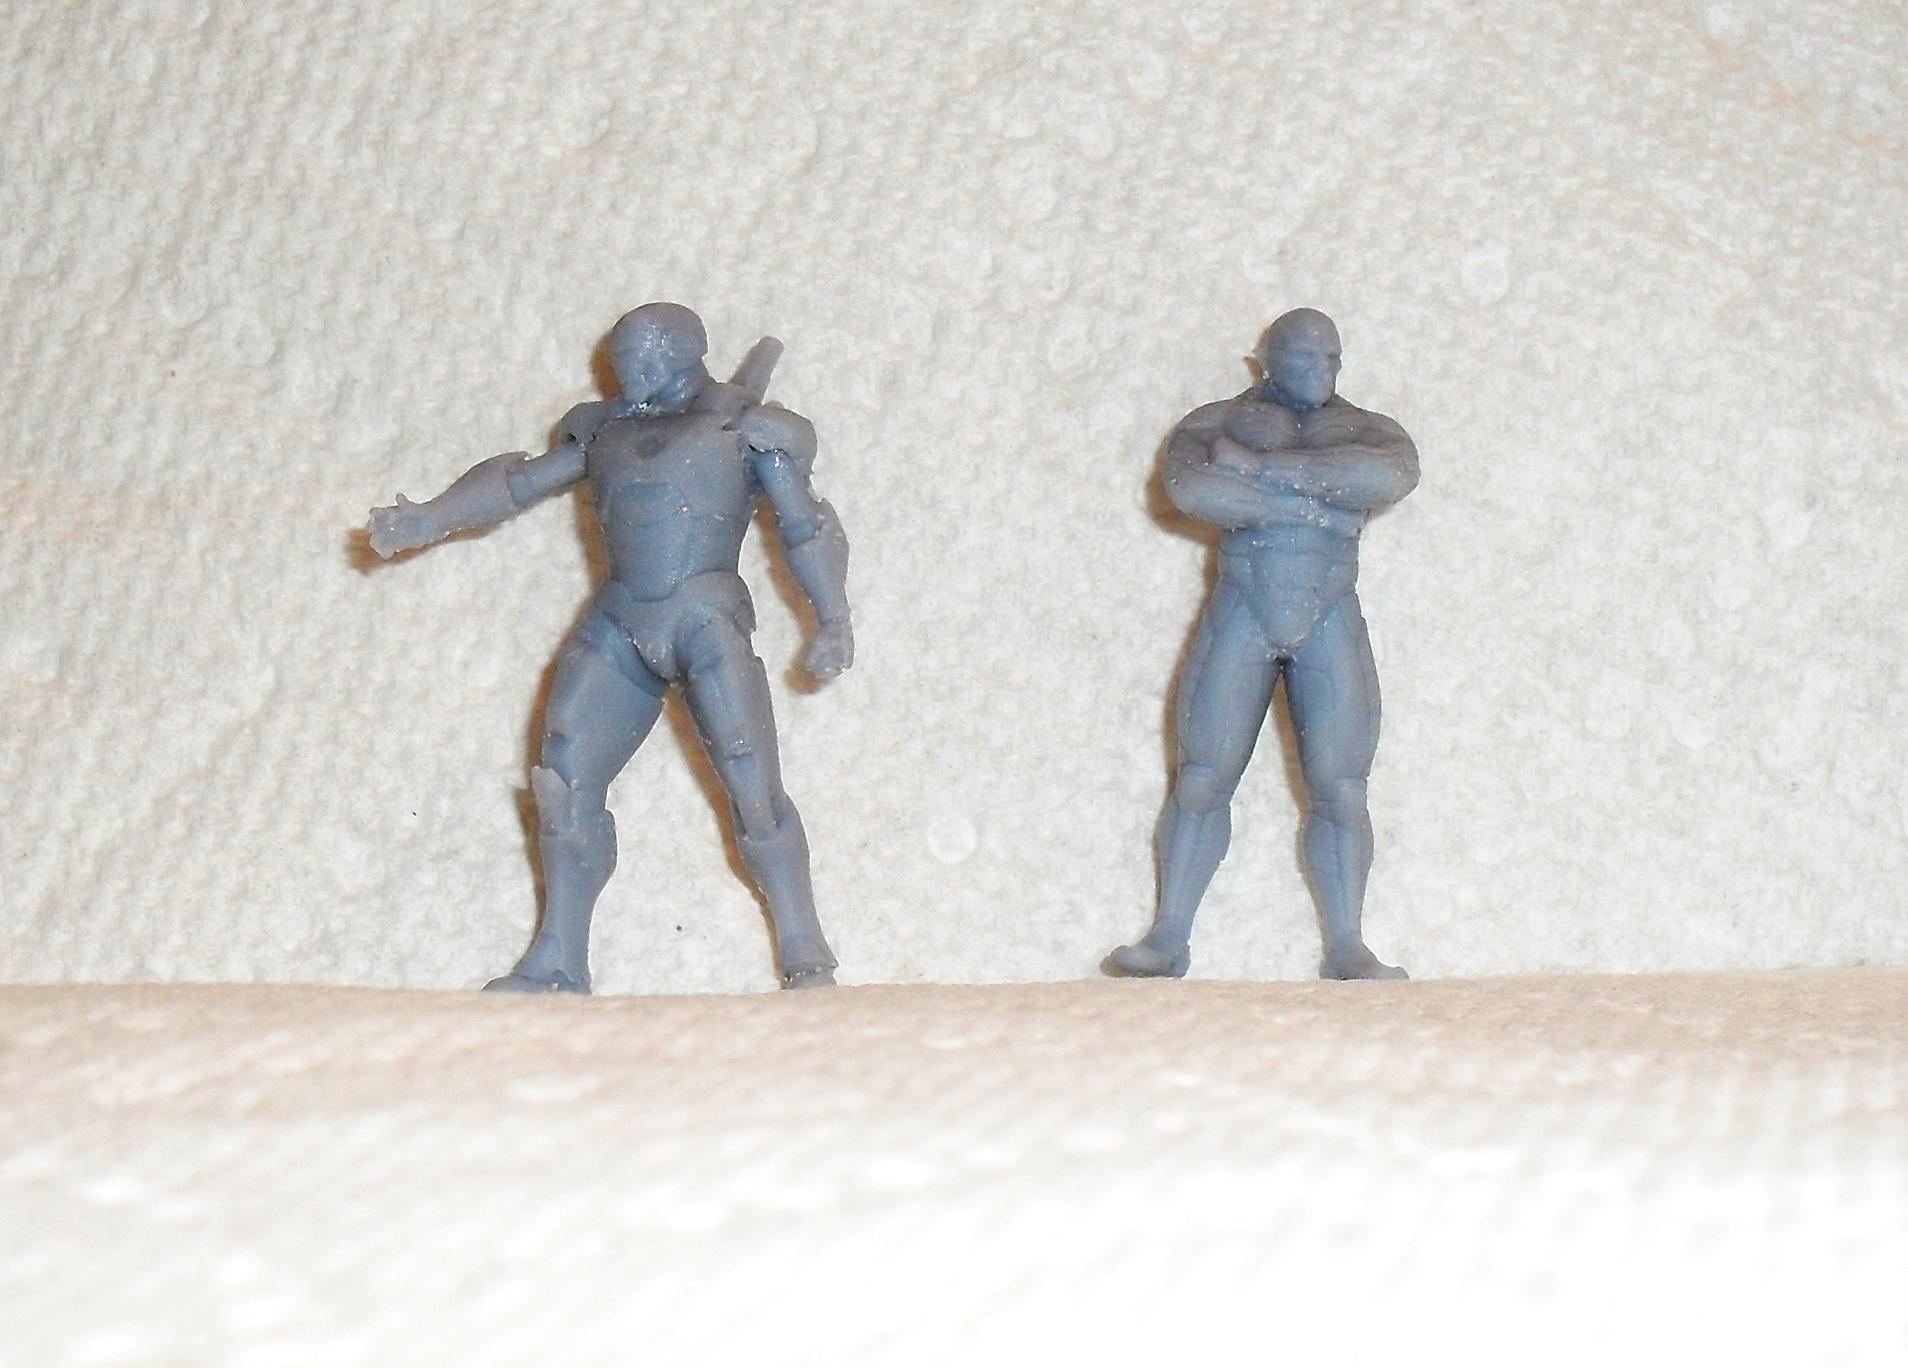
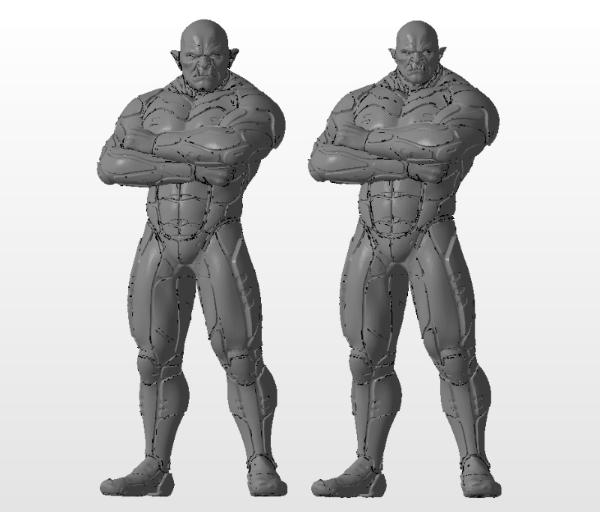
Well, I didn't print out my Knight Saber totally not from Bubblegum Crisis but I did print out my Rifts Full Conversion Borg as well as a new cyberpunk orc in a Crysis style nanosuit. The borg turned out well albeit with some shallow facial details but I hope that a thin red primer coat, drybrushing, wash, and edge highlighting will keep them visible. Unfortunately, deepening details is beyond my amateur 3d modelling skills. I decided to print out his weapons separtely instead of already attached to him for added details on those parts. It's more stable to print them out already attached but it makes supporting the otherwise simple vertical model more difficult and typically increases the chance of a misprint on those tiny parts. Since taking the picture, I've cleaned up with a new blade and soft bristle toothbrush some of the leftover bits of "flash" from the printing process/supports.
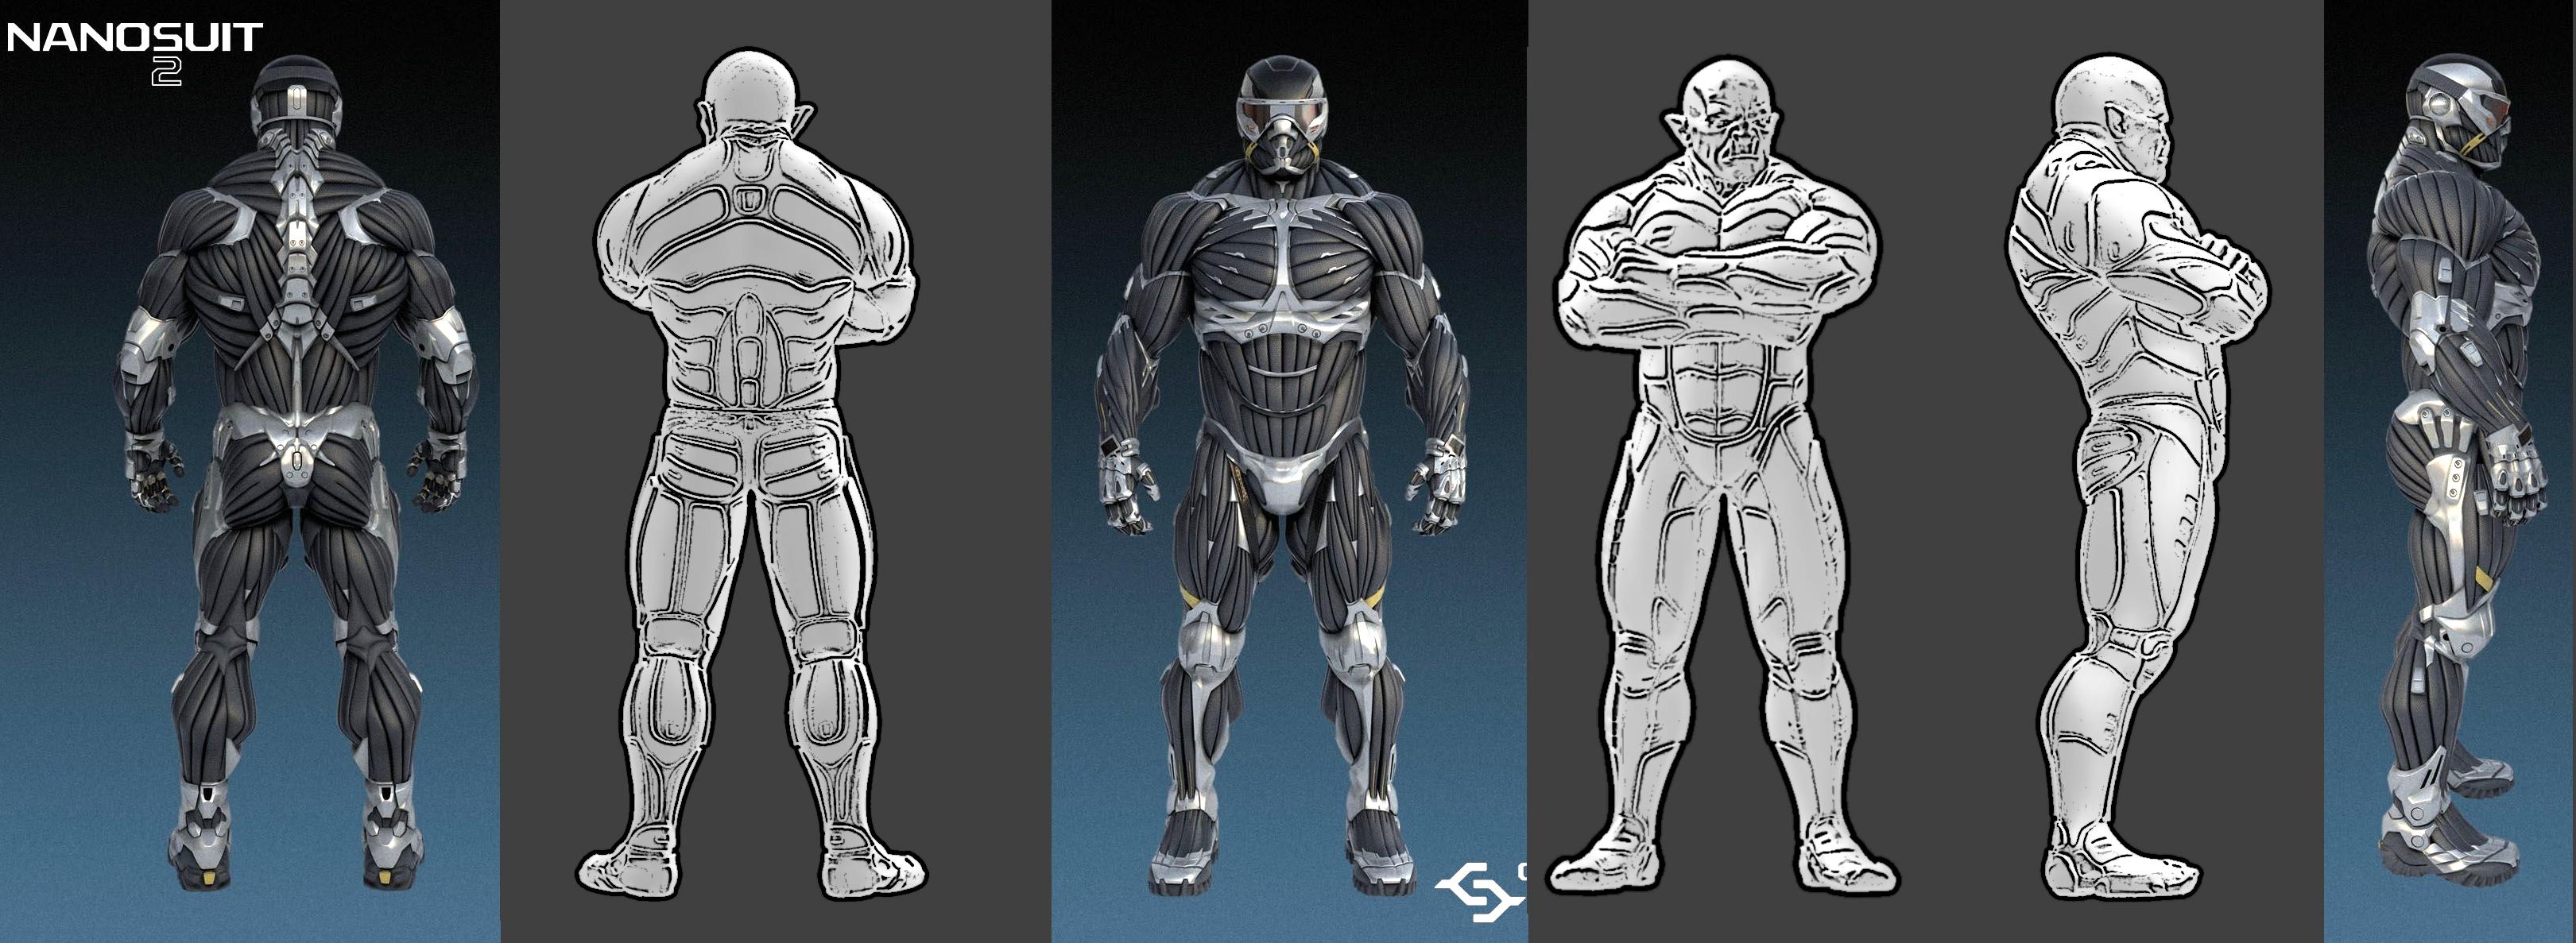
For eagle eyed readers, the orc is actually using the same body that I tried to convert for the dwarf above. I was never entirely happy with the dwarf so decided to go with the orc instead. The above is actually the second print as my first one used the model pretty much as completed by the sculptor but had printability issues with the head. The tusks were barely visible even with magnification and the ears were just nubs as the majority of them were too thin to print out even with tiny supports. I basically almost doubled the total volume of the head along with a further increase specifically of the tusks and ears and am happy with the results. For a comparison of what looks best in a 3d model vs what I think looks better on the tabletop and/or is more likely to print, take a look here.
I plan to paint him as much as I can (with my mediocre painting skills) like the Crysis videogame nanosuit pictured below.
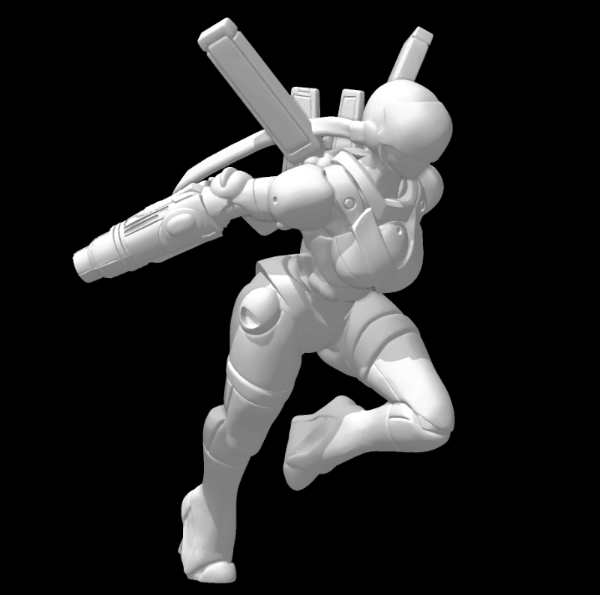
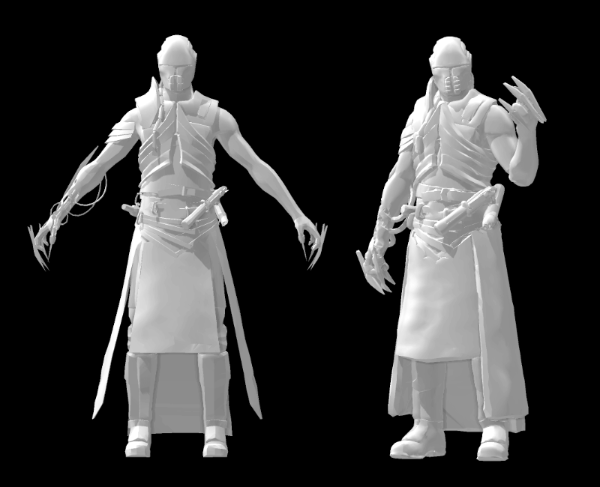
Finally, I worked on what I hope will be my next model. I've always loved the original Force Unleashed Star Wars game and consider it a flawed gem from that era. The sith stalker character option was my favorite but I hadn't been able to find a nice 3d model of it until this past weekend. It was in the traditional T-pose (think DaVinci's naked man drawing) but I was able to modify it to something a bit more appealing on the tabletop. About the only thing I modelled myself on this was a gap filling ovoid where I had to break the left arm to bend. The rest is just individually thickened, moved, and/or resized.
|
|
|
|
|
2020/09/22 20:18:34
Subject: Adventures of a 3D printing n00b (Cyberpunk Orc in Nanosuit, Borg, and Sith Stalker)
|
|

Dashing Super Valkyrie Flying Ace
|
That looks pretty cool! What are you using to mod the files? I've been thinking about getting into it...
|
|
|
|
|
2020/09/22 20:47:05
Subject: Adventures of a 3D printing n00b (Cyberpunk Orc in Nanosuit, Borg, and Sith Stalker)
|
|
The New Miss Macross!
|
 Albertorius wrote: Albertorius wrote:That looks pretty cool! What are you using to mod the files? I've been thinking about getting into it...
Thanks! I use several as I'm sure that I'm doing things the hard way. I use 3ds Max (free student edition) for the "thickening" as I like to call it that does a better job of it than simply scaling the XY planes. The other big benefit of that program is that I can select individual parts/shells assuming that the model hasn't been repaired into one big part and modify them individually without screwing up the adjacent ones. I then repair and resize the model with the 3D Builder program in Windows 10 so I don't get weird errors from my breaking/bending/combining certain parts together when I try to import it into chitubox. I used to use Netfabb for this but my evaluation period expired on that a while ago and the free included windows program does most of the same job albeit with less fine control/information. I have Blender 3d but I've found it to be confusing so don't use it. For simple plane cuts, I use meshmixer. I don't doubt that I could probably do most if not all of those in a free program but I just don't have the modelling knowledge. I'm just playing with my digital bits box/legos and trying to make something cool.
|
|
This message was edited 1 time. Last update was at 2020/09/22 20:55:52
|
|
|
|
|
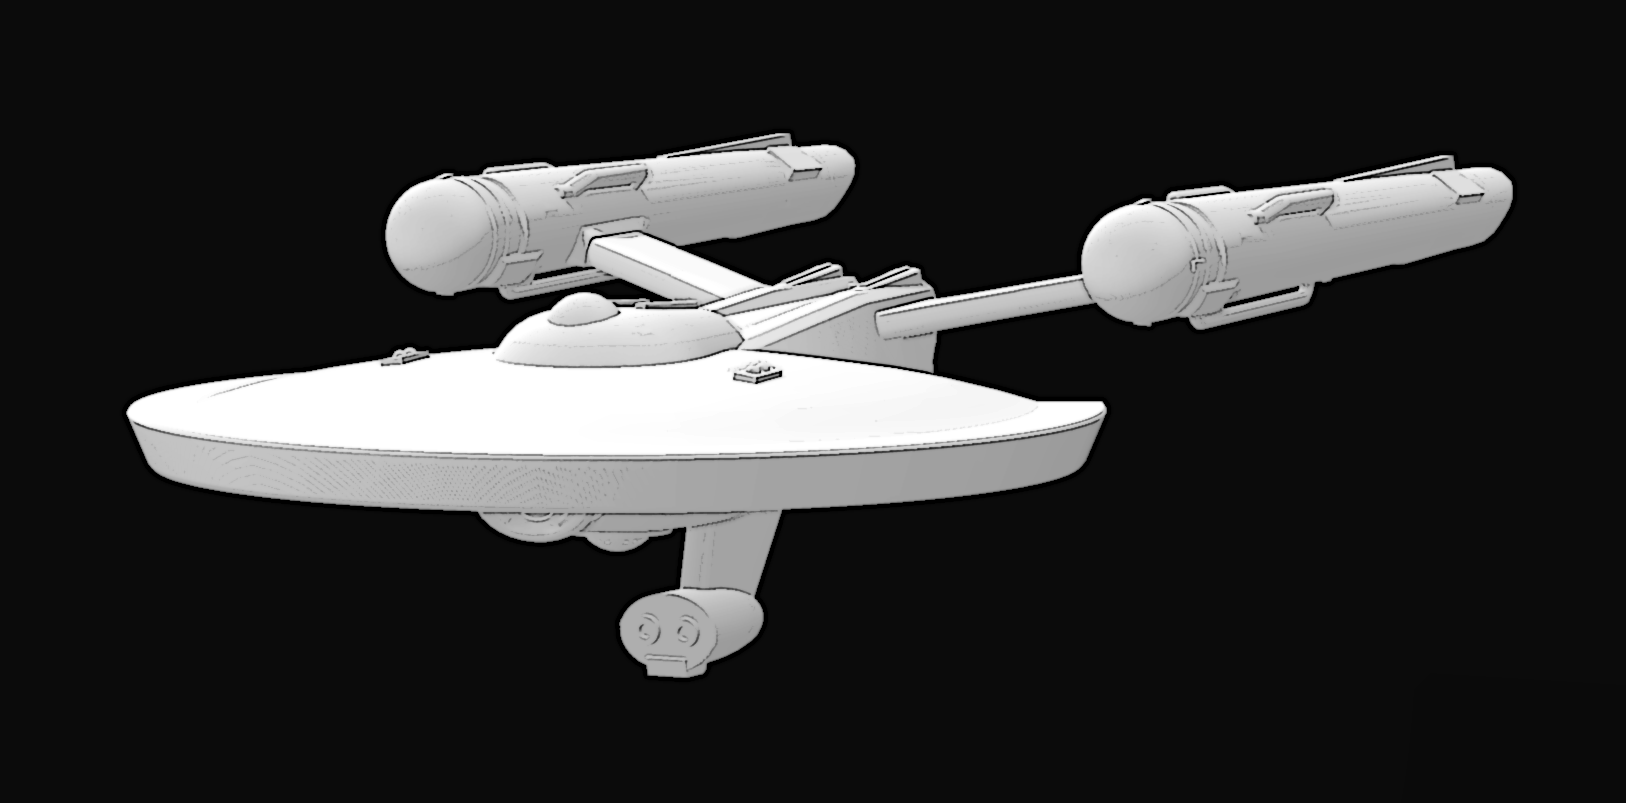
2020/10/04 22:11:19
Subject: Re:Adventures of a 3D printing n00b (Cyberpunk Orc in Nanosuit, Borg, and Sith Stalker)
|
|
The New Miss Macross!
|
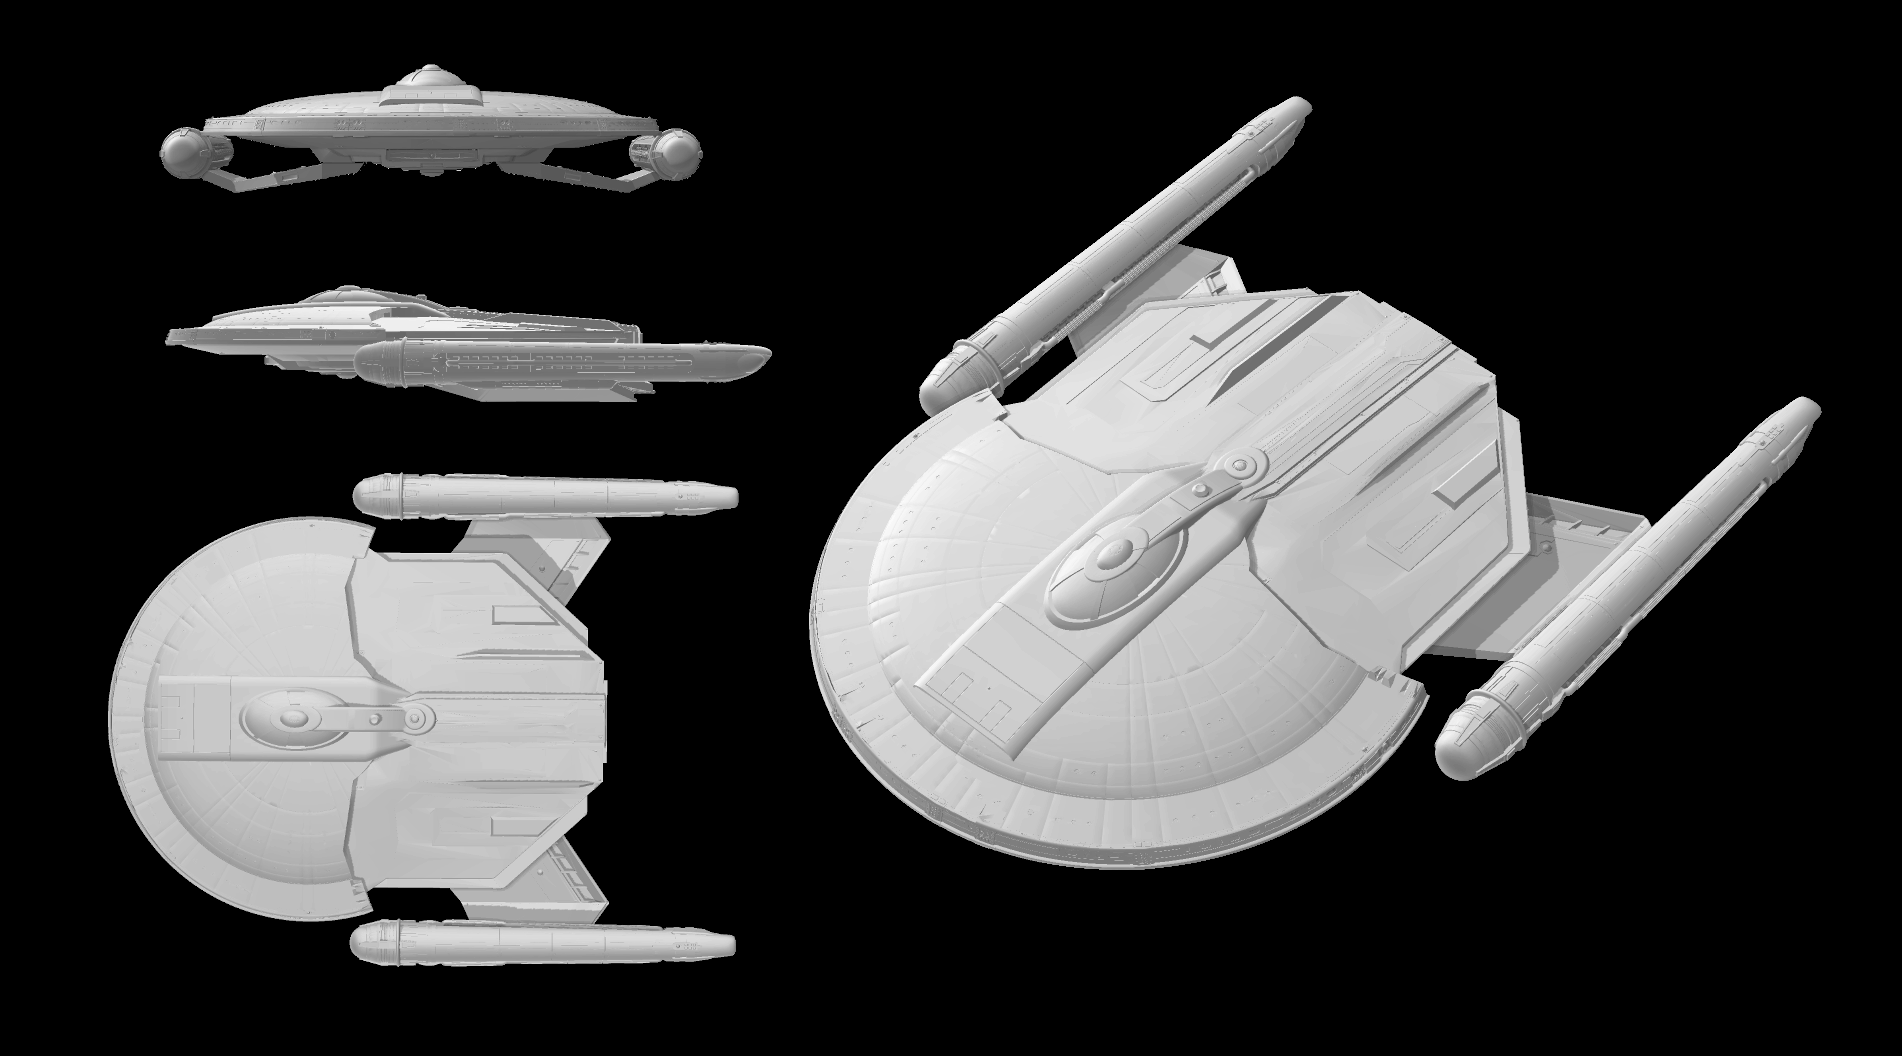
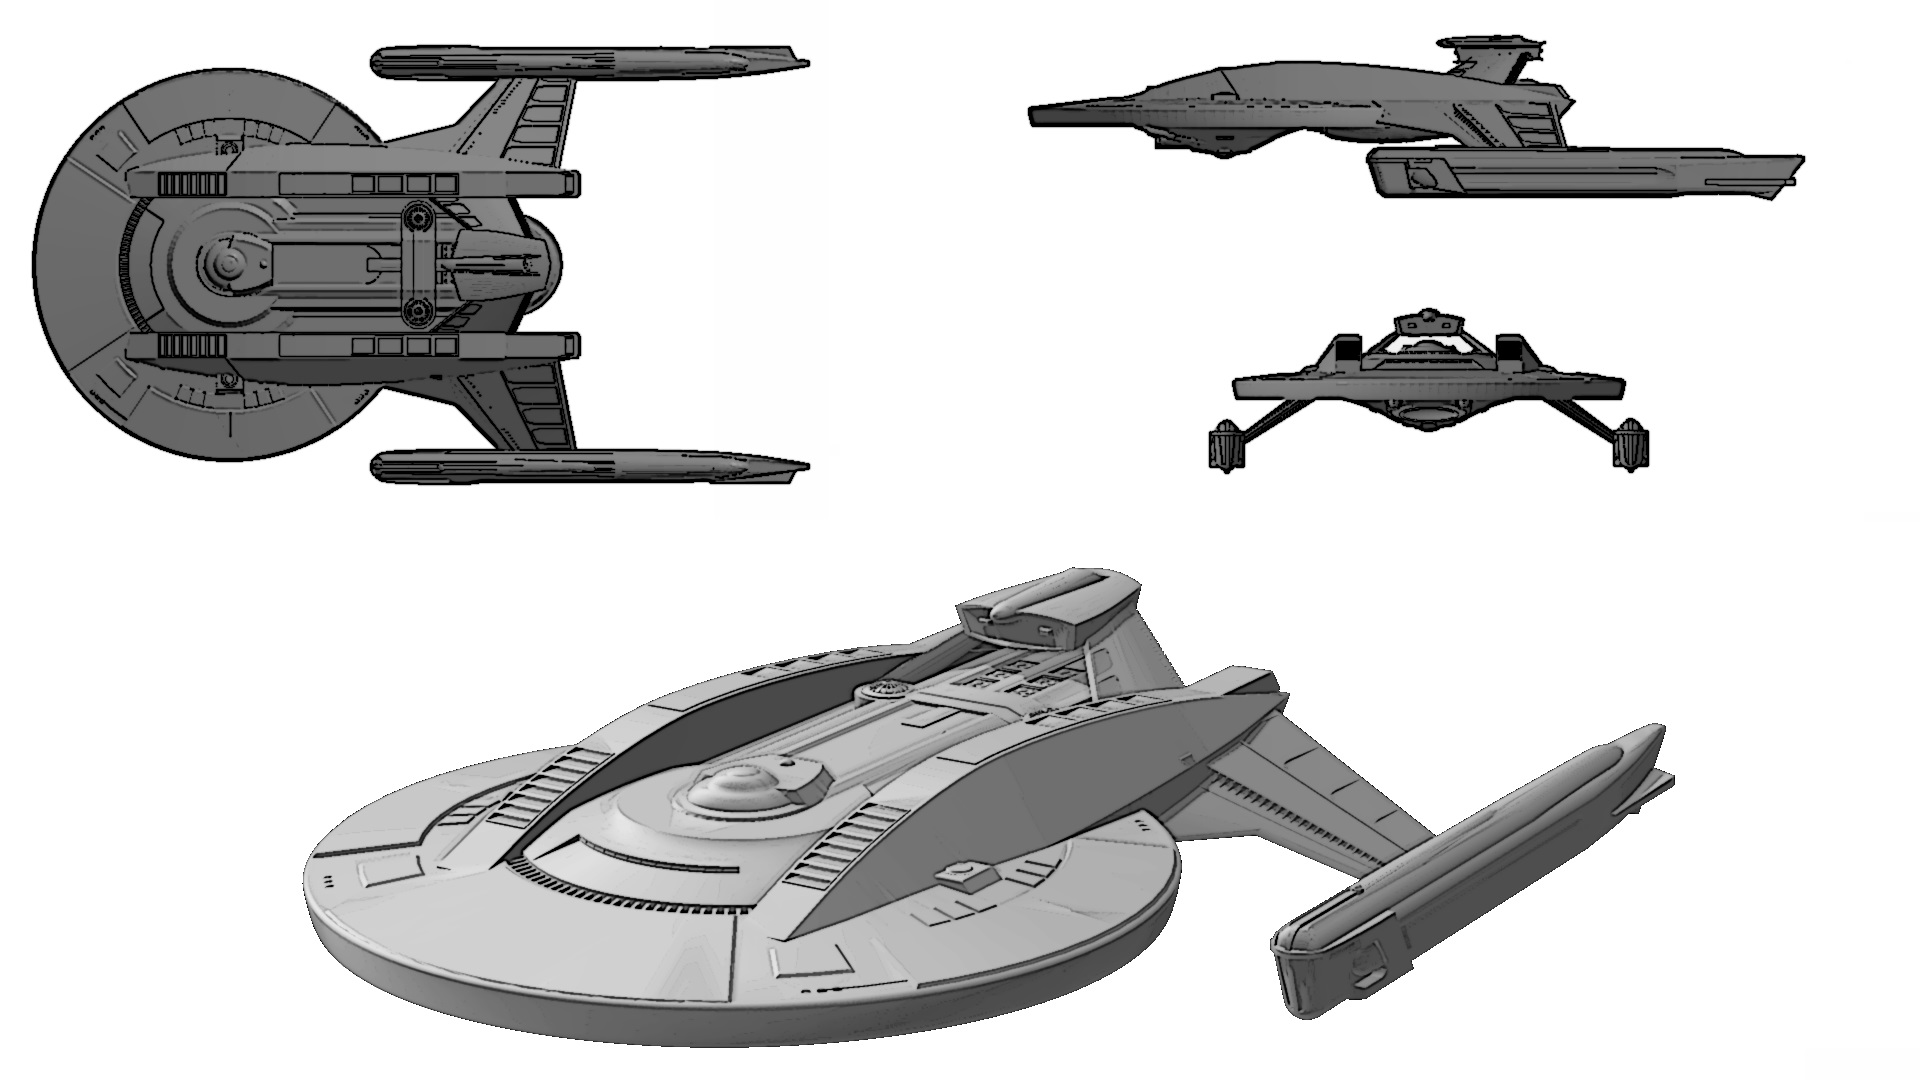
Well, I ran out of resin a while back and have been too lazy to reorder as of yet but that shouldn't be the case for long. Instead, I've been tweaking a whole bunch of kitbashed Star Trek ships in the meantime for potential 3d printing when I do get the restock. Starting out we have both an TMP and NX era version of the DISCO Malachowski ship. Next we have a TMP era Akira class conversion using another (this time non-canon) DISCO styled ship. And finally we have a TOS version of Bill Krause's Wasp physical model. Some of the pics are graphically filtered to look like the old FASA sheets since I intend to use them for that purpose whereas others are still mostly in their 3d mode view stylings. Once I finish the tweaks and put up a formal post along with links to download the models, I'll properly attribute the models' sources.
|
|
This message was edited 1 time. Last update was at 2020/10/04 22:12:17
|
|
|
|
|
2020/10/05 22:48:12
Subject: Adventures of a 3D printing n00b (Cyberpunk Orc in Nanosuit, Borg, and Sith Stalker)
|
|
Dashing Super Valkyrie Flying Ace
|
Those look pretty spiffy. Thinking about printing them?
|
|
|
|
|
2020/10/06 11:52:57
Subject: Adventures of a 3D printing n00b (Cyberpunk Orc in Nanosuit, Borg, and Sith Stalker)
|
|
The New Miss Macross!
|
Thanks and eventually. I paint at a glacial pace and my 3d printed backlog has grown significantly. Additionally I'm out of both resin and clean alcohol with little to no chance of getting more of the latter.
|
|
|
|
|
2020/10/06 12:30:12
Subject: Adventures of a 3D printing n00b (Star Trek ships 3d models)
|
|
[DCM]
Dankhold Troggoth
|
I can't find clean isopropyl alcohol anywhere! So frustrating...
I added some spoiler tags to wide images above so this thread is now very readable on mobile, hopefully that's okay (I believe it's high on Lego's fix list).
What program are you using to edit the Star Trek ships?
|
|
|
|
|
2020/10/06 14:31:53
Subject: Adventures of a 3D printing n00b (Star Trek ships 3d models)
|
|
The New Miss Macross!
|
No worries about the edits. I usually don't do that unless I have different sized pictures in the same post as every browser I use auto-resizes them to fit. It's only an issue when there are small and extra large pics in the same post and only then for me the scroll bars appear in browser.
Yeah, getting high percentage isopropyl alcohol is difficult. The strongest I've seen since March was 70% hand sanitizer gel and am I'm not sure I want to use that, lol. I wish I had stocked up back in January but only bought one bottle at that time. I've been reusing mine after curing and filtering it but my used supply gummed up. I kept it in a pickle jar (no Orville jokes please!) and apparently the alcohol with dissolved resin got into the lid thread and I couldn't open it desite multiple attempts including grip pads. My usual old wives tale technique of lightly banging it on the floor circumferentially around the lid to loosen it (works every time!) isn't a smart choice with toxic chemicals inside. I've never had a jar break ever doing that in 35+ years; I'm willing to take the risk with contents like salsa and pickle juice inside but not dissolved resin. I had to dispose of my excess unfortunately.
As for the programs that I use, I'm a total noob (hence the thread title) and likely do things the difficult way with the digital equivalent of walking uphill both ways when tweaking models. I don't have any modern formal training in 3d modelling so it's been more of a trial and error thing. I use mainly 3d builder (packaged with windows 10), meshmixer (free), and 3ds Max and Netfabb trial versions. I'm pretty sure that I could do most of the stuff in Blender but I've never been able to figure out that program and find its interface very unintuitive. It's powerful though since alot of people use it to create models that I download but I only occasionally use it for converting files to STL that I can't import in the other programs.
|
|
This message was edited 2 times. Last update was at 2020/10/06 14:36:56
|
|
|
|
|
2020/10/08 17:19:26
Subject: Adventures of a 3D printing n00b (Star Trek ships 3d models)
|
|
Inspiring SDF-1 Bridge Officer
|
|
It never ends well |
|
|
|
|
2020/10/08 17:42:43
Subject: Re:Adventures of a 3D printing n00b (Star Trek ships 3d models)
|
|
The New Miss Macross!
|
Thanks and I'll take a look at the supply. I'm not as prolific a printer and painter as some *cough*Albertorius*cough* but I do enjoy virtual kitbashing nonetheless. I've already put up two ships on my sig linked blog (my FASA D-10 update and Lower Decks Cerritos TMP variant) but I do plan on sharing those above assuming I can get the permission. So far, two of the creators of various parts didn't respond back and they weren't released under an obvious Creative Commons license.
|
|
|
|
|
|
|