| Author |
Message |
 |
|
|
|
|
Advert
|
Forum adverts like this one are shown to any user who is not logged in. Join us by filling out a tiny 3 field form and you will get your own, free, dakka user account which gives a good range of benefits to you:
- No adverts like this in the forums anymore.
- Times and dates in your local timezone.
- Full tracking of what you have read so you can skip to your first unread post, easily see what has changed since you last logged in, and easily see what is new at a glance.
- Email notifications for threads you want to watch closely.
- Being a part of the oldest wargaming community on the net.
If you are already a member then feel free to login now. |
|
 |
2020/03/12 23:57:56
Subject: Toxic Canal Sections
|
|

Crazed Spirit of the Defiler
|
For once I actually thought to take in-progress photos of one of my projects so I thought I might share this as a form of tutorial with you if that’s cool. It’s not terribly complicated but to be honest I struggled to find much in the way of guidance for using epoxy resin and felt a little apprehensive going in.
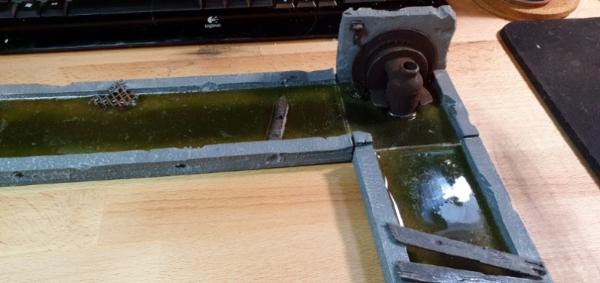
I wanted to create straight canals to give a little variation to my city terrain for use with 40k and Necromunda, obviously if you wanted more natural curves you could do that. I used 12” cork tiles as the base, in hindsight I think cork tile was a little too susceptible to warping and would use a stronger material if I did it again. I cut a single tile into 4no 12” x 3” straight sections and then cut a 3” square from another bit of scrap I had. I thought about doing more but I figured this would be enough to either go the width of a 4x6 table or section off a corner and to be honest I don’t envision ever really needing any other combinations.
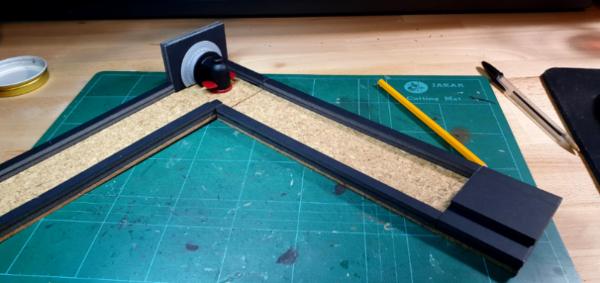
The sides of the canals were made from 1cm wide strips of foamboard stuck in place with wood glue, the corner piece I used two 3” squares of foamboard to build a wall to mount the ‘pump’ against. The pump is actually the plastic spout from a very classy 3 litre box of red wine which was then consumed as fuel over the course of this late night project!
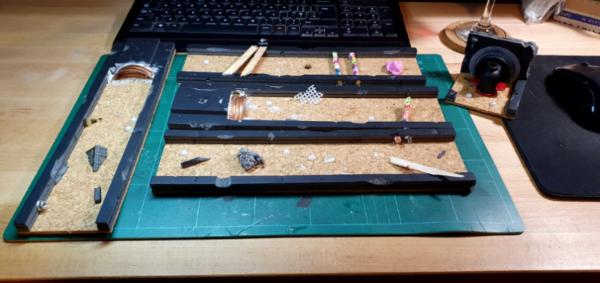
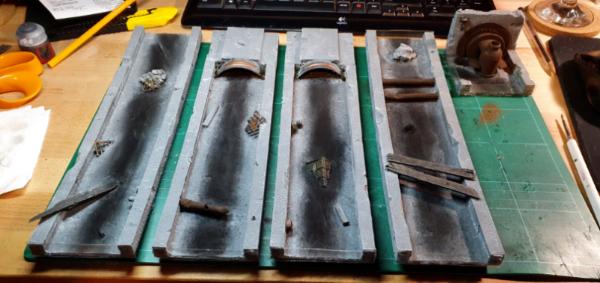
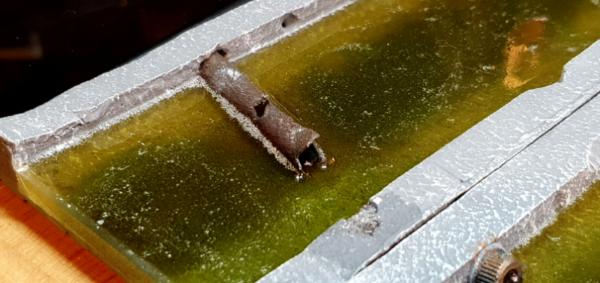
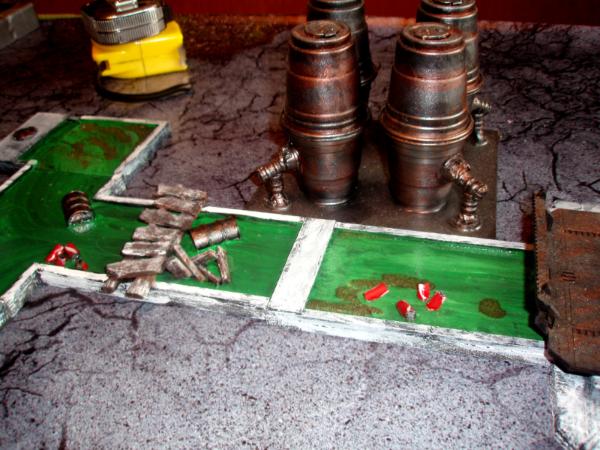
I blocked up an end of two of the canal sections and used a cut down jam jar lid as a tunnel entrance. This was stuck with No More Nails, I also at this point added some details and bits of rubble, pipes etc
I coated all of the foamboard with a roughly spread and stippled mix of easi-fill plaster, PVA and water. This gives the foamboard a little texture and also helps to seal the foam from being eaten by paint.
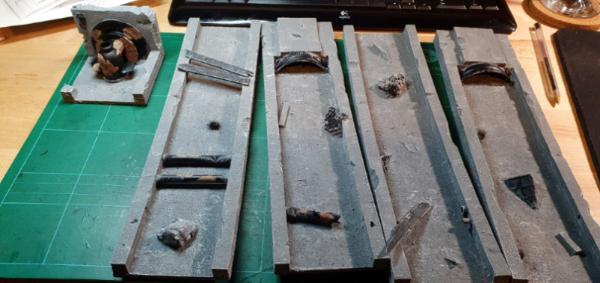
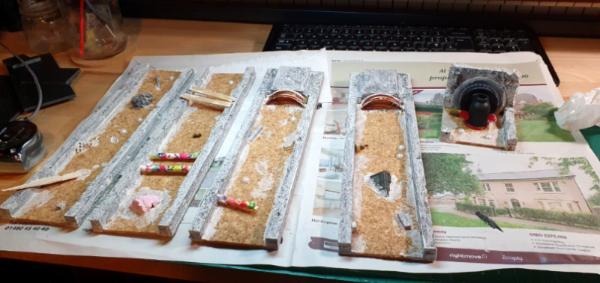
I then primed all the little detail bits with a quick blast of chaos black, all the concrete got a coat of suitable grey emulsion then drybrushed with a large makeup brush and a very light grey emulsion. I also added a little Agrellan Earth texture paint to some of the metal I planned to look rusty. I should have clamped it all down while it dried because unfortunately it warped. A little annoying but I was reasonably confident I could fix that at the resin stage
I painted up the rest of the detail bits, hitting the tunnel entrances with Balthasar Gold, then Nuln Oil, then Nihilakh Oxide. The rusted metal is simply drowned with Typhus Corrosion drybrushed with Ryza Rust then very light highlighting with Leadbelcher. I then roughly sponged some black paint down the centre of the canals to try to create a bit of depth and add to the grime. Finally I cut some clear plastic packaging up and using a glue gun dammed up all the open ends. I could have made a better seal, I should maybe have used silicone sealant but you don’t need to worry too much about leaks.
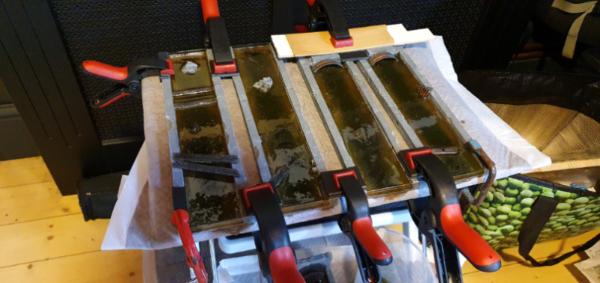
It was now time to pour the epoxy resin! I was pretty nervous about this because I had visions of me destroying all the work I had done up to this point. The epoxy resin I used I got from Amazon for £23 https://www.amazon.co.uk/gp/product/B07MZY846G/ref=ppx_yo_dt_b_asin_title_o01_s00?ie=UTF8&th=1. I clamped the pieces to a sheet of wood covered in a puppy pad (because I wanted the wood for something else) in the hope the resin would dry and fix the warping.
So here’s a weird thing, I had bought some green food colouring to dye the resin. After mixing it all up I added a couple of drops and it immediately went orange! I thought it was a disaster but in desperation I tried putting a dash of GW Biel-Tan Green wash and thankfully that brought it back to green. I think the bit of orange actually gave the final colour a bit more murkiness but I’d recommend testing what you mix in! Weird science…
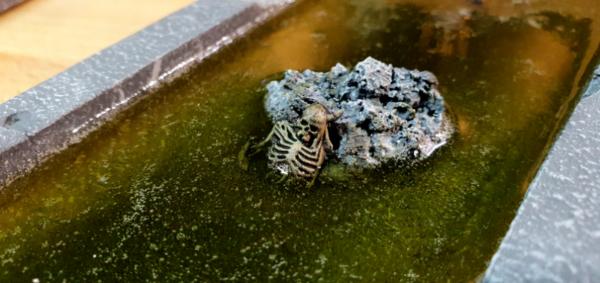
Anyway, I recommend pouring very slowly down the centres and let the resin find it’s level. Even if its not filling an area, poor it in the centre and let it work into the corners by itself. I left it like this overnight, bubbles quickly formed on the top which I read you can get rid of buy gently heating the epoxy with a hair dryer after an hour or so of curing time. I was planning to do that but then got an offer to go to the pub so I sacked it off. I think for toxic slime canals a few bubbles just add to the finish!
The next day i had to cut away some of the resin that had leaked and been absorbed by the puppy pad. Putting it on some plastic sheeting would probably have been better. I carefully ripped off the plastic dams but in reality i should have just not painted the ends to start with as they needed a complete repaint. The resin had also lipped up a little where it met the dams so i sliced off the lip with a stanley knife and sanded it with some wet & dry sandpaper.


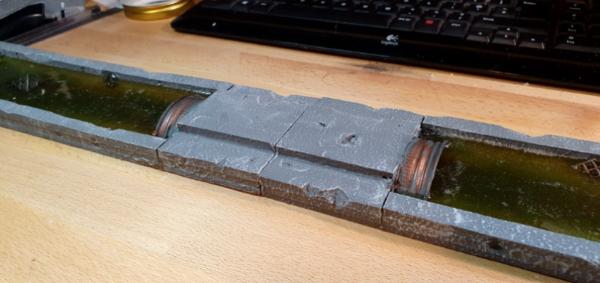
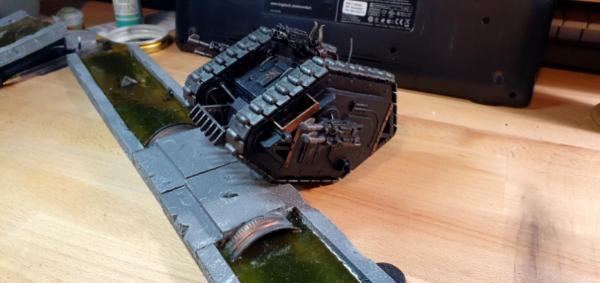
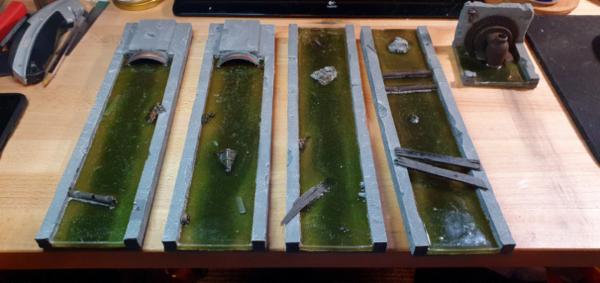
So a really simple bit of terrain that I hope will add a bit of colour and interest to my predominantly grey and rusty city terrain. The 12” lengths should work well with my 1ft square foam risers the canals can either have high walls or run along in the open. I might add some pictures with the risers at some point if anyone is interested.
My Instagram if you'd like to see what else I'm up to!
I hope this was of some use to somebody! Thanks.
|
|
This message was edited 1 time. Last update was at 2020/03/12 23:58:16
|
|
|
 |
|
2020/03/13 01:20:40
Subject: Toxic Canal Sections
|
|

[MOD]
Making Stuff
|
This looks great! Very similar to a project I've been meaning to get to for some time now...
|
|
|
|
|
|
2020/03/14 03:35:29
Subject: Re:Toxic Canal Sections
|
|
Regular Dakkanaut
|
I used to work for a pattern maker, and have used quite a few different types of resin professionally. That's actually criminally expensive for two part epoxy. Jesus Christ. I bet it's poor quality too, like most Art resins. They're all a rip-off and I doubt very much how UV stable it is, not that this should matter for your purposes.
I recommend this stuff, if you can get it. I can tell you for a fact it is used in commercial boat building here in Australia. There are harder clearer resins, but they are not safe and should never be used without professionals respirators.
https://www.ebay.com.au/itm/EPOXY-RESIN-Ultra-CLEAR-Casting-2-1-3-Ltr-kit-UV-Platinum/133358228822?hash=item1f0cc51556:g:6iUAAOSw5cNYFEwU
Here's a tip: Adding coloured chalk to epoxy makes it insanely hard, and will not effect how it sets.I've never seen anyone in this hobby do this, old trade secret I guess. If you want to colour epoxy resin, I would recommend using this over dyes, assuming you don't want a clear effect. You will have to find some way to powderize it however.
Alternatively glow powders work well with epoxies. There's a company that produces screw-on dispensing caps, which will mean you won't need multiple cups and digital scales when mixing. West systems or something, it's been a while, I forget.
Also, you mixed it too fast, which is why you've got little bubbles that cause foaming. Stir it very slowly; the more you agitate it, the more bubbling you will get. Really you only want to mix it past the point of threading. It's not egg whites; slow is better than fast. Getting some bubbling is unavoidable unless you de-gas it first, and if you intend to sell terrain like this, a de-gasing chamber will be a worthwhile investment. Don't be surprised if the resin peels of that base down the track, either. It probably will, you shouldn't apply resins over painted surfaces.
Edit: I forgot to say they look Great!
|
|
This message was edited 6 times. Last update was at 2020/03/14 04:02:40
|
|
|
|
|
2020/03/14 20:50:31
Subject: Toxic Canal Sections
|
|
Crazed Spirit of the Defiler
|
Oh wow, thank you for the advice! I feel a bit bad now as this was meant to a be tutorial of sorts and I've basically just given loads of bad advice! I knew i wasn't proficient enough for this!
I figured the stuff i bought was better than paying through the nose for the scenic hobby kits but didn't realise it would be poor quality. I also liked the fact it didn't stink as my floor layer sometimes uses epoxy for garage floors and it's horrible stuff!
I think to be honest I only wanted a small amount and for toxic slime I would think the quality shouldn't matter too much but I will bear that in mind if I ever want to do a larger clear water project.
And you're right, I did mix it like I was beating eggs, especially after I started to panic when it went orange!
|
|
|
|
|
|
2020/03/14 22:37:02
Subject: Toxic Canal Sections
|
|

Regular Dakkanaut
|
Abaddon303 wrote:Oh wow, thank you for the advice! I feel a bit bad now as this was meant to a be tutorial of sorts and I've basically just given loads of bad advice! I knew i wasn't proficient enough for this!
I figured the stuff i bought was better than paying through the nose for the scenic hobby kits but didn't realise it would be poor quality. I also liked the fact it didn't stink as my floor layer sometimes uses epoxy for garage floors and it's horrible stuff!
I think to be honest I only wanted a small amount and for toxic slime I would think the quality shouldn't matter too much but I will bear that in mind if I ever want to do a larger clear water project.
And you're right, I did mix it like I was beating eggs, especially after I started to panic when it went orange!
It should be fine, you can't really hurt yourself with high ratio epoxies unless you drink it or get it in your eyes. It's definitely weird that it turned orange though, no idea what that's about. The polyester resins which are the old class they used to use in boat building etc is super dangerous and will give you brain damage if you're not careful--literally. I cannot believe you are ;egally allowed to buy them over the counter.
Keep using it, it's great stuff. But I do recommend buying the stuff I linked for cost-effectiveness and quality, if you can get it. Art supply epoxies are a gouge.
|
|
|
|
|
2020/03/16 08:57:04
Subject: Toxic Canal Sections
|
|
Thane of Dol Guldur
|
If youre not supposed to apply resin over painted surfaces, what about all the model dioramas and such that do? do you need to apply an intermediate layer of some sort between?
|
  Heresy World Eaters/Emperors Children Heresy World Eaters/Emperors Children 
Instagram: nagrakali_love_songs |
|
|
|
|
2020/03/17 23:21:19
Subject: Toxic Canal Sections
|
|
Regular Dakkanaut
|
 queen_annes_revenge wrote: queen_annes_revenge wrote:If youre not supposed to apply resin over painted surfaces, what about all the model dioramas and such that do? do you need to apply an intermediate layer of some sort between?
I'd need to see it done and what they're using. It might not be epoxy.
What you can do with epoxies is pour it over paper or cardboard. That should include printed paper. Because it isn't water, it won't damage it.
|
|
|
|
|
2020/03/17 23:26:42
Subject: Re:Toxic Canal Sections
|
|

Longtime Dakkanaut
|
This is great and thank you for sharing. Any information on epoxy and water effect is really appreciated. I love your curbing. The damage to the "concrete" is really nice. And the lid idea for pipes, brilliant.
I did similar canals. To avoid the warping I really recommend using any brand of fake wood floor. You know, the click together types (I had some scraps from a project). They do not warp, are easy to cut, and glue etc. I wish I had done a thicker water effect. I used a brush on and it's just OK. Yours looks far better. Deeper if that makes sense.
Here is a simple picture. It was easy to cut to shape with a jig saw. The curbing is balsa wood strips bought in packs. I made mine modular with the little walk across at each junction.
Edited for clarity
|
|
This message was edited 2 times. Last update was at 2020/03/17 23:33:11
Keeping the hobby side alive!
I never forget the Dakka unit scale is binary: Units are either OP or Garbage. |
|
|
|
|
2020/03/17 23:31:16
Subject: Re:Toxic Canal Sections
|
|
Last Remaining Whole C'Tan
|
While I know you weren't intending to get the air bubbles in there, I think they actually look pretty good with how it came out. It gives it more character than just serene, green water would do.
Roberts84 wrote:Here's a tip: Adding coloured chalk to epoxy makes it insanely hard, and will not effect how it sets.I've never seen anyone in this hobby do this, old trade secret I guess. If you want to colour epoxy resin, I would recommend using this over dyes, assuming you don't want a clear effect. You will have to find some way to powderize it however.
Thanks for posting this. As you say, I've never heard that before; I look forward to trying it out.
|
 lord_blackfang wrote: lord_blackfang wrote:Respect to the guy who subscribed just to post a massive ASCII dong in the chat and immediately get banned.
 Flinty wrote: Flinty wrote:The benefit of slate is that its.actually a.rock with rock like properties. The downside is that it's a rock
|
|
|
|
|
2020/03/18 00:00:45
Subject: Re:Toxic Canal Sections
|
|
Regular Dakkanaut
|
No problem.
The way I've written that makes it sound as if I'm trashing dyes, and I'm definitely not. For Hobby stuff they're also going to be excellent. But you have to make sure you get the ratios right, otherwise you'll end up with rubber.
Best bit of a kit you'll buy is a set of digital scales. Mix Epoxy by weight and you can't go wrong. Tare off the cups, voila--perfecto.
You can buy dyes for a pittance, really. They do work. You could do some really cool gak with UV reactive glow powders and UV LEDS, too.
https://www.ebay.com.au/i/352638358161?chn=ps&norover=1&mkevt=1&mkrid=705-139619-5960-0&mkcid=2&itemid=352638358161&targetid=833201259820&device=c&mktype=pla&googleloc=9068965&poi=&campaignid=7408627107&mkgroupid=86410135848&rlsatarget=pla-833201259820&abcId=1139226&merchantid=7364522&gclid=EAIaIQobChMI8Krc1dui6AIVVRyPCh3J5QKvEAkYBCABEgJkFPD_BwE
A few other things:
a) don't sand epoxy. Do this and you're creating something that is about as bad as asbestos.
b) cover it while it sets with something that prevents dust sticking to it--this should be netting, not a closes cover. which will trap gasses Literally any ambient particulants around will stick to it, creating a less glossy finish or a dusty/silvery look.
c) you can pour epoxy over LEDS, it is not conductive. I recommend LED strips. preferably RC. Make yourself an LED gaming table if you like. A monkey could do it, seriously. People have used it this way to create all kinds of effects.
https://www.youtube.com/watch?v=IHWTw1LT0Hk
d) Epoxy doesn't like humidity. Sunny and dry conditions will make it set faster, and better. Don't ever pour it on a rainy day.
e) Finally, to get a glass finish, you really need to de-gas it. You can do this with a decomnpression chamber, or you can do what pretty much everyone without one does--and that's by strafing it with a gas blow torch. this causes the epoxy to heat and release gss bubbles. Be careful when doing this, and always do it in a well ventilated area. It does make a massive difference though, and can be achieved with something as simple as a jet lighter.
|
|
This message was edited 5 times. Last update was at 2020/03/18 00:29:53
|
|
|
|
|
2020/03/18 01:41:25
Subject: Re:Toxic Canal Sections
|
|
Last Remaining Whole C'Tan
|
I personally use a pressure pot and it works relatively well. I crank it up to 50PSI. Of course, i am limited to things that fit in the pot. I doubt that will work for OP, they probably are too large.
I'd love to get a vacuum setup but I can never find a good price on a vacuum pump around here, and the pressure pot works well enough I can't bring myself to splurge.
|
|
This message was edited 2 times. Last update was at 2020/03/18 01:43:14
lord_blackfang wrote:Respect to the guy who subscribed just to post a massive ASCII dong in the chat and immediately get banned.
Flinty wrote:The benefit of slate is that its.actually a.rock with rock like properties. The downside is that it's a rock
|
|
|
|
|
2020/03/18 02:34:23
Subject: Re:Toxic Canal Sections
|
|
Regular Dakkanaut
|
 Ouze wrote: Ouze wrote:I personally use a pressure pot and it works relatively well. I crank it up to 50PSI. Of course, i am limited to things that fit in the pot. I doubt that will work for OP, they probably are too large.
I'd love to get a vacuum setup but I can never find a good price on a vacuum pump around here, and the pressure pot works well enough I can't bring myself to splurge.
Honestly that will work almost as well. Most of it comes down to not over-agitating it in the first place. There is a spray you can get which reduces the surface tension of the epoxy making it degas much better because the bubbles don't meniscus on the surface and kinda just pop, the name eludes me right now but it does work well.
There are UV cure clear resins that are amazing, but they are extremely rapid set, I'm talking total set in minutes. They are amazing but you gotta be quick. They are used for glossing surfboards quite a bit.
Main take away is don't buy Art Store epoxies, they're overpriced garbage. Call your local composites dealer and tell them you need something safe, clear, UV stable and hard that is a ratio mix and doesn't require a catalyst. It's cheap even here in Australia where everything is a gouge, in the states and UK you should be able to get buckets off quality resin on the cheap.
|
|
This message was edited 1 time. Last update was at 2020/03/18 02:38:54
|
|
|
|
|
2020/03/18 10:49:16
Subject: Toxic Canal Sections
|
|
Thane of Dol Guldur
|
So are most hobby resins not two part epoxy? I use resin from aK interactive and that comes in 2 parts.
I find the UV resin from GSW quite useful for small areas of water on dioramas and bases etc, but it often cures with a very light sticky residue. this usually isnt an issue as I apply ripple effect over the top and that cures dry, but it you want still pools it could be a pain.
|
Heresy World Eaters/Emperors Children
Instagram: nagrakali_love_songs |
|
|
|
|
2020/03/18 22:22:02
Subject: Toxic Canal Sections
|
|
Regular Dakkanaut
|
queen_annes_revenge wrote:So are most hobby resins not two part epoxy? I use resin from aK interactive and that comes in 2 parts.
I find the UV resin from GSW quite useful for small areas of water on dioramas and bases etc, but it often cures with a very light sticky residue. this usually isnt an issue as I apply ripple effect over the top and that cures dry, but it you want still pools it could be a pain.
It will be 2 part epoxy. The stickyness is going to be down to either your environment or being slightly out of ratio with the parts. Since you're in the UK, It's probably the former; it's water vapor collecting on the surface and causing a very thin layer of it not to set. Either that or it just sucks. You really want to buy resins from a composites store. They can tell you everything you need to know and will cut you a much, much better deal. You can get around the vapor problem pretty easily:
What you want is one of those old kerosene heaters. You know the ones that have the mesh dome thing that heats up? Yeah, those are great. This will create hot dry air, causing the epoxy to degas, and stopping moisture forming on the surface of the epoxy. As with everything, observe safety precautions. Set your curing epoxy up close enough so it benefits, not so close you'll start a fire.
Epoxies don't set that hard. You'll probably always be able to scratch them with your fingernail if you try hard enough. For really really hard sets you will require catalyst poly resins of some type. However they are dangerous, and complete overkill for Hobby use.
You know, you can actually mix powdered metals with epoxy, then polish them up and it looks exactly like solid metal.
https://www.youtube.com/watch?v=aJvm2Lb_u0k
It's called cold casting I believe. I've been toying with the idea of creating some molds and using them to create my own cold cast models. Not sure which yet.
|
|
This message was edited 4 times. Last update was at 2020/03/18 23:26:28
|
|
|
|
|
2020/03/19 10:17:15
Subject: Toxic Canal Sections
|
|
Thane of Dol Guldur
|
thats fair enough. to be fair, my resin use is never really going to be so much that I'd have to go that deep. scenic bases for my display models and golden demon entries is all I'd use it for. theyre not going to be handled, and most will have the ripple effect gel applied over the top anyway.
The UV resin is not a mix, it pours straight from the pot. so yeah probably the humidity in my house. I cured some in summer outside in the sunshine and didnt have that issue so it makes sense.
|
Heresy World Eaters/Emperors Children
Instagram: nagrakali_love_songs |
|
|
|
|
|
|
