Forum adverts like this one are shown to any user who is not logged in. Join us by filling out a tiny 3 field form and you will get your own, free, dakka user account which gives a good range of benefits to you:
No adverts like this in the forums anymore.
Times and dates in your local timezone.
Full tracking of what you have read so you can skip to your first unread post, easily see what has changed since you last logged in, and easily see what is new at a glance.
Email notifications for threads you want to watch closely.
Being a part of the oldest wargaming community on the net.
If you are already a member then feel free to login now.
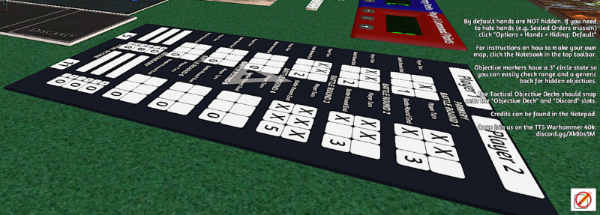
I've rediscovered TTS so I decided to do some picture batreps while stuck at home. I'll be posting them once a week with give a turn-by-turn synopsis and my thoughts on the lists.
I'm evolving my Aspect Warrior List and I pull opposition lists from the top 4 section of 40kstats.com here
Reports to follow.
Automatically Appended Next Post: Battle Report 1:
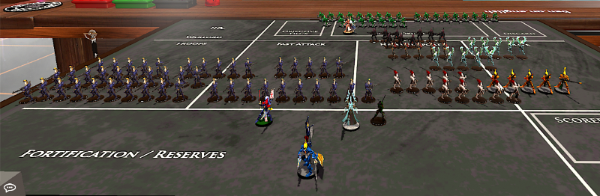
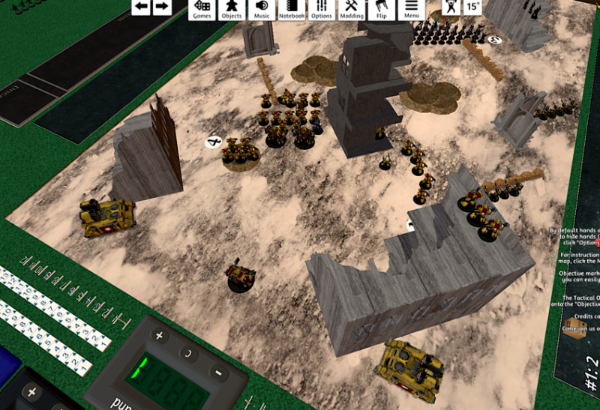
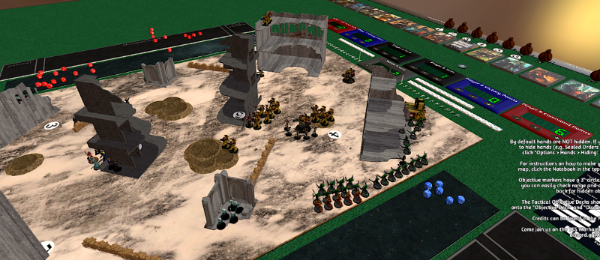
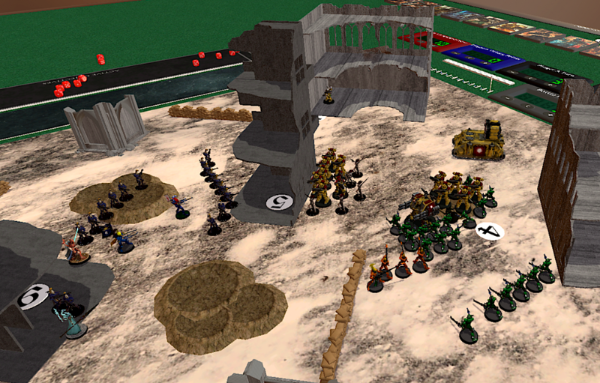
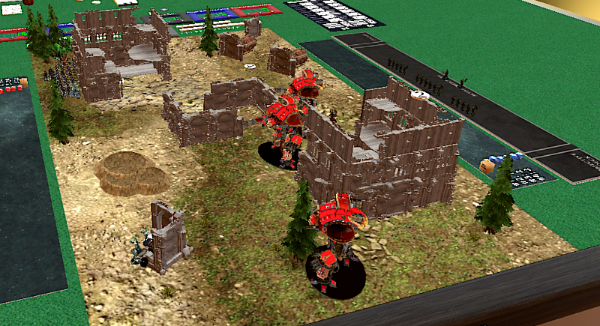
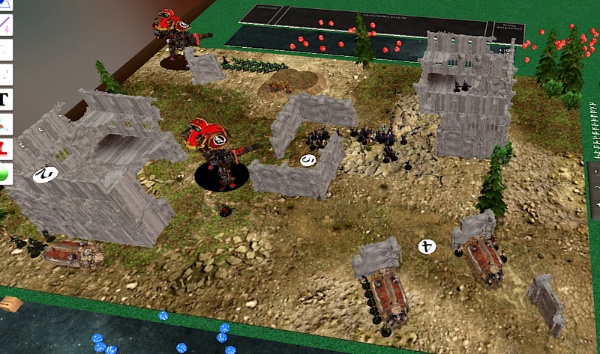
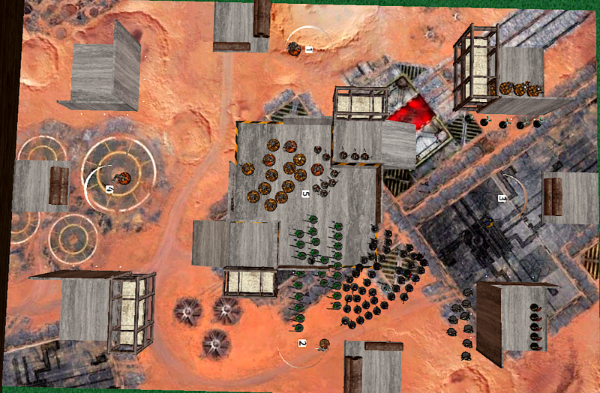
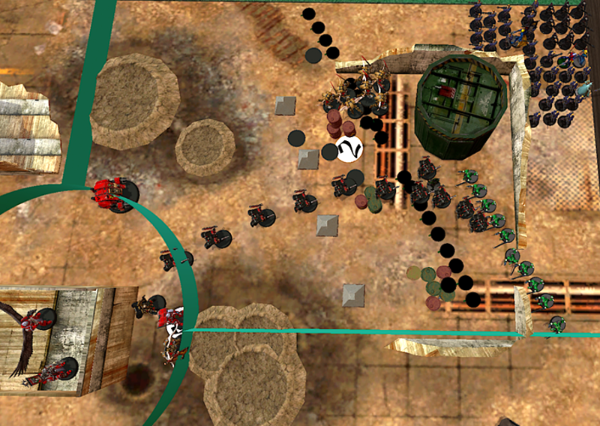
The Iron Hands won the roll off to go first and deployed aggressively. The Aggressors take point alongside the Intercessors in preparation to hold the middle of the table. The characters deploy nearby in support and the eliminators provide overwatch. The artillery stay out of line of sight and screened out the back of the deployment zone with one chaplain dread.
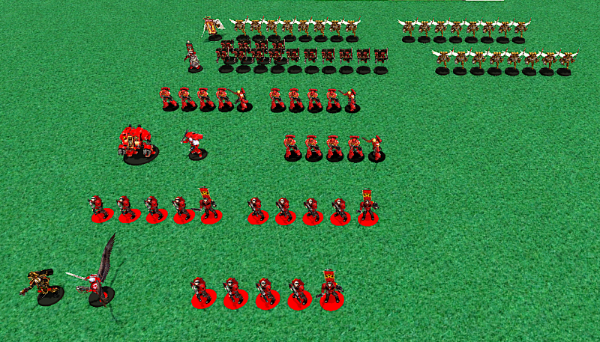
The Aeldari mirror the Astartes' deployment but take advantage of the center terrain piece to block line of sight to the main Intercessor group. Two of the small Dire Avenger units stayed back on objectives. The Swooping Hawks and Warp Spiders deployed far back awaiting to return into reserves. The Fire Dragons and one unit of Howling Banshees stayed in Webway Assault. The Striking Scorpions also wait in reserves for their opportunity to pounce.
Turn 1:
Spoiler:
The scouts infiltrate forward to catch my characters out in the open before they can put any buffs on my units. The snipers pick out the Farseer but between the Altaioc -1 to hit and slightly poor rolling, he only takes 3 wounds. The Eliminators are out of range so everything else goes into killing Dire Avengers. Surprisingly, the -1 to hit and 4++ save from most of the damage and only a few die.
The rest of the Iron Hands move into better positions in order to engage the Eldar warriors. The large pieces of terrain in the middle of the table are proving to be decisive.
The Eldar mow down most of the scouts, a few Intercessors and an Aggressor. A squad of Dire Avengers fire and fade forward to keep the pressure on. The Farseer doomed the Aggressors to set up the Howling Banshees later in the turn....
The Banshees make their charge (8" move + 3" advance + 11" charge) and killed an Aggressor. The lone Aggressor doesn't hit at all and the Banshees move on to tag the Librarian. With soulburst and some jammy rolls, the Banshees do 4 wounds to the Librarian in the next combat and remove him.
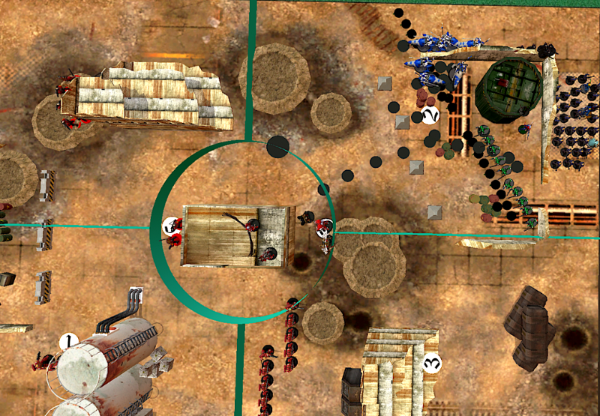
Turn 2:
Spoiler:
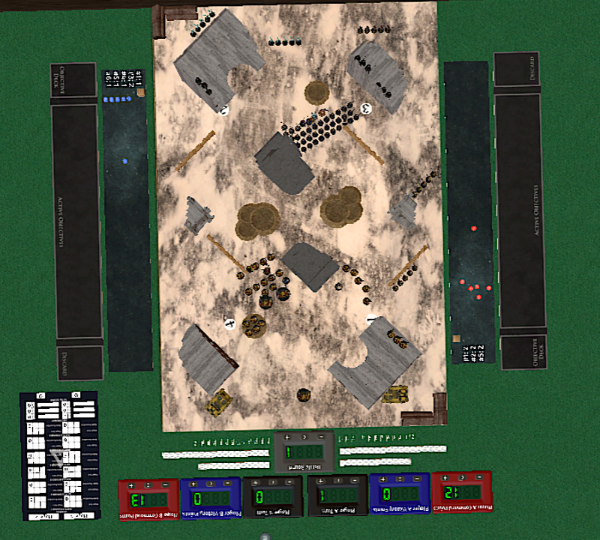
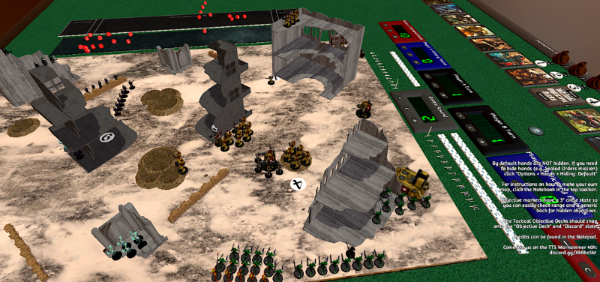
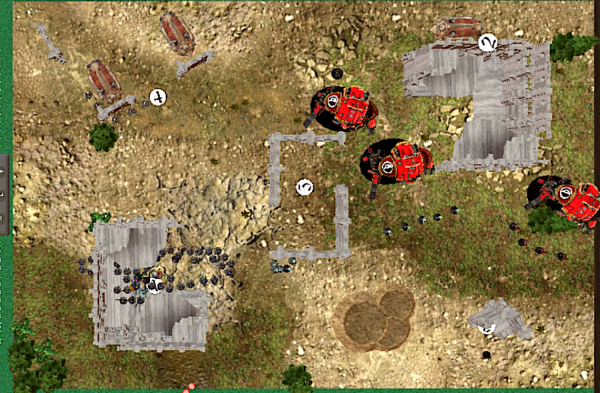
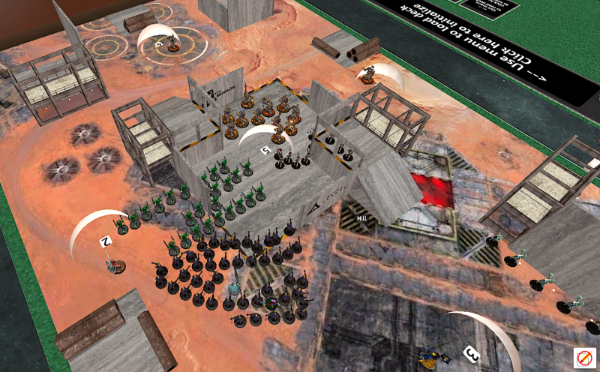
The high level photo shows the end of the Iron Hands' turn. The Intercessors are at roughly half strength already. The Relic Leviathan stomped around the corner of the building and leveled it's storm cannon array at the forward squad of Dire Avengers. 20 shots result in 14 failed 4++ saves and the squad vaporizes. No man's land has been restored.
Top of the Eldar turn 2 and the cavalry arrives.
The Fire Dragons blow the top off the Chaplain Dreadnought after the Farseer guides them. Only one unit of Striking Scorpions makes it's charge into the Scorpius. The Banshees trap the Leviathan but fail to do any damage.
The state of the game is pretty dire at this point for the Iron Hands. Banshees are tying up both the Leviathan and the large squad of Intercessors. The Eldar have lost about a quarter of the Dire Avengers but now are poised for a crushing blow with the Scorpions.
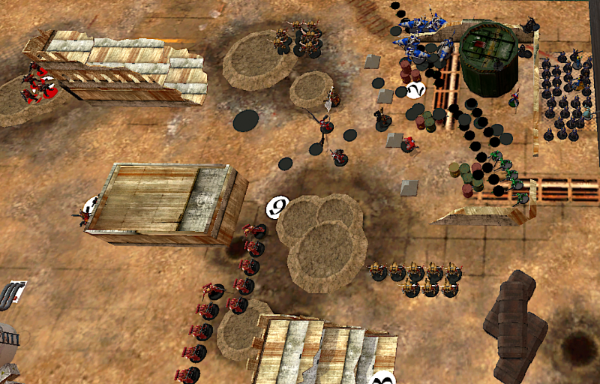
Turn 3:
Spoiler:
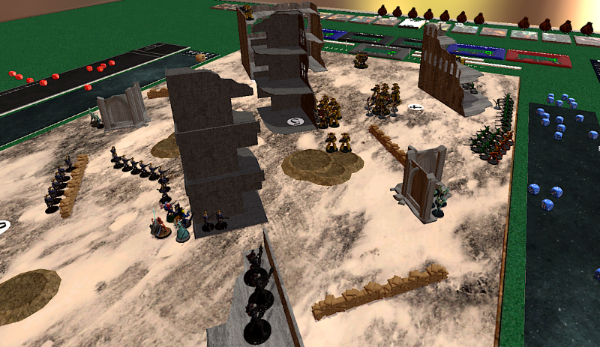
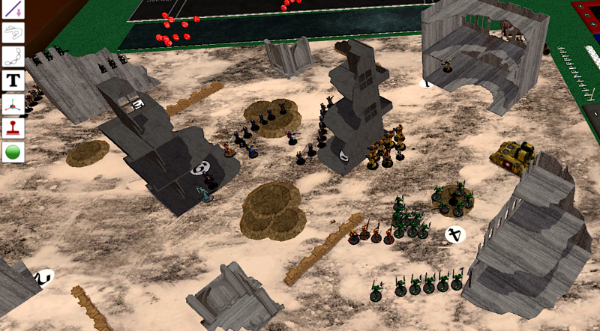
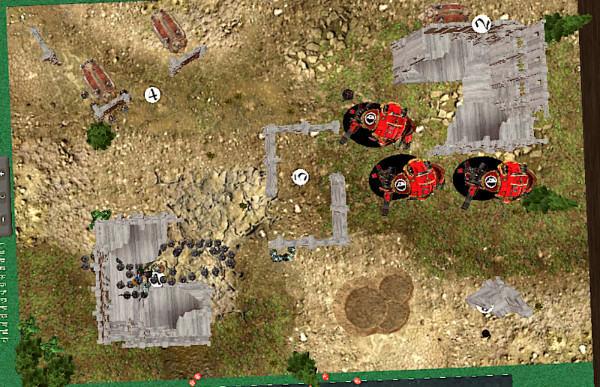
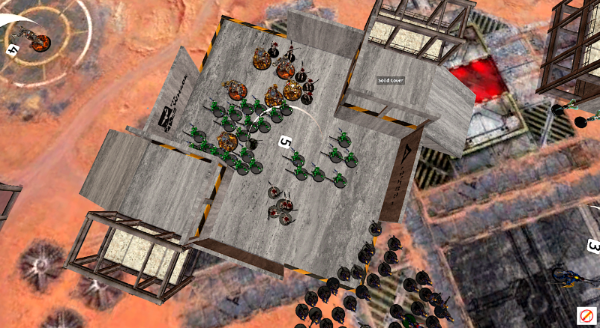
The Iron Hands fail to inflict much damage on the Eldar and this is what it looks like after the Eldar's movement phase. The Banshees fall back in order to use a stratagem to charge in and tie up more units. The Scorpius attempts to get away from the scrum descending upon the Iron Hands.
The Fire Dragons reduce the Leviathan to four wounds and shooting removes the Eliminators and all visible Intercessors. The noose tightens...
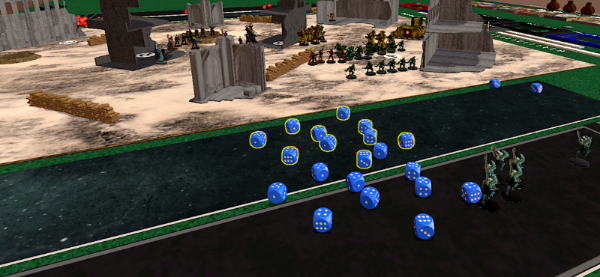
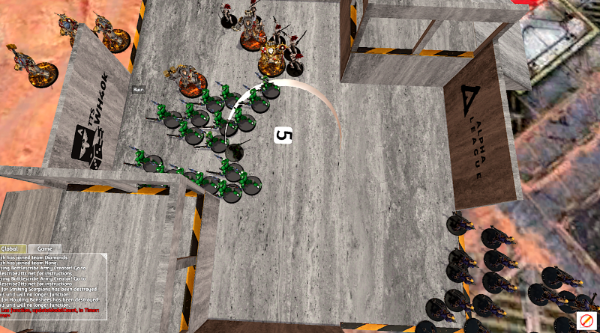
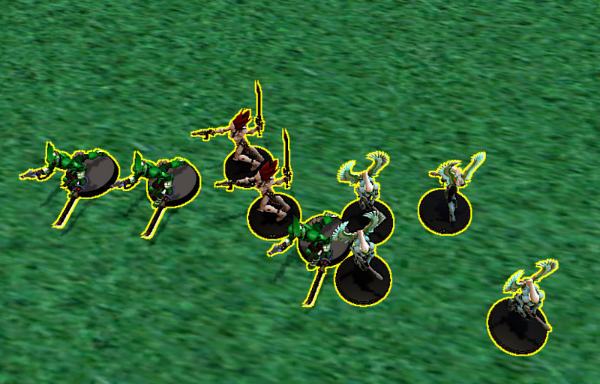
I took a screenshot to show the power of the Ynnari Scorpion combo. The highlighted dice are rolls of 4+ which explode into additional hits because of Karandras. The "un-highlighted" dice are me adding back in the additional hits. 5 guys get 10 attacks which luckily rolled all 4+'s I get it... that won't happen every time. But I essentially turned 5 Scorpions into 10...
Which was entirely necessary when I only get 8 wounding hits. In retrospect, Ynnari have a stratagem that gives you rerolls to wound. Perhaps I should use that in the future... but still, 5 Scorpions deal 8 wounds which is nice. Karandras and an Exarch finish the squad.
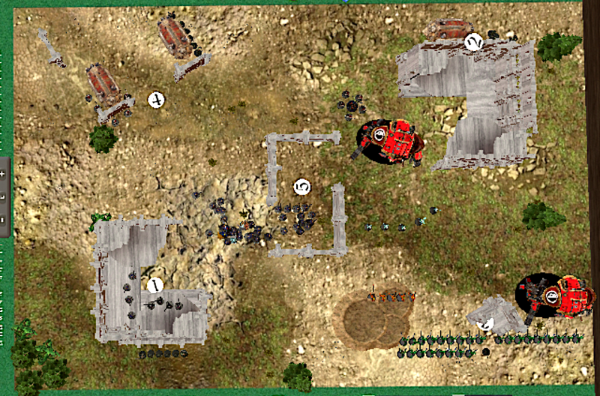
The Eldar now hold objective 4 and score the bonus point for the mission. With the last of the infantry tied up with Banshees and the remaining vehicles in a precarious position, the game ends.
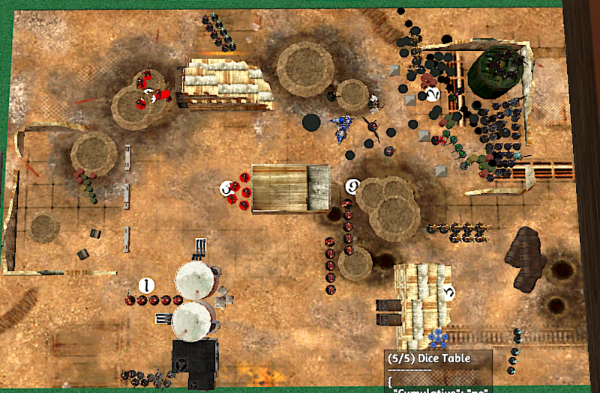
End of Game:
Spoiler:
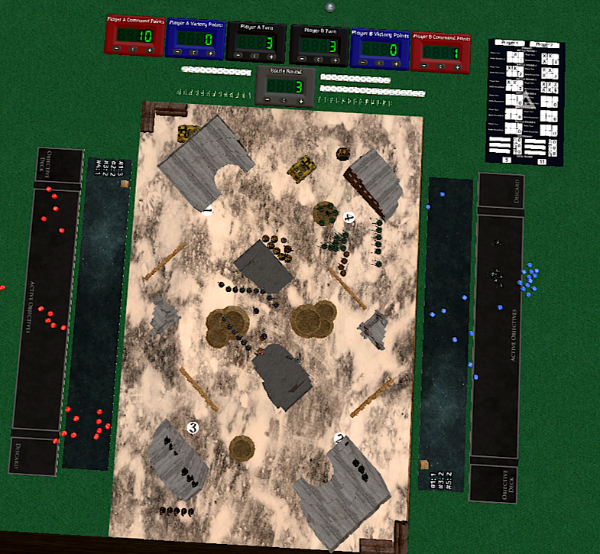
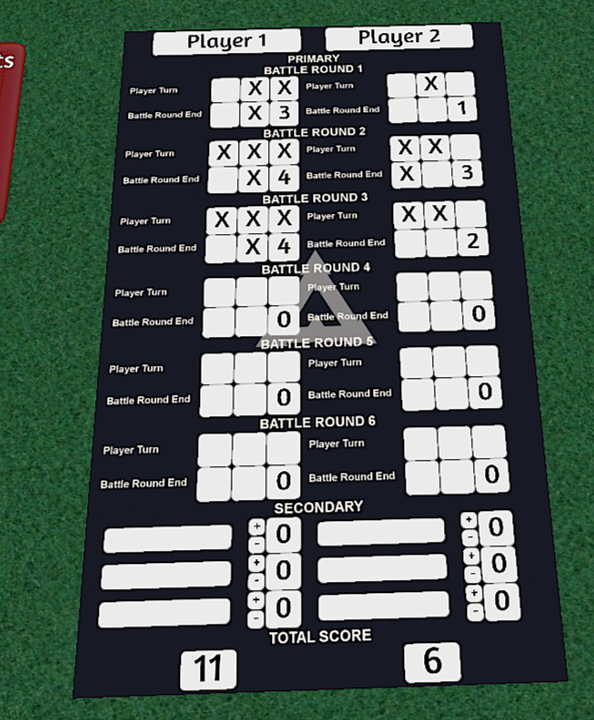
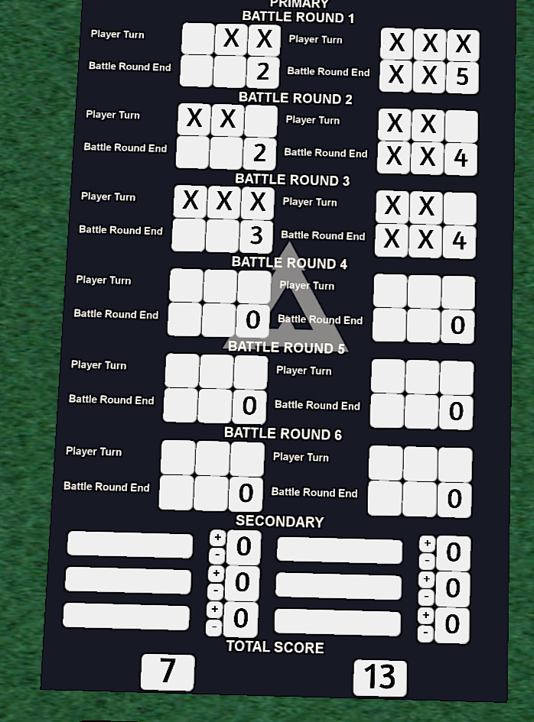
This is what the score sheet looks like. Essentially, we held 3 objectives each for 3 turns. The Iron Hands struggled to deal damage most of the game while the Eldar were able to at least kill one unit each turn. At the end of three, scoring 5 battle points was the tipping point from which the Iron Hands could not come back. I didn't chose secondaries for this game so I'll go back in a future post and calculate the score for each choice. If I do this for every batrep it should show me what secondaries this army tends to score without trying.
My thoughts on the lists.
Iron Hands
Spoiler:
The first thing I noticed was the lack of reroll auras. This list definitely won a GT so it must work but I really felt the loss of rerolling.
I likely didn't play this list to it's fullest. In the pictures, you'll see that I wasn't using CP for the IH list like I was for the Eldar. This comes from low experience with space marines and the fact that I haven't played many games of 8th.
The Intercessors were tough to take out. I felt like it was much easier for my dire avengers to kill them than it was for the dark reapers. The stalker bolt rifles are a meta choice and I personally feel that bolt rifles are better against my list. Most shots were bouncing off of invulnerable saves.
The leviathan was a beast and deleted at least one aspect warrior unit in the game. I was lucky to tie it up with banshees and trap it. It only has 2 attacks in close combat...
The sniper units were a huge threat and the infiltrating scouts nearly kill my farseer at the top of 1. I played them aggressively and it almost paid off. I had to reposition my entire main force to protect my characters and I spent a good deal of resources eliminating these scouts. In my opinion, scouts should be key board control units and sniper rifles allow you to offensively influence your opponent's character bubbles.
The relic scorpius things were not very good. Even firing them twice, they struggled to do much damage. I left them back to screen out the backfield which left them out of range of the dark reapers.
I've picked out a different list for my next game. This minimizes the new army to learn every game and allows me to step up my list against a similar opponent.
Asuryani
Spoiler:
I've spent a lot of time with the mathhammer app optimizing my choices and I felt like it came through in this game. That being said, I forced myself to take one of every aspect except for
Shadow spectres (FW), Shining Spears (bikes), and crimson hunters (vehicle). I also forced myself to stay foot. This are stylist choices and I want to see how good I can be within the theme.
Dire Avenger "Phalanx"
The dire avenger is the most efficient unit I can find in the codex. With rerolls of 1 to hit and to wound from the Autarch/Farseer combo, they punch above their weight class. Bladestorm from the Exarchs drives this even higher. -1 to hit (additional -1 from lightning reflexes if necessary) and the 4++ makes them tough to kill. In a game where pretty much every shot hits and wounds, 4++ is all you can rely on other than hiding out of line of sight.
Characters
The Visarch didn't do anything all game other than unlock the Ynnari detachment... 80 points, oh well. The Farseer/Autarch/Asurmen combo is vital to this list I think. The psychic powers didn't help me that much, to be honest. Guide and Doom never really caused a big swing. This list is designed around having "more" rather than "more likely." The Autarch's fearless bubble also prevented losses to morale. In future games, I'll need to find a better way to protect against snipers.
Scorpion Star
These guys hit a lot... but do little else. I love close combat and it was dramatic when they arrived but there are likely more efficient choices. I actually like Scorpions as a screen because 1) they're cheap 2) they have a 3+ save (2+ in cover) and 3) they can be -2 to hit from Alaitoc and the Stalker power. They are blenders they can actually do well in close combat against some enemies. The mandiblasters trigger at the beginning of the fight phase which may sneak some mortal wounds through before the enemy can strike.
Hawks/Spiders
The Swooping Hawks were great at killing scouts. 20 shots from 5 guys for 72 points? Awesome! I never had a reason to move the spiders... but they were just back up. I wish I had used them just so I could have some data on how they do in game rather than just theory crafting.
Dark reapers
These guys killed several models during the game but I expected them to do so much more... Don't get me wrong, I needed their extra fire power to kill off the scout units and they downed the Eliminators but I guess I thought they'd do more. I see them as counter battery fire at this point instead of a primary damage dealer.
Overall
I'm not going to change this list for at least 3 games I think. I'll play against a wildly different list next to see how it handles a different faction.
This message was edited 25 times. Last update was at 2020/04/13 13:28:58
As an exercise, I calculated how many points the Eldar and the Iron Hands would have scored in each of the secondaries. My thought is that if I do this for every battle report, I can see which secondaries I tend to score high on with the Eldar and which my opponents score high against me. I also see how match up changes my scores.
Eldar:
Spoiler:
Old School: 4
Headhunter: 4
Born for Greatness: 0
Marked for Death: 4
Gang Busters: NA
Big Game Hunters: 4
Butcher's Bill: 4
The Reaper: 3
Recon: 4
Behind Enemy Lines: 4
Ground Control: 4
King of the Hill: 4
Engineers: Undetermined
Sappers: Undetermined
The Postman: Undetermined
Iron Hands:
Spoiler:
Old School: 0
Headhunter: 0
Born for Greatness: 0
Marked for Death: 4
Gang Busters: NA
Big Game Hunters: NA
Butcher's Bill: 0
The Reaper: 1
Recon: 0
Behind Enemy Lines: 0
Ground Control: 0
King of the Hill: 1
Engineers: Undetermined (assume 4)
Sappers: Undetermined
The Postman: Undetermined
Engineers, Sappers, and Postman would require significant changes to gameplay. It's hard to simply play your best game then go back and see how you scored on those three objectives. You have to actively pursue them. That being said, Engineers could be an interesting option if you build your list for it as it could force your opponent to waste resources killing units that aren't threatening them. If no one ever shoots your Engineers, they're easy points.
If I could go back in time and pick the secondaries, I would have chosen the following:
Eldar:
Marked for Death
Recon
King of the Hill
Iron Hands:
Marked for Death
The Reaper
Engineers
This brings the score at the end of turn three to:
Eldar: 23
Iron Hands: 14
Be watching for the next game in the Battle Report Series verses a very different list!
This message was edited 3 times. Last update was at 2020/04/16 13:50:39
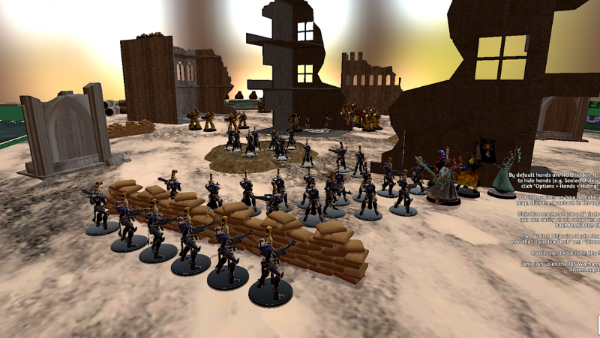
Mission: Precious Cargo
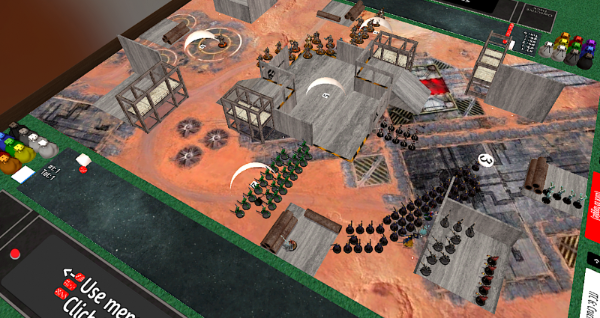
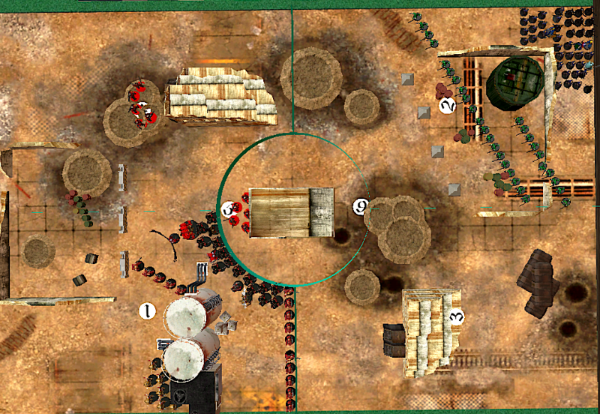
The Knights win the roll off and chose the side with more terrain. Notably, there were two “Skorpius-Shaped” pieces of terrain near OBJ 3. OBJ 2 and 6 were declared the prioritiy objectives and were moved back towards the table edges.
The Knights need more room to maneuver so they each took a lane initially. They can’t cross ruin walls so the open area in the bottom right corner is key for their success.
The Eldar deploy behind terrain, mostly in the lower left. They weighed the risk of being out of range of anything with protection against the knights.
Turn 1:
Spoiler:
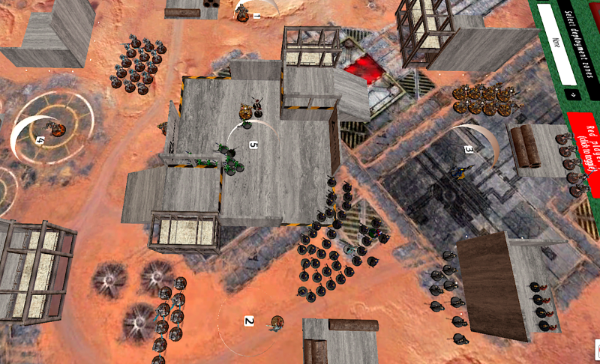
The Knights stomp forward and manage to get a bead on one unit of Dire Avengers, killing a few. The Skorpius can target units out of line of site which helps in this match up.
Unfortunately, one knight decided to reroute around the central ruin. The plan was to ambush one and take them out individually. By consolidating, they are now much more threatening and it’s hard to damage them.
The Eldar sent out movement blocker units to keep the knights in their deployment zone. Karandras came in to hold the priority objective so the warp spiders and swooping hawks could complete their grim duty.
One knight ends on 13/24 wounds, one out of 22/24, and the other undamaged.
The Howling Banshees that deployed on the table actually make their charge and take OBJ 4 from the Skorpius as they outnumber the Skorpius within 3” of the objective.
Turn 2:
Spoiler:
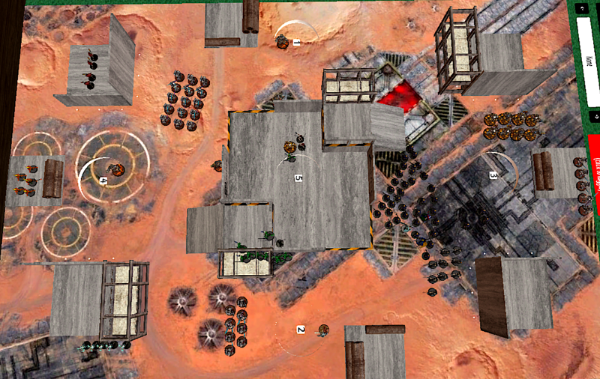
The knights clear out the screens, heavily deplete the Dark Reapers, and try to move forward. The sacrificial movement blockers did their part and kept the Knights on their side of the table.
Karandras takes 4 wounds from out of LOS shooting from a Skorpius. The knights killed all of the intervening units allowing the Skorpius to target a character.
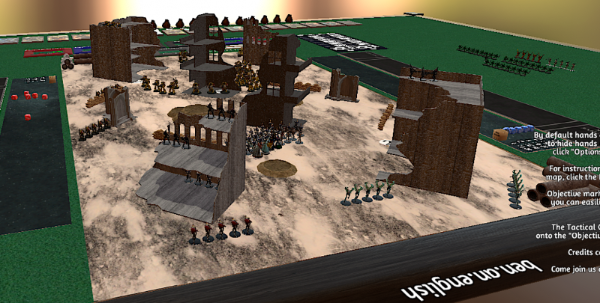
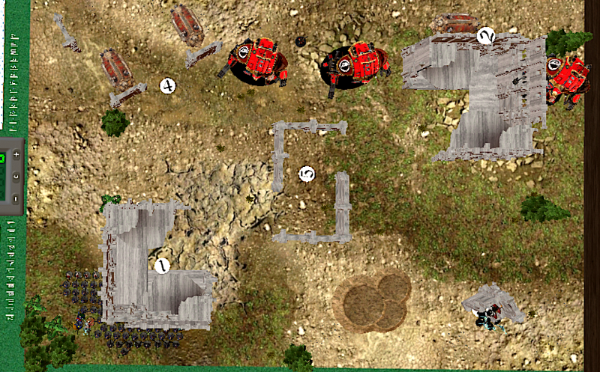
This photo comes after the Knights moved of turn 3, but it shows the Eldar position at the end of turn 2. The scorpions arrive to support Karandras on OBJ 2. The fire dragons drop in to target the weakened Knight. The Howling banshees drop in behind the tech-priest to target that character.
Between the Dark Reapers and Fire Dragons, they do 12 out of the 13 wounds on the Knight. The Swooping Hawks actually deal 2 wounds which were unsaved by the Knight! It doesn’t explode.
The unwounded knight in front of the Tech-Priest was Doomed and the Dire Avenger block takes it down to 13/24 wounds.
The Howling Banshees wrap and trap the Tech-Priest and take him down to one wound.
Turn 3:
Spoiler:
In response, the forward knight reduces the Dark Reapers to just 2 models. The Fire Dragons lose a few models and the last unit of Swooping Hawks dies. The Dire Avengers take heavy casualties. The wounded knight comes in and saves the Tech-Priest who is on one wound. The forward Knight takes a few wounds and ends the turn at 19/24 wounds.
A small note, the scions deepstrike in this turn which was probably a turn too late. They could have screened out the Eldar Deepstrikers if they had just come in one turn earlier.
The Dire Avengers take down the wounded Knight and it Explodes! Several Eldar lose their lives and the Tech-Priest is killed in the falling debris.
As a test, the Scorpions charged in and lost 5 members to overwatch. The remaining Striking Scorpions deal 9 wounds to the Knight, most of which came from Kharandras. Potentially, Scorpion claws on the Exarchs would actually help in a Knight matchup. Doom and more Scorpion Claws could have taken the Knight down surprisingly. Also, the Exarchs have the Scorpion’s Sting which improve the Mandiblaster rolls. This didn’t help in this matchup where Sustained Attack and Scorpion Claws would have really made a difference, especially in the Ynnari detachment.
End of Game:
Spoiler:
My thoughts on the game:
I need to deploy closer to the action in order to avoid wasting a turn. I’ll be shot out in the open anyway so I might as well get it out the way one turn sooner.
My chaff units (warp spiders and swooping hawks) were critical in this game. Their ability to block movement was huge and saved the game for me.
The Dark Reapers were much more valuable this game as they reliably snuck through 3 wounds a turn which turned into 9 damage!
As an exercise, I calculated how many points the Eldar and the Knights would have scored in each of the secondaries. My thought is that if I do this for every battle report, I can see which secondaries I tend to score high on with the Eldar and which my opponents score high against me. I also see how match up changes my scores.
Eldar:
Spoiler:
Old School: 3
Headhunter: 1
Born for Greatness: 0
Marked for Death: 4
Gang Busters: NA
Big Game Hunters: 4
Butcher's Bill: 0
The Reaper: 0
Recon: 4
Behind Enemy Lines: 4
Ground Control: 4
King of the Hill: 4
Engineers: Undetermined
Sappers: Undetermined
The Postman: Undetermined
Knights:
Spoiler:
Old School: 0
Headhunter: 0
Born for Greatness: 0
Marked for Death: 4
Gang Busters: NA
Big Game Hunters: NA
Butcher's Bill: 2
The Reaper: 2
Recon: 0
Behind Enemy Lines: 0
Ground Control: 0
King of the Hill: 0
Engineers: Undetermined (Assume 4)
Sappers: Undetermined
The Postman: Undetermined
Engineers, Sappers, and Postman would require significant changes to gameplay. It's hard to simply play your best game then go back and see how you scored on those three objectives. You have to actively pursue them. That being said, Engineers could be an interesting option if you build your list for it as it could force your opponent to waste resources killing units that aren't threatening them. If no one ever shoots your Engineers, they're easy points.
If I could go back in time and pick the secondaries, I would have chosen the following:
Eldar:
Big Game Hunters
Recon
King of the Hill
Knights:
Marked for Death
Butchers Bill
Engineers
This brings the score at the end of turn three to:
Eldar: 23
Knights: 16
This message was edited 1 time. Last update was at 2020/04/16 19:17:54
2020/04/17 16:15:18
Subject: Re:Tabletop Simulator Battle Report Series
TROOP4: 5 Strike Squad: Psilencer, 4 Nemesis Force Halberds
TROOP5: 5 Strike Squad: Psilencer, 4 Nemesis Force Halberds
TROOP6: 5 Strike Squad: Psilencer, 4 Nemesis Force Halberds
Vanguard Detachment–Grey Knights
+1CP
HQ5: Grand Master Voldus
Elite1: Apothecary: Nemesis Warding Stave
Elite2: 10 Paladins: 10 Storm bolters, 3 Force Halberds, 6 Force Warding Staves, Nemesis Daemon hammer
Elite3: 8 Paladins: 6 Storm bolters, 2 Psilencers, 2 Force Halberds, 4 Force Warding Staves, Nemesis Daemon hammer
Deployment:
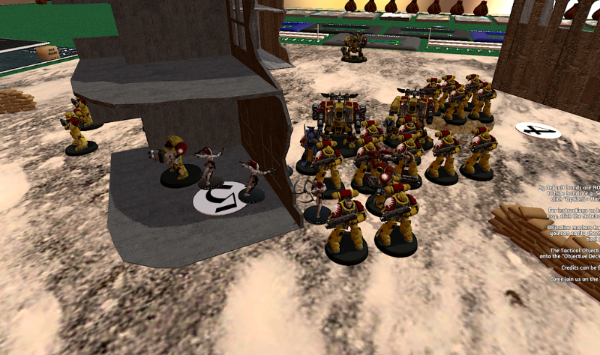
Mission: Crucible of Champions
The Eldar win the roll off but elect to give Grey Knights the first turn. The thought is that with the terrain and short range of Stormbolters the Eldar can mitigate the first turn of damage.
The Grey Knights deploy so that they can score the bonus point from round one. The Strike Squads stay in reserves to pounce upon the Eldar on Turn 2.
The Eldar deploy out of line of sight or in such a way that they are beyond 29” from any stormbolter wielding units.
Turn 1:
Spoiler:
The Grey Knights move up quickly and score the bonus. The central paladin bomb receives all the buffs it needs and the other jumps to the upper right, out of LOS, above OBJ 3. It Astral Aims but only deals 1 wound to a dark reaper exarch.
The Eldar move forward to pour fire onto the grey knight bomb. Tide of Shadow is up so they’re -1 to hit for being in cover.
NOTE: At the time of playing this game, I did not know about the psychic power that reduces to wound rolls by 1. This would have made a huge difference, but I just wasn’t aware. I knew about Transhuman Physiology and I played it to save them from the dark reapers but I just didn’t know that option was there.
The swooping hawks move out to block the paladins inside their bunker.
Shooting kills the Brother Captain who was scoring the bonus point but absorbs all of the dark reaper fire. The Eldar needed to kill one unit to power up the Ynnari units. The remaining shuriken weaponry reduces the Paladin bomb to eight members.
After the first squad of Striking Scorpions fight, the Paladins interrupt and kill several. When the dust settles, the Paladins are down to 3 models. The Ynnari stratagem that reduces enemy leadership by 2 comes into play and the rest of the Paladins flee.
This is another misplay. I forgot about the “Pay 2 CP to autopass” stratagem. In the hands of a more capable player, there likely would have been 3-5 Paladins left.
Turn 2:
Spoiler:
The Grey Knights activate the Tide of Convergence (+1 MW per smite). The mortal wounds deal grevious casualties to the Eldar.
The stormbolters from the strike squads deal surprisingly little damage. The Paladins advance on OBJ 3 after blowing through the swooping hawks.
The Eldar decide to withdraw to their deployment zone and focus on holding OBJ 2, 3, and 5. The Fire Dragons arrive to kill the rear librarian on OBJ 4. The Warp Spiders and the extra unit of Swooping Hawks drop in behind enemy lines.
After a weekend hiatus, I see the psychic power about -1 to wound. After all the Dark Reapers and Dire Avengers fire, only the Paragon remains. He pays 2CP to pass his check.
Turn 3:
Spoiler:
I quickly play turn 3 and this is how the field sits. The Grey Knights have taken catastrophic casualties and outside of the lone Paragon, a handful of Strike Marines scattered around the board, and woefully few Characters the Eldar hold most of the board.
End of Game:
Spoiler:
My thoughts on the game:
This list is a good example of how jumping between armies at the 2000 point level means you can forget key rules. I’m not sure the “-1 to wound” psychic power would have changed the outcome but I didn’t play a perfect game with the GK.
The Paladins were difficult, but not impossible, to chip away. Being so mobile, the Eldar were able to choose a unit to pick on each turn and it really made a difference. The 3+ armor save units (Warp Spiders, Striking Scorpions, Dark Reapers) were surprisingly resilient especially in cover.
I thought for sure the Strike Squads were going to gut the Eldar. This wasn’t the case at all. Potentially, bolter fire isn’t a counter to this list.
I didn’t realize how helpful all of the characters would be in this mission for scoring the bonus. This mission seems to favor high risk high reward play where single characters are holding objectives alone.
As an exercise, I calculated how many points the Eldar and the Grey Knights would have scored in each of the secondaries. My thought is that if I do this for every battle report, I can see which secondaries I tend to score high on with the Eldar and which my opponents score high against me. I also see how match up changes my scores.
Eldar:
Spoiler:
Old School: 4
Headhunter: 4
Born for Greatness: 3 (Karandras)
Marked for Death: 4
Gang Busters: 4
Big Game Hunters: NA
Butcher's Bill: 4
The Reaper: 4
Recon: 4
Behind Enemy Lines: 4
Ground Control: 4
King of the Hill: 4
Engineers: Undetermined
Sappers: Undetermined
The Postman: Undetermined
Grey Knights:
Spoiler:
Old School: 0
Headhunter: 0
Born for Greatness: 3 (Voldus)
Marked for Death: 4
Gang Busters: NA
Big Game Hunters: NA
Butcher's Bill: 2
The Reaper: 2
Recon: 0
Behind Enemy Lines: 4
Ground Control: 0
King of the Hill: 0
Engineers: Undetermined
Sappers: Undetermined
The Postman: Undetermined
Engineers, Sappers, and Postman would require significant changes to gameplay. It's hard to simply play your best game then go back and see how you scored on those three objectives. You have to actively pursue them. That being said, Engineers could be an interesting option if you build your list for it as it could force your opponent to waste resources killing units that aren't threatening them. If no one ever shoots your Engineers, they're easy points.
If I could go back in time and pick the secondaries, I would have chosen the following:
Eldar:
Gang Busters
Head Hunter
King of the Hill
Grey Knights:
Born for Greatness
Marked for Death
Behind Enemy Lines
This brings the score at the end of turn three to:
Eldar: 25
Knights: 18
2020/04/23 18:05:07
Subject: Re:Tabletop Simulator Battle Report Series
Strengths:
Consistent Damage
Mobility
Board Control
Weaknesses:
Range
Massed Fire
Superfluous Units
After three games, I like the direction the list is going. It seems like the concept is solid and I should develop it further. Moving forward, I want to diversify the list further to avoid the “Spammy” feel of 6 units of Dire Avengers. I also want to move away from Alaitoc for the whole army to have a more flavorful army list.
The characters are doing what I want them to do. I’m removing the Visarch and, hence, the Ynnari detachment because he was just dead weight. The Runes of Witnessing stratagem (reroll 1’s to wound) was expensive and largely not worth the 2CP unless I was firing Dire Avengers at several units. Doom overrides this if firing at one main unit so I am okay changing the craftworld on the Farseer. I also need a Warlock for Jinx to massively improve damage output against every target in the game. Basically, it gives all of your weapons -1 AP against one unit that also lowers invulnerable saves.
The Dire Avengers are borderline spammy. I am dropping to one battalion so I only need 30 now. I also realized that Bladestorm was marginally different than no powers at all. I think I will switch to Avenging Strikes to massively improve damage output once I take losses. The best way to take losses would be for the Warlock to perils, explode, and kill 1-3 models in each unit… haha.
The Striking Scorpion bomb is awesome and unique. I will continue to use it and maximize it’s ability. Scorpion’s Sting is a great ability and 30 Scorpions deal, on average, 10 Mortal Wounds at the beginning of the fight phase against infantry!
My fast attack choices were great as chaff and consistently move-blocked my opponents. It reminds me of my skink cloud days in WHFB. I will continue to use 10 Swooping Hawks and 5 Warp Spiders but I’m dropping Exarch upgrades to keep them cheap.
The Fire Dragons got cut… they never died but they were hit or miss performers. They are really swingy with their damage and only good against vehicles/characters. They pretty much guarantee 1-3CP spent each game just to deepstrike them which is no good.
The Howling Banshees were terrific! I am dropping to one unit of 10 to optimize buffs and CP usage to deepstrike them. I will also spend 1CP to give both the Warshout ability and the Graceful Avoidance.
I’d also like to add in Shining Spears just for a little diversity. It also cuts back on the “Horde” aspect of the army which is taking a long time on the table, to be honest. I’m exited to see how they do!
Captain: Gift of Foresight, Death Visions of Sanguinius, Gleaming Pinions, Thunderhammer, Storm Shield
14x Death Company w/Jump Packs, Chainswords
Sanguinary Ancient, Death Mask, Encarmine Swords, Icon of the Angel
8x Sanguinary Guard, Encarmine Swords
8x Sanguinary Guard, Encarmine Swords
8x Sanguinary Guard, Encarmine Swords
I slightly modified the list found here here to make it better against my list. For instance, I traded out Thunder Hammers for more Death Company.
Deployment:
Mission: Seize Ground
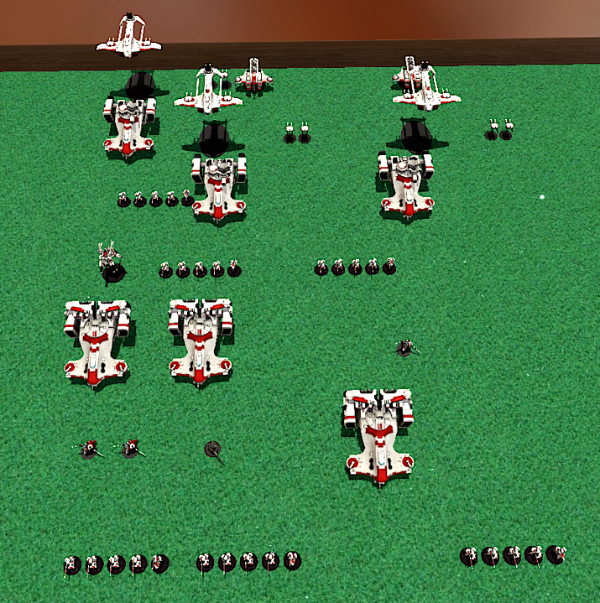
The Blood Angels get first turn and deploy aggressively. The idea is to hammer the Eldar turn 1 with the Death Company and the Sanguinary Guard. While the pressure is on, the two remaining Sanguinary Guard units will drop in and finish the job. The scout units deploy on OBJ 3, 4, and 5 to guarantee the bonus point.
The Eldar deploy deep in the backfield and hide behind a Striking Scorpion screen. They are the least expensive units on the Eldar side per model and are relatively choppy in close combat. The Howling Banshees and the Shining Spears deploy in reserves. The Swooping Hawks and the Warp Spiders remain in reserves also.
Secondaries are:
BA: Headhunter, The Butcher’s Bill, Behind Enemy Lines
Eldar: Recon, Marked for Death, Headhunter
Turn 1:
Spoiler:
The Death Company use Forlorn Fury to do their pregame move and then jump across the field. They are looking for a multicharge to wrap and trap a unit. The Sanguinary Guard leap across the field Upon Wings of Fire to land 9” away. With the Icon rerolling charges and Astorath giving +2” to charges, combat is likely.
The Death Company get a 4” charge even with rerolls and use Honor the Chapter to fight twice. They wrap Karandras and nearly kill him. Two units of Striking Scorpions die in the fighting.
Blood Angels score the bonus, hold one, kill one, and get a Butcher’s Bill point for a total of four points!
Due to the excitement of this turn, I forgot to take pictures until the end!
The howling banshees couldn’t fit anywhere useful because at max size they take up more space than normal. They stay in reserves. The Shining Spears on the other hand drop in, kill the librarian dreadnought with their shuriken catapults, charge and kill the Sanguinary Guard, and consolidate towards terrain. They average 4.6 wounds with their catapults and ended with 9 unsaved wounds against the dreadnought which is a little above average but these things happen.
The Striking Scorpions, Karandras, and Asurmen kill the unit of Death Company. Critically, the Eldar have denied a Behind Enemy Lines point to the Blood Angels.
The Eldar score hold 1, kill 1, kill more, 2 Marked for Death points, and 1 Headhunter point for a total of six points! The score is 6-5.
Turn 2:
Spoiler:
The two units of Sanguinary Guard deepstrike in. I end up going back to correct my moves to maximize charge bonuses in the charge phase by moving some characters to ensure one unit makes it in at least. These 9” charges are MUCH harder than the turn 1 charges. The Sanguinary Guard make it into the Shining Spears but the other unit fails. Half of the Sanguinary Guard unit dies in combat with the Spears but manage to take the unit down to two models.
The Eldar drop the Howling Banshees to threaten the Intercessors on OBJ 1. The Swooping Hawks and Warp Spiders drop in to threaten the scouts on OBJ 4 and 3. The Shining Spears fall back out of combat and plan to use a stratagem to charge into combat with some characters. The Eldar Host moves forward to hopefully deal a mortal blow to the wall of Golden Armor descending upon them.
The Eldar are able to kill all of the Characters in their deployment zone maxing out the Headhunter points and denying Behind Enemy Lines. The Sanguinary Guard units are destroyed and now the threat to the Eldar is significantly reduced. However, by dividing their forces, the Eldar fail to knock the Blood Angels off of any objectives allowing them to continue to score Hold More and the Bonus.
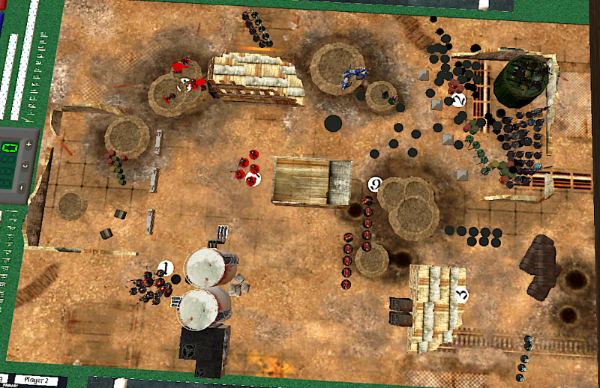
The Blood Angels score Hold 1, Hold More, and the Bonus. The Eldar Score Kill 1, Kill More, and Hold 1 in addition to their first Recon point, maxing Headhunters and maxing Marked for Death. This brings the total score to 18-8.
Turn 3:
[spoiler]
This turn went pretty quickly. The Blood Angels fail to do much in the way of damage and most of their units stay put to make their last stands.
The Eldar move forward strike the final blow. The Blood Angels are cleaned off the remaining objectives and the game ends there.
End of Game:
Spoiler:
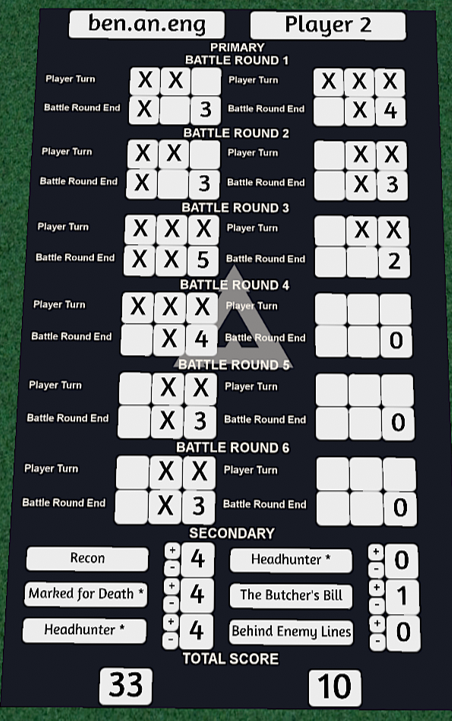
I “fast forward” the game and see how the scores would have turned out. ITC doesn’t force the game to end when one side is tabled so I just envisioned how it would play out. 33-10 is a pretty healthy score!
My thoughts on the game:
This is my first game where I tallied secondaries in each turn. They really make a difference! I also thought the fact that the Blood Angels were holding so much of the table during the game would have forced the Eldar to stay on the back foot but this wasn’t the case. The primary score was very similar until turn 3 when it skewed in favor of the Eldar. I wonder if this is the norm for ITC games.
I was very intimidated by the speed of this list and I thought for sure the Eldar would go down. This didn’t turn out to be the case and it reflects in the secondary choices. I don’t know if I could have chosen better secondaries for the Blood Angels as there aren’t any good Marked for Death units above 120 points in the Eldar list. King of the Hill would have been a good choice actually. Old School would have gotten some points on the board as well. That being said, even Recon would’ve scored the Blood Angels 0 points.
The Eldar list is very solid it seems. I was going to play a possessed bomb list next but instead I am opting to do a “Stress Test” Battle.
The opponent gets two armies to the Eldar’s one. 4000 pts, up to 6 detachments, versus the 2000 points of Eldar. The Opponent gets first turn. Eldar wins if it can survive and account for itself. ITC mission rules apply to both sides as well.
This message was edited 1 time. Last update was at 2020/04/29 17:45:42
2020/05/04 10:29:00
Subject: Re:Tabletop Simulator Battle Report Series
Thanks man, just looked it up. That thing seems crazy! Will have to try it out. Love your avatar, by the way - highly appropriate to the current situation!
Skinflint Games- war gaming in the age of austerity
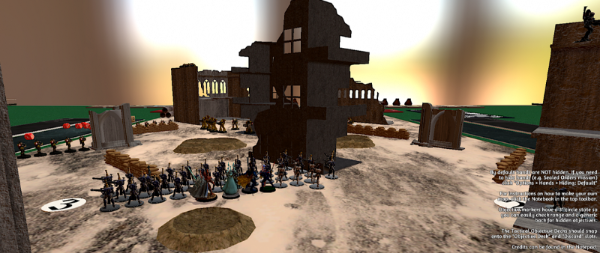
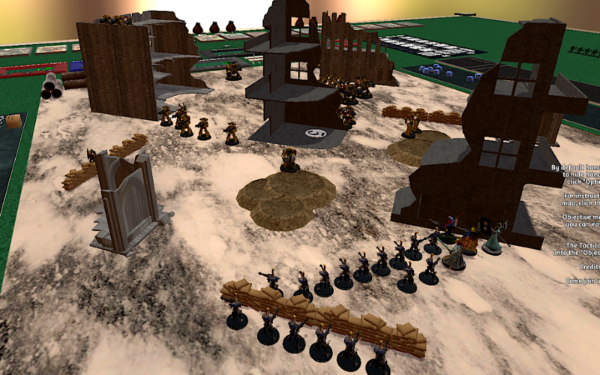
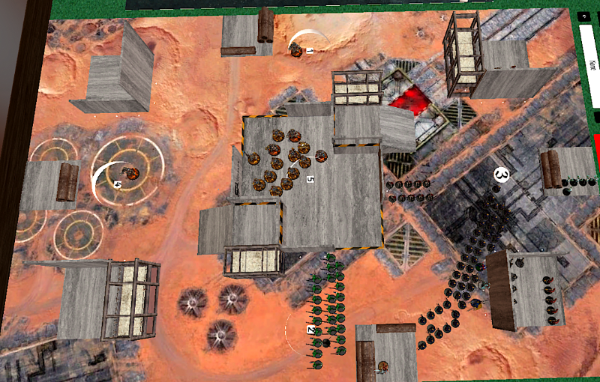
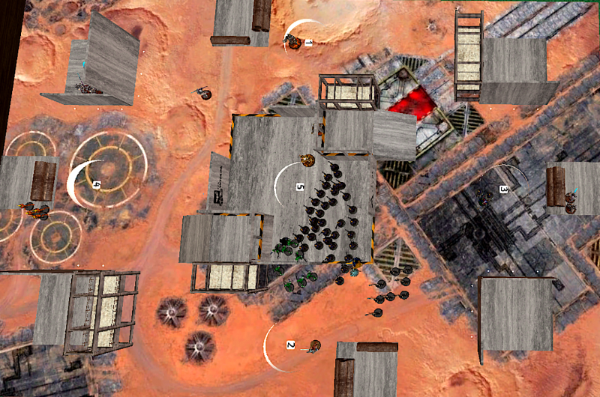
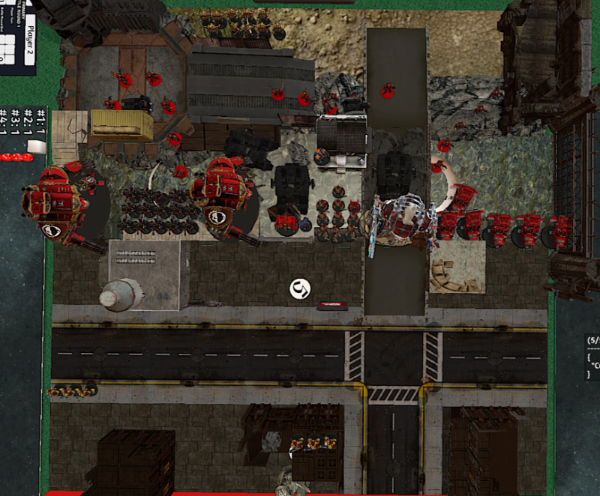
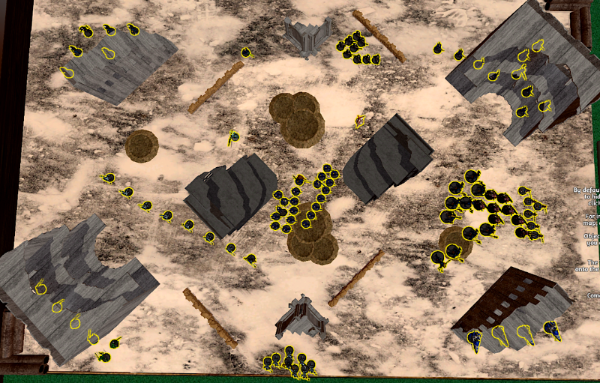
I'm about finished tweaking the Army so this may be my last "Battle Report" post. I thought this image was interesting in my last test game.
Basically, this is what it looks like to completely screen off the table in game. The list I was testing against had a unit of 10 Terminators and 10 Warp Talons in reserve but now at the end of turn 2 there isn't anywhere for them to deploy. Obviously, this homebrew CSM list isn't very good to be tabled at the end of 2 basically, but it goes to show that a 2000 point army can block off the table and deepstriking is inherently dangerous.
Imagine what it will be like when the tables are smaller?