| Author |
Message |
 |
|
|
|
|
Advert
|
Forum adverts like this one are shown to any user who is not logged in. Join us by filling out a tiny 3 field form and you will get your own, free, dakka user account which gives a good range of benefits to you:
- No adverts like this in the forums anymore.
- Times and dates in your local timezone.
- Full tracking of what you have read so you can skip to your first unread post, easily see what has changed since you last logged in, and easily see what is new at a glance.
- Email notifications for threads you want to watch closely.
- Being a part of the oldest wargaming community on the net.
If you are already a member then feel free to login now. |
|
 |
2020/08/28 23:56:32
Subject: Modeling amputations like pinned sleeves, pegs or other prosthetics?
|
|

Fresh-Faced New User
|
I was wondering if there was some kind of recommendation for a putty or other form of clay type stuff for miniatures. I just had a buddy offer me a commissar he had laying around for $10 and no real use for and knew I might get some use from it. It needs assembled and painted and I thought it would be awesome if I could have a one armed commissar in my DKoK unit. Do they make a putty or clay that dries and can be fashioned into the shape of say, a pinned sleeve or something that I can then glue on and paint? Failing that I could whittle of pegged leg from wood I suppose. lol Yes, I'm aware it'll probably cost me the melee weapon on the table. I'd just give him a plasma pistol and be good with it.
|
|
This message was edited 3 times. Last update was at 2020/08/29 00:04:57
|
|
|
 |
|
2020/08/29 00:10:17
Subject: Modeling amputations like pinned sleeves, pegs or other prosthetics?
|
|
Willing Inquisitorial Excruciator
|
Green Stuff (Kneadatite) is the most common. You mix the two parts together and they can be sculpted, shaped and sanded, and dry after several hours.
There are other types known as "Grey Stuff" (Procreate) and "Brown Stuff", each of them is the same type of two part putty, but they each have their own properties (some hold better edges, some are easier to sand).
Another popular one is Milliput. This can all seem overwhelming, but there are a lot of tutorials in the tutorial forum, and lots of resources on the net.
Any one of those would be great, and a folded sleeve is infinitely doable as a first go at using the medium. Keep us posted on how you make out.
|
|
This message was edited 1 time. Last update was at 2020/08/29 00:32:04
 Legio Suturvora 2000 points (painted) Legio Suturvora 2000 points (painted)
30k Word Bearers 2000 points (in progress)
 Daemonhunters 1000 points (painted) Daemonhunters 1000 points (painted)
 Flesh Tearers 2000+ points (painted) - Balt GT '02 52nd; Balt GT '05 16th Flesh Tearers 2000+ points (painted) - Balt GT '02 52nd; Balt GT '05 16th
 Kabal of the Tortured Soul 2000+ points (painted) - Balt GT '08 85th; Mechanicon '09 12th Kabal of the Tortured Soul 2000+ points (painted) - Balt GT '08 85th; Mechanicon '09 12th
 Greenwing 1000 points (painted) - Adepticon Team Tourny 2013 Greenwing 1000 points (painted) - Adepticon Team Tourny 2013
"There is rational thought here. It's just swimming through a sea of stupid and is often concealed from view by the waves of irrational conclusions." - Railguns |
|
|
|
|
2020/08/29 02:30:07
Subject: Modeling amputations like pinned sleeves, pegs or other prosthetics?
|
|
Fresh-Faced New User
|
 Cruentus wrote: Cruentus wrote:Green Stuff (Kneadatite) is the most common. You mix the two parts together and they can be sculpted, shaped and sanded, and dry after several hours.
There are other types known as "Grey Stuff" (Procreate) and "Brown Stuff", each of them is the same type of two part putty, but they each have their own properties (some hold better edges, some are easier to sand).
Another popular one is Milliput. This can all seem overwhelming, but there are a lot of tutorials in the tutorial forum, and lots of resources on the net.
Any one of those would be great, and a folded sleeve is infinitely doable as a first go at using the medium. Keep us posted on how you make out.
Thanks for pointing me in the right direction! Make me a banner pole that I can strap to his belt over the stump side that reads "In Morte, Redemptio" (In death, redemption) from some Krieg Litany. That'll get those clone troops fired up and look great on the table.
|
|
This message was edited 1 time. Last update was at 2020/08/29 02:33:02
|
|
|
|
|
2020/08/29 03:13:11
Subject: Re:Modeling amputations like pinned sleeves, pegs or other prosthetics?
|
|
Longtime Dakkanaut
|
|
|
This message was edited 1 time. Last update was at 2020/08/29 03:14:04
Keeping the hobby side alive!
I never forget the Dakka unit scale is binary: Units are either OP or Garbage. |
|
|
|
|
2020/08/29 03:20:18
Subject: Re:Modeling amputations like pinned sleeves, pegs or other prosthetics?
|
|
Scarred Ultramarine Tyrannic War Veteran
Maple Valley, Washington, Holy Terra
|
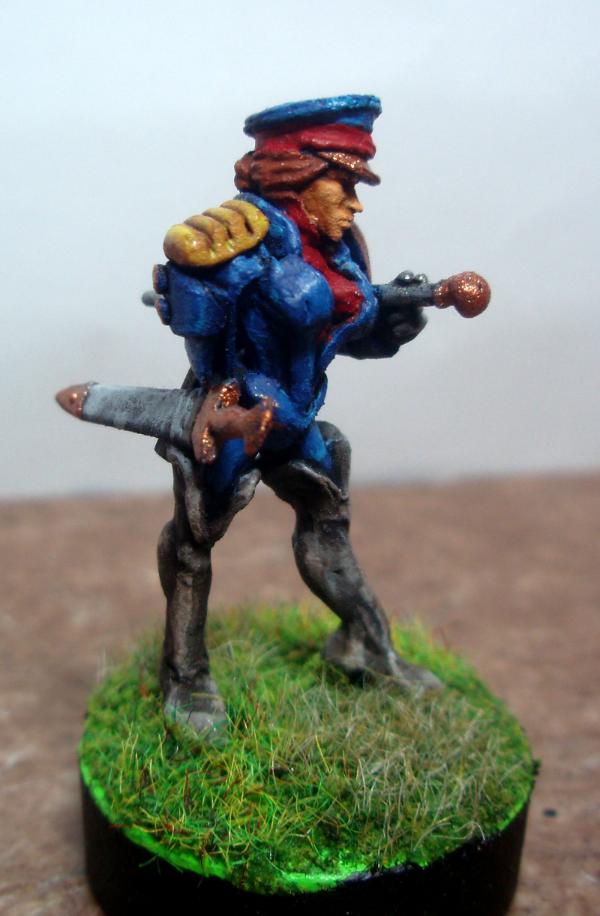
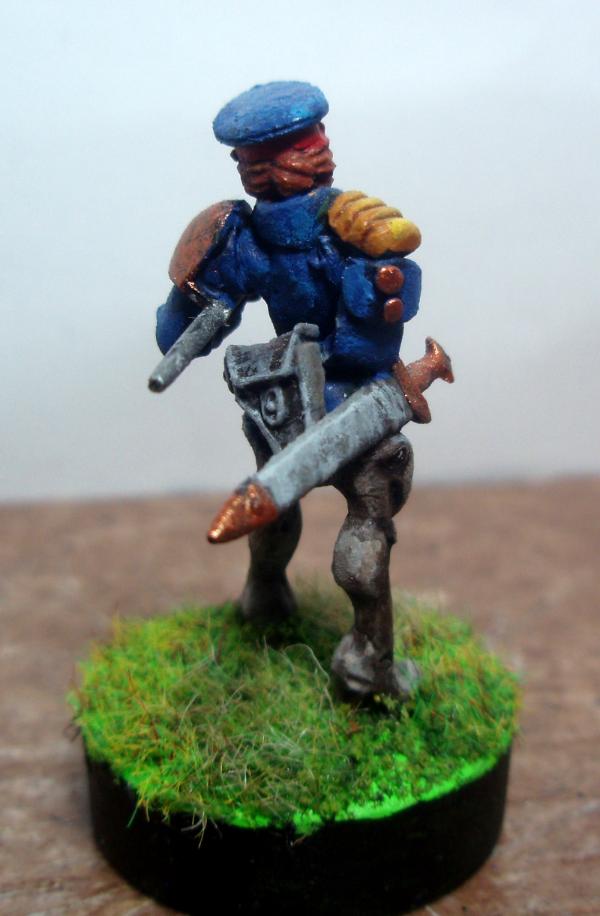
One of my first attempts sculpting with greenstuff was this exact idea, added to a Mordheim model who had lost an arm in battle. It was quite easy to achieve.
|
"Calgar hates Tyranids."
 Your #1 Fan Your #1 Fan |
|
|
|
|
2020/08/29 03:43:58
Subject: Re:Modeling amputations like pinned sleeves, pegs or other prosthetics?
|
|
Fresh-Faced New User
|
edwardmyst wrote:I managed this with Greenstuff. Amputated right arm with the sleeve pinned. Hope it helps. I could explain how I did it if it's not obvious.
]
That looks great. Since he has his right arm extended to hold a weapon I figure I'll just mold a clay snake as long as his right arm and then flatten and fold it in half and then use a small stylus to sculpt the details of the left hand cuff in.
Automatically Appended Next Post:
 Pariah Press wrote: Pariah Press wrote:One of my first attempts sculpting with greenstuff was this exact idea, added to a Mordheim model who had lost an arm in battle. It was quite easy to achieve.
Mom to Son: "Honey, why are you cutting the arm off your warrior man?"
Son to Mom: "He lost his arm in combat Mom. See his datasheet right here? Amputated right arm. Sheesh."
|
|
This message was edited 2 times. Last update was at 2020/08/29 04:05:16
|
|
|
|
|
2020/08/29 15:25:09
Subject: Modeling amputations like pinned sleeves, pegs or other prosthetics?
|
|
Willing Inquisitorial Excruciator
|
Here is another sample, from Perry Miniatures - its the middle Union Commander, Howard. I have the model, but actually converted him to be holding a sword, so removed the folded sleeve.
https://www.perry-miniatures.com/product_info.php?cPath=23_32&products_id=1437
Your approach sounds solid, but make sure to let it "set" for about 20-30 minutes before you begin the detail, as it'll still be malleable and you might push it out of shape.
Another idea is to do the sleeve, and then let it dry, perhaps making it a little thinner where it pins. Then when its hard, make another small ball to add the cuff on top of the existing sleeve. That way you can detail the cuff separately without messing with any of the creases/folds you put into the original.
You also want to make sure it doesn't protrude too far from the shoulder, I'm sure the Commissar wouldn't want to go getting caught up on trees, spikes, or whatever while whirling around and fighting.
|
Legio Suturvora 2000 points (painted)
30k Word Bearers 2000 points (in progress)
Daemonhunters 1000 points (painted)
Flesh Tearers 2000+ points (painted) - Balt GT '02 52nd; Balt GT '05 16th
Kabal of the Tortured Soul 2000+ points (painted) - Balt GT '08 85th; Mechanicon '09 12th
Greenwing 1000 points (painted) - Adepticon Team Tourny 2013
"There is rational thought here. It's just swimming through a sea of stupid and is often concealed from view by the waves of irrational conclusions." - Railguns |
|
|
|
|
2020/08/29 17:10:36
Subject: Re:Modeling amputations like pinned sleeves, pegs or other prosthetics?
|
|
Longtime Dakkanaut
|
As said above, your idea is excellent. A flattened tube, folded for sleeve. On mine I let that dry completely, then I took a flat piece the width I wanted for the cuff and added it on. Do not underestimate the ability to use Super Glue (or equivalent) it bonds greenstuff almost instantly. So a tiny dot centered at end of sleeve, placed the strip for cuff, and then shaped it around. I add buttons by taking a tiny bit of GS rolled into ball, a dab of glue, place, then use your tool to flatten it out. Those were early work for me and they're way to big, but there's the idea.
Braid at the shoulder is easy as well. A tube of GS the length you want, place it, then use an x-acto to slice it into the amount of stripes you want. The slicing act usually flattens it as well.
|
Keeping the hobby side alive!
I never forget the Dakka unit scale is binary: Units are either OP or Garbage. |
|
|
|
|
2020/09/06 04:00:40
Subject: Re:Modeling amputations like pinned sleeves, pegs or other prosthetics?
|
|
Fresh-Faced New User
|
Okay so I'm just about ready to begin. I've got my Commissar and my paints and I'm getting my Green Stuff on Tuesday. So the next question I have. I've decided that his entire left side of his body will be damaged. Eyepatch over the left eye, folded sleeve for the left arm and here's the kicker. I found on ebay a guy selling a sprue of a Necron overlord that was damaged in shipping or badly casted or something for like $5. So I want to amputate my commissar's left boot and replace it with the foot and shin of the Necron as if he took it as some kind of trophy in a past battle and had a prosthesis made from it.
I figured the best way to attach the leg would be to fashion a kind of cup out of Green Stuff around the stump, take the cup off and then attach the Necron shin/foot to the cup. I assume I should do this when the cup is still soft and press the bit into the bottom of the cup with a little glue and then let it all dry then attach the prosthesis to his leg and glue it on. Am I on the right track here?
|
|
This message was edited 2 times. Last update was at 2020/09/06 04:07:04
|
|
|
|
|
2020/09/07 13:04:11
Subject: Re:Modeling amputations like pinned sleeves, pegs or other prosthetics?
|
|

Been Around the Block
|
If you're just looking at attaching a plastic component to another plastic component, and the surfaces are relatively flat/ fit together relatively well (a file or a hobby knife can improve this), then plastic glue will work fine. If the join point is too small/ not flat enough, then you can just drill a small hole in each component and attach them via some wire before gluing. You could then add the green stuff at the end if the joint is messy.
If they don't fit together well and you don't have a hand drill, then what you suggested could work, although you might be over-complicating things a little bit. Not quite sure if the cup is to function as part of the synthetic or whether you wanted it to look like part of the pants, but you could even just place a blob of green stuff on one of the components, smoosh them together, take one away, smooth out the green stuff then let it dry and glue.
Ultimately, it's your model, so just go wild and experiment. If it end up messy, you can always just cut some it back/ pull it apart and try again. The things I mentioned above are just methods which I prefer to use, they may not work for you. 'Kit-bashing' is not and never has been an exact science, and I personally find that most of the fun comes from trying new things, so by all means give that a go. I'm loving the idea, and I'm super keen to see a photo at the end!
|
|
|
|
|
2020/09/10 02:50:56
Subject: Re:Modeling amputations like pinned sleeves, pegs or other prosthetics?
|
|
Fresh-Faced New User
|
Ferrous695 wrote:If you're just looking at attaching a plastic component to another plastic component, and the surfaces are relatively flat/ fit together relatively well (a file or a hobby knife can improve this), then plastic glue will work fine. If the join point is too small/ not flat enough, then you can just drill a small hole in each component and attach them via some wire before gluing. You could then add the green stuff at the end if the joint is messy.
If they don't fit together well and you don't have a hand drill, then what you suggested could work, although you might be over-complicating things a little bit. Not quite sure if the cup is to function as part of the synthetic or whether you wanted it to look like part of the pants, but you could even just place a blob of green stuff on one of the components, smoosh them together, take one away, smooth out the green stuff then let it dry and glue.
Ultimately, it's your model, so just go wild and experiment. If it end up messy, you can always just cut some it back/ pull it apart and try again. The things I mentioned above are just methods which I prefer to use, they may not work for you. 'Kit-bashing' is not and never has been an exact science, and I personally find that most of the fun comes from trying new things, so by all means give that a go. I'm loving the idea, and I'm super keen to see a photo at the end!
Project creep has set in big time because when the Emperor sends that inspiration you just have to keep going. lol
I now ordered a recast squad of krieg grenadiers that should be here beginning of October. I'm going to do an entire diorama of "The Last Stand of the 19th Regiment on Vraks". This battle scarred commissar standing on a mound of skulls directing the last stand. A squad of Krieg grenadiers arrayed in a circle facing outward in all directions. In the back ground that artwork from Imperial Armor of Nurgle's Plague Marines crossing the trenches. Arrange the background so that it curves in a semi circle to give the impression of the unit being surrounded as the Plague Marines come in for the final kill. A banner flying in the wind above the head of the commissar with the words "IN MORTE REDEMPTIO" (In Death, Redemption).
I saw on YouTube how this German dude does his Kriegers and makes them look all dirty and battered up. It was so simple that I couldn't resist the look so all of the chars are going to get that treatment. I'm hoping to have it done to post images on Halloween.
|
|
This message was edited 2 times. Last update was at 2020/09/10 03:07:02
|
|
|
|
|
|
|