Switch Theme:

Advice on correcting overruns, detailing and where should I go from here.  [RSS] Share on facebook Share on Twitter Submit to Reddit
»
Author Message
Advert


Forum adverts like this one are shown to any user who is not logged in. Join us by filling out a tiny 3 field form and you will get your own, free, dakka user account which gives a good range of benefits to you:
  • No adverts like this in the forums anymore.
  • Times and dates in your local timezone.
  • Full tracking of what you have read so you can skip to your first unread post, easily see what has changed since you last logged in, and easily see what is new at a glance.
  • Email notifications for threads you want to watch closely.
  • Being a part of the oldest wargaming community on the net.
If you are already a member then feel free to login now.


Made in us
Fresh-Faced New User


I have to hand it to you guys, this stuff is alot harder than it looks! I wish I had started on a simpler model with less details but I basically got it for free. Anyway. I followed the advice from my other thread and managed to create a pretty cool model. I used milliput because it was cheap and it worked really well. I had some fits and starts but I managed to fashion the sleeve and the eye patch and a peg leg for my battle wounded Commissar. I spent all day today trying to paint this sucker and I know it's my first model and can't expect to become a pro overnight but I did the best I could. As you can see, overruns over the sleeve and other places like the wash that ran down his hat and blackened the white fur collar of his cloak! The gold ran down and mixed with the red of the cuff. Is it possible to cover it back up and start over? How can I correct issues like that?

How the heck do you guys do those tiny details without over runs like his medals? How to do you get those sharp edges like along the brim of his hat? Here is where I am at right now with it.
[Thumb - 20200911_174157.jpg]

[Thumb - 20200911_175440.jpg]

[Thumb - 20200911_172338.jpg]

This message was edited 3 times. Last update was at 2020/09/12 00:08:49


Made in gb
Rotting Sorcerer of Nurgle


Portsmouth UK

smaller brush &/or better brush control; decent brush; practice.
I'm afraid it all boils down to repetition to find out & refine your style.

Check out my gallery here
Also I've started taking photos to use as reference for weathering which can be found here. Please send me your photos so they can be found all in one place!! 
   
Made in au
Been Around the Block


As bubber said, practice and repetition is a huge part of this. If I could also recommend watching some painting tutorials on youtube.

If you're finding that the paint is running between different coats, you're probably not giving the paint enough time to dry. I would recommend giving each coat maybe a minute to several minutes (depending on the paint) to dry. If the paint is still wet, then paint will run between the different colours. If it's almost dry, it will come away from the model very easily and you can very easily lose a lot of progress. Once it's fully dry it will stick to the surface and you can paint your other layers.

Looks better than my first mini, and I love the conversion. Converting is probably my favourite part of the hobby (even though I'm not very good at it), so it makes me really happy to see that you're getting into it straight away. Keep up the good work, and don't feel discouraged if you're not as good at painting as others; no matter what level of skill you're at, there will probably be someone who paints better than you, so don't feel put off by it but treat it as inspiration and motivation to practice you're own painting.


edit: what paints are you using? Drying times and sometimes even painting styles can change a bit depending on what you're painting with. And what brush are you using?

This message was edited 1 time. Last update was at 2020/09/12 07:04:35


Made in us
Fresh-Faced New User


Well I have learned alot that's for sure. I made my paints just a bit too thin. Also I think I will paint parts individually rather than as a whole for now at least. I'm going to strip this guy and start over. I thought the gold armor would look good but I don't think it does. Too bright, too cartoony IMO. I think instead I will give the armor a black lacquer look instead. Redo the sleeve and paint as a separate part along with the peg.

I didn't use plastic glue but a general all purpose glue that will dissolve in thinner just in case I needed to start over. So none of what is in the pics is truly permanent.

As far as paints go, they are Hobby Lobby Acrylic model paints with Hobby Lobby model brushes. Conversion parts done with milliput.

This message was edited 1 time. Last update was at 2020/09/12 15:47:33


Made in us
Stalwart Space Marine


Chicago

Probably repeat some of what been said but a better quality brush is important. When I first started in the hobby I bought really expensive brushes (Winsor & Newton Series 7 Kolinsky Sable Brushes) and honestly the only thing that I learned from them was brush care is important. I used to destroy my other brushes, the expensive ones I took care off. I recently been using standard brushes you can get at Michael's or an art store in the 7-9 dollar range with synthetic bristles, but the brush care stuck.

I've had good luck with these, but I tend to buy them in store to make sure they aren't damaged or have bent bristles.
https://www.michaels.com/golden-taklon-short-handle-round-brush-by-artists-loft-vienna/10011028.html

Rinse often, clean your brush and make sure it has a great tip. If you can, multiple sized brushes help but I've been using my size 2/4 for most of my work.

Paints - this will be somewhat of an investment. I use Vallejo and GW brand paints. I like the GW brand because they are easy to get in my area.

Practice / new techniques - washes and dry-brushing can get your model 95% there for table top quality+. Find some good youtube videos on both and practice.

These are two terminators I've painted one was a while back and one was recent.


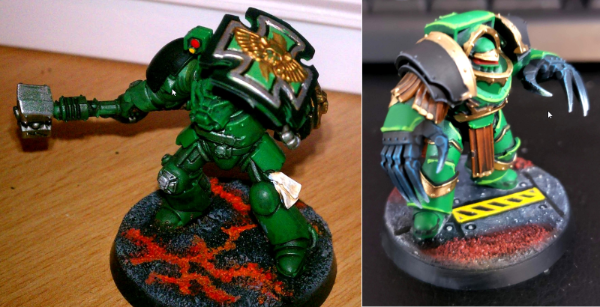
Terminator 1 - primed with a rattle can, washed with a wash and applied some paint where I thought he needed it.
Terminator 2
- Prime with airbrush / can be done with a rattle can
- Zenithal primer applied with airbrush / can be done with a rattle can or a heavy dry-brush.
- Base layer of green with airbrush
- Block in areas with black that need it. most metallic paints go over a dark color better (notice terminator 1 has green paint showing through both the gold silver)
- Dry-brush the claws to give them a bit of power weapon look
- Edge highlight the green panels. This might be doable with a dry-brush but it's one of the areas where I want to improve so I try it where I can.
- apply wash strategically, in this case the wash only went to the legs where the different plates meet.
- edge highlight the shoulder pads


Made in us
Scarred Ultramarine Tyrannic War Veteran


Maple Valley, Washington, Holy Terra

As a general rule, if you overrun an area, you can simply paint over the overun with the correct color later. As long as your paints are thinned properly, you can do plenty of layers before you start to obscure the detail.

"Calgar hates Tyranids."

Your #1 Fan  
   
Made in gb
Thane of Dol Guldur


Bodt

If your paint is running down the model, then you have thinned it way too much.

Thinning paint is the go to advice for beginner painters, but no one ever says: don't thin too much. In my opinion it's better to under thin than over thin early on as a beginner. That way your paint will at least stay where you want it, and you'll get coverage. At this stage you're not going to be layering any colour transitions so paint thinning doesn't have to be perfect. As long as you're not gooping it on with a trowel you won't obscure any details.

Work on painting 'between the lines' first, and then you will notice that you'll naturally start to find out about thinning as you get more into it.

Also, have you primed this model? It looks like bare metal underneath. Primer will help the paint stick better where it's applied.

This message was edited 1 time. Last update was at 2020/09/12 21:46:00


Heresy World Eaters/Emperors Children

Instagram: nagrakali_love_songs 
   
Made in us
Fresh-Faced New User


 queen_annes_revenge wrote:
If your paint is running down the model, then you have thinned it way too much.

Thinning paint is the go to advice for beginner painters, but no one ever says: don't thin too much. In my opinion it's better to under thin than over thin early on as a beginner. That way your paint will at least stay where you want it, and you'll get coverage. At this stage you're not going to be layering any colour transitions so paint thinning doesn't have to be perfect. As long as you're not gooping it on with a trowel you won't obscure any details.

Work on painting 'between the lines' first, and then you will notice that you'll naturally start to find out about thinning as you get more into it.

Also, have you primed this model? It looks like bare metal underneath. Primer will help the paint stick better where it's applied.


Yes it was primed with white rustoleum rattle can primer, then base coated with a sand colored shade close to Agrax Earthshade. It isn't completely finished though. I stopped to ask help before I continued on, also I don't have a proper flesh tone shade yet so I haven't applied that to the face.

This message was edited 2 times. Last update was at 2020/09/12 21:49:31


Forum Index » Painting & Modeling
Go to: