Forum adverts like this one are shown to any user who is not logged in. Join us by filling out a tiny 3 field form and you will get your own, free, dakka user account which gives a good range of benefits to you:
No adverts like this in the forums anymore.
Times and dates in your local timezone.
Full tracking of what you have read so you can skip to your first unread post, easily see what has changed since you last logged in, and easily see what is new at a glance.
Email notifications for threads you want to watch closely.
Being a part of the oldest wargaming community on the net.
If you are already a member then feel free to login now.
2021/01/28 22:24:43
Subject: Painting and texturing "the ground" on large wargaming boards and tiles?
For the large expanses of grassland, junkyard dirt, temple ruins sand, etc. Basically for all these huge flat areas. What is an efficient and effective way of painitng?
I've made a wargaming board in the past which was cover completely in sand + drybrush it. It had the disadvantage of shedding sand sometimes, so I would like to only use sand in more targeted areas rather than "cover literally the whole thing"
Tools I am thinking about using:
-various colors of brown, green, tan spraypaint to be applied in layers in some manner
-static grass, flock, miniature greenery tufts and shrubs and such
-textured spraypaint?
-drybrushing regular acrylic hobby paint
I'm a bit overwhelmed by the possibilities. I have maybe 4 full boards worth of stuff to paint, so about 100 tiles of 1 ft x 1 ft each. I'd like to really think out my strategy before going at it.
Any advice, links to blogs, tutorials, videos, personal experience, etc would be greatly appreciated!
How do you model/paint flat areas on your wargaming table?
ph34r's Forgeworld Phobos blog, current WIP: Iron Warriors and Skaven Tau +From Iron Cometh Strength+ +From Strength Cometh Will+ +From Will Cometh Faith+ +From Faith Cometh Honor+ +From Honor Cometh Iron+
The Polito form is dead, insect. Are you afraid? What is it you fear? The end of your trivial existence?
When the history of my glory is written, your species shall only be a footnote to my magnificence.
2021/01/28 22:51:08
Subject: Painting and texturing "the ground" on large wargaming boards and tiles?
I did a modular table with the thick insulation foam boards that has held up great doing this:
1. Paint the base
2. Mix the same paint and 25-30% white glue. You might need to add a bit of water so it paints well and feel free to blend colors while it is wet.
3. While the paint is still wet, sprinkle on your terrain texture of choice. I used Woodland Scenics turf (Brown and Green) and grass.
4. When dry, put water and 10-15% white glue into a spray bottle and coat the board to cover the turf and grass really good - really saturate it. You might need to add a few drops of dishwashing liquid or soap to help the water/glue penetrate the grass and such.
This has held up like iron and has withstood a lot of dice throwing and such. So I have the large grass areas and the scattered brush in the differing colors that really looks nice. I also had a small river feature and did that after the turf was down. Nice thing about the foam boards or having something with a bit of give makes dice rolling quiet and easy.
This message was edited 1 time. Last update was at 2021/01/29 14:31:45
Look at how Mel the Terrain Tutor and Luke from Geek Gaming Scenics do their full tables. I think both have tutorials on their Youtube channels. If I remember right, Luke has moved toward using products that don't require painting, so tile grouts in various sand/dirt colors, mixed flocks and static grasses, and so on. It's generally sealed by spraying multiple coats of pva glue mixed with water.
2021/01/29 03:12:44
Subject: Re:Painting and texturing "the ground" on large wargaming boards and tiles?
I did a huge project a couple of years ago where I stripped and repainted 8 old Realms of Battle boards that had been painted different colors by different owners. I used spray paint and then art store acrylic to paint them, got a satisfying degree of visual depth from paint as much as from 3D texture, and came up with a pretty good homebrew recipe for Agrax Earthshade in huge quantities. The MVPs of the project were ModPodge instead of PVA glue, an natural sponge instead of a brush, and remembering that anyone will look closely at your models and then at your terrain long before they look at your table.
I'm also going to have to redo 8 x 4 feet worth of RoB boards, so am keen to hear all your tips regarding this subject! Keep em coming
I intend to augment the RoB base texture with some extra layers of detail, as the detail on the tiles themselves looks a bit meh and too regular to plausibly portray a ground surface. But a big challenge in this is that I also cannot have too much surface detail which would prevent placing terrain pieces with a solid base on the board.
This message was edited 2 times. Last update was at 2021/01/29 09:13:22
"The larger point though, is that as players, we have more control over what the game looks and feels like than most of us are willing to use in order to solve our own problems"
2021/01/29 16:56:09
Subject: Painting and texturing "the ground" on large wargaming boards and tiles?
Jackal90 wrote:I’ve always used sand on boards without much issue.
I tend to give them a few coats of matte varnish at the end though to seal them.
Textured wallpaper can also be a good one as coverage.
Matte varnish, good call. Would that be after you've done spraypainting, drybrushing, etc?
MDSW wrote:I did a modular table with the thick insulation foam boards that has held up great doing this:
1. Paint the base
2. Mix the same paint and 25-30% white glue. You might need to add a bit of water so it paints well and feel free to blend colors while it is wet.
3. While the paint is still wet, sprinkle on your terrain texture of choice. I used Woodland Scenics turf (Brown and Green) and grass.
4. When dry, put water and 10-15% white glue into a spray bottle and coat the board to cover the turf and grass really good - really saturate it. You might need to add a few drops of dishwashing liquid or soap to help the water/glue penetrate the grass and such.
This has held up like iron and has withstood a lot of dice throwing and such. So I have the large grass areas and the scattered brush in the differing colors that really looks nice. I also had a small river feature and did that after the turf was down. Nice thing about the foam boards or having something with a bit of give makes dice rolling quiet and easy.
Mr. Grey wrote:Look at how Mel the Terrain Tutor and Luke from Geek Gaming Scenics do their full tables. I think both have tutorials on their Youtube channels. If I remember right, Luke has moved toward using products that don't require painting, so tile grouts in various sand/dirt colors, mixed flocks and static grasses, and so on. It's generally sealed by spraying multiple coats of pva glue mixed with water.
Great suggestions, thanks. Wow there is a huge volume of material here. I'm going to just link a couple here that seem good for my own reference:
MacPhail wrote:I did a huge project a couple of years ago where I stripped and repainted 8 old Realms of Battle boards that had been painted different colors by different owners. I used spray paint and then art store acrylic to paint them, got a satisfying degree of visual depth from paint as much as from 3D texture, and came up with a pretty good homebrew recipe for Agrax Earthshade in huge quantities. The MVPs of the project were ModPodge instead of PVA glue, an natural sponge instead of a brush, and remembering that anyone will look closely at your models and then at your terrain long before they look at your table.
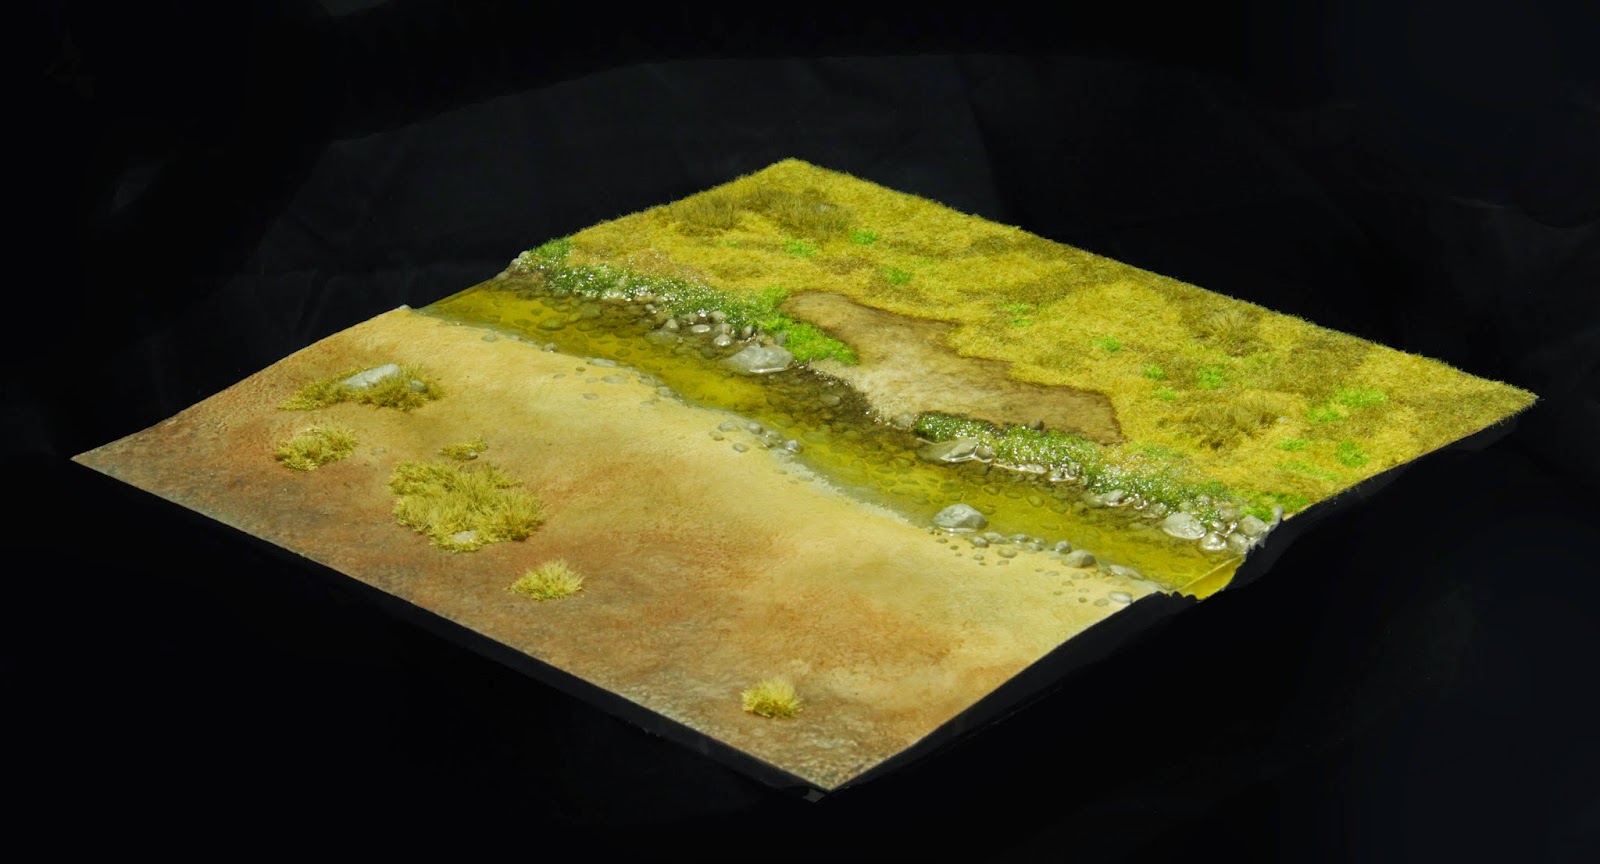
Also, that's a gorgeous board in the original post!
Art store acrylic + natural sponge seems like a strong way to go for base coating the tiles. Might be easier than spraypainting those different colors as I can do it inside, and cheaper too. Thanks for the blog link.
ModPodge, for covering the areas where you intend to flock?
I would love to achieve results anywhere near that picture in my original post!
tauist wrote:I'm also going to have to redo 8 x 4 feet worth of RoB boards, so am keen to hear all your tips regarding this subject! Keep em coming
I intend to augment the RoB base texture with some extra layers of detail, as the detail on the tiles themselves looks a bit meh and too regular to plausibly portray a ground surface. But a big challenge in this is that I also cannot have too much surface detail which would prevent placing terrain pieces with a solid base on the board.
This is the balance I'm trying to achieve as well. It sounds like some options people have used for texture are:
Spackle/filler
Sand fixed with PVA glue/water/ModPodge
Thick paint creating texture by itself
Thanks to everyone who has posted ideas so far. Any additional ideas or specific video links are welcome, it looks like there are a fair few of us needing to get a whole lot of board painted up
ph34r's Forgeworld Phobos blog, current WIP: Iron Warriors and Skaven Tau +From Iron Cometh Strength+ +From Strength Cometh Will+ +From Will Cometh Faith+ +From Faith Cometh Honor+ +From Honor Cometh Iron+
The Polito form is dead, insect. Are you afraid? What is it you fear? The end of your trivial existence?
When the history of my glory is written, your species shall only be a footnote to my magnificence.
2021/02/01 01:58:17
Subject: Painting and texturing "the ground" on large wargaming boards and tiles?
I will say it makes a HUGE difference in the game you are playing and how you want to use your board. My boys and I play old WHFB and KoW, so mass ranks of troops od a tray that you have to scoot around the board, so it needs to be fairly smooth.
Now with the individual bases and 40k, you can do a varied texture terrain with all sorts of details - much cooler!!
This message was edited 1 time. Last update was at 2021/02/01 16:12:01