 The city of Tarentum was one of the largest and most powerful of the Greek city-states in Southern Italy. This area of Italy had been in the Greek sphere of Influence for decades and the Romans were newcomers in comparison. However, the Roman consolidation of central and northern Italy did not go unnoticed in the area known as Magna Graecia. Therefore, when Roman ships on a "sightseeing" journey entered their harbor, the Tarentines took it very seriously.
The Tarentines appealed for aid from their Greek brothers on the mainland. Their pleas mostly fell on deaf ears, except for one man. Pyrrhus of Epirus decided to come to their aid. Pyrrhus was widely considered by his contemporaries to be one of the greatest of the successor general-kings. He had all ready had a well-earned martial reputation, and had been swinging well over his weight-class. However, he was also an inveterate opportunist, and he saw the Tarentine's plight as a chance to further his own ambitions. He soon set sail for southern Italy with his battle hardened forces.
Of course, the campaign of Pyrrhus in Italy is the stuff of historical "legend". After several hard fought victories, Pyrrhus choose to leave Italy. The Romans had tasted defeat, but the victories were so costly for Pyrrhus that he had to abandon his attempts to subjugate the area for himself. He abandoned his allies and sailed off to fight the Carthaginians in Sicily instead.
There are several major battles that history records. However, for every major battle recorded, there were several smaller skirmishes or lesser encounters that led up to the big clash. Today, we will be playing one of those lesser engagements.
Forces:
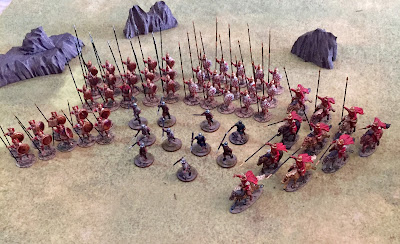
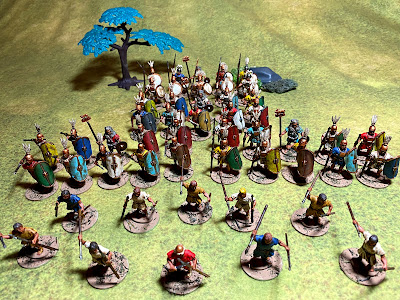
Today, Pyrrhus and his troops will be represented by my Macedonian forces for Men of Bronze. Pyrrhus' forces were of the Macedonian Successor style so they should fit right in. My Romans will be my Early Republican Roman troops. All models are from Victrix.
Pyrrhus Of Epirus
1 Bronze Shields - General
1 White Shields
1 Light Cavalry
1 Militia Hoplites
1 Light Infantry
 Roman Triplex Acies
1 Skirmisher
2 Hastati
1 Principes- General
1 Triarri
 Set-up
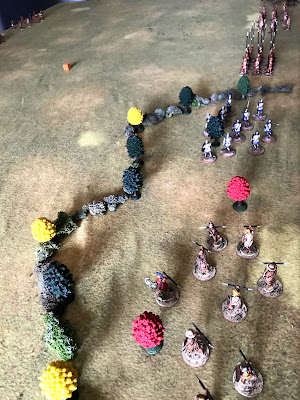
This was completed using the rules laid out by the rules in the booklet. The board is 72 x 48 MU with an MU being 1 inch. The board was divided into 6 grid spaces and terrain rolled and placed using the chart. The Players took turns rolling and placing terrain, with the player being able to place the terrain anywhere they wished in the grid square.
This system led to the following set-up.
Grid 1 is the Roman right, 2 Roman center, and 3 is Roman left. Grid 4 is Pyrrhus left, 5 is Pyrhuss center, and 6 is Pyrhuss right.
Grid 1- No terrain
Grid 2- No terrain
Grid 3- No terrain
Grid 4- Grove of Trees
Grid 5- Grove of Trees
Grid 6- No terrain
Wow, that was a strange set-up roll. I hope we roll better during the actual game!
The Romans set up in a standard Triplex Acies formation in the center. Skirmishers on the left edge, Principes, , Hastati, Hastati, with the Triarri in the rear of the center.

Pyrrhus' troops are deployed thus form their left to right: :Light Infantry in the left trees, Militia Hoplites in the center woods in open order. Bronze shields in the center flanked by the white shields. Cavalry on the right in the open with plenty of room to maneuver.
 Mission
We set-up our scenario using the method found right in the main rules. Therefore, we will be playing a Secure and Control Raid scenario. Both armies are trying to have a unit standing at the exact center of the board. The battle is 8 turns or until 1 side collapses. If no one is in control of the center at the end of the game, it is a draw.
There are no additional complications in this battle.
You can read it all on the blog here:
http://bloodandspectacles.blogspot.com/2021/11/battle-report-wars-of-republic-romans.html

