Switch Theme:

FW Scorpion Grav tank assembly tips  [RSS] Share on facebook Share on Twitter Submit to Reddit
»
Author Message
Advert


Forum adverts like this one are shown to any user who is not logged in. Join us by filling out a tiny 3 field form and you will get your own, free, dakka user account which gives a good range of benefits to you:
  • No adverts like this in the forums anymore.
  • Times and dates in your local timezone.
  • Full tracking of what you have read so you can skip to your first unread post, easily see what has changed since you last logged in, and easily see what is new at a glance.
  • Email notifications for threads you want to watch closely.
  • Being a part of the oldest wargaming community on the net.
If you are already a member then feel free to login now.


Made in us
Fixture of Dakka


Los Angeles

Making the pulsar lasers fit; it is snug in both sockets, a little more on the starboard mount. Advice?

Semi-relevant info:
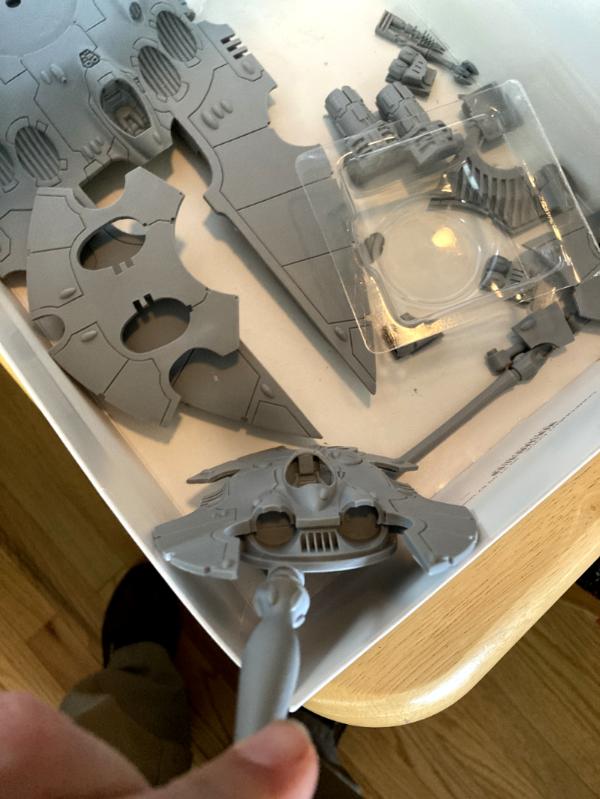
I washed off the release agent, cleaned molding lines, heated (hot air gun), bent, and flattened the rear deck to fit better.

This will be my first time assembling one of these, and, as many would guess, want to Get it Right the first time. Other advice I've received says to be very, very, careful with GaleF9 glue as it sets fast.


Automatically Appended Next Post:

This message was edited 1 time. Last update was at 2023/01/03 19:16:41


"You can bring any cheesy unit you want. If you lose. Casey taught me that." -Tim S.

"I'm gonna follow Casey; he knows where the beer's at!" -Blackmoor, BAO 2013

Quitting Daemon Princes, Bob and Fred - a 40k webcomic 
   
Made in au
Anti-Armour Swiss Guard


Newcastle, OZ

You'll probably need to sand them a little if they're a bit tight.

WET SAND them (keeps the dust down) and go slow. Better to only remove a little at a time than too much at once.

I'm OVER 50 (and so far over everyone's BS, too).
Old enough to know better, young enough to not give a ****.

That is not dead which can eternal lie ...

... and yet, with strange aeons, even death may die.
 
   
Made in gb
Crafty Bray Shaman


Anor Londo

Agreed RE wet sanding. If you are going to sand it also make sure that you are in a well ventilated area (preferably outside) and are wearing a dust mask.

Resin dust is incredibly bad for your lungs.
   
Made in us
Fixture of Dakka


Los Angeles

I will 'wet sand'. Thanks, guys.

"You can bring any cheesy unit you want. If you lose. Casey taught me that." -Tim S.

"I'm gonna follow Casey; he knows where the beer's at!" -Blackmoor, BAO 2013

Quitting Daemon Princes, Bob and Fred - a 40k webcomic 
   
Made in us
Fixture of Dakka


Los Angeles

Awright, all the wet-sanding and dry fitting is done. I've glued the big, quad engines and the rear hull plate. All fairly straight forward.

I will hold off gluing the pulsars into the turret until I paint them.

A. Any heads up about the 3x2 vector nozzles? - I did note they're labeled 'R' and 'L' for starboard and port.
1. any order? Seems plenty of space in between each
2. I did a little smoothing, flattening of their contact edges, though they contact the hull only slightly. Glue points at the curved center of each and?

B. Side fins and their fin mounts - which order?
1. adhering the mount to the fin first, then the two pieces to the engine?
2. Vice versa

Zap-aGap is not setting up instantly, so that's good.

"You can bring any cheesy unit you want. If you lose. Casey taught me that." -Tim S.

"I'm gonna follow Casey; he knows where the beer's at!" -Blackmoor, BAO 2013

Quitting Daemon Princes, Bob and Fred - a 40k webcomic 
   
 
Forum Index » Painting & Modeling
Go to: