| Author |
Message |
 |
|
|
|
|
Advert
|
Forum adverts like this one are shown to any user who is not logged in. Join us by filling out a tiny 3 field form and you will get your own, free, dakka user account which gives a good range of benefits to you:
- No adverts like this in the forums anymore.
- Times and dates in your local timezone.
- Full tracking of what you have read so you can skip to your first unread post, easily see what has changed since you last logged in, and easily see what is new at a glance.
- Email notifications for threads you want to watch closely.
- Being a part of the oldest wargaming community on the net.
If you are already a member then feel free to login now. |
|
 |
2026/02/05 12:53:07
Subject: Battle for Macragge (2004) Restoration
|
|

Boosting Space Marine Biker
|
Hello there friends! 
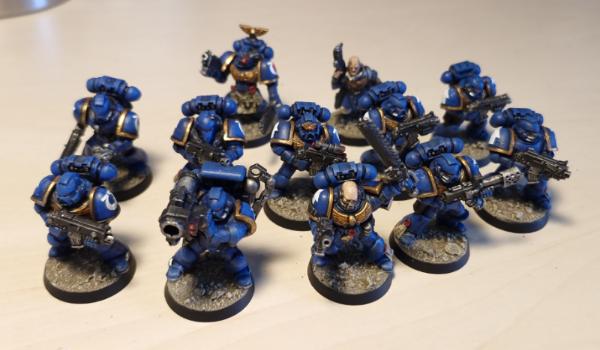
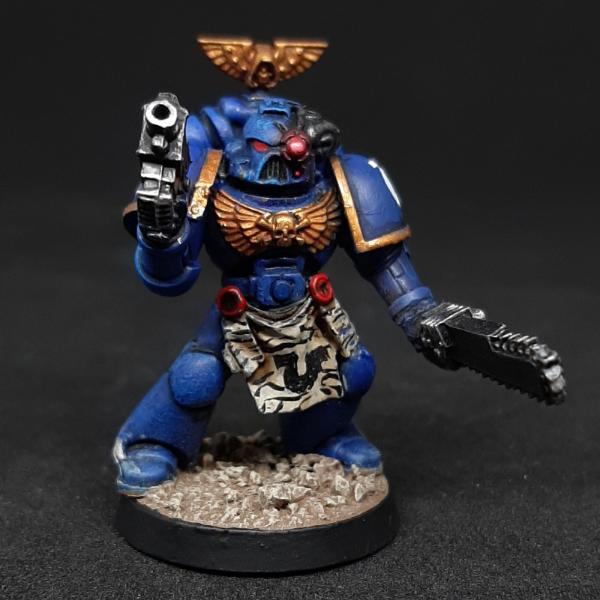
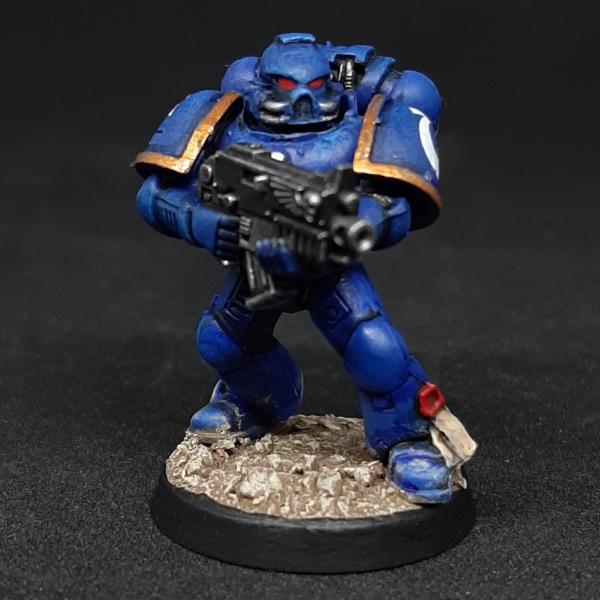
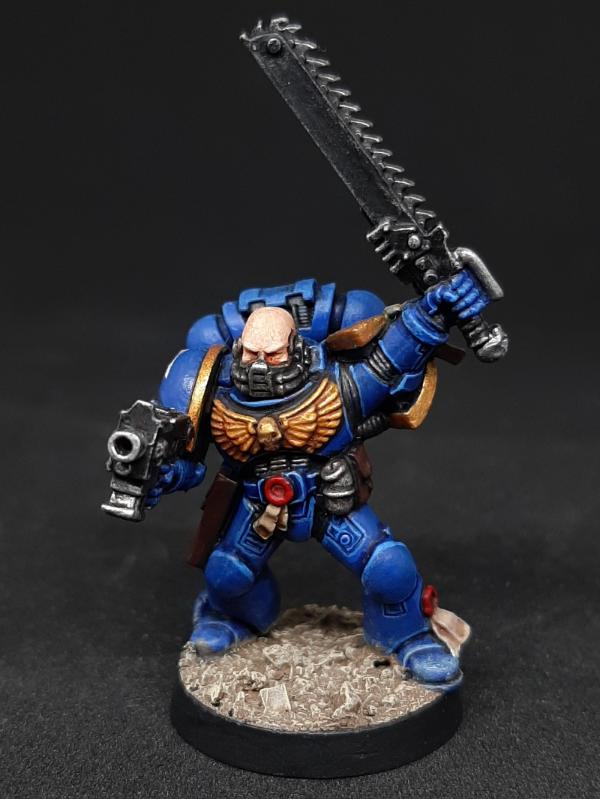
Starting this blog here for a brand new project (like I need any more of those, right?). While working on my Soul Drinkers army, I noticed I needed some more parts to round out my firstborn Sternguard squad. I went online to look for some used Space Marines and found a cheap set of 10 dudes for a tenner and promptly ordered it. Upon arrival, I was pleased to see that, even after finishing the Soul Drinkers they were intended for, I still had enough parts to actually complete the whole squad of 10 Marines. Not wanting to let good minis go to waste, and seeing how they were already mostly painted, I decided to quickly finish them up. I also had an old Sergeant Octavian and Lieutenant Varras from the old Battle for Macragge (2004) starter set lying around and decided to finally paint them as well. Here’s the finished result:
That quick painting session kind of gave me an itch for more classic Macragge goodness, so I was tempted to stalk ebay for a box of the original “Battle for macragge” Starter set from 2004. I had never bought the box when it came out, but since then I was lowkey kicking myself for that, not least because a friend of mine who’s also into the hobby had one. I often saw how nice and retro the minis were, even though he had not finished painting the full set and had apparently lost parts of it unfortunately.
When I checked out the ebay results, the prices almost made me drop the idea altogether. A complete set of BfM might go up to 400 bucks, so definitely not worth it, even for a classic set. There were also the reprints from 2023, but luckily, I didn’t fall for them. They are more expensive and lack important stuff like the rulebooks, certain terrain etc. Also, the box is just a blank and boring, lacking the awesome, classic artwork. So all around a bad deal, unfortunately.
Still, I couldn’t quite let go of the idea. I kept checking ebay occasionally for a better deal, until, late one night, I stumbled upon it - the perfect offer: An original box with all the contents still present, except for the Space Marine half (which I already had) for 90€! Most of the stuff was even still on the sprue! The seller had added some other Marines and other goodies to the offer as well, so that was a nice bonus. It was almost as if this offer was meant for me, so I decided to take the hint and made the purchase.
After a few days of impatient waiting, the box finally arrived. Here’s what I got:
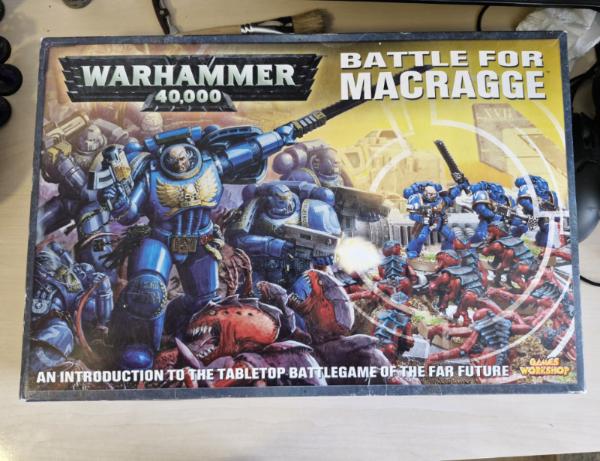
Ah, the beautiful cover art. This will make a nice addition to my shelf even when stored away. Just lovely, I’m so happy I found the original Alright, let’s crack it open:
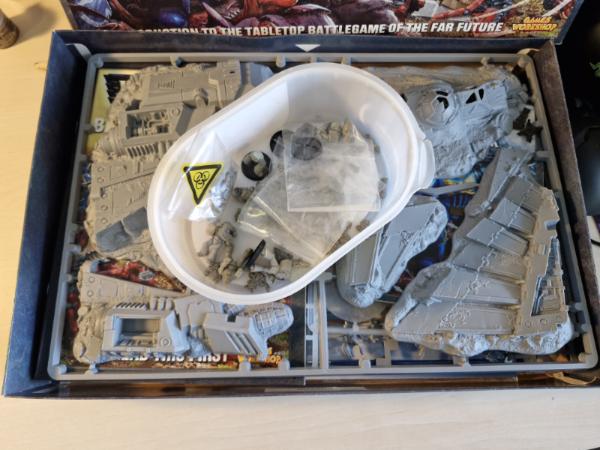
I had to pick out the Space Marine parts and put them into a tub to make sure nothing went missing, as there were a lot of loose parts already. Let’s take a look at some choice bits from the awesome haul:
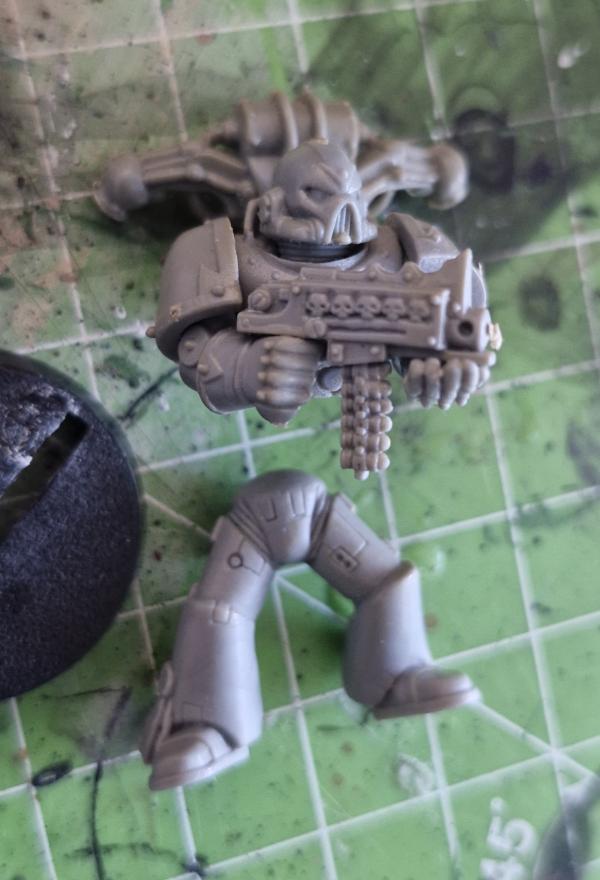 #
There’s this guy who seems to be made of a mix of 3rd and 2nd edition Chaos Marine bits. He’s got this awesome Boltgun with decorative skulls, a very cool relic indeed, which will definitely come in handy in my bits box.
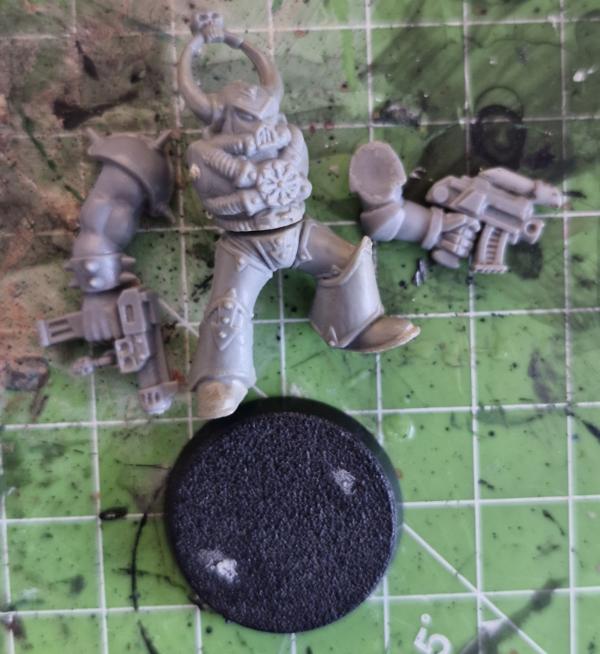
Then there’s this awesome guy with two pistols. Again, seems like 2nd edition. Also, very cool idea the original owner had to use an old Necromunda Goliath arm with autopistol on a Chaos Marine. Such a cool and thematic idea. Might even try to finish this miniature like that to honour this idea. We’ll see.
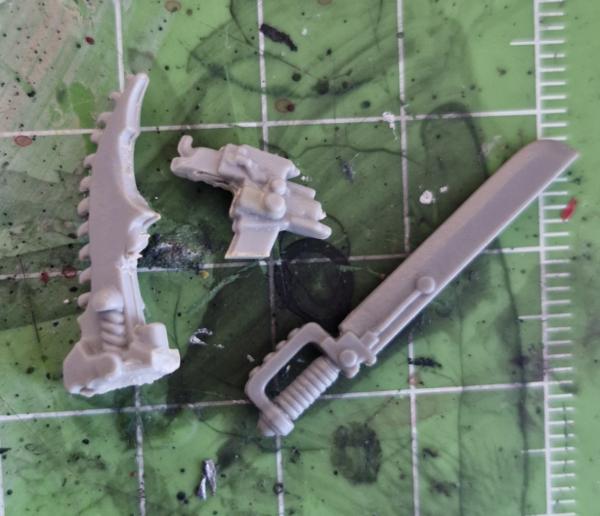
Finally, there’s this fine selection of bits: iirc, here we have a 2nd edition ork chainsword, a 2nd edition power sword and a freaking ROGUE TRADER bolt pistol  Can’t believe I was lucky enough to get one of these relics in a ebay haul!  There’s a lot more cool Space marine stuff there, these were just the best bits. Now, let’s move on to the other contents:
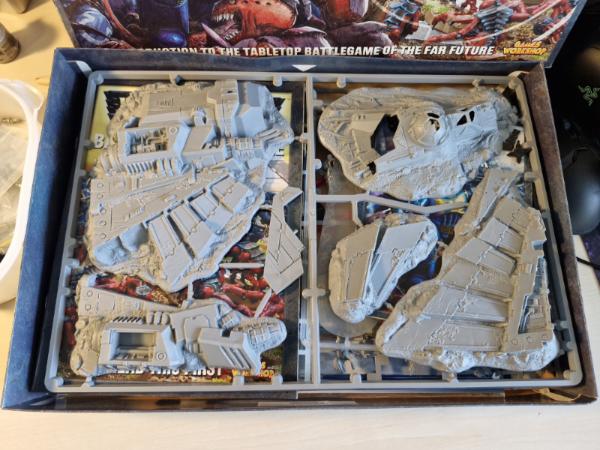
The beautiful Aquila lander terrain, still on the sprue. Can’t wait to dig into that
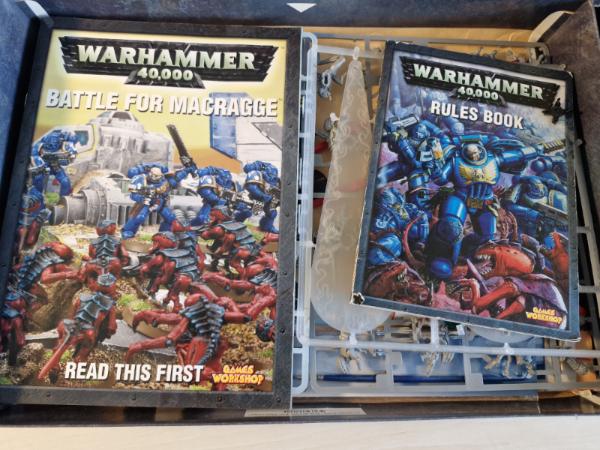
Then, the rulebook and the accompanying booklet for BfM. Even if the rules are outdated, the books are worth it just for the lovely artwork and pictures alone IMO. Besides, who says I can’t play the old missions with the classic rules from 4th?
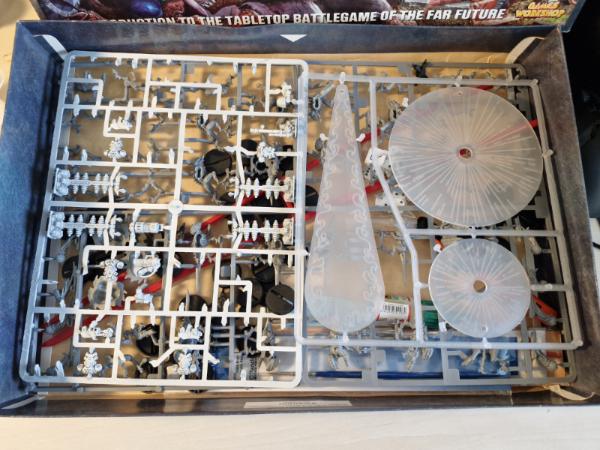
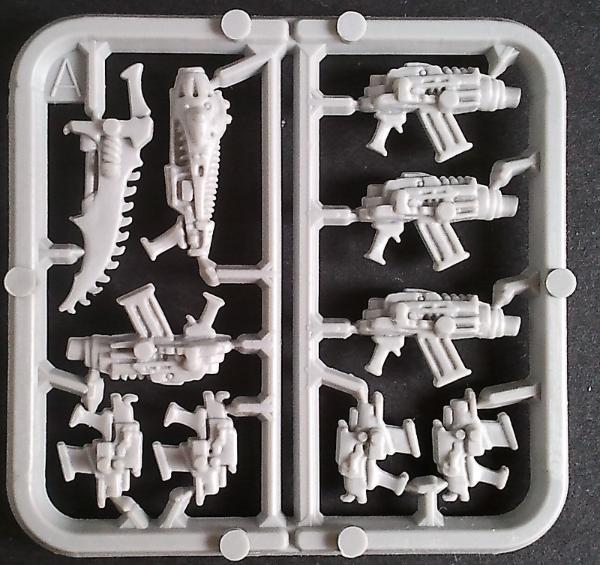
Here’s the Space Marine sprue, looking pretty empty, as well as the classic blast and flamer templates. Ah, those were the days, huh?
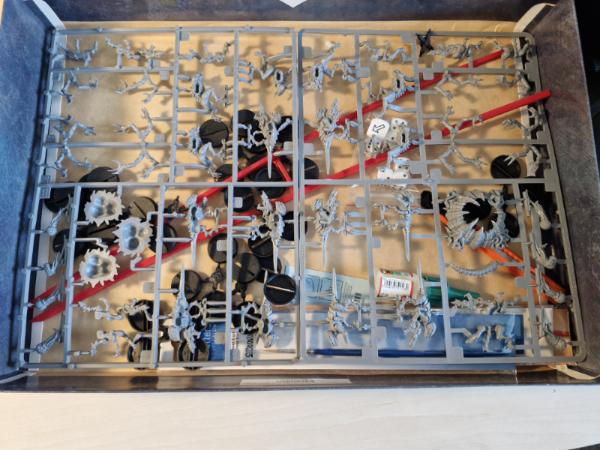
Finally, the sprues with the ‘nids. While I’m personally not a ‘nid player, I’m very much looking forward to assembling and painting something other than Astartes for once. Should be quite the nice palate cleanser.
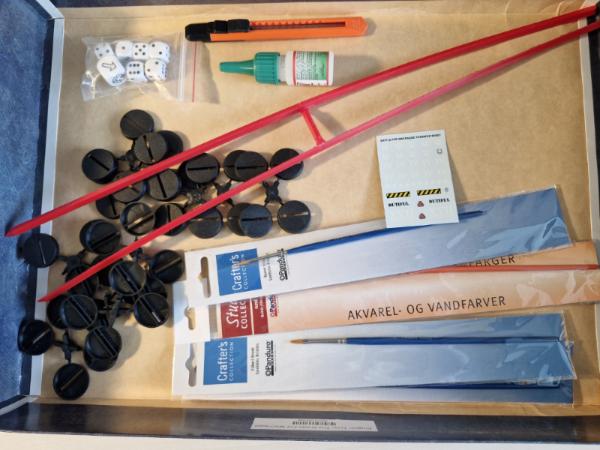
The seller even gave me free goodies, like a stanley cutter, some paintbrushes and even old glue  Most importantly, though, the extras like the dice, measuring sticks and transfer decals are also still present. Very good. I got nothing bad to say about this trade. Even the box is still in very good shape considering it’s age. I’m all around super stoked about this purchase.
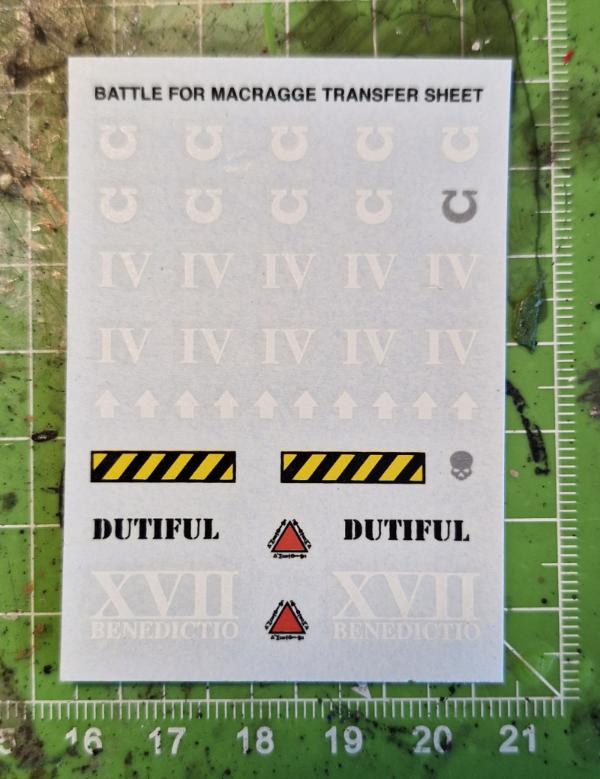
Here’s a closeup of the little decal sheet. I’ll defintely use these on the Aquila lander.
Alright, that’s all I have for now. I’m off to assemble the minis and terrain now. I’ll also have to remove a whooooole lot of mould lines and base everything, but I’m eager to get cracking! If you enjoy this blast from the past and want to see where this goes, keep your eyes peeled as I will be back with an update hopefully soon! Thanks for checking this out! 
|
|
|
|
2026/02/06 16:14:02
Subject: Battle for Macragge (2004) Restoration
|
|
Boosting Space Marine Biker
|
Nevelon wrote:Those are some old sprues. Have fun with them!
I had traded away the nid sprue back in the day, but it returned later when my friend dropped out of the hobby. The marines are still on the shelf, but don’t see the battlefield that often. Still a fun bit of history.
Thanks Nevelon, glad to see you're checking this out too! I already saw your Ultramarines from BfM in your gallery when looking for inspiration online, they are pretty awesome!
Ragsta wrote:
Hello lad! Nice to see you taking a trip down memory lane with some old school miniatures! The blue on that first squad is really lovely- dark yet vibrant IMHO.
Thank you for all the pictures- I love ebay scores like these! Although it usually ends up in me spiraling into multiple projects and purchases 
Hey Ragsta, cool to have you on board! Thanks for your input on the Marines, they are quite a bit darker and grittier than my regular Ultramarine recipe, as I tried to emulate and build upon what the previous owner had done with them. I quite like the new paint scheme as well I must say, I think it'll contrast nicely with the Tyranids from the box. Also, I'm very happy to hear that reading about my ebay haul gave you some joy! I'm quite the same, these bargains and restorations scratch a very particular itch for me.
Alright, quick update: First off, I must admit I was wrong about the pistol I got as part of the free goodies. I checked again and was surprised to find out that it is, in fact, not the Rogue Trader bolt pistol from the RTB01 set I had previously assumed. I actually have no clue where it is from, but it must be pretty old. If anyone can shed any light on the provenance of this particular bit, it'd be much appreciated! Here are some better pictures for you detectives out there:
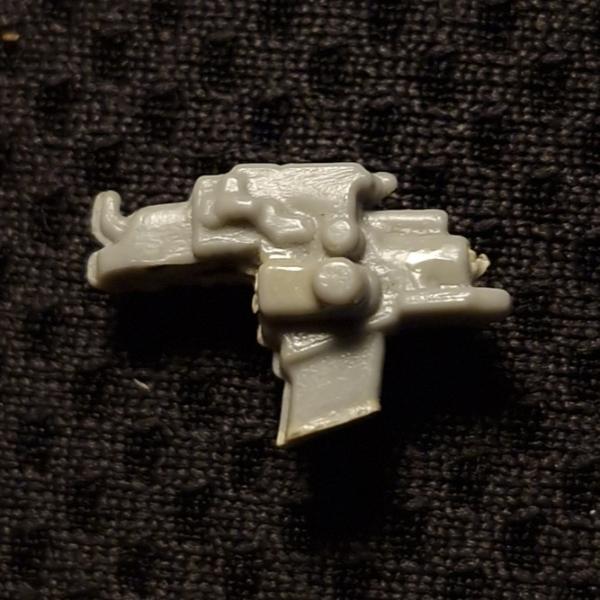  
Maybe it's an old ork shoota of some kind? 
In other news, I'm making steady progress ont the BfM box. Here's the terrain:

I noticed that, if I glue the dorsal fin of the Aquila lander in place, I will no longer be able to store everything flat in the original box. Thus, I decided to come up with a different solution: MAGNETS!
The dorsal fin now snaps nicely into place and the whole terrain piece can be painted like that, then be disassembled again to fit inside the box.
I also finished building and basing all the remaining miniatures from the set:
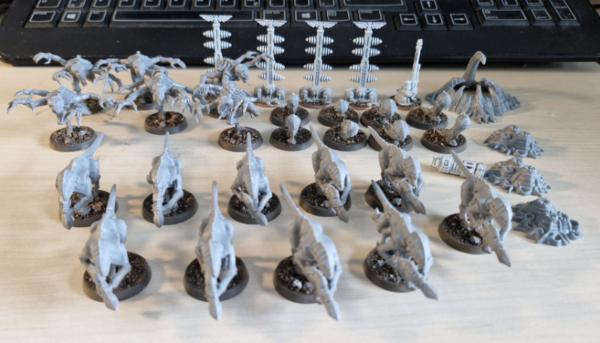
I made sure that all the parts line up nicely and there are no gaps, something that is rather common to see on older BfM minis. Im currently at the rather tedious step of removing mould lines from all the minis so that I can finally move on to the painting stage.
Anyway, I hope you enjoyed this quick update and stay tuned form more. Thank you very much for checking this out!
|
|
|
|
2026/02/07 17:35:10
Subject: Battle for Macragge (2004) Restoration
|
|
Boosting Space Marine Biker
|
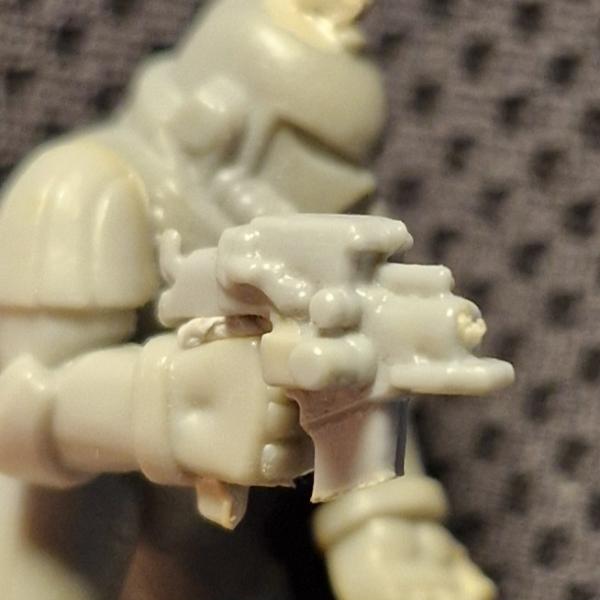
Nevelon wrote:That pistol should be from the RT era space ork box.
Ah, right. Thanks Nevelon, you are absolutely correct! I even found a picture of the sprue it used to come on:
Although it seems somebody cut off part of the magazine. Anyway, I think it'll be a nice part to use on something like an Inquisitorial character or something. We'll see. Oh, and looking at the sprue, I notice I even have one of those Bolters/rifles in my bitzbox! How cool!
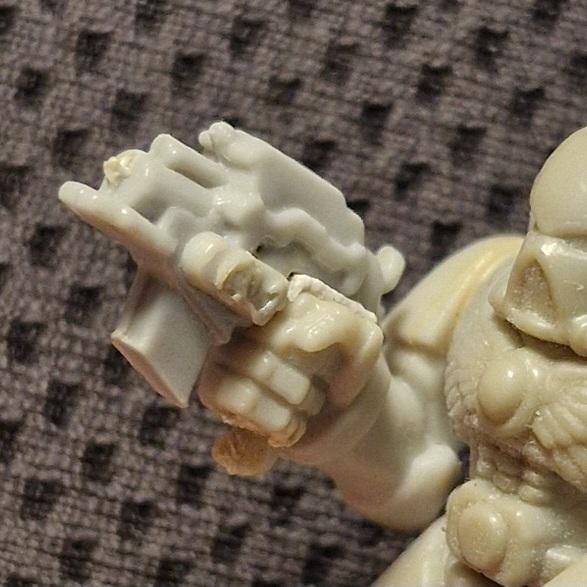
youwashock wrote:Yeah, as is the chainsword, I think. Cool project! No school like the old school.
Indeed. the chainsword also came on that sprue, as seen above. I wish I had two of those, they would have been perfect for the "Tellos" character build for my Soul Drinkers. Ah well. Thanks for your comment youwashock, and I agree, oldschool is awesome
JordySteve wrote:Hi FeistyRips, nice eBay haul, you don’t see something like that coming up too often! The marines are looking good, I like the darker colour scheme, how are you thinking of painting the tyranids?
Hey JordySteve, thanks for your reply!  I was very lucky I would say. Glad you like the Marines. In fact, I brought some better pictures today so you can take a closer look at what I have completed already! Regarding the Tyranids: I think I'll stick to the Behemoth paint scheme and try to get it pretty close to the box art (with some leeway for lazyness and sloppy drybrushing), as I want the set to be true to the lore. Although I'm pretty sure my girlfriend would prefer it if I turned them into hot pink bugs from Hive fleet Cottoncandy

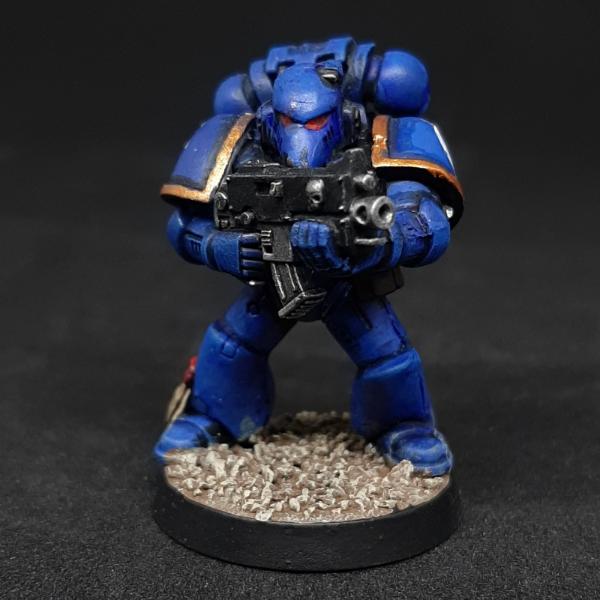
Alright, so I'm still in the process of removing some mold lines, but I managed to get cracking some scenery painting. Pics of that will come later. For today, I want to share with you my painted Ultramarine replacement squad for my BfM restoration project. Here we go:
First off, we have Lieutenant Varras. Now, the keen-eyed among you may have noticed that something is a little off about him. And you would be correct, as this mini also had to undergo a bit of restoration. Its original head was missing because I had regrettably attempted a conversion which didn’t turn out too well. A replacement was needed. I decided that one of the new Space Marine heads should do the trick. While the joint isn’t as clean as the original, I think it is at least passable. Regarding the paintjob, I tried to keep my palette similar to the rest of the Marines in the set. Unfortunately, the paint was already caked on a little thick in some spots on the mini, so certain details don’t pop as much as they should. Still, I think the mini is serviceable for what it is.
Next, we have this conversion for a Sergeant. I remembered too late that I still had an original “Sergeant Octavian” model lying around in my cellar, so I broke apart the…. I guess Captain? … of the used lot I had bought and turned him into the cheap little Tactical sergeant you see here. I really like that he came with a head with a bionic eye, and I tried to make it pop with a very basic glow effect. The chainsword is from Forge World and features the cool knuckle duster guard which I really like.
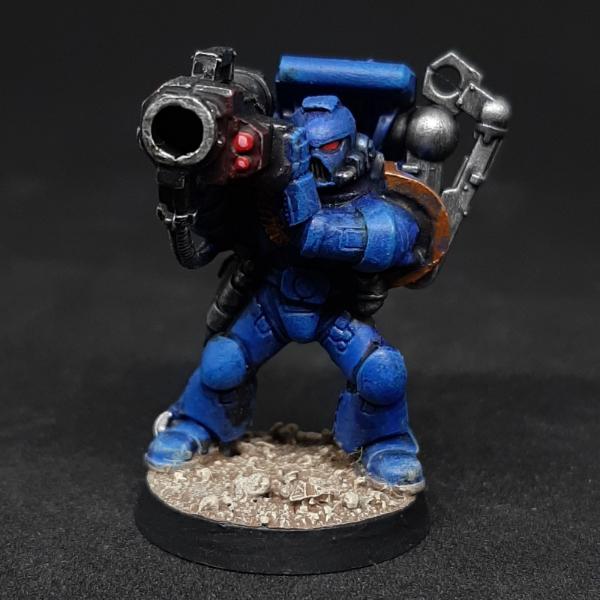
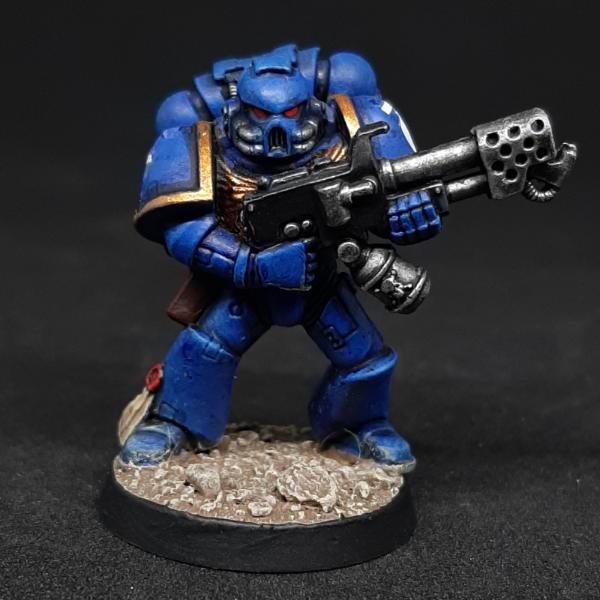
Then, there’s this Missile Launcher Marine, an original from the BfM set, although I did cannibalize him for the regular backpack and gave him one with an autoloader (or whatever it is called).
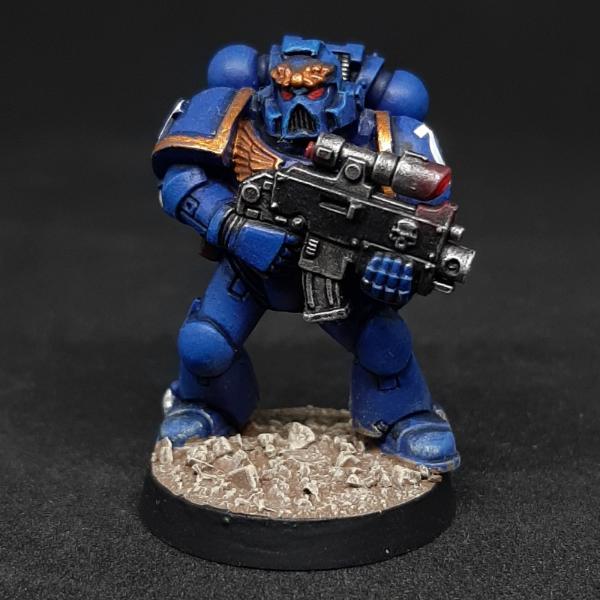
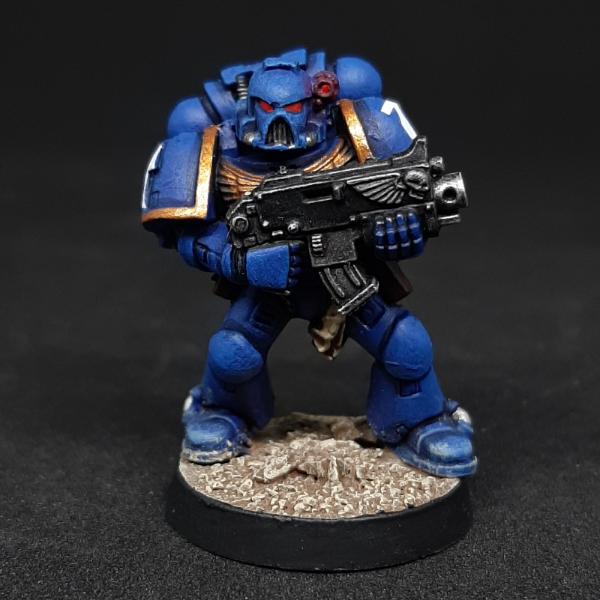
Next, a regular Marine from the AoBR starter set which came with the used lot. I think I’ll be using this mini for the Sergeant/Lieutenant Atreus character from the tutorial missions, because he has that pretty aquila on his helmet, as well as the better optics on his boltgun. Next, just a regular dude:
And a replacement guy with Auspex scanner:
Another replacement with a Beakie helmet:
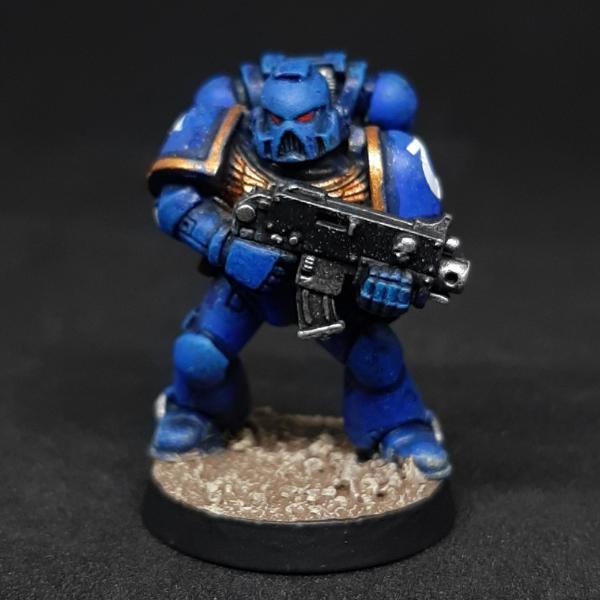
There’s the flamer specialist, an original from the BfM set:
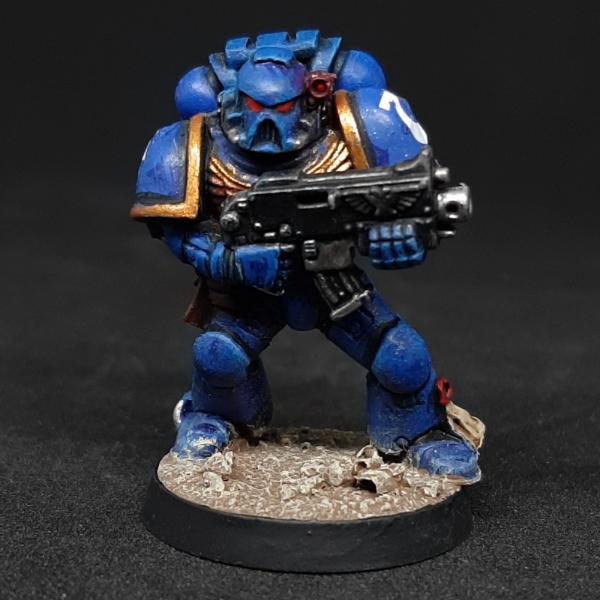
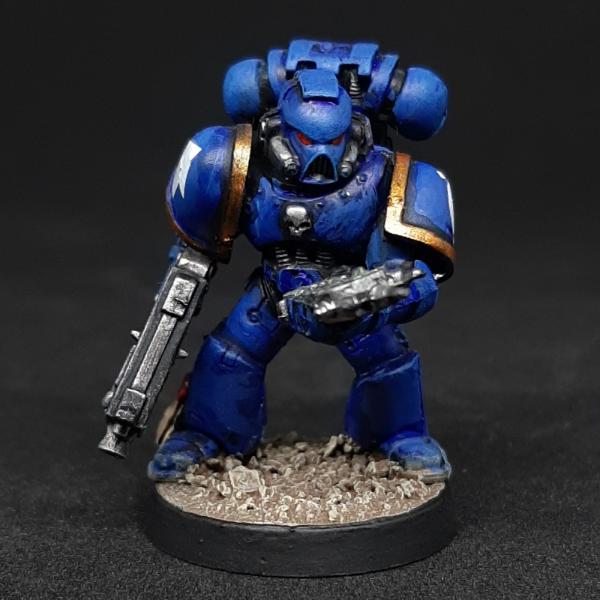
And finally, the original Sergeant Octavian himself, which I still had from some previous ebay purchase and who had been desperately awaiting a paintjob for years:
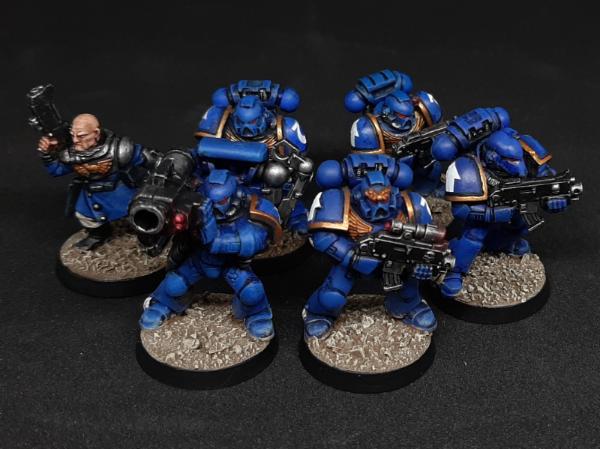
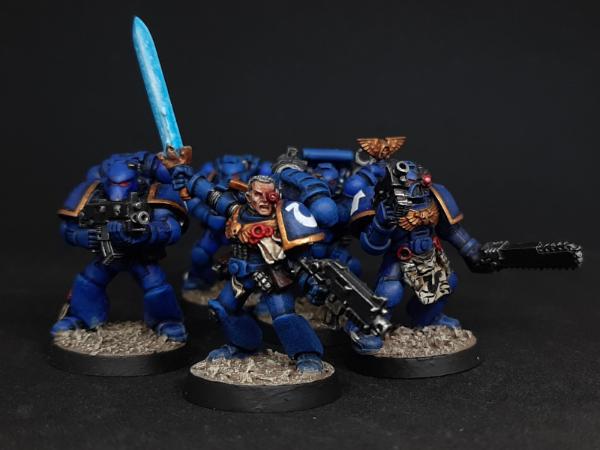
You can tell he has a little more highlighting and less drybrushing, because I had initially started painting him in my old Ultramarines scheme and had to tone him down a little from that. The old scheme was much more involved, and I feel has become too tedious, which makes me reluctant to paint anything that way. Besides, the gritty, dark paintjob kinda looks even nicer IMO. Time for some group shots! First half:
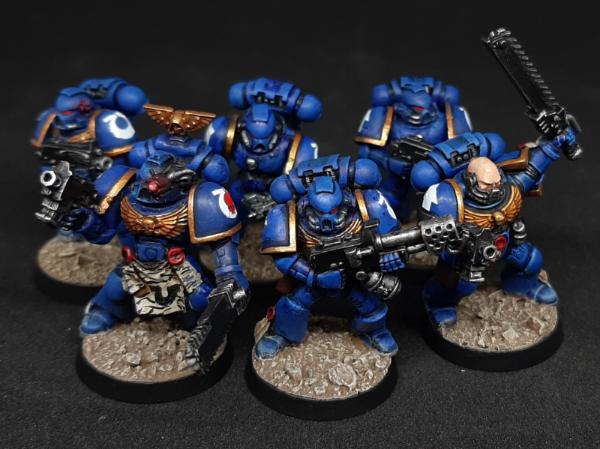
… and the second half:
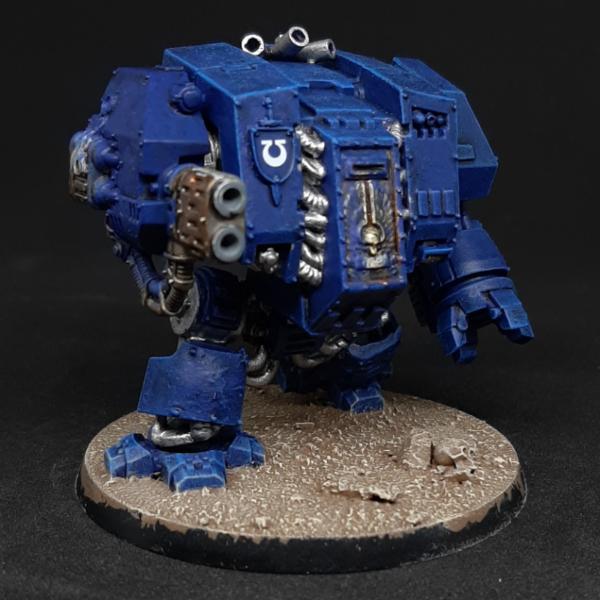
… and that’s all the Marines from the BfM box. However, I still have one little bonus for you! The BfM expanded missions, which used to be hosted on GW’s proprietary Macragge website and can still be accessed through the Wayback Machine, mentioned the possibility of playing more involved battles. One of these included a Dreadnought. Aha! That's just the excuse I needed to build another one of those! What can I say... I just can help myself, I love everything about Dreadnoughts and I need more of them  Luckily, I still hade one in my bitzbox which I had bought for a conversion that never ended up happening. It is a classic, easy to build Dread from the AoBR starter set which I reposed slightly. Mind you, his paintjob is still a WIP! Here he is in his standard configuration:
…and with an assault cannon, as outlined in the Mission rules:
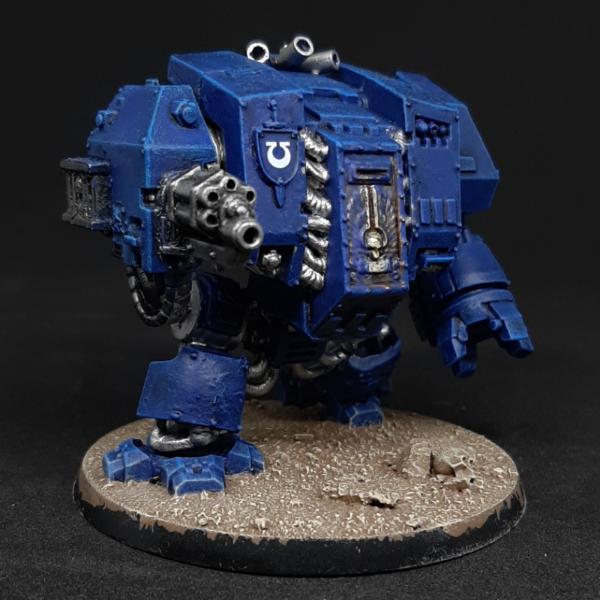
The walking pose changes so much about the Dreadnought. I think the old Dread models get such a bad rep, but it is mostly just the stiff, unchanging pose GW ended up giving them. If they had been sold like the dreads we have now, with poseable legs, I think they could have looked so much better and offered way more variety on the tabletop. That’s why I always try to alter the pose with these old sculpts, and I think it helps a lot. Anyways, that’s all I have for today. I hope you liked this update and will stay tuned for more! See you soon!
|
|
This message was edited 2 times. Last update was at 2026/02/07 18:34:54
|
|
|
|
2026/02/10 20:31:41
Subject: Re:Battle for Macragge (2004) Restoration
|
|
Boosting Space Marine Biker
|
Hello again!
I'm back with another quick little update. Today, I hopped over to my local Warhammer store to get some paints, and I signed up for the "1 Million miniatures" challenge while I was there. I only pledged 25 minis, mostly because I want to finish my Macragge set, but I've already started the paintjob on most of the stuff in there and that means it won't count. Still, I'll try my best to get to the 25 minis some other way. It's a humble goal, but in all fairness, I'm also a very slow painter
In other news, I'm happily chipping away at the Tyranid half of the box at the moment. All the mold lines are finally removed and I'm in the process of painting the little buggers. I also brought some pictures of finished stuff for you!
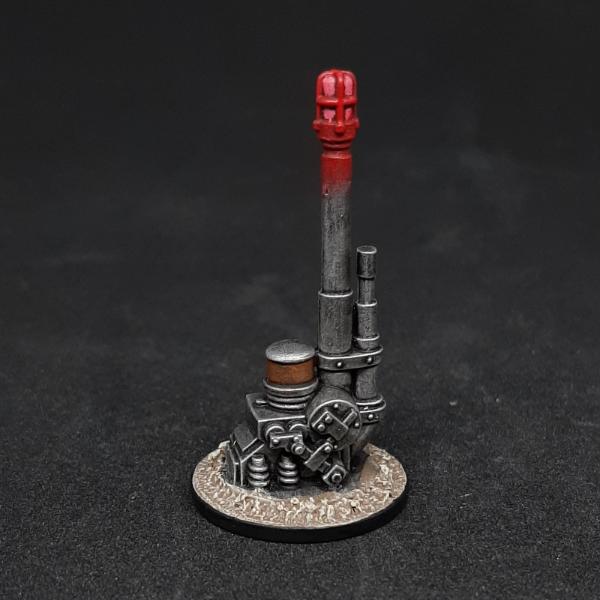
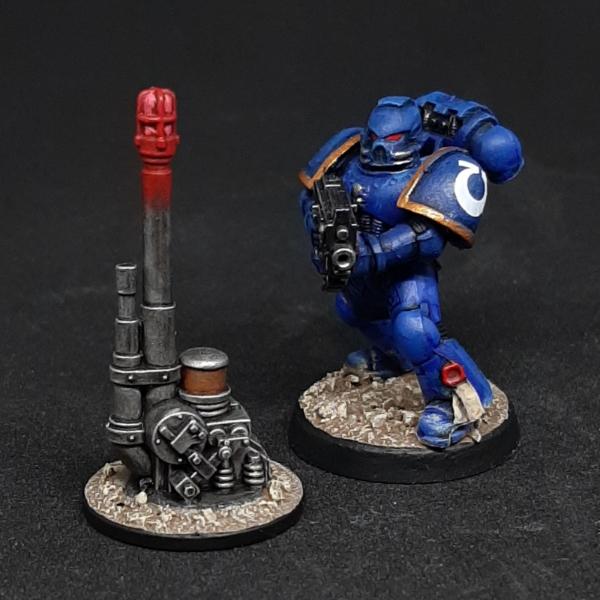
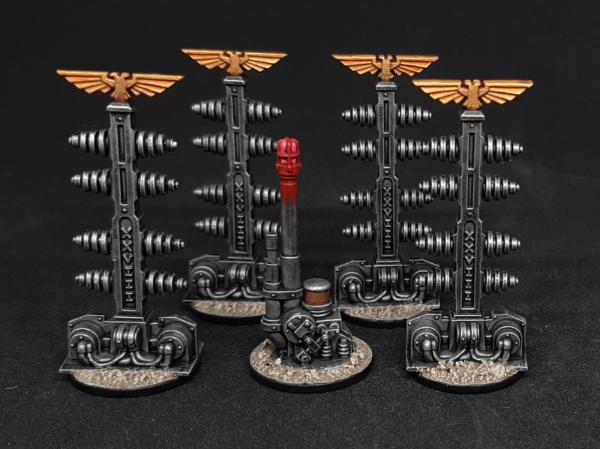
First off, we have the lovely "Magna Power Field Projectors":
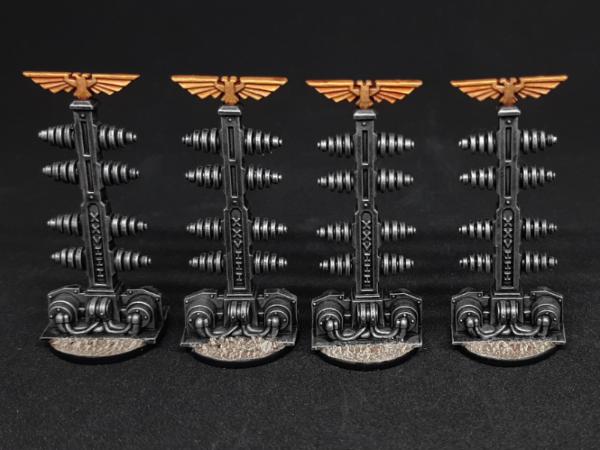
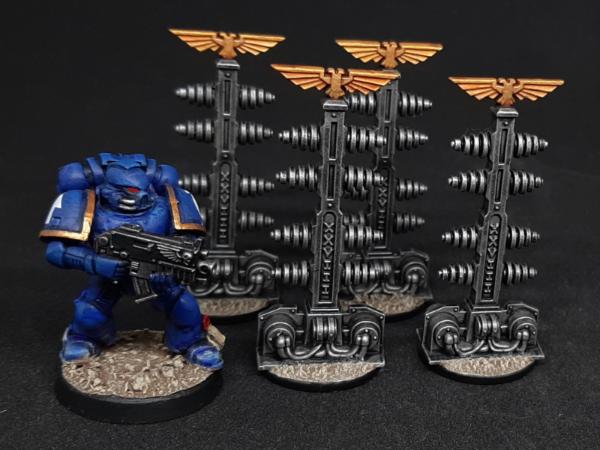
Glad I finally got a set of those, they look so cool. Plus, they were super easy to paint just with simple techniques. As you may notice, I added a small, weighted round base to each one to keep them from getting knocked over. Here they are with a Marine for scale:
I also completed the "Locator Beacon":
I'm really kicking myself for not entering into the challenge sooner now. These simple minis would have made quick work of my pledge goal, but unfortunately I was too late. Once again, this bit received a heavy base to weigh it down and tie it in with the rest of the minis.
Here's all the small scenery bits set up together:
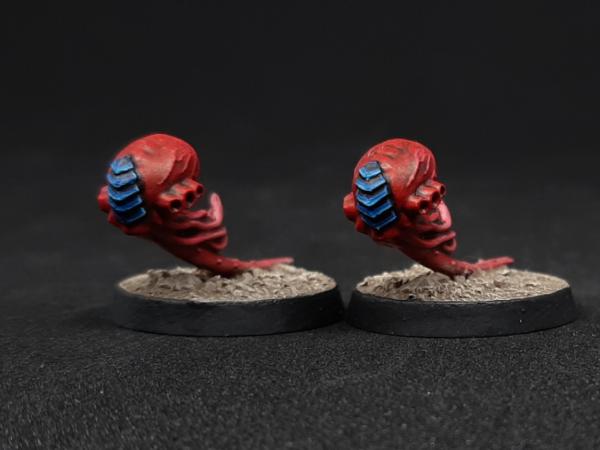
Finally, a sneak-peek at my WIP 'nids. I'm currently painting the infestation markers and the spore mines, and here's two of them which are nearing completion:
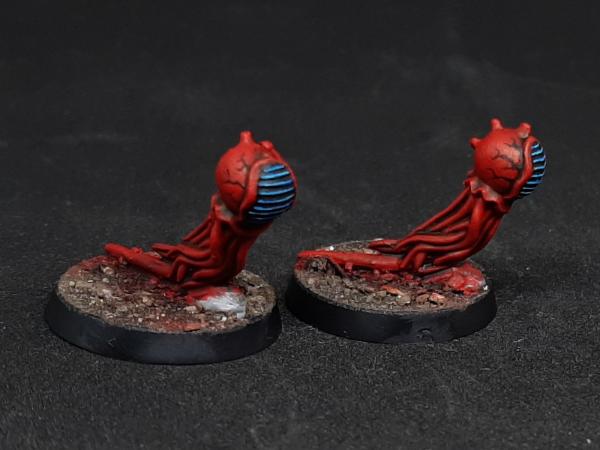
They are still missing some pink on the tentacles/tendrils and of course their bases still need to be painted, but I'm pretty happy with how they are shaping up. I'm quite proud of the small veins on the sides, too 
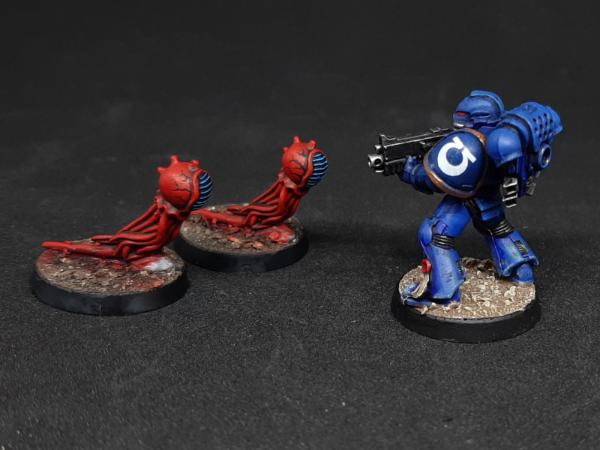
This guy might be in big trouble
And that's all for today. Like I said, just a little update. I will be back with more soon I hope! Until then, thanks for looking and stay tuned for more!
|
|
|
|
2026/02/19 22:45:33
Subject: Battle for Macragge (2004) Restoration
|
|
Boosting Space Marine Biker
|
Hey there! I’m back with another update!
blockade23 wrote:Bits & Bobs looking super crisp there, very nice! You've made al the Marines look super unified and that trimwork is neat. Excellent job.
Thanks a lot blockade23! Glad you like them despite the rather quick and dirty paint scheme!
Ragsta wrote:
Loving the reds on those spore mines, mate. The Ultras have come out very nice in those close ups. I love the old dreads too! I've scraped together some of them and look forward to renovating them.
Thanks mate! Old dreads are the best I wish you a lot of fun renovating them!
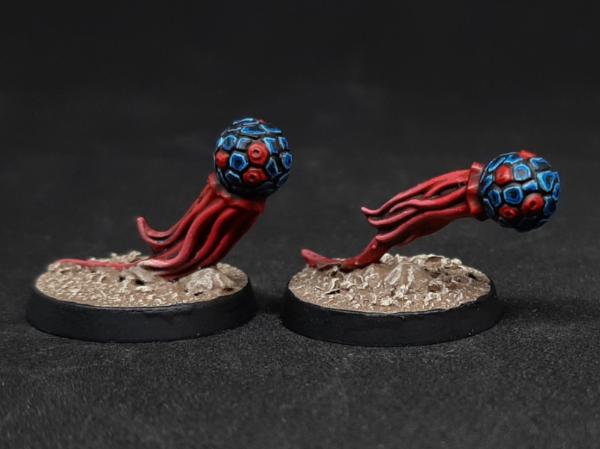
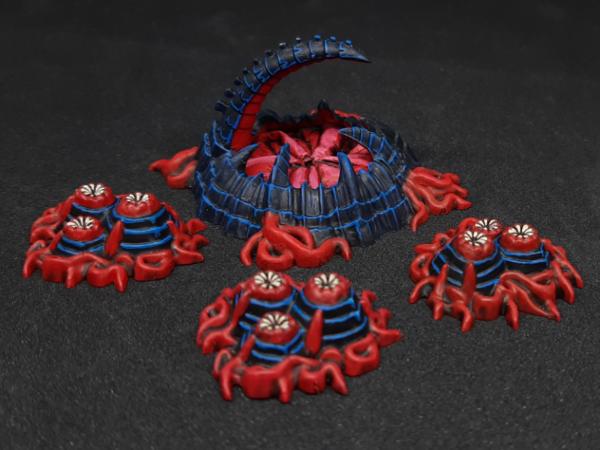
Alright, let’s get to the meat of this section. Today, I want to share a few pictures of my progress on the Tyranid part of the set. Let’s start off with some Spore Mines:
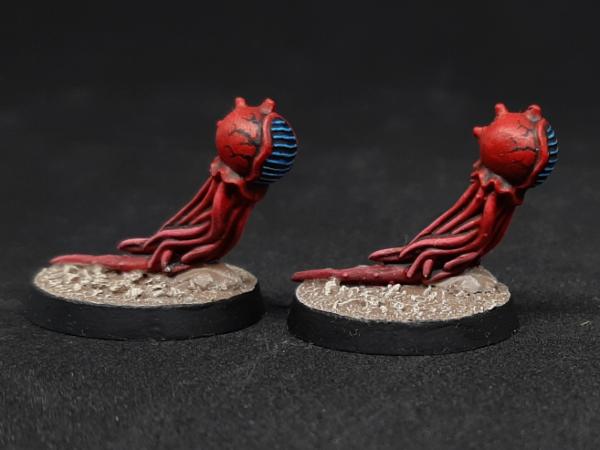
These are the Poison Spore Mines I already teased in my last post. I finished them up with some subtle pink highlights on the tentacles and a unifying paintjob for their bases.
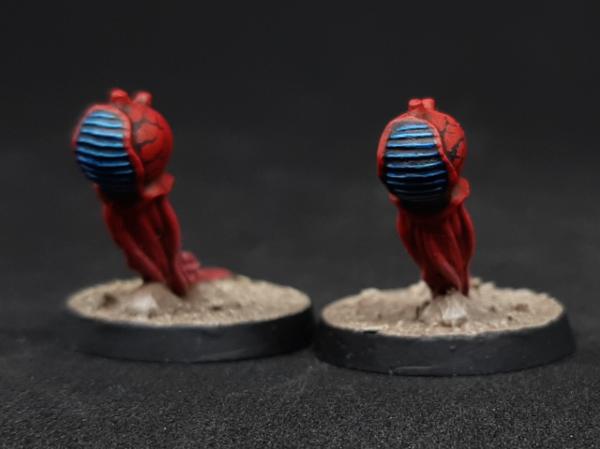
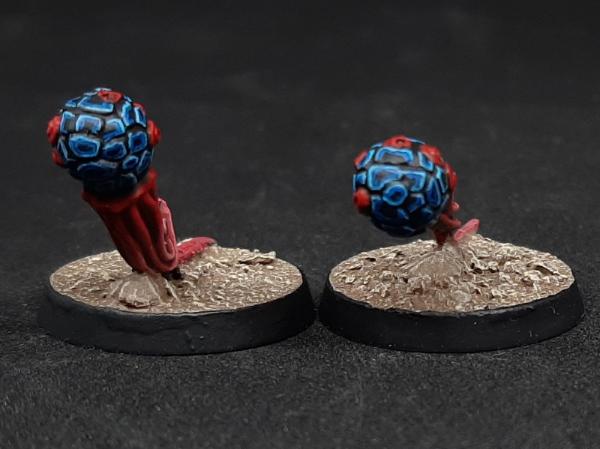
Really stoked how they turned out, I especially like the contrast between the intense red and the vibrant blue of the classic Behemoth fleet paint style. Next up, the Acid Spore Mines:
Very similar paintjob to tie them in with the others. I used a two-tone highlight for the blue to give a subtler transition on their little carapaces. What I love most about these has got to be their little acid spouts on the sides.
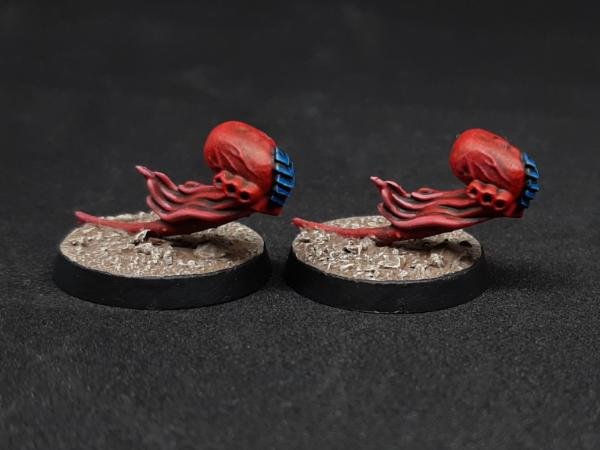
Finally, we have the Exploding Spore Mines:
These look very nice with the tiny little fragments all over them, but they were an absolute pain in the butt to highlight. It takes forever to add both highlight stages to every little piece on the heads, which is why I’ve only managed to finish two out of four thus far. I’ll finish the rest soon, but I must admit I got a little distracted with terrain building and painting over the past few days (update in my terrain blog to follow soon). I hope you’ll bear with me anyway
Of course, the Mines just don’t pop up out of thin air, no no. They are spawned by the so called “Infestation Markers”, some more scenery from the Macragge box set:
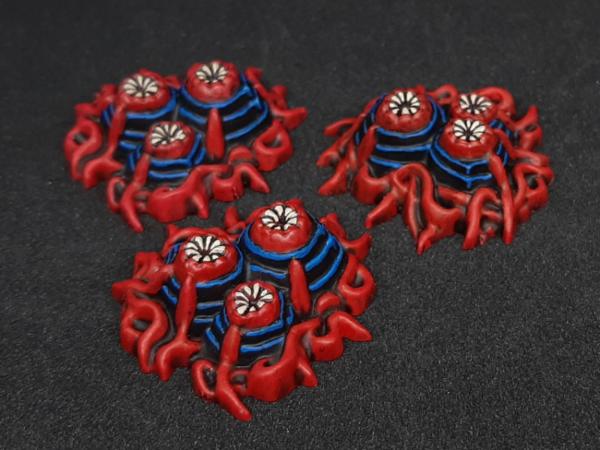
Once again, I tried to stay true to the paint scheme of the box art, and I hope I did an ok job. Here they are together with the Mines:

Finally, here’s a WIP picture of the “Hive Node”, the slightly bigger Tyranid terrain piece which can spawn Termagants and Genestealers in the Missions:
The thing is nearing completion, but is still missing about 50% of the highlights. As you may notice, I added a fleshy orifice to the tunnel entrance, as I thought it would look weird if the underlying surface could be seen through the hole. I’m a bit iffy on that decision as it looks a little... sketchy. I might still change that last minute. We’ll see. Anyway, that’s all for today! I hope you liked this quick little update and stay tuned for more. Oh and of course, any feedback, comments and ideas are very welcome, as always! Until next time
|
|
|
|
2026/03/05 16:23:34
Subject: Re:Battle for Macragge (2004) Restoration
|
|
Boosting Space Marine Biker
|
Hello again!
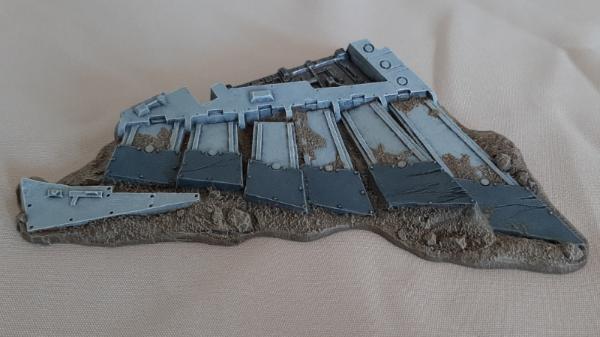
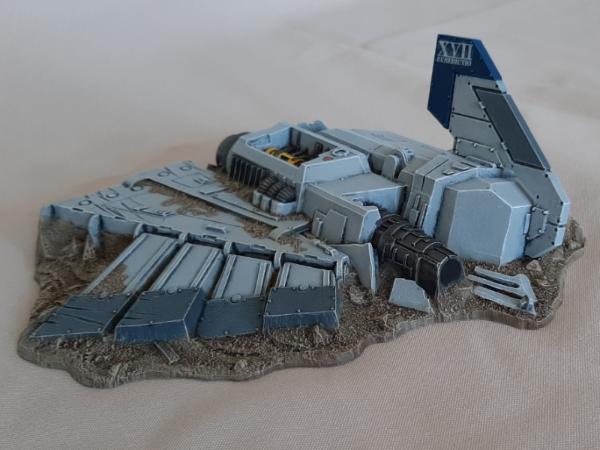
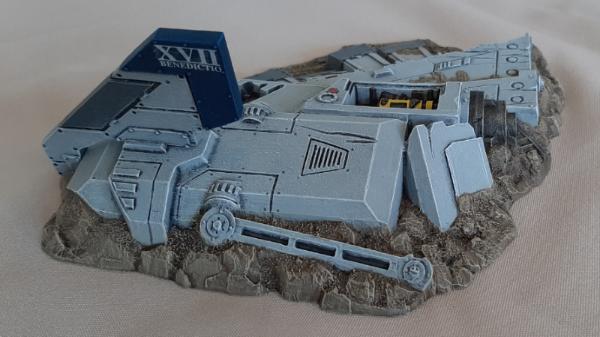
I'm back with some more pics today. Sorry for the long wait this time, but I'm trying to work on my goal for the 1 Million miniatures challenge simultaneously (not to mention the other projects I keep getting distracted by), so I don't have as much time to write up a post because I should rather be painting On that note, let's get to the point. I recently finished all the pieces of the Aquila lander terrain from the BfM box, a project which I was able to submit to the 1 Million Miniature challenge luckily. Here's the finished results:

I started off by painting this small piece to give me a chance to test out the paint scheme. I settled on a Dawnstone basecoat, followed by a Nuln oil pin wash, then a heavy stippling/drybrush of Greyseer, and finally finished up with a gentle, pure white drybrush to pick up the details.
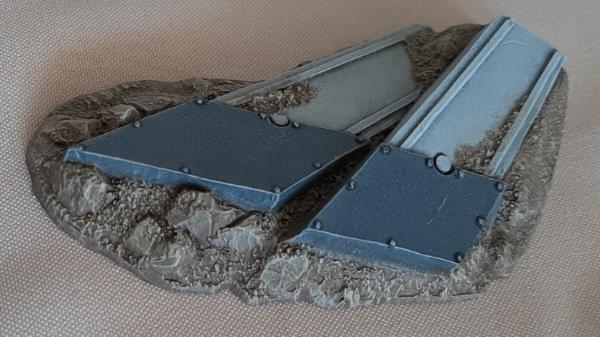
The dirt was painted according to the recipe for the bases of the miniatures I have already finished to make them match on the tabletop. I was pretty happy with this result and got cracking on the remaining 4 pieces.
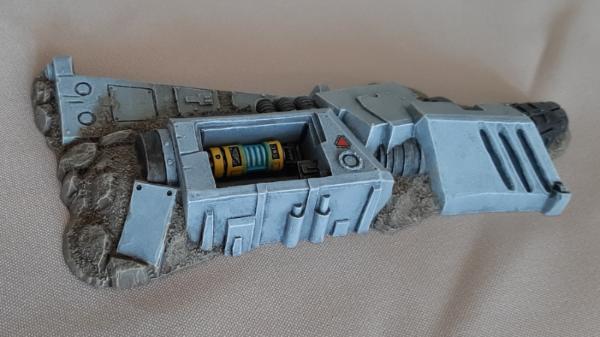
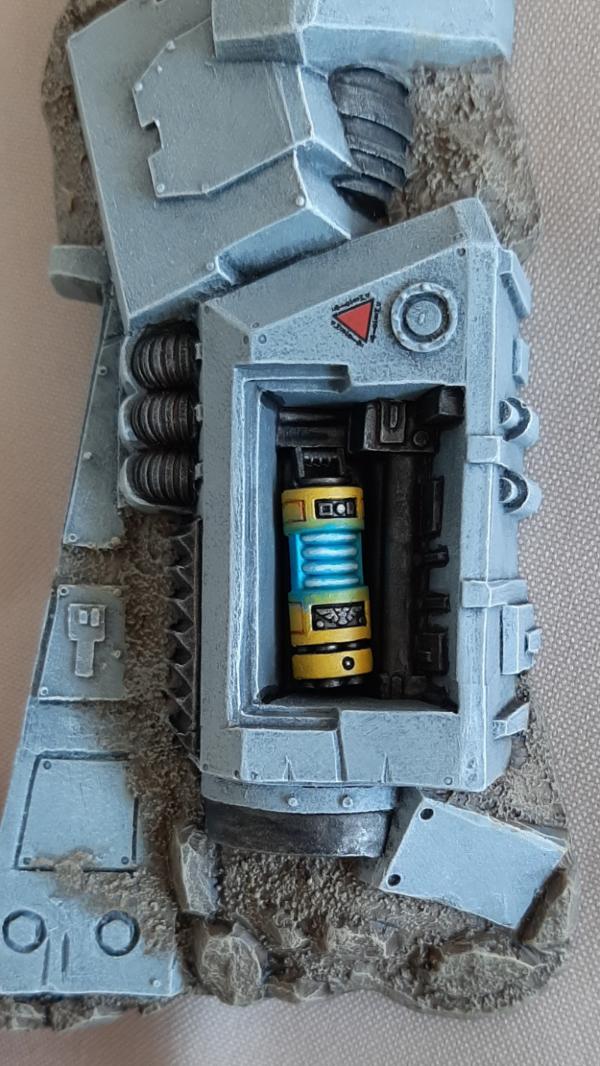
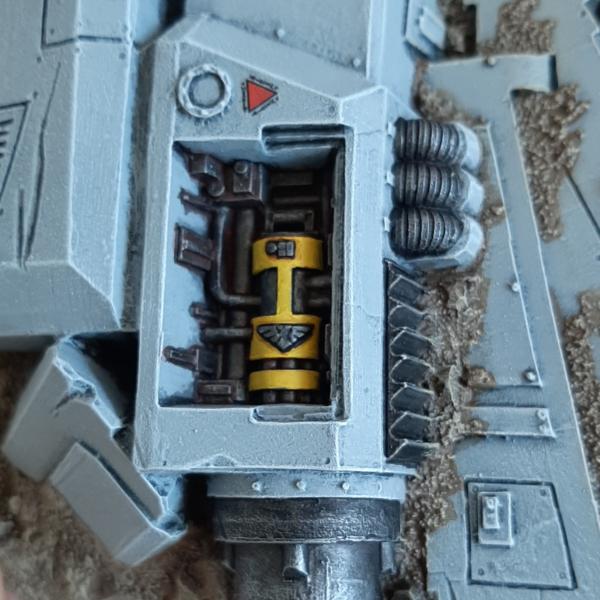
Next was this slightly larger piece. I followed the exact same recipe. The removable fusion core was also painted in this step.
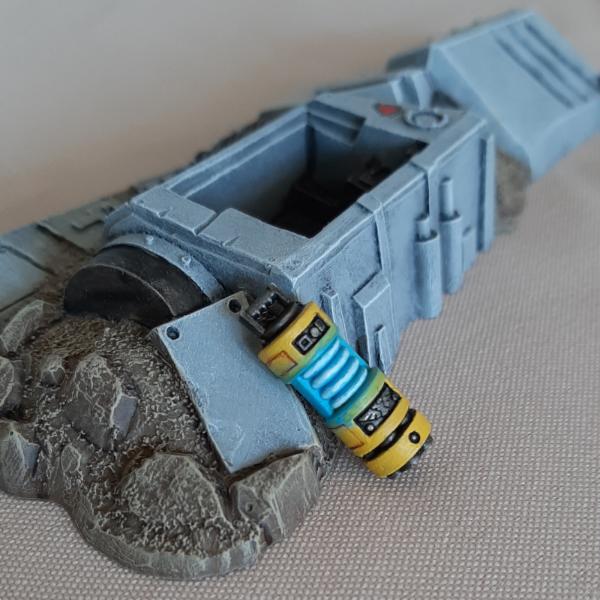
This piece had some metallic parts. I painted these with leadbelcher, washed them with nuln oil and then drybrushed them with Ironbreaker for a highlight. I also added some homemade red-brown wash so certain areas to create the impression of rust. Some detail shots of the painted fusion core for you:
By this point, I had the recipe pretty much nailed down, so I immediately tackled piece nr. 3:
Here’s a better view of the slightly rusty metal areas that got exposed in the shuttle crash:
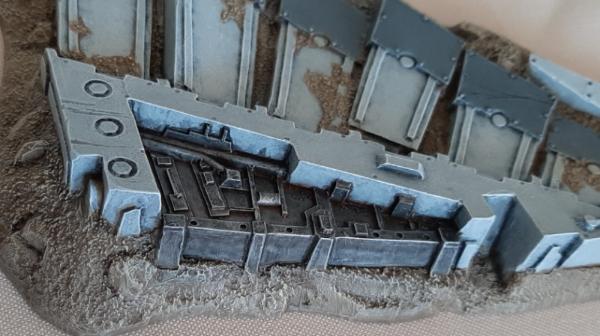
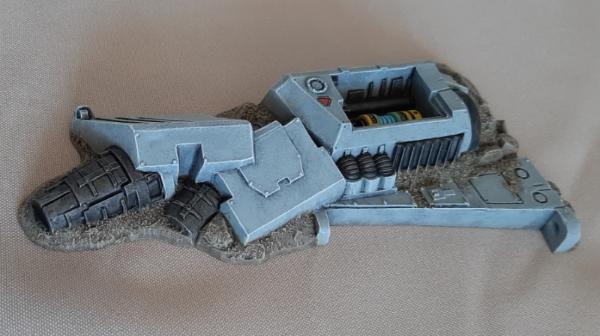
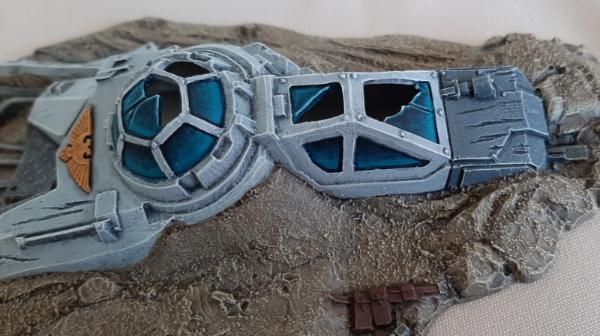
With my confidence in my recipe now firmly established, I decided to tackle the most challenging piece from a technical standpoint: the cockpit!

I added the “Dutiful” decal near the front of the craft because I thought that would be the most logical place to put the vessel’s name.
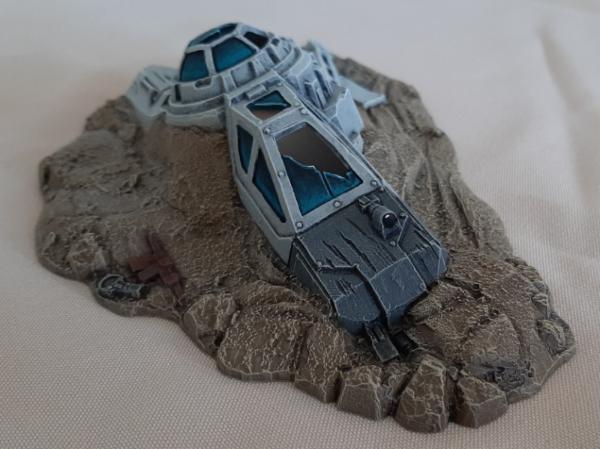
After following my recipe to get the basic work done, it was time to do the glass of the canopy. I took some heavy inspiration from the BfM box and booklet to give me an idea of how to paint this thing. Tbh, I have never done a real glass effect (unless you count the small lenses on weapons and vehicles), and so I am actually super happy with how I managed to emulate the original style here.
To achieve this effect, the glass panes were first basecoated with Sotek Green. Then, I added several layers of Drakenhof Nightshade, starting from the top and getting lighter toward the bottom. This created a nice gradient and gave me a good, dark base colour to place my highlights.
The highlights were an initial layer of Sotek green, then a mix of Sotek green and white, then finally pure white for the sharpest edges. This created a wonderful glass shard illusion that I am honestly rather proud of. I’ll definitely have to keep this method in mind to try and emulate it on other minis (a demonic glass sword with this effect would be totally awesome IMO).
I might add some interior or at least a base plate to the inside of the cockpit, as I find it looks weird just hollow like that. However, I wanted to get these pieces done for the challenge, so for now, it is what it is.
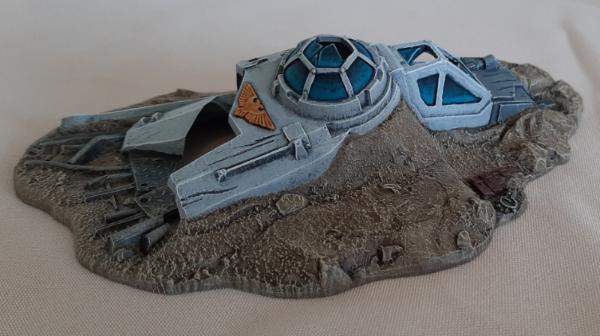
From here on out, it was smooth sailing. The fifth and final piece, although big, was pretty straightforward and had barely any new colours, apart from a bit of blue on the tail fin and the yellow fusion core.
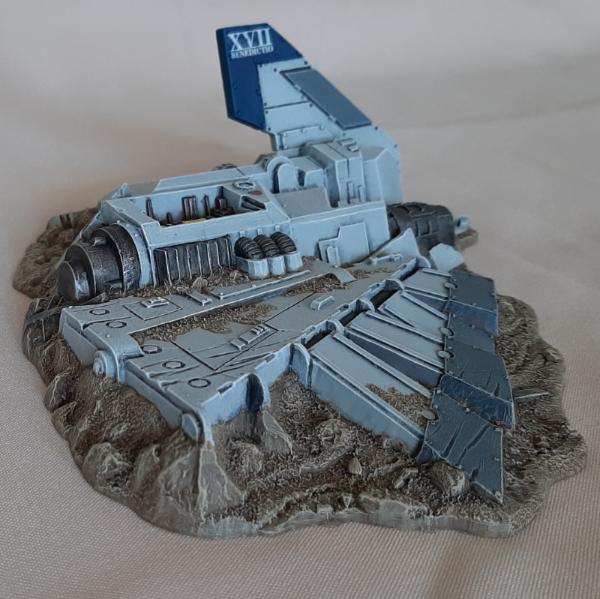
I also added the “Benedictio” (the cruiser this lander belonged to) decal on the tail fin. Unfortunately, the decal started silvering after I applied some decal softener. I guess I should have added a gloss coat to the area first, but I didn't and found out the hard way. Oh well. Other than that, I think the piece turned out pretty good.
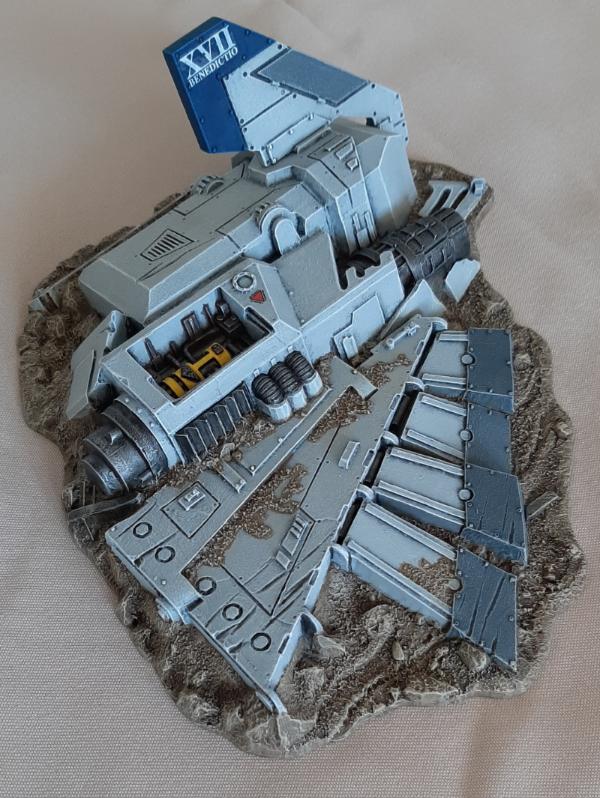
Another closeup shot of the fusion core, this time the port-side one. It has a slightly different design than the other one for some reason. I think they had an older desgin which can still be seen in some of the booklet photographs, but then changed the sculpt shortly before release. Same goes for Lt. Varras, something I find rather interesting but couldn’t find a reason for thus far. Maybe some of you can shed some light on this matter?
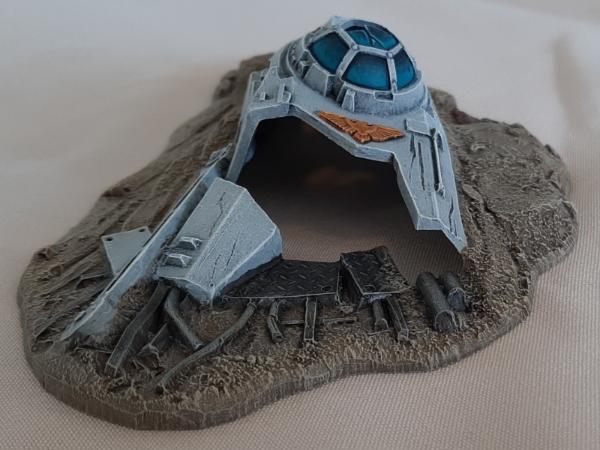
And here’s the terrain with a Marine setup next to it for scale:
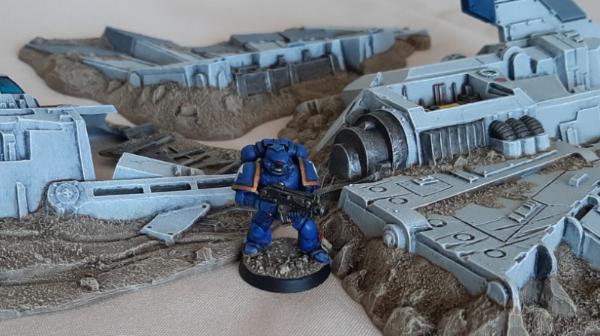
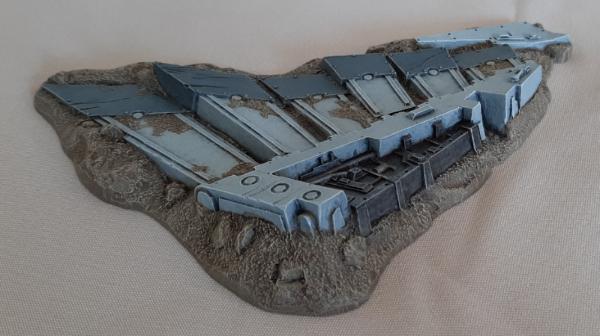
This already looks very cool. I really need to get some games in with this set once it’s done- maybe the missus can be convinced to play me at some point… we’ll see Now, let’s take a look at all the terrain pieces together:
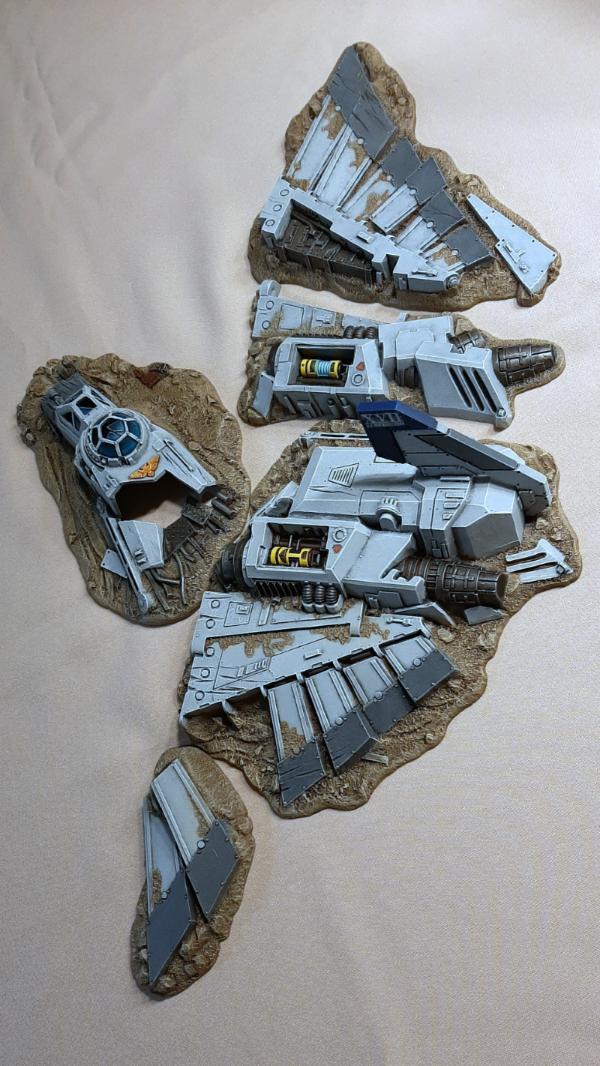
Set up like that, you can appreciate the true size of the lander in it’s full glory. It almost makes me want to get an intact one to paint up as well now However, I realized that these are no longer manufactured/for sale (barring a recast or 3D print). But I already have neough on my plate, no need to expand my backlog of minis any further
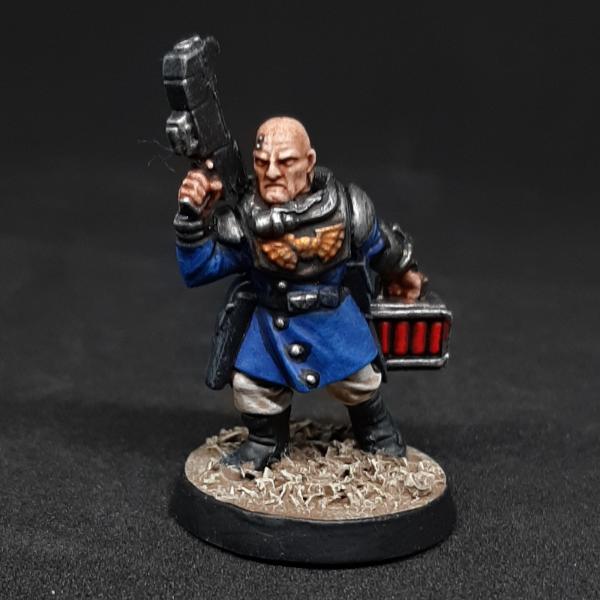
The Aquila lander is, however, not all that I have to show you today. I also finished another miniature for the challenge which I guess I should put in here. No progress on the Tyranids atm, but I did complete this lovely chap:
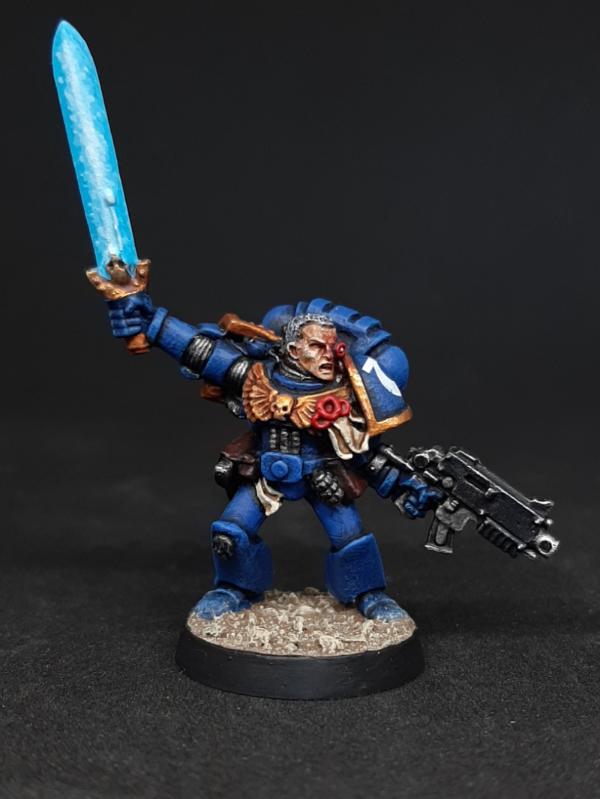
This miniature I received from one of the many used lots I keep buying off ebay and other online sellers. It seems that the oringinal owner converted an old 2nd/3rd edition metal standard bearer into a Captain. I really liked this idea and thought it would go perfectly with my Macragge Ultramarines (mostly because of the sweet roman gladius this mini was given by the converter), so I got to work slapping some blue onto him (he used to belong to the Salamanders, originally).
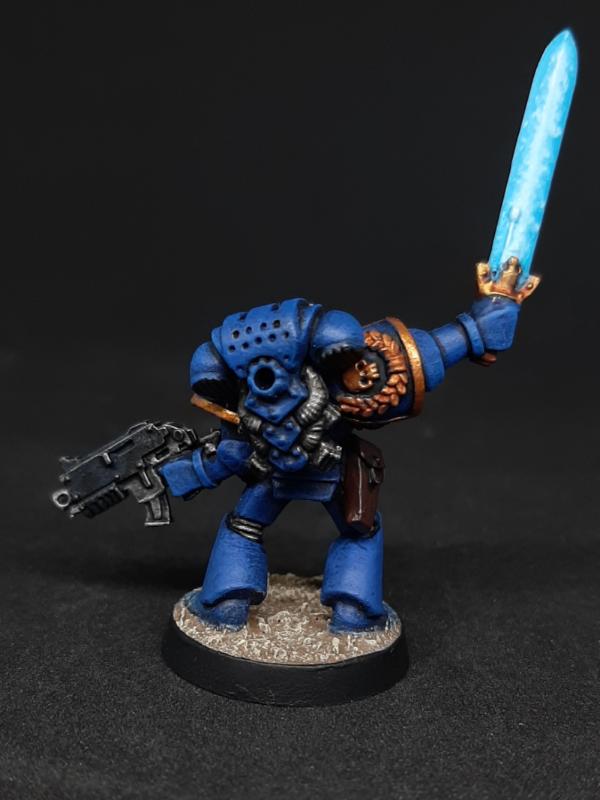
On this captains sword, I used my new-ish technique for power weapons. I try to paint them like Star Wars lightsabers, i.e. a vibrant base colour with some bright highlights down the center of the blade to create the illusiion of a “glow from within”. I really like this style and I think I’ll be using this for some of my collections going forward.
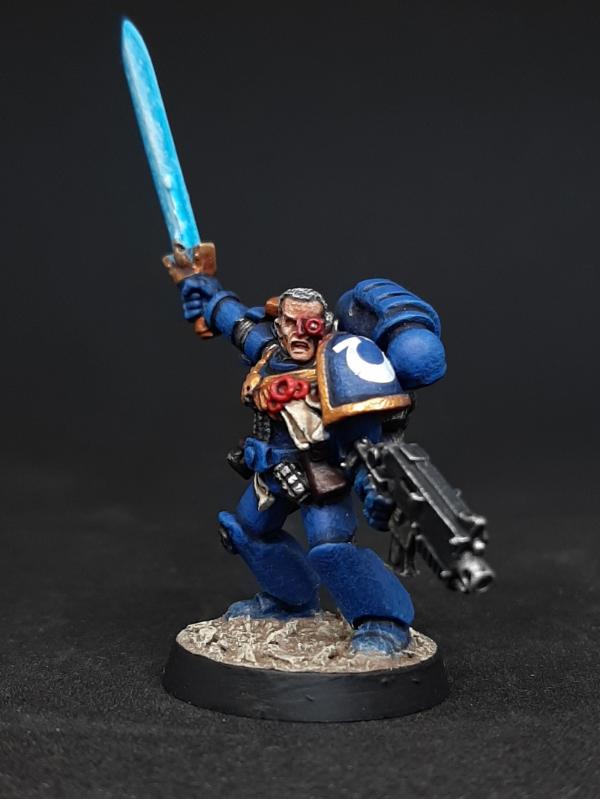
I laso added a tiny bit of OSL to the bionic eye of this mini, mirroring the other sergeant I kitbashed and showed off in an earlier post.
Here we have the metal Captain with some of his buddies from the box/my collection. The only issue I have with this mini is that, even for a Firstborn Marine, he seems to be very much on the short side. Good news for my fellow short kings out there, I guess we can still become Astartes, we just need to believe
Alright then, that’s all for today. I hope you enjoyed this update and stay tuned for more. As always, I’m really looking forward to your comments and feedback, so please let me know your thoughts. Thanks for looking, see you later!
|
|
This message was edited 1 time. Last update was at 2026/03/05 16:34:27
|
|
|
|
|
|
|