| Author |
Message |
 |
|
|
|
|
Advert
|
Forum adverts like this one are shown to any user who is not logged in. Join us by filling out a tiny 3 field form and you will get your own, free, dakka user account which gives a good range of benefits to you:
- No adverts like this in the forums anymore.
- Times and dates in your local timezone.
- Full tracking of what you have read so you can skip to your first unread post, easily see what has changed since you last logged in, and easily see what is new at a glance.
- Email notifications for threads you want to watch closely.
- Being a part of the oldest wargaming community on the net.
If you are already a member then feel free to login now. |
|
 |
2012/04/07 20:47:13
Subject: Corroded copper (with new GW paints)
|
|

Regular Dakkanaut
|
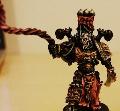
Had a first ever try at the corroded copper. What I've done here is to paint the whole thing with 'Screaming Bell' and washed over that with 'Agrax Earthshade' two coats, fully dried between each coat. Then drybrushed 'Screaming Bell',and another coat of 'Agrax Earthshade'. Then I mixed up a wash made of 'Sotek Green' and Liquitex Airbrush Medium. This wash I slathered all over quite liberally ad then with some cotton buds, started to remove it in places somewhat randomly. When that was fully dried I once again drybrushed with 'Screaming Bell' (lighter than before) and washed with 'Agrax Earthshade' for a final time. I'm looking for other peoples opinion of it, before it gets glued into the arch ontop of the wagon thingy  C&C, Tips, Advice all welcome edit; d'oh forgot the piccy haha 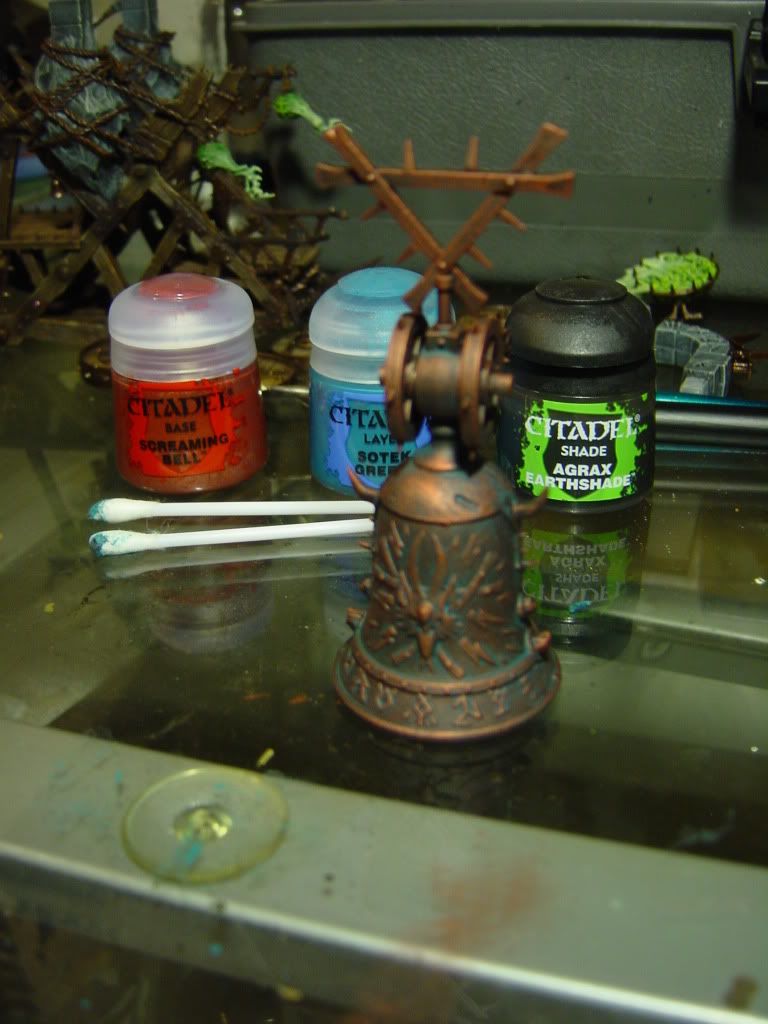
|
|
This message was edited 1 time. Last update was at 2012/04/07 20:47:43
|
|
|
 |
|
2012/04/07 21:00:11
Subject: Corroded copper (with new GW paints)
|
|
Regular Dakkanaut
|
I think that looks fantastic.
|
|
|
|
|
|
2012/04/07 21:12:59
Subject: Corroded copper (with new GW paints)
|
|

Stalwart Strike Squad Grey Knight
Jacksonville, NC
|
That looks pretty good keep it up!
|
|
|
|
|
2012/04/07 21:35:25
Subject: Corroded copper (with new GW paints)
|
|
Regular Dakkanaut
|
Thanks for the votes of confidence guys. I'm fairly happy with it, I didnt know if its worth doing another layer, stippling the Sotek Green mixed with some white into choice areas of the corroded bits, and to highlight the clean copper edges with a brighter copper colour (which I don't have - buy one? or mix some silver into Scremaing Bell?)
|
|
|
|
|
|
2012/04/07 21:44:18
Subject: Corroded copper (with new GW paints)
|
|
Regular Dakkanaut
|
I agree with a bit of a lighter tone.
When you look at actual corrosion it's more of a light green than 90% of people paint it - and I've done the same I'll admit.
All the guides say to use 50:50 Dark Angels Green and Hawk Turquoise - which is too blue.


I can't offer any advice on making that colour - I've not tried yet!
|
|
|
|
|
|
2012/04/07 22:15:47
Subject: Corroded copper (with new GW paints)
|
|
Regular Dakkanaut
|
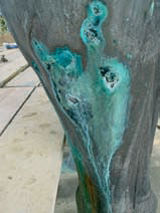
Looking at those pic's, I'm tempted to try grinding a chalk pastel up if I can find a turqouise-ish colour one, and sticking some of the dust on to give it a texture like that pipe.
Just dunno if that corrosion would be limited to wet things, theres a distinct difference in how its forming on the varying bits of metal in different environments and that pipe is dripping something 
While the other pics (the bottom one) looks like it might be bronze rather than copper. With a slightly different tarnishing effect... is it because the metal is different? or because the environment is different? or both haha 
|
|
|
|
|
|
2012/04/07 22:38:56
Subject: Corroded copper (with new GW paints)
|
|
Regular Dakkanaut
|
Already done that one!
The chalk pastels look incredible - the texture is just right.
The top one is copper, the bottom two are bronze.
|
|
|
|
|
|
2012/04/07 22:39:36
Subject: Corroded copper (with new GW paints)
|
|
Regular Dakkanaut
|
Another thought I've just had;
When I make the warpstone gems green, The Sotek Green is going to come across a lot more blue in contrast to them.
I could put thrakka green over what I've got, and then repeat what I've done already maybe? Any other ideas to stop it going all blue on me?
Or maybe go really far towards yellow on the gems? :/
|
|
This message was edited 1 time. Last update was at 2012/04/07 22:40:56
|
|
|
|
|
2012/04/08 03:44:22
Subject: Corroded copper (with new GW paints)
|
|
Rogue Grot Kannon Gunna
|
You could always pick up a tub of VMC bluegreen for your verdigris fx. It would save a lot of mucking around in the future.
|
|
|
|
|
|
2012/04/08 03:50:03
Subject: Corroded copper (with new GW paints)
|
|
Shadowy Grot Kommittee Memba
The Great State of New Jersey
|
AG. wrote:I agree with a bit of a lighter tone.
When you look at actual corrosion it's more of a light green than 90% of people paint it - and I've done the same I'll admit.
All the guides say to use 50:50 Dark Angels Green and Hawk Turquoise - which is too blue.
IMO the best verdigris ive seen was a hawk turquoise and scorpion green mix, watered/thinned down to flow more like a wash.
You could always pick up a tub of VMC bluegreen for your verdigris fx. It would save a lot of mucking around in the future.
Or the actual color verdigris which they do in fact make... although i still say the turquoise/scorpion green mixture looks better
|
|
|
|
|
|
2012/04/08 03:51:05
Subject: Re:Corroded copper (with new GW paints)
|
|
Ollanius Pius - Savior of the Emperor
Gathering the Informations.
|
That came out fantastic Marv.
|
|
|
|
|
2012/04/08 04:03:10
Subject: Corroded copper (with new GW paints)
|
|
Rogue Grot Kannon Gunna
|
chaos0xomega wrote:
Or the actual color verdigris which they do in fact make... although i still say the turquoise/scorpion green mixture looks better
Aye, that they do. Though it is a glaze, and really isn't all that impressive at pulling off a good verdigris effect compared to VMC bluegreen. Each to their own though of course. I shall give your recipe a whirl, as it will give a nice saturated look that I may find useful on something. XmarvX40k - Sorry, I forgot to add that your efforts so far look ace btw. I look forward to seeing your finished model.
|
|
This message was edited 2 times. Last update was at 2012/04/08 04:07:47
|
|
|
|
|
2012/04/08 04:11:51
Subject: Corroded copper (with new GW paints)
|
|
Regular Dakkanaut
|
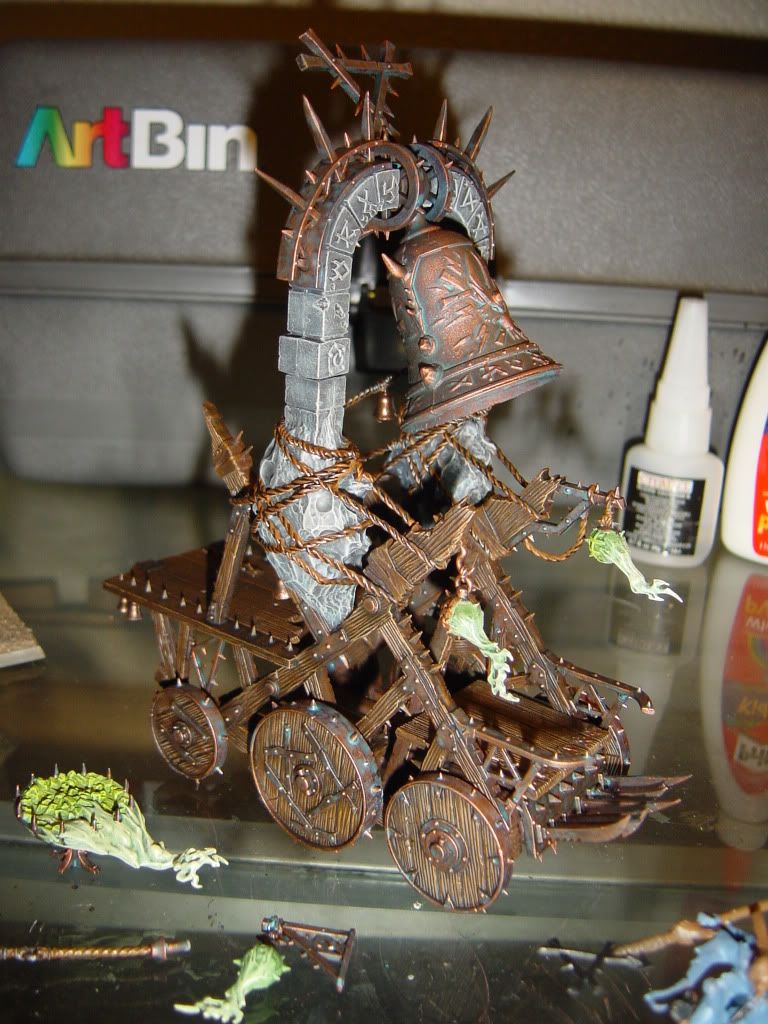
Thanks everyone. Since posting that piccy I've gone through the other bits on the model doing the same.
All the little plates and bars holding the frame together, the cow catcher/spiked plate at the front and the banding on the wheels are all the same, except the base colour was tin bitz which is a tad darker. The bell just looks a tiny bit brighter as a result, which is kind of nice as its the main feature I guess.
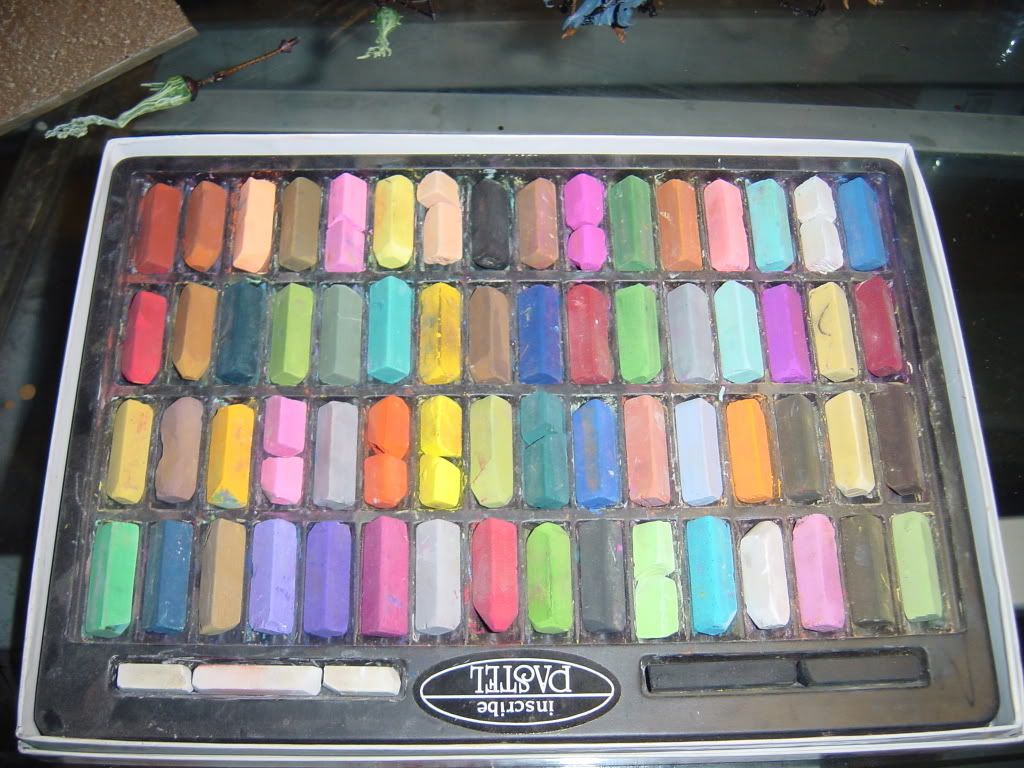
I've dug out some pastels from way back and theres a nice selection of green through blue shades. So I might try weathering powder effects on this also (that would be a first try too! ) I just need to get something to use as a fixative before I try.
Do you literally brush it on dry and spray some fix when you're happy with the effect?
|
|
|
|
|
|
2012/04/08 04:13:18
Subject: Corroded copper (with new GW paints)
|
|
Shadowy Grot Kommittee Memba
The Great State of New Jersey
|
I got the idea from here:
http://www.deathsquadsgame.com/t744-verdigris-style-weathering-on-copper-bronze-brass-pic-heavy
looking at the pics earlier in this thread, it might be a bit on the green side, but... I grew up in NYC, and to me Lady Liberty always looked greenish so... eh whatever works.
|
|
|
|
|
|
2012/04/08 04:24:09
Subject: Corroded copper (with new GW paints)
|
|
Regular Dakkanaut
|
I've actually got one of those shining gold's mentioned in that thread! So i'l definatly try that recipe out sometime. Those pieces look a lot more like bronze than my bell.
A little bit of wild speculation, perhaps the variance in colour is down to the base metal; bronze is a bit more gold (or yellowish) than copper, the same way that one pot of paint can be a little different over varying base coats?
|
|
|
|
|
|
2012/04/08 07:45:35
Subject: Corroded copper (with new GW paints)
|
|
Regular Dakkanaut
|
When I did my pastel vedigri layer I did a plain mix of ground up pastels and white spirit.
Apply liberaly and let dry.
The white spirit dries up - and the entire thing is blue.
Grab a toothbrush, some cloth, your fingers, and rub off most of the pastel. It's sort of a reverse drybrush. You're polishing away the excess powders (and they come away easy - cos you aint got no fixative yet) and leaving the vedigri in the recesses.
The effect is ace. I have a chaos warrior I did this on (I just chose the wrong colour - hah)

After you're happy with the result just give it a spray with a satin varnish, like purity seal.
|
|
|
|
|
|
2012/04/08 14:45:55
Subject: Re:Corroded copper (with new GW paints)
|
|
Regular Dakkanaut
|
Thanks for that quick tutorial AG, Quite like your Chaos Warrior. Compared to how forgeworlds site says to use their weathering powders; to carefully brush them into place dry and seal them when happy. Using a solvent carrier seems alike a good idea to speed things up, especially where an all over effect is aimed for.
Here's how she's looking so far (not glued the arch, bell or wheels in place yet), I wanted all the coppery brassy parts to have some of this verdigris effect on them, to make it all look aged together. But not too 'in your face'. Might use the pastel powder to make streaks of it running down the other materials towards the floor? Verdigris does drip off the object in the rain and weather?
Here's the pastel shades I've dug out, bound to be a useful shade
|
|
|
|
|
|
2012/04/08 14:53:07
Subject: Corroded copper (with new GW paints)
|
|
Regular Dakkanaut
|
If you apply a grid reference to your pastels, with the collums being numbered 1-16 and the rows being lettered A-D.
I would grind up a 70:30 mix of B6 and D1 and try that.
|
|
|
|
|
|
2012/04/08 15:01:36
Subject: Corroded copper (with new GW paints)
|
|
Regular Dakkanaut
|
I was thinking a mix of an aqua green shade and a yellow green shade, kind of like the hawk turquoise and scorpion green mix of paints in that tutorial.
|
|
|
|
|
|
2015/01/12 14:32:40
Subject: Re:Corroded copper (with new GW paints)
|
|
Fresh-Faced New User
|
Trying out a few goes at this myself with a venerable dreadnought. I wanted the chassis to have an ancient metal look. Polished but suffered at the ravages of time.
Took a few trials to get the mix right and a convoluted painting process, but happy with this as a starting point. I've subsequently "de-aged" the cables as they would move more and have less corrosion on them.
Base coat in chaos black
Dry brush rune fang steel
Thick wash with a snakebite brown paint and Vallejo black ink wash.
Heavy dry brush an auric armour gold paint and Vallejo skin wash ink mix.
1 to 3 to 3 skull white, enchanted blue and goblin green mix, Vallejo azure blue ink (a few drops) and thinners to wash on the corrosion.
Dry brush auric gold over the top.
A splash of thinned down Vallejo green-black ink for the shading....
K.
|
|
This message was edited 1 time. Last update was at 2015/01/12 14:33:59
|
|
|
|
|
2015/01/12 15:56:09
Subject: Corroded copper (with new GW paints)
|
|
Thane of Dol Guldur
|
Verdigris or copper corrosion can take lots of different forms and shades, i assume due to chemical variables such as water, chemical composition of the material, presence of impurities, so if youre happy with your verdigris then stick with it
|
  Heresy World Eaters/Emperors Children Heresy World Eaters/Emperors Children 
Instagram: nagrakali_love_songs |
|
|
|
|
2015/01/12 16:04:51
Subject: Corroded copper (with new GW paints)
|
|
Tough-as-Nails Ork Boy
|
 queen_annes_revenge wrote: queen_annes_revenge wrote:Verdigris or copper corrosion can take lots of different forms and shades, i assume due to chemical variables such as water, chemical composition of the material, presence of impurities, so if youre happy with your verdigris then stick with it
It gets more confusing, because many mistake alloys of copper (bronzes) for pure copper.
For my Necrons, I did the quick and dirty method of Balthasar Gold, Hashut Copper, then applying Nihilakh Oxide, then liberal washing of black ink.
Yours looks better, and it appears you actually found a pot of Screaming Bell that was worth a darn. All of mine are separated into red ink and copper dust, and will never mix again.
|
|
|
|
|
2015/01/14 15:33:07
Subject: Corroded copper (with new GW paints)
|
|
Stealthy Grot Snipa
|
Wow, this is some really awesome stuff Loving the bell, cant wait to see it all finished, your rusting is really looking good and effective. thought i'd just chime in on using pastels, as its something I use alot on me orks! I find you can apply with two methods; Dry brush applying the powders 'loose' - with this most of the excess falls off, its very wasteful of the powders but with £3 amazon packs of 24 colours.... whos complaining. With this method I find that because you aren't using a carrier or solvent the powders can get a nice textured feeling instantly, you can clog up certain parts and really get the whole crusty rust feeling. To finish, I simply airbrush over with a varnish to seal, a couple coats not too thick. Use a 'sealer'/carrier - by applying a sealer solution directly to the model, or by mixing up the pigment and sealer/carrier on a palette and apply, you get a much thinner coat once dried, as the carrier evaporates. I find this is better for when you want to wash with it or when you want thin/controlled application. It is worth noting you can use method 1 then simply use a brush to lightly apply a sealer, which soaks into the thicker application of powder and will work as sort of a middle ground, as with small amount of sealer it will prevent it becoming a complete solution with the pigments. So i say experiment, theres some great effects to be had with powders. As a test I even painted an entire ork tank using solely pastels ground up. It has an unbelievable texture and looks like the whole model is so rusty that it'd fall apart at a sneeze In fact, here's another example! to go with all your examples  - looking at saw 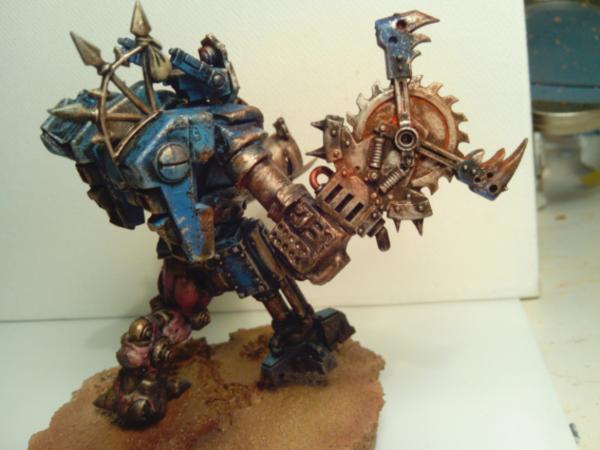 This was applied dry, then sealed with varnish. I used an orange and a bit of brown, I use brown for a little dirting feel so you may want to keep to rusts. With applying dry I find it works better on the flat surfaces than when applied in a solution as it doesn't try to move to the crevices. It also drys with a ever so slightly grainy effect. This is a pretty light application of it dry, as I don't have any images where I really went overboard
|
|
This message was edited 2 times. Last update was at 2015/01/14 15:39:51
Favourite Game: When your Warboss on bike wrecks 3 vehicles simply by HoW - especially when his bike is a custom monowheel.
|
|
|
|
|
|
|