| Author |
Message |
 |
|
|
|
|
Advert
|
Forum adverts like this one are shown to any user who is not logged in. Join us by filling out a tiny 3 field form and you will get your own, free, dakka user account which gives a good range of benefits to you:
- No adverts like this in the forums anymore.
- Times and dates in your local timezone.
- Full tracking of what you have read so you can skip to your first unread post, easily see what has changed since you last logged in, and easily see what is new at a glance.
- Email notifications for threads you want to watch closely.
- Being a part of the oldest wargaming community on the net.
If you are already a member then feel free to login now. |
|
 |
2012/12/20 21:07:51
Subject: Vehicle destroyed
|
|

Homicidal Veteran Blood Angel Assault Marine
|
Hi guys,
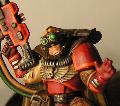
I created a marker for vehicle detroyed results as a proof of principle of this tutorial:
http://s3.zetaboards.com/The_Ammobunker/topic/7493864/1/
So all the credits go to DakkaDakka-user Digits with his inspiring army:
http://www.dakkadakka.com/dakkaforum/posts/list/0/398194.page

It's relatively cheap and easy to do if you own a hot glue pistol and an airbrush (coloured spray paint).
Have fun!
|
|
|
|
 |
|
2012/12/20 21:12:27
Subject: Vehicle destroyed
|
|

Sneaky Kommando
|
Looks damn nice. I need to make a few of those.
|
Jesus man change your tampon and drive on - darefsky
In the grim darkness of the far future something will shoot your dog. - schadenfreude
And saying you have the manliest tau or eldar tank is like saying you have the world's manliest Prius. I mean yeah, it's fast and all, but it's a friggin PRIUS. - MrMoustaffa
|
|
|
|
|
2012/12/21 05:53:50
Subject: Re:Vehicle destroyed
|
|
Hellish Haemonculus
|
Your paint job is really nice. I especially love the chapter symbols on the tank.
But the explosion marker doesn't really look like an explosion. I think if you hadn't told me what it was supposed to be, I might not have known. I think the orange-y spots, in particular, are killing it for me. The way they are done makes it look like they are painted on the outside of the column of smoke rather than coming from within it. I also think that the smoke is a little too brownish, but that might just be the way it looks on my screen. Personally, I would make the smoke either significantly darker or lighter. Either way would work, since smoke comes in both extremes. I think lighter would make it more clear what you are trying to show, while darker would be more realistic.
I wonder if it isn't the base which is hurting the look? I've seen these done before where the hatch on the vehicle is removable and the marker 'plugs' into it. That, I think, might help quite a bit.
That being said, I also think it's better than any method I could come up with. It's a great start to an awesome game aid.
|
|
|
|
|
|
2012/12/21 09:38:08
Subject: Re:Vehicle destroyed
|
|
Homicidal Veteran Blood Angel Assault Marine
|
 Jimsolo wrote: Jimsolo wrote:Your paint job is really nice. I especially love the chapter symbols on the tank.
But the explosion marker doesn't really look like an explosion. I think if you hadn't told me what it was supposed to be, I might not have known. I think the orange-y spots, in particular, are killing it for me. The way they are done makes it look like they are painted on the outside of the column of smoke rather than coming from within it. I also think that the smoke is a little too brownish, but that might just be the way it looks on my screen. Personally, I would make the smoke either significantly darker or lighter. Either way would work, since smoke comes in both extremes. I think lighter would make it more clear what you are trying to show, while darker would be more realistic.
I wonder if it isn't the base which is hurting the look? I've seen these done before where the hatch on the vehicle is removable and the marker 'plugs' into it. That, I think, might help quite a bit.
That being said, I also think it's better than any method I could come up with. It's a great start to an awesome game aid.
Thank you for your detailed comment.
A few points though. I can assure you that there is nothing brown on this model. It was sprayed black -> grey -> white.
I want to use the marker for other vehicles too. If I would create something that would fit into the hatch... how would I use it on Rhinos, Vindicator or Landraiders?
It might be not optimal. But this is a simple marker. There is only so much effort I want to invest in this piece. But I will clean up the base.
Maybe I can pull of the fire effects better on the next piece. Thank you for pointing it out.
|
|
|
|
|
|
2012/12/21 10:22:20
Subject: Vehicle destroyed
|
|
Bounding Assault Marine
Layton, Utah
|
I think it looks amazing. I hope i do this well on my 3rd or 4th go. Thank you so much for linking that tutorial too. BTW your hand painted emblems look awesome on your vehicle!
Cheers
|
 Hopefully one day i'll have an army! Hopefully one day i'll have an army! |
|
|
|
|
2012/12/21 11:57:05
Subject: Vehicle destroyed
|
|

Been Around the Block
|
Thanks for linking the tutorial, I may give this a go.
|
|
|
|
|
2012/12/21 17:07:47
Subject: Vehicle destroyed
|
|
Guard Heavy Weapon Crewman
Greenville, TX
|
Looks pretty cool. Makes me wonder if you could embed some magnets in the base and in the ends of the various plumes. Thi way, it would be more stable, still vehicle interchangeable, and you could hang a turret on the plume to give it a more realistic "catastophic" kill look.
|
Bonecrusher 6, out. |
|
|
|
|
2012/12/21 18:48:49
Subject: Re:Vehicle destroyed
|
|
Gargantuan Gargant
|
 Enzephalon wrote: Enzephalon wrote:I want to use the marker for other vehicles too. If I would create something that would fit into the hatch... how would I use it on Rhinos, Vindicator or Landraiders?It might be not optimal. But this is a simple marker. There is only so much effort I want to invest in this piece. But I will clean up the base
Totally understand the effort point and the flat base makes it useable across armies, but am I mistaken in recalling that all SM tanks have the same small, round hatches (the ones that can mount HK missiles, exposed crew, or be plugged with sensor plates)? It would require a smaller marker to look anything but ridiculous, but it is, I think, an option, at the very least.
As far as fixing up a flat base is concerned, how stable is the plume? That looks like a 40mm base, is it not? If you kept the plume relatively well balanced, I think dropping down to a 25mm base (weighted, if necessary) to shrink the footprint would help make it less noticeable, regardless of how it was painted. The bright grey also makes it jump out at me. If you're only using these on a single SM army, it might be worth painting them the same red as your BA tanks, just to help them blend.
|
The Dreadnote wrote:But the Emperor already has a shrine, in the form of your local Games Workshop. You honour him by sacrificing your money to the plastic effigies of his warriors. In time, your devotion will be rewarded with the gift of having even more effigies to worship.
|
|
|
|
|
2012/12/21 23:39:02
Subject: Re:Vehicle destroyed
|
|
Swift Swooping Hawk
|
That is really cool!!
I have seen those explosion markers in the pages of WD and 40K Rulebook...I thought they used some sort of armature and sprayed insulation on it!!
I never thought of using Woodland Scenics Foam...GREAT IDEA!!
Keep up the great work!
|
 -3500+ -3500+
 -1850+ -1850+
 -2500+ -2500+
 -3500+ -3500+
 --3500+ --3500+ |
|
|
|
|
2012/12/22 03:36:28
Subject: Re:Vehicle destroyed
|
|
Storm Trooper with Maglight
|
Maybe try using a small disc of clear plastic or plexi glass. That way, you wont really "see" the base of the explosion.
|
|
|
|
|
|
|
|