| Author |
Message |
 |
|
|
|
|
Advert
|
Forum adverts like this one are shown to any user who is not logged in. Join us by filling out a tiny 3 field form and you will get your own, free, dakka user account which gives a good range of benefits to you:
- No adverts like this in the forums anymore.
- Times and dates in your local timezone.
- Full tracking of what you have read so you can skip to your first unread post, easily see what has changed since you last logged in, and easily see what is new at a glance.
- Email notifications for threads you want to watch closely.
- Being a part of the oldest wargaming community on the net.
If you are already a member then feel free to login now. |
|
 |
2013/08/18 16:15:29
Subject: How can I bring my paintjobs to the next level (pics included)
|
|

Flashy Flashgitz
|
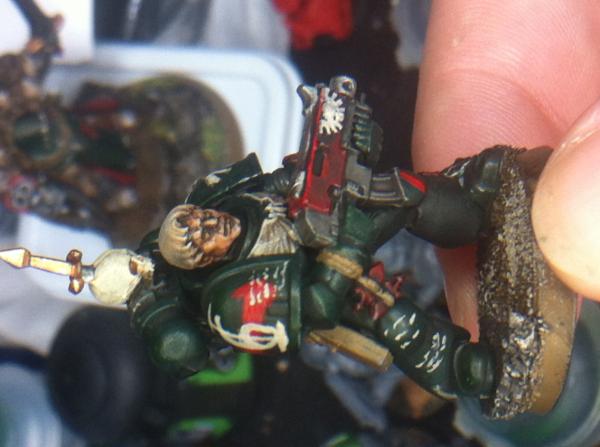
Hey all, I really want to make my minis be very high end, I spend quite a few hours on each one, and when I look at them compared to others I feel they are lacking in someway. I know my shading technique isn't nearly as good as it could be, but if any of you could give me tips to improve it, and suggestions on what my model is missing I'd greatly appreciate it.


I tried to put some of my prior models on coolminiornot.com, and got some pretty bad results a 4.5 to me means I'm doing something seriously wrong, I'm not sure how much points I lose for a grey base, but anyway if any of you can explain to me why my model is only a 4.5 rating I'd also appreciate that.

Thanks in advance,
Chris
|
|
|
 |
|
2013/08/18 16:22:43
Subject: How can I bring my paintjobs to the next level (pics included)
|
|

Dakka Veteran
|
I'm by no means an expert myself but Inwould look towards the gems and eye lenses to take it up a notch, heres a simple but effective guide, It pretty much the same technique for eye lenses.
http://www.bananaking.net/cento/workshop/paint_gems.htm
Your shading looks pretty good on the shield.
|
|
|
|
|
2013/08/18 16:35:44
Subject: How can I bring my paintjobs to the next level (pics included)
|
|
Hollerin' Herda with Squighound Pack
|
ok a few things im seeing, the robe clothes look a bit splotchy. have you tried dry brushing the 2nd color in rather then apining it in (get ur rush so it has hardly any paint, the less the better, then apply it on do this several times and repeat will bring out finner details while slowly lightening the color giving it a better shaded effect.
next, touch ups. on alot of ur models, i can see colors where they wouldnt normaly be, on the botom pic, the guy has a glob of green on his sword, and i can see that his eye color got onto the armour as well, some simple touch ups can remove that and make it look more profesional.
you did a great job with your metal looking colors for the most part, the shiny bronze skull was 2 much for me though, i felt it really took away from the model
i really enjoy the sheild on the first picture, but that is really about all i enjoyed on that model. and here is why, the armour doesnt looked faeded or anything it looks sloply done, like it was painted in a hurry, the spaces inbetween the wings werent painted the armour color i loks like you just ran a brush over it and said ok good enough. the little details like that can make or break a model's paintjob
next you can see the differnt line marks on his hand which make it look unrealistic, and you can see most of your painting strokes, for the most part you want to feather your paint in layers give it depth and hide that,
as for base coats there is only 2 colors i use for models usualy. white or black
for these paticular models i would have used a white, it will lighten your paints and help hide and spots you might have missed, if the majority of your model is oging to be a lighter color you want a white ase coat, if it is going to be darker you want a black base coat, you might also want to do something to the ase so that you dont get paint on it or cover it in sand afte words or something so they cant see the paint,
also dont be afraid to add more color's to the model for instance the top model, instead of bronze for the skull i would probably use a aged bone. and add more color to the ribons hes wairing instead of just a standard brown
|
|
|
|
|
2013/08/18 16:36:23
Subject: How can I bring my paintjobs to the next level (pics included)
|
|
Flashy Flashgitz
|
Thanks man, I was just trying to clean up the eye lens before I read your post, the red on there now is my lightest right so I might try your technique right now, but much like eyes on models with faces I have huge problems. The problem with this super fine detail stuff like that is my brush, I have the citadel starter brush, citadel fine detail brush, and a set I picked up for 6 bucks at walmart which tends to work as well/a little better than the citadel fine detail brush.
|
|
|
|
|
2013/08/18 16:37:14
Subject: How can I bring my paintjobs to the next level (pics included)
|
|
Hollerin' Herda with Squighound Pack
|
also i usualy do multiple models at once and heres why, i wil paint the 1 color on model 1 move 2 model 2 so model 1 can dry, i dont ever start painting on model 1 again till the paint on it is already dry
|
|
|
|
|
2013/08/18 16:38:36
Subject: How can I bring my paintjobs to the next level (pics included)
|
|
Secret Inquisitorial Eldar Xenexecutor
|
You dont need an overly fine brush aslong as it holds a decent point, most of my painting is done with a citadel standard brush which has held up remarkably well over the past year or so, with a steady hand and a good point you can even do eyes with the thing.
|
|
|
|
|
|
2013/08/18 16:40:33
Subject: How can I bring my paintjobs to the next level (pics included)
|
|
Flashy Flashgitz
|
wazrokk wrote:ok a few things im seeing, the robe clothes look a bit splotchy. have you tried dry brushing the 2nd color in rather then apining it in (get ur rush so it has hardly any paint, the less the better, then apply it on do this several times and repeat will bring out finner details while slowly lightening the color giving it a better shaded effect.
next, touch ups. on alot of ur models, i can see colors where they wouldnt normaly be, on the botom pic, the guy has a glob of green on his sword, and i can see that his eye color got onto the armour as well, some simple touch ups can remove that and make it look more profesional.
you did a great job with your metal looking colors for the most part, the shiny bronze skull was 2 much for me though, i felt it really took away from the model
i really enjoy the sheild on the first picture, but that is really about all i enjoyed on that model. and here is why, the armour doesnt looked faeded or anything it looks sloply done, like it was painted in a hurry, the spaces inbetween the wings werent painted the armour color i loks like you just ran a brush over it and said ok good enough. the little details like that can make or break a model's paintjob
next you can see the differnt line marks on his hand which make it look unrealistic, and you can see most of your painting strokes, for the most part you want to feather your paint in layers give it depth and hide that,
as for base coats there is only 2 colors i use for models usualy. white or black
for these paticular models i would have used a white, it will lighten your paints and help hide and spots you might have missed, if the majority of your model is oging to be a lighter color you want a white ase coat, if it is going to be darker you want a black base coat, you might also want to do something to the ase so that you dont get paint on it or cover it in sand afte words or something so they cant see the paint,
also dont be afraid to add more color's to the model for instance the top model, instead of bronze for the skull i would probably use a aged bone. and add more color to the ribons hes wairing instead of just a standard brown
Yeah the armor is where I feel I'm really lacking, I've followed 2 different guides to doing deathwing armor, 1 is with a ushbanti bone, then wash with 2/3 water/agrax earthshade. Then I tried my own method on the model in the first three pictures which was 1/4reikland fleshshade 1/4 agrax earthshade 1/2 water. If you have any suggestions for adding better detail to the armor I'd appreciate it. That is where I'm actually spending the most time, and the part that is looking the worst.
EDIT: also, the green blob on the last model is supposed to be a little light thing on his power sword, but obviously I didn't do a good job if it just looks like a blob of paint
|
|
This message was edited 1 time. Last update was at 2013/08/18 17:07:59
|
|
|
|
|
2013/08/18 17:13:42
Subject: How can I bring my paintjobs to the next level (pics included)
|
|
Dakka Veteran
|
Niexist wrote:
Thanks man, I was just trying to clean up the eye lens before I read your post, the red on there now is my lightest right so I might try your technique right now, but much like eyes on models with faces I have huge problems. The problem with this super fine detail stuff like that is my brush, I have the citadel starter brush, citadel fine detail brush, and a set I picked up for 6 bucks at walmart which tends to work as well/a little better than the citadel fine detail brush.
No problem I try something new each time I paint, a long list of things to work on can be over welming and a little frustrating/off putting, work on a couple achievable thing rather than everything and the models will improve each time. This and thinning paints helps!
I also tend to paint 5 models at a time for the block colours, one colour at a time so the first is dry by rhe time I come back to ot.
Automatically Appended Next Post: Just saw the bit about the colours and mixing, I don't mix as each batch of models will look a little different, I use the the citadel colour guide on the GW site, pick the colour you want to acheive and it tells you the paints to acheive it from base to wash to highlight, just pick the colours as far as you want to go:
http://www.games-workshop.com/gws/catalog/paintChart.jsp?catId=cat820002a&rootCatGameStyle=paints-tools
|
|
This message was edited 1 time. Last update was at 2013/08/18 17:28:28
|
|
|
|
|
2013/08/18 18:01:30
Subject: How can I bring my paintjobs to the next level (pics included)
|
|
Hollerin' Herda with Squighound Pack
|
i would try picking one color instead of mixing i personaly prefer reaper paints but gws hasgood paints to and paint i on in a nice even coat so that the paint is nice and even not darker in some areas and lighter in others, then take a lighter shade of a color very simular and against with almost no paint at all on the brush like with 1 stroke you just bearly leave a noticable mark, start just dry brushing over it it will give i more details. it takes a little while to get really good at it, but you are not a bad painter and i think you will catch onto it quick, just takes some practice and patients. and dont wory about making mistakes, if you ever dont like how a model looks, you can always strip it and try again
|
|
|
|
|
2013/08/18 18:06:16
Subject: Re:How can I bring my paintjobs to the next level (pics included)
|
|
Colonel
This Is Where the Fish Lives
|
Here are a few tutorials on how to paint Deathwing armor:
http://fromthewarp.blogspot.com/2011/09/how-i-paint-deathwing-bone-armour.html
http://taleofpainters.blogspot.com/2012/09/tutorial-how-to-paint-ravenwing-and.html
They will get you different results, with the second one a little closer to the "official" GW scheme (which I am not a fan of). The first one, in my opinion, looks fantastic.
Here are a couple of videos. They are done with an airbrush, but the main the same colors can be used to get a similar result. Plus, everything else except the armor is painted with a brush.
http://www.youtube.com/watch?v=1iAGHbZ8pqg
http://www.youtube.com/watch?v=IPd7gxn8egI
Now, as far as the 4.5 rating on CMoN... don't let it stress you too bad. A lot of the very best painters in world are on that site and it is a notoriously tough crowd. That being said, if you want your minis to be "high end," there are things you need to work on. Like some previous posters mentioned, some touch up is needed. Let's face it, we all make mistakes and get paint where we don't want it. Usually, the best fix is just to paint over whatever got messed up with the original color and call it a day. Myself personally, since I use numerous layers of varnish during various stages of painting, I can often hit the troubled area with a little alcohol and get the paint off. Either way, fixing tiny mistakes can lead to a big pay off on the finished model.
Someone else mention the lenses on the helmet and sensor. They definitely need some work, but luckily it isn't that difficult to get good looking lenses and gemstones. This tutorial is pretty simple and will get you awesome results quickly. When I am done with a model and put on the last coat of matte varnish, I like to go back with a brush and some gloss varnish to make the lenses, gemstones, etc. stand out a little.
The robes do look splotchy, but drybrushing will not fix them. Try to stay away from drybrushing whenever possible, instead saving it for areas of high texture (fur, stones, ground, etc.). To get a nice smooth transition between shadows and highlights, you have a few options: airbrushing, wet blending, and glazes. I know you don't airbrush, so we'll take that option off the table so you are left with wet blending and glazing.
Wet blending (or two-brush blending) is time consuming and takes a lot of practice and patience. But a lot of people like this method and it get good results, so I can't really knock it. Here is a little more insight on the method.
Using glazes is a little more forgiving and a better way all around to do it. It also takes time to do it right, but you have a much more room for error using glazes. You can also use them to do true metal metallics (TMM), as shown here, here, and here. That effect really looks cool on a sword.
Lastly, upgrade your brush. My brush of choice is Raphael series 8404 and I have three sizes: 1, 0, & 2/0. My size 0 gets the most use with my size 2/0 in a distant second. My size 1 gets almost no use because if i need to paint a large area, I use an airbrush. Thee are other popular brands out there, but the bottom line is: yes, a high quality brush will make a difference. It won't make you a better painter, but it will let manipulate the paint much easier. They are more expensive than the cheap ones you find at arts & crafts stores, but if you take care of them, they will last you a long time.
|
|
This message was edited 1 time. Last update was at 2013/08/18 18:10:05
 d-usa wrote: d-usa wrote:"When the Internet sends its people, they're not sending their best. They're not sending you. They're not sending you. They're sending posters that have lots of problems, and they're bringing those problems with us. They're bringing strawmen. They're bringing spam. They're trolls. And some, I assume, are good people."
|
|
|
|
|
2013/08/18 18:29:17
Subject: Re:How can I bring my paintjobs to the next level (pics included)
|
|
Flashy Flashgitz
|
I tried drybrushing the armor on him does it look any better?

|
|
|
|
|
2013/08/18 21:00:55
Subject: Re:How can I bring my paintjobs to the next level (pics included)
|
|
Dakka Veteran
|
Looking at your minis I would say the thing you need most is practice. That's pretty much it. You seem to have a decent idea of what you're doing, now you need to get better at it. Don't be in a hurry, just paint, try to make each mini better than the last and you'll be fine. There's no silver bullet to becoming immediately better. I've been doing this since the 1980's and I'm still taking small steps forward with every minis.
|
|
|
|
|
|
2013/08/18 21:24:22
Subject: Re:How can I bring my paintjobs to the next level (pics included)
|
|

Civil War Re-enactor
|
 Dullspork wrote: Dullspork wrote:Looking at your minis I would say the thing you need most is practice. That's pretty much it. You seem to have a decent idea of what you're doing, now you need to get better at it. Don't be in a hurry, just paint, try to make each mini better than the last and you'll be fine. There's no silver bullet to becoming immediately better. I've been doing this since the 1980's and I'm still taking small steps forward with every minis.
Yup, you clearly know how to paint miniatures. So just keep practising.
|
Shotgun wrote:I don't think I will ever understand the mentality of people that feel the need to record and post their butthurt on the interwebs.
|
|
|
|
|
2013/08/18 22:44:35
Subject: Re:How can I bring my paintjobs to the next level (pics included)
|
|
Hollerin' Herda with Squighound Pack
|
Niexist wrote:I tried drybrushing the armor on him does it look any better?
yes i think the armour did turn out a bit better i went ack and forth looking at them the picture you origionalyposted simular to it if you look at the his right shoulderblade (our left) then look at the new one you can tell it is better in my opinion, but another thing to keep in mind to, other peoples opinions do not matter nearly as much as your own does. if you love how a model looks then its perfect.
|
|
This message was edited 2 times. Last update was at 2013/08/18 22:49:53
|
|
|
|
|
2013/08/19 08:06:02
Subject: How can I bring my paintjobs to the next level (pics included)
|
|
Road-Raging Blood Angel Biker
|
You need practice, that's it. Like the first few images I noticed you've painted outsides the lines, like on the lenses. You need brush control
It depends what standard you're going for, a quick table top that kinda looks alright, or Golden Daemon?
I only got into the hobby 2 years ago and my first models were awful, but just watch as many painting tutorials for what you want to achieve, like if you aren't sure how to paint robes - youtube is your friend, and try and replicate what you see.
It'll all come together eventually and you'll be happy with what you paint 
It just takes time
|
Camouflage is the colour of fear... I have no need to hide from my foes... I have no fear of death. My colours I wear openly, they proclaim louder than any words, "I am proud to live - I am proud to die" :   |
|
|
|
|
2013/08/19 09:42:51
Subject: How can I bring my paintjobs to the next level (pics included)
|
|
The Hammer of Witches
|
More armor wash. That's what you need. Around the nooks and cracks in the armour and the items on his belt - just around the edges - this will define and visually separate them.
|
|
|
|
|
|
2013/08/19 10:03:00
Subject: How can I bring my paintjobs to the next level (pics included)
|
|
Jealous that Horus is Warmaster
|
Nice work, thanks also to those who shared tips.
|
|
|
|
|
|
2013/08/19 10:09:23
Subject: How can I bring my paintjobs to the next level (pics included)
|
|
Regular Dakkanaut
|
I read an article on massive voodoo about blending and the most valuable piece of information I read was this:
There is a certain moment when the blending is done, when it is finished according to the current skills of the painter.
I think this is a very good thing to learn.
When I started I put a lot of pressure on my self because I sucked at painting miniatures and I would get frustrated seeing the beautiful minis people would post on the internet.
I have taken a lot of breaks from miniature painting and come back to find that I have improved a lot in that time as if by magic. When you are hunched over your minis every day swearing at an eye you can't get right or a massive blob of paint you spray over your mini with an airbrush you don't see your progress. It takes time.
I think if you can find enjoyment in painting miniatures then do it but only try to paint without results in mind. Its far less stressful and you can always strip the miniatures later.
here is a link to the massive voodoo article: http://massivevoodoo.blogspot.com/2010/11/blending-tutorial-part-2a.html
|
|
|
|
|
2013/08/19 10:14:26
Subject: Re:How can I bring my paintjobs to the next level (pics included)
|
|
Three Color Minimum
|
I like what you're doing with the model, but there isn't anything more to see after you first look at the model, try some scriptwork on the large open spots (dark grey or brown will work fine there) see what I did below
Also, try some weathering. A lot of the best painters will have some subtle weathering.
|
Dark angels  70/100 of deathwing, 50/100 ravenwing, 80-100 3rd company 70/100 of deathwing, 50/100 ravenwing, 80-100 3rd company
IG  +6k pts +6k pts
and a sampling of different armies
warmachine, 40-50 points of:
protectorate, legion, and convergence armies |
|
|
|
|
2013/08/19 10:34:08
Subject: How can I bring my paintjobs to the next level (pics included)
|
|

Longtime Dakkanaut
|
The first thing you need to do is prime your figures with a spray primer. Black is good as if you miss any bits they look like they're lost in shadow. There's a lot of grey showing through on the model you posted.
When you're painting, have a picture of a pro-painted version of your mini close by. You can compare colours and more importantly, you can see what details they've painted.
Some people simply don't know what the thing they're painting is supposed to be and you get silly things like bits of sprue being painted because the person didn't know that was supposed to be cut off.
Yeah, and practice. You could paint all the GW code stuff that appears under the bases - for practice of painting raised surfaces without leaving paint between the letters.
|
|
|
|
|
2013/08/19 11:07:27
Subject: How can I bring my paintjobs to the next level (pics included)
|
|
Jealous that Horus is Warmaster
|
"bits of sprue being painted because the person didn't know that was supposed to be cut off."
This made me chuckle to myself..
|
|
|
|
|
|
2013/08/19 11:16:20
Subject: How can I bring my paintjobs to the next level (pics included)
|
|
Road-Raging Blood Angel Biker
|
rustproof wrote:"bits of sprue being painted because the person didn't know that was supposed to be cut off."
This made me chuckle to myself..
I was the opposite, I cut the toe off my Forgeworld Shas'o R'alai because I thought it was part of the sprue
|
Camouflage is the colour of fear... I have no need to hide from my foes... I have no fear of death. My colours I wear openly, they proclaim louder than any words, "I am proud to live - I am proud to die" : |
|
|
|
|
2013/08/19 13:47:50
Subject: How can I bring my paintjobs to the next level (pics included)
|
|
Fresh-Faced New User
|
I would take ratings from CMoN with a grain of salt. A 4.5 isn't that bad. I've posted some things on there and have gotten a similar score, but yet I've won several best painted awards in several competitions. I've also found myself wondering how some models get the ratings they do. Generally the 8-10 range warrant those ratings, but everything else ranges wildly.
A lot of it is based on how high quality your camera is and if you have the right setup to take pictures of miniatures.
But yeah, no worries, in time if you have the patience to spend that much time on each model you'll continue to improve!
|
|
|
|
|
2013/08/19 15:53:13
Subject: Re:How can I bring my paintjobs to the next level (pics included)
|
|

Sagitarius with a Big F'in Gun
|
Taken from some older articles in one of my p'logs, maybe these blobs of text on the subject of Washes, Glazes, and using them on pale surfaces, can be useful to your cause. In your case I would mix a few levels of Wash (Light and Dark, or Light, Medium, and Dark) to work the bone coloured armour down with more shadows. Then go in and add simple, but pronounced, highlights to get more 'pop'; your robes are a great example, but take it a bit further and add some even brighter Green highlights. One key I've learned for painting in general is you want to do modest exaggeration to the lights and darks (especially the highlights) to get them to really stand out. It's not realistic and that's not what you want; over-do it a little, and from 2+ feet away the models will just 'pop' more.
And, in my personal opinion: Do not Drybrush. Drybrushing has its place in a very select few painting techniques, but most times drybrushing will look like drybrushing, make a mess of things, and detract from the miniature. It's tempting to use it to save time and effort, but it you're tying to get better at painting it's not the way to go. Again, I don't hate Drybrushing, but I feel this isn't where to use it.
Ok, on to the copy-and-paste; if it seems like I'm talking on a different level, it's because I'm answering older questions, but the information is still good. In the case of the washing technique for pale colours (like your armour) I'm talking more about working on skulls and bone, but the process it exactly how I would tackle bone coloured armour.
I've been mixing my own washes (glazes) for years. I swore by them then, and swear by them now. They are not a magic bullet that stand on their own, in my opinion. They seem like a one-trick-pony, but if you use them more like paint and less like a 'selective dip', they start to really shine. Like all painting, it's all about layering - layering gives you control. When you combine them with a few practiced methods (paint layering and/or blending, and good brush technique) it becomes a real confidence builder. Certain more advanced effects and looks like skin, bone, and rich golds, suddenly don't seem so daunting.
When it comes to mixing washes, it really depends what you're after - a simple alteration (darker or lighter) of an existing colour, or a hand mixed wash for a specific task. My home-brew metallic washes are a good example of a simple darkening of Badab and Sepia. I want the effect of these washes to be more pronounced than the base colour, so I deepen them modestly with several drops of ink. I then use some simple wet brush blending to control how/where the washes will sit. Washes provide lots of very forgiving opportunity for control, if you're willing to push, pull, dab, scrape, and taper/blend. Take the time to do a few layers instead of slopping it on, and the results speak for themselves.
My soon-to-be-concocted headlight/searchlight wash is going to be a good example of a true custom mix. Following with the 'cold colour' theme of the army, I want all lights on vehicles to have a glassy-blue colour. I want a wash that can go over a very pale base, and only leave a trace of pale blue shadow. Experiments with thinned down Asurmen Blue Wash were too blue, and not pale enough for me. I'll be playing around with mixing a small amount of Spacewolves Gray and/or Shadow Grey with Glaze Compound. The result should be a 'chalky' wash colour that will blend better with the pale base, and hopefully give a more subtle blue shadow for lenses.
Think about your base colour, and what you want from your wash. Is it helping to unify blending or just adding some richness to a bright colour? - Use a pure colour that matches the base colour, and apply it very thin and/or watered down. Is it being used to add stronger shadowing and depth? - Use the base colour mixed with some Brown or Black wash, and apply it very selectively to shadowed placed, blending the edges. Want to add scorching, or soot? - Straight black wash is your friend, and remember to manipulate it in layers, don't slop it on. Looking for some alien skin, a good mutation colour, or daemon flesh? - Mix things up and put weird combinations together; Purple wash over Yellow base, bright Blue wash dappled over a Pink, Green wash streaked over pale Blue, etc..
Always remember a little trial-and-error is a good thing. Take some time to test and practice a few things on a spare miniature or a bit of sprew, and see what you can come up with.
After much trail-and-error, I present a lesson on how I paint bone, skin, and other pale white-based colours:
Most importantly: Do not start with a dark colour base and try to 'blend up' to the brighter colours. Unless it's simple layering, that is an exercise in tedious frustration, and will drive you to madness. A much easier method, that I think produces better results, follows...
1) Start with a very light base. In the case of bone, I would choose Bleached Bone / Ushabti Bone or straight White.
2) Now, 'blend down' the light base using washes to give depth and shadowing. Start with a very pale colour wash like Gryphonne Sepia / Seraphim Sepia, and paint it over the entire surface. This layer should be very thin, and only just start the darkening effect. Slopping it on too thick will overwhelm and mute the pale colour you're going for. This first layer of wash also makes the surface very uniform. A layer of wash seems to lay smoother on a dried wash layer, making the next steps more consistent.
3) After letting that dry, go back and add a second layer of the wash. This time, be more selective, and only add it where you want richer tones and shadows like the temples, brow ridge, cheekbones, jaw line, and below the nasal hole. As always, keep a clean damp brush handy (I clench mine in my teeth) to soften/blend any hard edges that might try to form.
4) Once that is dry (A hairdryer is your best friend when working with washes), start adding wash layers that will add serious shadow to places like below cheekbones, around teeth, and the underside of the jaw. I find Devlan Mud / Agrax Earthshade is wonderful for this task. Again, be very selective and smooth edges that might form with your, always handy, clean damp brush. How many layers you add comes down to how dark you want the shadows.
5) Now, go in with a Black wash like Badab Black / Nuln Oil, and hit all of the really dark places like eye sockets, the nasal hole, around teeth, rivets, bands, and very shadowed areas. More than one layer might be needed to get really deep Black, if that is desired. More is less here most times, so keep the amount small, but really close to what's getting this dark shadow. Tiny dabs that aren't blended too much.
6) Finally, to really get the raised areas to pop, go back with your base colour and 'scrape' (use the sides of the brush bristles, not the tip) a light trace of it over the raised edges. The trick here is to have the brush loaded with paint almost like you were going to dry-brush. Thin the paint down significantly, load the brush, and then wipe most of it away. Unlike true dry-brushing, you want the brush to have thin 'damp' paint in it, but only a trace. Carefully drag the side/edge of the brush bristles (again, not the tip, the sides) along the edges you want to highlight. You just want to leave a trace of paint on the edge. Repeat and/or brighten the colour to enhance effect until the desired point. For teeth on skulls, do the exact same process, just with pure White. Once you get the hang of just how much paint you need, you'll be amazed how easy it is to get a wonderfully smooth result.
This process might seem like a lot of effort, but I've found the wash does most of the work for you. In the long run, this actually saves time and gives you much more control, and consistent, easily repeatable results. Compared to trying to 'blend-up' from a dark base there's no contest, and the results speak for themselves. If you take this method and change up the colours a bit, things like skin, claws, horns, leather, even metallic Gold, (this is a very similar process as the way I paint Gold and Bronze) all become much less daunting. Start bright, 'blend-down' the dark areas with wash, and pick out the highlight edges to finish.
|
"The old galaxy is dying, and the new galaxy struggles to be born; now is the time of monsters."

 |
|
|
|
|
2013/08/19 16:13:25
Subject: How can I bring my paintjobs to the next level (pics included)
|
|

Mighty Chosen Warrior of Chaos
|
Hi mate. I must say a few things myself. I have only been painting for about 1 and a half years and have improved so much since I started.
Your biggest issue I can see from your painting is thick paint. Your paint does not look smooth.
I'm not trying to sound like a jerk just something I've noticed. And 2nd most important rhing is clean up.
|
|
|
|
|
|
2013/08/20 03:12:16
Subject: How can I bring my paintjobs to the next level (pics included)
|
|
Mekboy Hammerin' Somethin'
|
Not to beat a dead horse but the most glaring thing that needs work is brush/paint control and touching up.
Your work on areas like the robes, and the metallics on your last picture's winged mantle show that you clearly have a good grasp of the basics, now you just need practice. Trust me when I say I understand the motivation to batch paint (I line my Orks up ten at a time), but when you're trying to get better slow and steady is the way to go. Really look at what you're painting and think about the techniques you're using.
You can sit a person down with a step-by-step 'Eavy Metal guide and all the tools they'll need, but if they've never painted a mini before, their end product is simply not going to look the same. Practice, practice, practice...it'll come.
|
|
|
|
|
|
2013/08/20 04:50:01
Subject: How can I bring my paintjobs to the next level (pics included)
|
|
Hurr! Ogryn Bone 'Ead!
|
80% of the battle is staying within the shapes and properly "blocking" areas. That alone well get you a really good looking model. You definitely have a good start mastering the more advance techniques (blending, shading, washes), so you are on your way, don't give up friend!
If anything, maybe you can get some good practice in with rank and file troops - maybe grab your mitts on a basic marine or something from Black Reach or Dark Vengeance and concentrate solely on blocking in the mini carefully. Things like the shading and dry brushing can always be done after the fact.
|
|
|
|
|
2013/08/20 17:07:15
Subject: How can I bring my paintjobs to the next level (pics included)
|
|
Hurr! Ogryn Bone 'Ead!
|
I was going to add...what you have there is a good start, perhaps you can go in and do "clean up" and you'll see it will really make the model step up a few notches. Like in particular, getting some of that armor color back where the bronze wash spilled over the skulls and wing emblems (ie belt and leg plates), the tips of the dagger scabbards getting hit with spots of green from the cloak, etc.
|
|
|
|
|
2013/08/21 03:03:42
Subject: How can I bring my paintjobs to the next level (pics included)
|
|
Shas'ui with Bonding Knife
|
Blend..... blend....blend!
Check this out, from dakka's very own useless wizard:
http://www.youtube.com/watch?v=tXxlIHuQUXo
|
I destroy my enemies when I make them my friends. 
Three!! Three successful trades! Ah ah ah!
 |
|
|
|
|
2013/08/21 07:16:23
Subject: How can I bring my paintjobs to the next level (pics included)
|
|
Steadfast Grey Hunter
|
You clearly know wht you are doing and know what you want to do. As memtioned before its all practise dude pure and simple.
For death wing and robes I undercoat white followed by rakarth flesh (a few thin layers until even) a heavy wash of seraphim sepia. Once the wash is dry another few thin cots of rkarth flesh ( avoiding all cracks and crevices) then a 50/50 of rkaryh flesh and uhbati bone for highlights. Then ushbati as extreme highlights.
It's a really simple technique and works well. Weathering is always a good call on death wing armour to break the bone armour and draw the eye. As for gems and lenses a standard brush is fine, just relax. Small details may seem intimidating but they are no worse then the armour. Just relax and take your time. I make sure I have an extra brush and some fresh water on hand, a slight slip can be cleaned up with a blob of water a quick wipe with the brush and dry, then try again.
Look forward to seek g how it goes dude. Keep us posted. Cheers
|
|
|
|
|
|
|
|


