Switch Theme:

Painting Dark Vengeance: Tactical Squad  [RSS] Share on facebook Share on Twitter Submit to Reddit
»
Author Message
Advert


Forum adverts like this one are shown to any user who is not logged in. Join us by filling out a tiny 3 field form and you will get your own, free, dakka user account which gives a good range of benefits to you:
  • No adverts like this in the forums anymore.
  • Times and dates in your local timezone.
  • Full tracking of what you have read so you can skip to your first unread post, easily see what has changed since you last logged in, and easily see what is new at a glance.
  • Email notifications for threads you want to watch closely.
  • Being a part of the oldest wargaming community on the net.
If you are already a member then feel free to login now.


Made in ie
Fresh-Faced New User


Hey guys! New player 40k player here!

I got my hands on Dark Vengeance over Christmas and my goodness, these models are absolutely beautiful! I am really happy with how these guys turned out. I used a really straight forward method on these guys and I think it worked.

I can't wait to start the Chosen and the Hellbrute. For now all I have done is this tactical squad and the bikes which I will get pics up of soon. The termies are nearly done also.

I'm making it my goal to finish every model in the set and weather it's two months or two years away from the finish date I don't care, as long as I get them done!

Any how here's what I've got so far.


New pics!
Plasma Cannon


Tactical troops, front and back


Finally, the Sergeant


Hope you like it!

Thanks guys!

This message was edited 2 times. Last update was at 2014/02/14 19:42:22


Made in us
Stealthy Dark Angels Scout with Shotgun


Awesome job. They look really good.
   
Made in gb
Snord


Barovia

Really nice Tactical Squad - well done!

Regards,
Reavsie

Is no fun, is no Blinsky! 
   
Made in ie
Fresh-Faced New User


Reavsie wrote:Really nice Tactical Squad - well done!

Regards,
Reavsie


Thanks for the kind words! This is really encouraging!
   
Made in gb
Revving Ravenwing Biker


Cardiff, UK

This is my mission too, I look forward to seeing the rest of your work. Would you mind posting your steps? It's a good result considering you say it was quick!


Automatically Appended Next Post:
This is my mission too, I look forward to seeing the rest of your work. Would you mind posting your steps? It's a good result considering you say it was quick!

This message was edited 1 time. Last update was at 2014/02/14 13:13:40


Made in ie
Fresh-Faced New User


 Million wrote:
This is my mission too, I look forward to seeing the rest of your work. Would you mind posting your steps? It's a good result considering you say it was quick!


Thanks for your comment man, I really appreciate it!

And as for posting my steps I'd be more than happy to show you the method. However, I may have stated that this was a quick method, but this is just what I see as quick painting. I'm a busy secondary school student and am busy most weekends. The unit took me a little over a week to complete, (keep in mind I wasn't painting everyday) which I feel is good because I think they are to a table top standard. The method is quick, but you won't finish a unit in an afternoon.

Anyhow here's how I did it. I may try get some pictures up.

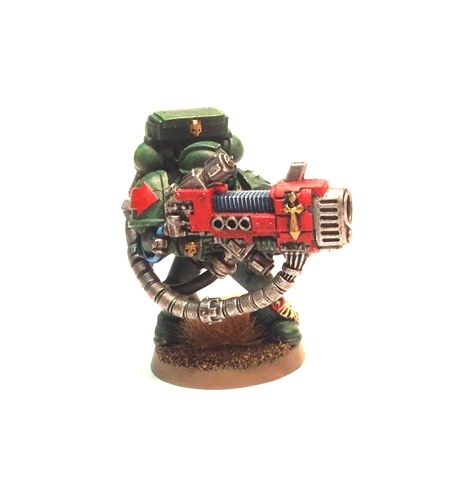
I started by priming the model Army Painter: Angel Green, they have excellent spray paints.

Next I washed each model with Thraka Green (Biel-Tan Green) to darken the recesses. Alternatively you could use Nuln Oil, giving the model a much darker look.

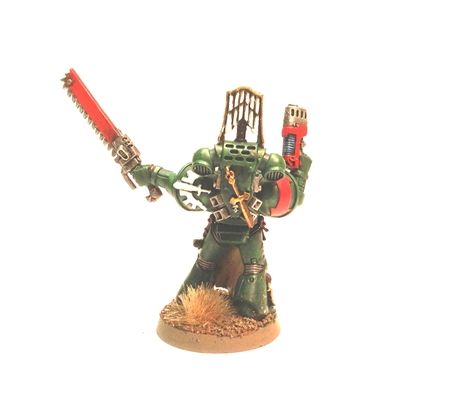
I wanted to go for a more 'real' look which is why in the next step I lightly dry brushed the power armour hitting only the raised areas using Warpstone Glow and then Scorpian Green. You can individually highlight each individual part of the model but that's just not my style. I don't like sharp, il luminous highlights like a how a lot of the 'Eavy Metal team painters paint.

This is where the speed of the method really runs out. A lot of time is saved when choosing to dry brush the highlights rather than paint them on bit by bit. So for all of the little details theres no corner cutting.

I won't tell you how I did each and every detail but I will tell you how I did most of it.

The reds began with a base coat of Scab Red followed by a quick and dirty highlight of Evil Sunz Scarlet. Then washed with Nuln Oil.

For the metallics I used a base coat of Leadbelcher followed by a wash of Nuln Oil and a highlight of Mithril Silver.

The whites where painted straight on using thin coats of Ceramite White, don't use White Scar, it's far too difficult to paint with.

The bone coloured parts like the Sergeants robe were done by base coating the piece Zandhri Dust, followed by a wash of Seraphim Sepia and another coat of Ushabti Bone. Finally highlight with a mix of White Scar and Ushabti Bone or just straight Screaming Skull.

That's the meat of the method. Just batch paint the unit, and bit by bit it comes together. It takes nothing more than an afternoon to get the power armour all done, after that its just the details.

Thanks again, good luck painting your army!

This message was edited 1 time. Last update was at 2014/02/14 17:31:50


Made in us
Fresh-Faced New User


Very neatly done! Bravo!
   
Made in us
Regular Dakkanaut


Nice showcase! I look forward to seeing more.

How do you take photo's of our mini's? The background is ultra bright and it saturates the models a bit. The colors looks like standard incandecent or halogen too if I had to guess.

1500 Dark Angels( 9 - 4 - 0 )
Humility must always be the portion of any man who receives acclaim earned in the blood of his followers and the sacrifices of his friends.
- Dwight D. Eisenhower


Made in nl
Fresh-Faced New User


Looking very good! Did you line them up or finished every model one by one?
   
Made in ie
Fresh-Faced New User


 Brillow80 wrote:
Nice showcase! I look forward to seeing more.

How do you take photo's of our mini's? The background is ultra bright and it saturates the models a bit. The colors looks like standard incandecent or halogen too if I had to guess.


Thanks man, that means a lot!
As for taking pictures of my minis I start by setting up where I'm going to take the pics. I usually take the pics at a window where sun is shining through. So I pick a spot, and set my minis up with two simple white sheets of paper, one for the minis to stand on and one for the background. Next I take two desk lamps and point them at the mini, trying to remove any extreme shadows. Finally I dim the lights with a white piece paper.

After taking the pics I go through a simple editing process. There is a free to use, no download required photo editor online at pixlr.com. Here I crop my picture to focus on the mini. Next I edit the brightness and contrast. Here, I make the background white and edit the brightness and contrast until I'm happy I can see all of the details of the model.

Finally I take the edited picture and bring it into Microsoft Office where I resize image so that it fits here on forum. I think you can do this on pixlr but this is just how I like to do it.

And that's how I take my pictures.

Thanks again!


Automatically Appended Next Post:
charke wrote:
Looking very good! Did you line them up or finished every model one by one?


Hey man thanks for your comment.
I batch painted these guys.

Thanks!

This message was edited 1 time. Last update was at 2014/02/15 15:15:30


Made in us
Fresh-Faced New User


So good. This is what I'm striving for with my set. Someday .
   
Made in ie
Fresh-Faced New User


Risible wrote:
So good. This is what I'm striving for with my set. Someday .


Wow man, that means so much to me, thanks!
Honestly this is not a difficult method at all. Just break down the steps, look for tutorials on YouTube and your models will look awesome!
   
 
Forum Index » Painting & Modeling Showcase
Go to: