| Author |
Message |
 |
|
|
|
|
Advert
|
Forum adverts like this one are shown to any user who is not logged in. Join us by filling out a tiny 3 field form and you will get your own, free, dakka user account which gives a good range of benefits to you:
- No adverts like this in the forums anymore.
- Times and dates in your local timezone.
- Full tracking of what you have read so you can skip to your first unread post, easily see what has changed since you last logged in, and easily see what is new at a glance.
- Email notifications for threads you want to watch closely.
- Being a part of the oldest wargaming community on the net.
If you are already a member then feel free to login now. |
|
 |
2014/02/17 10:29:36
Subject: How to make custom terrain? (With only clay and cardboard.)
|
|

Terrifying Wraith
|
All I have to work with is a block of clay and some cardboard, how would I begin making terrain with this?
|
Dear old friends, remember Navarro |
|
|
 |
|
2014/02/17 15:22:20
Subject: How to make custom terrain? (With only clay and cardboard.)
|
|
Trustworthy Shas'vre
|
First get some ideas on what you want to make, that will help.
Making a forest is a lot different than ruins.
With what you have, depending on skill, might be ok for craters and hills, but more work for other things.
then, go watch ever single terrain video on youtube, and look for terrain posts on here and other places.
I start with a concept, or a sketch (maybe) then pick a base size, and start making stuff.
Even with a block of clay and cardboard, you can make some simple ruins (get some rocks from outside).
There is no turnkey "this is how to make terrain" but with some research and PRACTICE I think you can make stuff with that.
|
DavePak
"Remember, in life, the only thing you absolutely control is your own attitude - do not squander that power."
Fully Painted armies:
TAU: 10k Nids: 9600 Marines: 4000 Crons: 7600
Actor, Gamer, Comic, Corporate Nerd
|
|
|
|
|
2014/02/17 17:29:52
Subject: Re:How to make custom terrain? (With only clay and cardboard.)
|
|
Terrifying Wraith
|
Yeah, I'm just working with an imprompo set up till I manage to get some real terrain materials. I'm trying to go with simple stuff to start, some of those weird Imperium half-wall things, some rocks, that sort of stuff. Tried making a webway portal by drawing one on the cardboard, cutting it out, and then cutting the clay around it. It looked nice, but my drawing sucked and it crumbled.
|
Dear old friends, remember Navarro |
|
|
|
|
2014/02/17 22:25:02
Subject: How to make custom terrain? (With only clay and cardboard.)
|
|

Regular Dakkanaut
|
What type of clay do you have and what are you looking to make?
You could do sandbag, brick, stone, cement walls with ease, you could push the boat out and try to make a bunker using card as the frame and then cover the frame in clay.
And before you start building sit down with a pen and paper and write a list of things you want to build, this way you can tick things off as you go or in my case keep adding to it as the list grows quicker than I can make things 
|
 2000+ points, but I think I know how to use them 2000+ points, but I think I know how to use them
 Bolt action, 1500 points BANZI Bolt action, 1500 points BANZI
Dwarfs 2500+
Vampires 1000ish |
|
|
|
|
2014/02/17 23:07:57
Subject: How to make custom terrain? (With only clay and cardboard.)
|
|
Terrifying Wraith
|
deathwolf669 wrote:What type of clay do you have and what are you looking to make?
You could do sandbag, brick, stone, cement walls with ease, you could push the boat out and try to make a bunker using card as the frame and then cover the frame in clay.
And before you start building sit down with a pen and paper and write a list of things you want to build, this way you can tick things off as you go or in my case keep adding to it as the list grows quicker than I can make things
For now I want to start with a simple Imperial Trench like the GW models, then expand into a ruined city when I get the materials. Once the city is done, I plan to slowly convert it into a tyranid hellscape by modifying the buildings with Biospores and other such nid things.
As for the clay, all the box tells me is its "Modeling clay" which probably isnt helpful at all.
|
Dear old friends, remember Navarro |
|
|
|
|
2014/02/18 04:25:22
Subject: Re:How to make custom terrain? (With only clay and cardboard.)
|
|
Dakka Veteran
|
This trench thing was made with cardboard, dry wall mud, and some left over sprues. It did not take a great deal of effort and came out decent.
|
|
|
|
|
2014/02/18 08:51:52
Subject: Re:How to make custom terrain? (With only clay and cardboard.)
|
|
Regular Dakkanaut
|
Foamcard is what you want to look at getting your hands on in the long run!
I am guessing then its air drying clay, in that case good luck! I have suggested getting some for modeling and my other half wont let me as it can be hard to handle and doesn't want me wasting a block, but paper mache should be just as good and cheaper
Plus large clay scenery can get heavy if you are moving it around a lot.
Loborocket has done a good one, if you want barbed wire look at anyone but army builder. Not saying theirs is bad its just a small roll. I got mine from http://scarabminiatures.com/index.php?main_page=product_info&products_id=264 or just make your own, very simple and easy from what I have seen, will make my own after this lot is finally used up.
I am looking at making my own trench system for bolt action but then it will be carved into 1/2" polystyrene then layered up.
|
2000+ points, but I think I know how to use them
Bolt action, 1500 points BANZI
Dwarfs 2500+
Vampires 1000ish |
|
|
|
|
2014/02/18 09:04:40
Subject: How to make custom terrain? (With only clay and cardboard.)
|
|

Deadly Dark Eldar Warrior
|
For a very simple crater:
Step 1:
Cut a cardboard base the size you want for your newly created crater.
Step 2:
Put a nice hill of clay on top of the base. Thin at the sides and thick in the middle.
Step 3:
Now using very exact measurments and a lot of very difficult science... Punch it really hard right in the centre!
Step 4:
????????????
Step 5:
Profit! (Or paint it if that is more your thing  )
|
|
|
|
|
2014/02/18 10:23:36
Subject: How to make custom terrain? (With only clay and cardboard.)
|
|

Terminator with Assault Cannon
|
badkamer1 wrote:For a very simple crater:
Step 1:
Cut a cardboard base the size you want for your newly created crater.
Step 2:
Put a nice hill of clay on top of the base. Thin at the sides and thick in the middle.
Step 3:
Now using very exact measurments and a lot of very difficult science... Punch it really hard right in the centre!
Step 4:
????????????
Step 5:
Profit! (Or paint it if that is more your thing )
Don't do it on a glAss table.
|
*Insert witty and/or interesting statement here* |
|
|
|
|
2014/02/18 11:22:32
Subject: How to make custom terrain? (With only clay and cardboard.)
|
|
Terrifying Wraith
|
badkamer1 wrote:For a very simple crater:
Step 1:
Cut a cardboard base the size you want for your newly created crater.
Step 2:
Put a nice hill of clay on top of the base. Thin at the sides and thick in the middle.
Step 3:
Now using very exact measurments and a lot of very difficult science... Punch it really hard right in the centre!
Step 4:
????????????
Step 5:
Profit! (Or paint it if that is more your thing )
How well would a crater made this way work? I dont think any figures would be able to stand in it.
|
Dear old friends, remember Navarro |
|
|
|
|
2014/02/18 11:24:21
Subject: How to make custom terrain? (With only clay and cardboard.)
|
|
Stealthy Space Wolves Scout
Louisville, Ky
|
 Hive Fleet Cerberus wrote: Hive Fleet Cerberus wrote:badkamer1 wrote:For a very simple crater:
Step 1:
Cut a cardboard base the size you want for your newly created crater.
Step 2:
Put a nice hill of clay on top of the base. Thin at the sides and thick in the middle.
Step 3:
Now using very exact measurments and a lot of very difficult science... Punch it really hard right in the centre!
Step 4:
????????????
Step 5:
Profit! (Or paint it if that is more your thing )
How well would a crater made this way work? I dont think any figures would be able to stand in it.
smooth out the knuckle lines and add a few more cracks, it will work fine
|
1000-6500 SW W/L/D 6/1/3
2014: 12/0/4
2015: 8/5/4
Adeptus_lupus instagram for BR
Ave Imperator |
|
|
|
|
2014/02/18 11:41:36
Subject: Re:How to make custom terrain? (With only clay and cardboard.)
|
|
Dakka Veteran
|
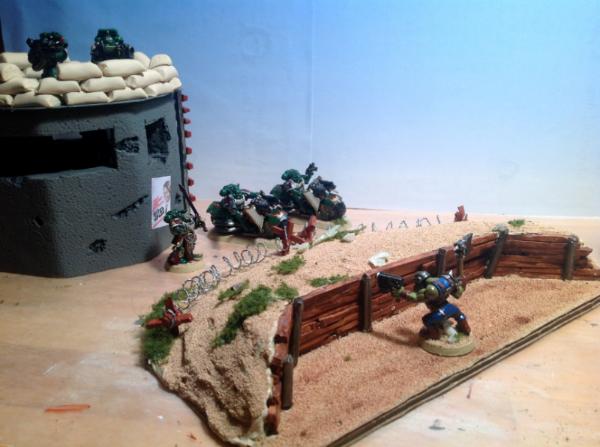
The barbed wire in this photo was done with a couple of cut sprue pieces on each end and then floral wire. I use 2 sizes first coiling the smaller around the larger, and the coiling them both around a pencil or some other round object. Then kind of just uncoil to the size you like and glue on the end pieces. I have enough floral wire to do miles of this stuf for about $2.50.
Oh and the sandbags on top of the bunker were made with air dry clay. Just rolled out to size ( these are a bit big) and cut with a kitchen knife and shaped a bit. Then glued in place on the bunker. The bunker itself is just painted styrofoam from a candle I bought for my wife.
All of the scenery in this photo cost about $1.50 in materials.
|
|
This message was edited 1 time. Last update was at 2014/02/18 11:45:57
|
|
|
|
|
2014/02/18 12:35:14
Subject: Re:How to make custom terrain? (With only clay and cardboard.)
|
|

Focused Dark Angels Land Raider Pilot
|
I really do want to help but I need a bit more to work with. Are we talking corrugated cardboard? And is the clay airdrying or do you need to bake it in the oven?
EDIT: Also, what sort of glue and tools do you have available? I have a few fun ideas in mind but will need a little more time to make you some pictures with mockups.
|
|
This message was edited 1 time. Last update was at 2014/02/18 13:57:39
// Andreas
 Dark Angels 4th Company (3,830pts) 950pts fully painted Dark Angels 4th Company (3,830pts) 950pts fully painted
  |
|
|
|
|
2014/02/18 20:55:55
Subject: Re:How to make custom terrain? (With only clay and cardboard.)
|
|
Terrifying Wraith
|
 granander wrote: granander wrote:I really do want to help but I need a bit more to work with. Are we talking corrugated cardboard? And is the clay airdrying or do you need to bake it in the oven?
EDIT: Also, what sort of glue and tools do you have available? I have a few fun ideas in mind but will need a little more time to make you some pictures with mockups.
Air drying clay, I think. Normal UPS box cardboard, some Elmers glue, an X-Acto knife, and a bottle of citadel thick glue
|
Dear old friends, remember Navarro |
|
|
|
|
2014/02/19 00:15:38
Subject: How to make custom terrain? (With only clay and cardboard.)
|
|
Rotting Sorcerer of Nurgle
|
The card will warp if left in contact with drying clay - is it DAS clay?
You want to build it up in thin (5-10mm) layers or it will crack.
Any cracks can be covered with sand either mixed with or sprinkle onto the Elmers. Or the cracks might actually add to the look of the piece. I recommend using something like MDF for the base though - if you're building something like a large crater, it will end up surprisingly heavy & cardboard just isn't sturdy enough. Also if you try to go without a base, the edges will crumble - air-drying clay isn't the strongest.
For trenches raid your local MacD's or coffee shop for wooden stirrers to make free planks from.
With the cardboard try taking off the top layer to reveal the wobbly card under & use as corrugated iron panels & roofing.
Hope that helps.
|
Check out my gallery here
Also I've started taking photos to use as reference for weathering which can be found here. Please send me your photos so they can be found all in one place!! |
|
|
|
|
2014/02/19 12:04:18
Subject: Re:How to make custom terrain? (With only clay and cardboard.)
|
|
Focused Dark Angels Land Raider Pilot
|
Okej, I've had a couple of minutes to spare. This is just a simple simple test.

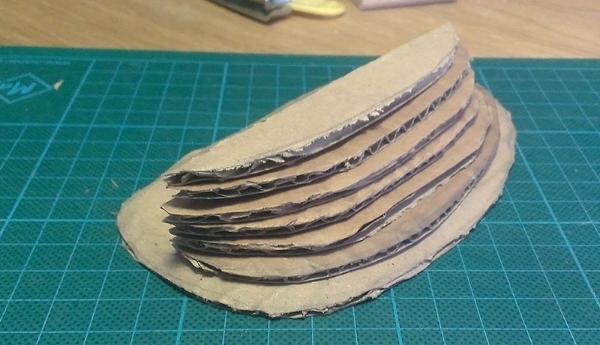
Now these are just cut and not glued together yet. What I have done is to cut out this stepped cardboard to save on the use of thick clay. I have cut them in alternating directions 90 degrees to help with warping.
The next step when they are glued and dried is to work the stepped edged with a spoon to make the sharp edges on the stepped side to collapse and thus get a smoother surface to lay down the clay on.
I have no clay to work with but the idea is to roll it thin and then cover the slope like a cake. The thin clay dries faster and the warping should be less.
For the backside I agree that wooden stirrers from McD are the best planks available. Both for the upright support and the plankflooring.
This same technique should be applicable to any hills and natural formations.
What do you guys think?
|
|
This message was edited 1 time. Last update was at 2014/02/19 12:04:49
// Andreas
Dark Angels 4th Company (3,830pts) 950pts fully painted
|
|
|
|
|
2014/02/20 02:16:29
Subject: Re:How to make custom terrain? (With only clay and cardboard.)
|
|
Dakka Veteran
|
granander wrote:Okej, I've had a couple of minutes to spare. This is just a simple simple test.
Now these are just cut and not glued together yet. What I have done is to cut out this stepped cardboard to save on the use of thick clay. I have cut them in alternating directions 90 degrees to help with warping.
The next step when they are glued and dried is to work the stepped edged with a spoon to make the sharp edges on the stepped side to collapse and thus get a smoother surface to lay down the clay on.
I have no clay to work with but the idea is to roll it thin and then cover the slope like a cake. The thin clay dries faster and the warping should be less.
For the backside I agree that wooden stirrers from McD are the best planks available. Both for the upright support and the plankflooring.
This same technique should be applicable to any hills and natural formations.
What do you guys think?
This is pretty much what the inside of my trench thing looks like.
|
|
|
|
|
|
|