| Author |
Message |
 |
|
|
|
|
Advert
|
Forum adverts like this one are shown to any user who is not logged in. Join us by filling out a tiny 3 field form and you will get your own, free, dakka user account which gives a good range of benefits to you:
- No adverts like this in the forums anymore.
- Times and dates in your local timezone.
- Full tracking of what you have read so you can skip to your first unread post, easily see what has changed since you last logged in, and easily see what is new at a glance.
- Email notifications for threads you want to watch closely.
- Being a part of the oldest wargaming community on the net.
If you are already a member then feel free to login now. |
|
 |
2014/03/31 21:26:34
Subject: How do you go by painting your gaunts? Or any small miniature
|
|

Speedy Swiftclaw Biker
|
Greetings!
I'm pretty new to the whole WH40K universe, building myself a nice 'Nids army!
I made so far: 1 Trygon prime, 3 raveners and a Venomthrope.
All those Are either big or medium (Or I consider them that way) But whats a tyranid army without any gaunts?
So here I am, starting some termagants! But I do have a question;
How do you paint your gaunts (or small miniatures).
For example, the gaunts has 2 color basecoat, do you make 1 area completely and then go to the second. Or paint everything "at the same time"?
Any particular things YOU do? Tips perhaps?
Thanks! 
Wiiff
|
 Lotsa wolves! Lotsa wolves!
  Decently sized Nurgle army Decently sized Nurgle army
 Literally 2 tau models Literally 2 tau models
 Imperial Knight Errant Imperial Knight Errant |
|
|
 |
|
2014/03/31 21:39:35
Subject: How do you go by painting your gaunts? Or any small miniature
|
|

Storm Trooper with Maglight
|
 wiiffler wrote: wiiffler wrote:For example, the gaunts has 2 color basecoat, do you make 1 area completely and then go to the second. Or paint everything "at the same time"?
Any particular things YOU do? Tips perhaps?
I'm not sure exactly what you mean here, but I will just prime and then base coat my small models all one color (whatever will cover the most area on the finished model) and then paint all of the details.
As for general tips - when I'm painting a large number of small miniatures, I tend to do them in batches. I have guardsmen, so I'll base coat them all tan, and then do the green armor for ten in a row. After that I'll paint all the skin on each model, and then the black, and so on...
|
|
|
|
|
2014/03/31 21:45:02
Subject: How do you go by painting your gaunts? Or any small miniature
|
|
Speedy Swiftclaw Biker
|
 rabidguineapig wrote: rabidguineapig wrote: wiiffler wrote:For example, the gaunts has 2 color basecoat, do you make 1 area completely and then go to the second. Or paint everything "at the same time"?
Any particular things YOU do? Tips perhaps?
I'm not sure exactly what you mean here, but I will just prime and then base coat my small models all one color (whatever will cover the most area on the finished model) and then paint all of the details.
As for general tips - when I'm painting a large number of small miniatures, I tend to do them in batches. I have guardsmen, so I'll base coat them all tan, and then do the green armor for ten in a row. After that I'll paint all the skin on each model, and then the black, and so on...
Mhmmm. What I meant is, I basecoat the carapace of the nids purple, then ill ill do the arms/body/head/gun in a white and work from there.
Thanks for the tip though!
|
Lotsa wolves!
Decently sized Nurgle army
Literally 2 tau models
Imperial Knight Errant |
|
|
|
|
2014/03/31 21:50:01
Subject: How do you go by painting your gaunts? Or any small miniature
|
|
Storm Trooper with Maglight
|
Ah ok that's what I thought - I would definitely just base coat the entire model purple, and then do the arms body head and gun after.
If you are painting the base coat by hand, remember to thin your paints and use a few layers so the finish is smooth and doesn't mess up details. I always find that spraying the base coat for small models is far easier though, and Army painter makes a great range of acrylic primers in plenty of colors that match GWs line. Otherwise primer and and then an airbrush works well.
Good luck!
|
|
|
|
|
2014/04/01 11:12:33
Subject: How do you go by painting your gaunts? Or any small miniature
|
|
Automated Rubric Marine of Tzeentch
|
Base coat skin tone, then paint chitin, give model wash, highlight chitin, pick out details.
Be mindful not to exaggerate the highlights. It's a pitfall that I see a lot of tyranid players fall into.
|
|
|
|
|
2014/04/01 11:32:02
Subject: Re:How do you go by painting your gaunts? Or any small miniature
|
|

Towering Hierophant Bio-Titan
|
Just before the last codex I went through and decided to get all my Nids up to the same standard. With 180 guants, 50 Genestealers and 30 Gargoyles that was gonna take a little while...
So I cut out the usual shading for the flesh and chitin parts, and went with a more basic scheme:
Black primer (left as the primary colour on the flesh parts)
Mephiston red on chitin
A light blue layer with a dark blue wash for the tongues + weapons (this is really noticable and effective on Devourers).
White for the teeth (doesn't take as long as you think, and quickly adds contrast to the model)
Based with Agrellan Earth, which produces a nice effect in one coat. The base rim was either left black or done in brown to help separate units on the table.
With small, swarmy models, it's generally more noticeable to have 3-4 colours than have 1-2 colours that are properly shaded.
For comparison, on my larger Nids (Warriors and bigger), I normally follow these steps for the black flesh parts:
Black primer
Heavy longbeard grey drybrush
Nuln oil shade
Very light longbeard grey drybrush for final highlights
And these for the chitin:
Mephiston red
Evil Sunz red in 2-3 layers
Shading between armour sections in black and/or nuln oil
|
|
|
|
|
2014/04/01 17:30:24
Subject: Re:How do you go by painting your gaunts? Or any small miniature
|
|
Speedy Swiftclaw Biker
|
 Quarterdime wrote: Quarterdime wrote:Base coat skin tone, then paint chitin, give model wash, highlight chitin, pick out details.
Be mindful not to exaggerate the highlights. It's a pitfall that I see a lot of tyranid players fall into.
Thanks for the tips!
Theyre all termagants though, so no chitin on these guys 
 xttz wrote: xttz wrote:Just before the last codex I went through and decided to get all my Nids up to the same standard. With 180 guants, 50 Genestealers and 30 Gargoyles that was gonna take a little while...
So I cut out the usual shading for the flesh and chitin parts, and went with a more basic scheme:
Black primer (left as the primary colour on the flesh parts)
Mephiston red on chitin
A light blue layer with a dark blue wash for the tongues + weapons (this is really noticable and effective on Devourers).
White for the teeth (doesn't take as long as you think, and quickly adds contrast to the model)
Based with Agrellan Earth, which produces a nice effect in one coat. The base rim was either left black or done in brown to help separate units on the table.
With small, swarmy models, it's generally more noticeable to have 3-4 colours than have 1-2 colours that are properly shaded.
For comparison, on my larger Nids (Warriors and bigger), I normally follow these steps for the black flesh parts:
Black primer
Heavy longbeard grey drybrush
Nuln oil shade
Very light longbeard grey drybrush for final highlights
And these for the chitin:
Mephiston red
Evil Sunz red in 2-3 layers
Shading between armour sections in black and/or nuln oil
Love that post, I like how you breakdown all those steps, ill be sure to give it a try with my color scheme!
Thanks a bunch!
|
Lotsa wolves!
Decently sized Nurgle army
Literally 2 tau models
Imperial Knight Errant |
|
|
|
|
2014/04/01 19:24:19
Subject: Re:How do you go by painting your gaunts? Or any small miniature
|
|
The Hive Mind
|
wiiffler wrote: Quarterdime wrote:Base coat skin tone, then paint chitin, give model wash, highlight chitin, pick out details.
Be mindful not to exaggerate the highlights. It's a pitfall that I see a lot of tyranid players fall into.
Thanks for the tips!
Theyre all termagants though, so no chitin on these guys
Chitin being the back armor parts. Termagants definitely have that.
|
My beautiful wife wrote:Trucks = Carnifex snack, Tanks = meals.
|
|
|
|
|
2014/04/01 19:43:32
Subject: Re:How do you go by painting your gaunts? Or any small miniature
|
|
Infiltrating Broodlord
|
Just as another example, here is my process for painting.
Step 1: Prime on Sprue (afterwards, just clip them off. The parts that aren't primed wont matter much, since they usually go in places that wont be seen.)
Step 2: Piece by piece, paint in soft tissue. (I find it easy to get in the soft tissue, then just paint onward from there.)
Step 3: Paint hard carapace. (Since this is 90% of the model, I find it easy just to get it over with.)
Step 4: Paint chitin, claws, and weaponry. (These are the more easily worn areas of the model, so I wind up painting them last)
Step 5: Details. (Don't forget the details!)
Step 6: Touch up as needed. (Everyone makes mistakes, take this time to fix them.)
Step 7: Assemble and touch up again as needed. (Trust me, everyone winds up with a few scratches, etc, when they wind up putting it together, somehow)
Step 8: Clear coat: (My bases are done long before the model ever is, so after you carefully get it positioned, go ahead and give it a coat so it stays the way you want it forever. Depending on how you like it, a heavy coat can give it that nice shiny/slime look.)
After all that, I can cheerfully crank out a single termagant in roughly 4 hours.
|
|
This message was edited 2 times. Last update was at 2014/04/01 19:44:36
"There is a cancer eating at the Imperium. With each decade it advances deeper, leaving drained, dead worlds in its wake. This horror, this abomination, has thought and purpose that functions on an unimaginable, galactic scale and all we can do is try to stop the swarms of bioengineered monsters it unleashes upon us by instinct. We have given the horror a name to salve our fears; we call it the Tyranid race, but if is aware of us at all it must know us only as Prey."
 Hive Fleet Grootslang 15000+ Hive Fleet Grootslang 15000+
Servants of the Void 2000+ |
|
|
|
|
2014/04/01 20:05:28
Subject: How do you go by painting your gaunts? Or any small miniature
|
|
The Hive Mind
|
For gants I:
Cut from sprue. Clean mold lines. Assemble.
Use alligator clips and cake-pop sticks to hold gants at varying heights.
Prime.
Basecoat (I use a spray paint http://www.krylon.com/products/fluorescent-paint/ )
Brush paint chitin and carapace
Paint fleshy bits
Paint on a "dip"
Attach to base.
Flock base.
|
My beautiful wife wrote:Trucks = Carnifex snack, Tanks = meals.
|
|
|
|
|
2014/04/01 21:06:18
Subject: Re:How do you go by painting your gaunts? Or any small miniature
|
|
Speedy Swiftclaw Biker
|
 Unyielding Hunger wrote: Unyielding Hunger wrote:Just as another example, here is my process for painting.
Step 1: Prime on Sprue (afterwards, just clip them off. The parts that aren't primed wont matter much, since they usually go in places that wont be seen.)
Step 2: Piece by piece, paint in soft tissue. (I find it easy to get in the soft tissue, then just paint onward from there.)
Step 3: Paint hard carapace. (Since this is 90% of the model, I find it easy just to get it over with.)
Step 4: Paint chitin, claws, and weaponry. (These are the more easily worn areas of the model, so I wind up painting them last)
Step 5: Details. (Don't forget the details!)
Step 6: Touch up as needed. (Everyone makes mistakes, take this time to fix them.)
Step 7: Assemble and touch up again as needed. (Trust me, everyone winds up with a few scratches, etc, when they wind up putting it together, somehow)
Step 8: Clear coat: (My bases are done long before the model ever is, so after you carefully get it positioned, go ahead and give it a coat so it stays the way you want it forever. Depending on how you like it, a heavy coat can give it that nice shiny/slime look.)
After all that, I can cheerfully crank out a single termagant in roughly 4 hours.
Thats definetly a great way to go by! My gaunts all have devourers and getting behind their arms/chest is pretty hard.
But im curious, could you post a finished model you painted this way?
Ive only see 1 person do it this method and the outcome was huh....terrible....
Thanks for the idea though! Automatically Appended Next Post: rigeld2 wrote:For gants I:
Cut from sprue. Clean mold lines. Assemble.
Use alligator clips and cake-pop sticks to hold gants at varying heights.
Prime.
Basecoat (I use a spray paint http://www.krylon.com/products/fluorescent-paint/ )
Brush paint chitin and carapace
Paint fleshy bits
Paint on a "dip"
Attach to base.
Flock base.
Oooh, i like that one.
So you use sticks to elevate them, and paint them on there? where do you make the hole to put the stick in? the feet?
If youd have a pic of the set-up that'd be awesome!
|
|
This message was edited 1 time. Last update was at 2014/04/01 21:09:24
Lotsa wolves!
Decently sized Nurgle army
Literally 2 tau models
Imperial Knight Errant |
|
|
|
|
2014/04/01 21:21:27
Subject: How do you go by painting your gaunts? Or any small miniature
|
|
The Hive Mind
|
The alligator clips grab the tab that goes in the base. They have a hole in the bottom that the cake-pop sticks fit into perfectly. I have them at varying heights so they don't block the spray to each other.
No pics right now - lots of work being done on the house so I can sell it.
|
My beautiful wife wrote:Trucks = Carnifex snack, Tanks = meals.
|
|
|
|
|
2014/04/01 21:32:04
Subject: Re:How do you go by painting your gaunts? Or any small miniature
|
|
Infiltrating Broodlord
|
wiiffler wrote:
Thats definetly a great way to go by! My gaunts all have devourers and getting behind their arms/chest is pretty hard.
But im curious, could you post a finished model you painted this way?
Ive only see 1 person do it this method and the outcome was huh....terrible....
Thanks for the idea though!
Hehehe...you think I have finished models. Yea.. for some strange reason, I wind up with about 10% finished product, and the other 90% wind up in darn near eternal reconstruction. The people in my gaming circle are used to me fielding a unit one day, and the empty base it used to sit on the next because I noticed some small flaw and my CDO kicked in and I had to go fix it. But, here is a prime example of my work.
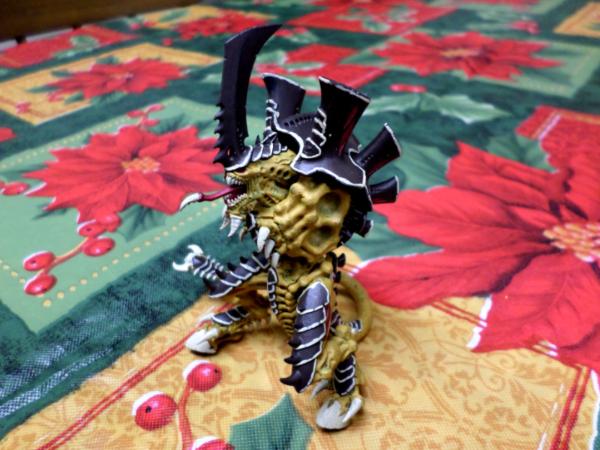
Even as I look at this picture, I still see flaws that I have to triple check to make sure I covered...
|
"There is a cancer eating at the Imperium. With each decade it advances deeper, leaving drained, dead worlds in its wake. This horror, this abomination, has thought and purpose that functions on an unimaginable, galactic scale and all we can do is try to stop the swarms of bioengineered monsters it unleashes upon us by instinct. We have given the horror a name to salve our fears; we call it the Tyranid race, but if is aware of us at all it must know us only as Prey."
Hive Fleet Grootslang 15000+
Servants of the Void 2000+ |
|
|
|
|
2014/04/01 22:27:06
Subject: How do you go by painting your gaunts? Or any small miniature
|
|
Speedy Swiftclaw Biker
|
rigeld2 wrote:The alligator clips grab the tab that goes in the base. They have a hole in the bottom that the cake-pop sticks fit into perfectly. I have them at varying heights so they don't block the spray to each other.
No pics right now - lots of work being done on the house so I can sell it.
Yeah, I just realised i forgot about that tab, woops. Great idea, ill look into it.
Good luck with the house! 
Unyielding Hunger wrote:
Hehehe...you think I have finished models. Yea.. for some strange reason, I wind up with about 10% finished product, and the other 90% wind up in darn near eternal reconstruction. The people in my gaming circle are used to me fielding a unit one day, and the empty base it used to sit on the next because I noticed some small flaw and my CDO kicked in and I had to go fix it. But, here is a prime example of my work.
Even as I look at this picture, I still see flaws that I have to triple check to make sure I covered...
Mhmm, i see , looks good!
|
Lotsa wolves!
Decently sized Nurgle army
Literally 2 tau models
Imperial Knight Errant |
|
|
|
|
2014/04/02 01:22:12
Subject: Re:How do you go by painting your gaunts? Or any small miniature
|
|

Elite Tyranid Warrior
|
I was doing them in lots of 10.... before I got an airbrush! 
I still have basically the same process, but do a big batch of the "Skin" step. Around 30 at a time.
Prime
Skin: Airbrush or Drybrush
Basecoat (Xerus Purple)
Topcoat (Genestealer Purple)
Highlight (Pink Horror)
Shade with Drakenhof Nightshade
1 or 0 brush:
Fleshy bits & tongue (Moot Green)
Eyes (Moot Green)
Teeth (White)
Shade Moot Green with then shade with Coelia Greenshade
Highlight washed green over with Moot Green again
'Ardcoat
Carapace: 0 & 00 brush
Kantor Blue
Hoeth Blue
Shade with Drakenhof Nightshade
Lothern Blue
Edge with Baharroth Blue
Matt Varnish carapace.
Paint base & Matt Varnish
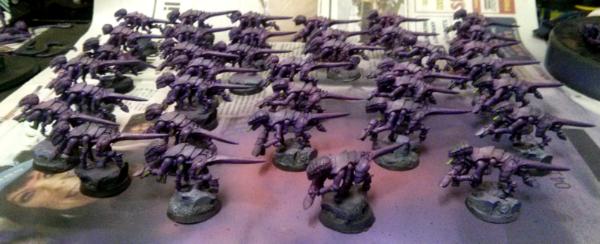
WIP of latest batch:
|
|
|
|
|
2014/04/02 03:11:49
Subject: Re:How do you go by painting your gaunts? Or any small miniature
|
|
Speedy Swiftclaw Biker
|
Kr00gZ wrote:
I was doing them in lots of 10.... before I got an airbrush!
I still have basically the same process, but do a big batch of the "Skin" step. Around 30 at a time.
Prime
Skin: Airbrush or Drybrush
Basecoat (Xerus Purple)
Topcoat (Genestealer Purple)
Highlight (Pink Horror)
Shade with Drakenhof Nightshade
1 or 0 brush:
Fleshy bits & tongue (Moot Green)
Eyes (Moot Green)
Teeth (White)
Shade Moot Green with then shade with Coelia Greenshade
Highlight washed green over with Moot Green again
'Ardcoat
Carapace: 0 & 00 brush
Kantor Blue
Hoeth Blue
Shade with Drakenhof Nightshade
Lothern Blue
Edge with Baharroth Blue
Matt Varnish carapace.
Paint base & Matt Varnish
WIP of latest batch:
Dayum! 30 per batch? How long did it used to take you to finish a lot of 10?
Today I soent a good 2-3 hours basecoating the skeleton and washing it, and thats for a 12 pack!
Looks good btw 
|
|
This message was edited 2 times. Last update was at 2014/04/02 03:13:56
|
|
|
|
|
2014/04/02 23:46:16
Subject: How do you go by painting your gaunts? Or any small miniature
|
|
Elite Tyranid Warrior
|
What you see in the pic only took about 2 hours in total. That's not including assembly and priming. Mixing the paint to an appropriate viscosity takes the most time when airbrushing, especially as I've only just started using one.
It took a while to do everything with brushes. Base-coating was the longest as I did 2 thin layers but production-lined all 10 so that the first was pretty much dry by the time I'd finished the last.
2-3 hours sounds about right, timing wise. Was that for 2 thin coats of base? I tend not to rush as I find I end up missing something and not seeing it until I'm washing the shade over it. :-/
|
|
This message was edited 1 time. Last update was at 2014/04/02 23:47:33
|
|
|
|
|
2014/04/02 23:52:34
Subject: How do you go by painting your gaunts? Or any small miniature
|
|
Speedy Swiftclaw Biker
|
 Kr00gZ wrote: Kr00gZ wrote:What you see in the pic only took about 2 hours in total. That's not including assembly and priming. Mixing the paint to an appropriate viscosity takes the most time when airbrushing, especially as I've only just started using one.
It took a while to do everything with brushes. Base-coating was the longest as I did 2 thin layers but production-lined all 10 so that the first was pretty much dry by the time I'd finished the last.
2-3 hours sounds about right, timing wise. Was that for 2 thin coats of base? I tend not to rush as I find I end up missing something and not seeing it until I'm washing the shade over it. :-/
Yep, for 2-3 coats. sometimes I get the paint too wet and gotta paint over some more. lol
But yeah, I also try and get every spot, but i mounted them on their base and finished that as a first thing. big mistake, now its really hard getting around because they all have devourers 
But heres a pic of my progress for fun https://www.dropbox.com/s/4yv7zv5xug0osna/2014-04-02%2015.43.45.jpg
|
|
This message was edited 1 time. Last update was at 2014/04/02 23:58:51
Lotsa wolves!
Decently sized Nurgle army
Literally 2 tau models
Imperial Knight Errant |
|
|
|
|
2014/04/02 23:58:29
Subject: How do you go by painting your gaunts? Or any small miniature
|
|
Grizzled Space Wolves Great Wolf
|
Guants aren't actually small, but yeah, lol. I do a quick job on them, spray white, Devlan mud wash, pick out the carapace in dark blue using a large brush, highlight with mid blue using a large brush, edge highlight the carapace with a light blue using a number 1 brush with a good tip, pick out claws in dark red, highlight claws a mid red. Finally I pick out the crevices with a brown ink (opposed to a brown wash). That's pretty much it. If I can be bothered I pick out the teeth in white, but most my gaunts I haven't. Takes me about 40 minutes each to do that. Not the fastest scheme in the world, but I like the results: 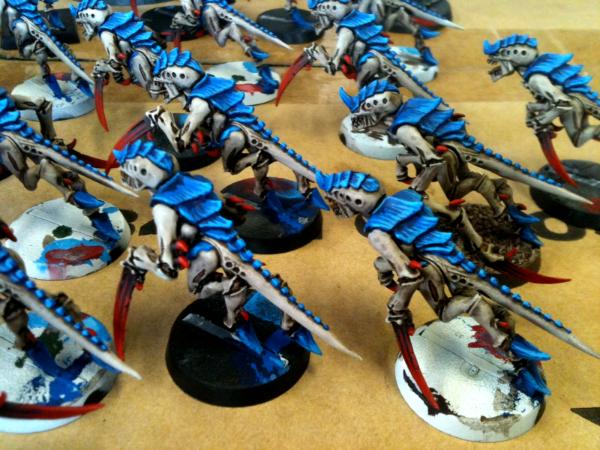 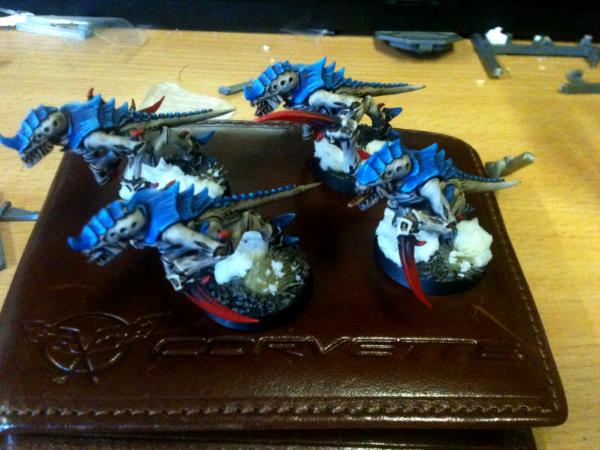 By comparison, my big things, I spend more time on the flesh, going Rakarth Flesh -> brown ink -> highlight mix of Rakarth and darker brown -> highlight Rakarth. And the carapace I spend more time on the streaking, and I add an extra layer or two of red on the claws to smooth the transition. IF I were to paint my gaunts to this standard, instead of 40 minutes they'd probably take 2 hours. My Trygon took me over 20 hours just to paint  
|
|
This message was edited 1 time. Last update was at 2014/04/03 00:00:21
|
|
|
|
|
2014/04/03 00:03:05
Subject: How do you go by painting your gaunts? Or any small miniature
|
|
Speedy Swiftclaw Biker
|
AllSeeingSkink wrote:Guants aren't actually small, but yeah, lol. I do a quick job on them, spray white, Devlan mud wash, pick out the carapace in dark blue using a large brush, highlight with mid blue using a large brush, edge highlight the carapace with a light blue using a number 1 brush with a good tip, pick out claws in dark red, highlight claws a mid red. Finally I pick out the crevices with a brown ink (opposed to a brown wash).
That's pretty much it. If I can be bothered I pick out the teeth in white, but most my gaunts I haven't.
Takes me about 40 minutes each to do that. Not the fastest scheme in the world, but I like the results:
By comparison, my big things, I spend more time on the flesh, going Rakarth Flesh -> brown ink -> highlight mix of Rakarth and darker brown -> highlight Rakarth. And the carapace I spend more time on the streaking, and I add an extra layer or two of red on the claws to smooth the transition.
they do look pretty great! the colors are nice.
But I consider then small since its the smallest minis ive done so far (I painted 1 trygon, 3 raveners and a malanthrope )
So what would you consider small minis? spore mine and those little ravagers that passes after the hive nomnomnom'd everything?
|
Lotsa wolves!
Decently sized Nurgle army
Literally 2 tau models
Imperial Knight Errant |
|
|
|
|
2014/04/03 00:30:00
Subject: How do you go by painting your gaunts? Or any small miniature
|
|
Grizzled Space Wolves Great Wolf
|
Guants are cheap models, but size wise they're bigger than a human, they're about the size of a Space Marine maybe even a touch larger When I think "small models" I tend to think Goblin, Gretchin, Skink sort of size. I enjoy painting Night Goblins because they're small enough you can spend more effort on each one and they still don't take a huge amount of time. These take me about 20 minutes each and are still painted to a reasonably good standard (not show piece, but yeah, you get what I mean).

|
|
|
|
|
2014/04/03 01:32:02
Subject: How do you go by painting your gaunts? Or any small miniature
|
|
Speedy Swiftclaw Biker
|
AllSeeingSkink wrote:Guants are cheap models, but size wise they're bigger than a human, they're about the size of a Space Marine maybe even a touch larger When I think "small models" I tend to think Goblin, Gretchin, Skink sort of size. I enjoy painting Night Goblins because they're small enough you can spend more effort on each one and they still don't take a huge amount of time. These take me about 20 minutes each and are still painted to a reasonably good standard (not show piece, but yeah, you get what I mean).
Yeah, true. Also, thats pretty impressive for 20 minutes! I wouldnt be able to tell it took you so short. Great job on them
|
Lotsa wolves!
Decently sized Nurgle army
Literally 2 tau models
Imperial Knight Errant |
|
|
|
|
|
|
