Forum adverts like this one are shown to any user who is not logged in. Join us by filling out a tiny 3 field form and you will get your own, free, dakka user account which gives a good range of benefits to you:
No adverts like this in the forums anymore.
Times and dates in your local timezone.
Full tracking of what you have read so you can skip to your first unread post, easily see what has changed since you last logged in, and easily see what is new at a glance.
Email notifications for threads you want to watch closely.
Being a part of the oldest wargaming community on the net.
If you are already a member then feel free to login now.
2015/06/10 20:17:56
Subject: Late war German tank colours - advice needed on project
Maybe not quite the forum for it but I know there are some historical modellers and I need some ideas. I'm making a 1/35 late war Panther with IR gear for an event weekend after this at Duxford.
This is the kit, currently I've primered most of it on the sprue.
I want to do something somewhat exotic, almost speculative to be very-late war and have settled on a strong stripes pattern. There's definite historical basis for what I'm doing as seen in these photos.
This has been interpreted in the following scan from a japanese magazine, and is the basis for what I'm going to do.
So that's the look I'm going for and I have bought appropriate colours in Vallejo colours that match german colours. But I want to achieve a very-late war, rushed-from-the-factory look to the vehicle. So was thinking that the hull and turret would be as in the pictures, but am undecided on the chassis. I want some of the vehicle to be in the red-brown (red oxide) primer that the germans used, so though the chassis could be this and perhaps the wheels too. Or perhaps the chassis in redbown but the wheels would be yellow or green. But then I'm concerned the vehicle will look like a patchwork quilt which gets away from the simple appearance of the stripes and the idea that it's been done quickly.
Any advice on what would look best? Will update this thread as I go along.
This message was edited 3 times. Last update was at 2015/06/10 20:19:22
2015/06/10 21:05:30
Subject: Re:Late war German tank colours - advice needed on project
I think the latest stuff was just coated with the oxide red protection paint and then some dunkelgelb striped over it, as seen here on this Jagdpanther:
Waaagh an' a 'alf
1500 Pts WIP
2015/06/10 22:35:50
Subject: Late war German tank colours - advice needed on project
The Panther in the first post are 'Kustrin' Panthers in their unique camo pattern from Panzer Division Muncheburg.
Generally the odd replacement item might be in rex oxide, such as a replaced wheel or side skirt, but the crews would try to camo them as soon as possible. Replacement gun barrels were in grey heat resistant undercoat.
Not a buff but my job involves creation of historically correct tank artwork and I have been exposed to quite some materials.
In the late war everything was scarce. Camo patterns were usually makeshift from whatever the crew got their hands on.
From 1943 onwards "Dunkelgelb" was the factory primer color. But in late 1944 it was changed to "Dunkelgrün". Buckets of Dunkelgelb and Rotbraun came along and were to be applied in a hard edge pattern. Sometimes this was done at the factory. In many cases the colors might not have been available or of poor quality. Patterns also varied in style and quality. In the very late war the crew would have probably brushed them on with rags, creating a dirty, rounded hard edge pattern. Some would still show some areas in green, some would be red and yellow only (like the example above).
PS: Either way, Vallejo is your friend
This message was edited 1 time. Last update was at 2015/06/11 03:12:21
2015/06/11 08:23:51
Subject: Late war German tank colours - advice needed on project
Late-War the Germans adopted factory applied schemes on all armoured vehicles. Indeed you can tell where a Panther was built by its camo pattern.
As these aged they would be repainted in the 'field'. Generally this was done at rest periods by the Werkstatte Komp. of the unit, as they had airguns and compressors for the task, or occasionally by the crews themselves.
Obviously in the last few months and weeks of the war the situation degraded further and shortages led to a variety of expedients.
Dunkelgelb was ordered in October 1942 as the standard colour and remained so for the war.
In Feburary 1943 a three colour disruption pattern was ordered over the Dunkelgelb to be applied by maintenance crews as required to suit local terrain.
In August 1944 the so-called Ambush pattern was ordered to be factory applied. This could vary between factories, though most had a templated pattern for each vehicle type.
Between September and December, in order to speed up production, we see tanks left in the red oxide primer and oversprayed with green and yellow disruption patterns.
In December 1944 we see the appearance of a basecoat of Green over the primer with red and yellow hard edge disruption pattern.
This would then be varied by unit applied patterns, both on an individual and unit level of application and all manner of patterns could appear alongside 'ordered' ones. Also application varied greatly. The paints came as pastes and were required to be thinned with paint for the best retention of application and pigment. As petrol became scare water was used with the effect of lessening the durability and the pigment. On occasion plain coloured vehicles were given just a complete coat of watered down Olivgrun over the Dunkelgelb to give an overall green/grey look that seems to have been used in the West. On the Eastern front in late 43 and early 44, a single colour Yellow and Green disruption pattern was common...
So really... despite German orders and factory application, huge variety existed.
Thanks for the replies guys, it seems I have a fair bit of room to be creative but the more unusual I go the more speculative it is.
I also have one of these to make which is an entirely fictitious vehicle, so I feel I can afford to play somewhat loose with reality when painting the pair.
I have to make decisions quite soon on the colour of the chassis as it needs painting before assembly...
So it begins.
2015/06/12 13:53:55
Subject: Re:Late war German tank colours - advice needed on project
All ready to go, I had to cut and sculpt the arms to get the man in around the equipment. Had to use my imagination on fitting the IR equipment. The kit has it coming from an arm inside the hatch leaving no room at all for the crew to sit in. I made a plastic card fitment to attach it to the ring arounf the cupola instead. Photos of the real thing seem to vary.
2015/06/12 15:18:33
Subject: Late war German tank colours - advice needed on project
Big P wrote: On the Eastern front in late 43 and early 44, a single colour Yellow and Green disruption pattern was common...
When you say late 43, do you mean Battle of Kursk and soon after? I seem to see a lot of green and yellow for Kursk vehicles in references (and yellow and Rotbraun 2 tone schemes as well).
2015/06/16 23:44:31
Subject: Re:Late war German tank colours - advice needed on project
It's mostly together now and I'm into painting. But before I can move onto the hull I've had to suffer putting the tracks on. None of the links wanted to go together they were just too damn tight with flash and mould lines blocking them. I cleaned up what I could but when each link has four notches to link to the next and you have nearly 200 links, it's just an impossible task. I think they look ok and not too squiffy, at least the bad bits are hidden.
2015/06/18 23:50:38
Subject: Re:Late war German tank colours - advice needed on project
Speeding along now. I'm awaiting some side skirts in the post at it looks naked without them, but the main colours are done. Some weathering next and putting the equipment on.
2015/06/19 00:02:02
Subject: Late war German tank colours - advice needed on project
I am working on a Japanese tank as my first Diorama. I am at the same stage (base done, now weathering equipment and details).
Your brush work is amazing though. I can't see any strokes.
One thing to note though is I think the paint was actually also on the wheels of the tank. I know Japan did this for certain but if you look at the colour photo of the tank above you can see the wheels have all the camo colours on them.
I suppose you are putting on the sides though so it doesn't matter too much.
2015/06/20 17:19:53
Subject: Late war German tank colours - advice needed on project
I am working on a Japanese tank as my first Diorama. I am at the same stage (base done, now weathering equipment and details).
Your brush work is amazing though. I can't see any strokes.
One thing to note though is I think the paint was actually also on the wheels of the tank. I know Japan did this for certain but if you look at the colour photo of the tank above you can see the wheels have all the camo colours on them.
I suppose you are putting on the sides though so it doesn't matter too much.
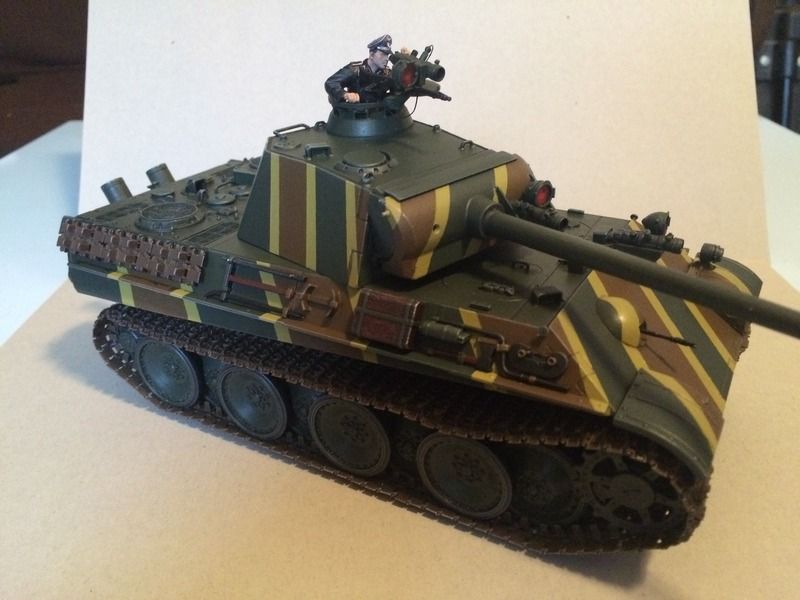
Cheers! I find the Vallejo paints work by thinning and using several coats, the paint never gets too thick and you avoid too many brush marks. I've finished painting and assembly and put the commander in. I did a was into the cracks and a light drybrush. No heavy weathering as in out of time. Also I'll want to do other vehicles so may weather them all with dust at the same time to keep them all consistent.
Just have to take it on the train to Duxford now :-/
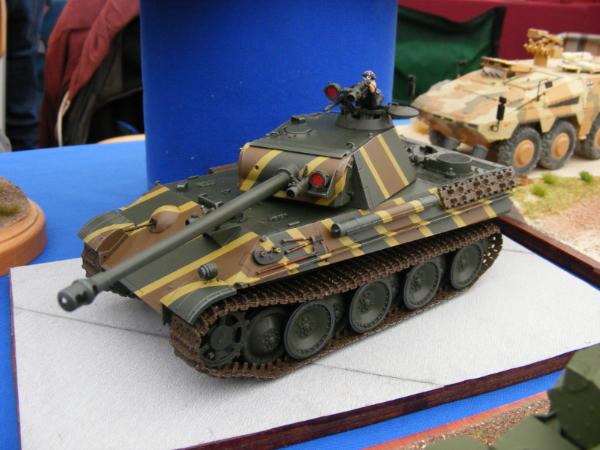
2015/06/24 16:34:06
Subject: Re:Late war German tank colours - advice needed on project
Finished the show on Sunday but have been away since. Finally got my photos off the camera to upload. Bit of a quiet day as they didn't have the vehicle rally and other events to coincide with the show. They did have a couple of vehicles out through so I took a video of them taking the T34 away at the end of the day.


 Waaagh an' a 'alf