| Author |
Message |
 |
|
|
|
|
Advert
|
Forum adverts like this one are shown to any user who is not logged in. Join us by filling out a tiny 3 field form and you will get your own, free, dakka user account which gives a good range of benefits to you:
- No adverts like this in the forums anymore.
- Times and dates in your local timezone.
- Full tracking of what you have read so you can skip to your first unread post, easily see what has changed since you last logged in, and easily see what is new at a glance.
- Email notifications for threads you want to watch closely.
- Being a part of the oldest wargaming community on the net.
If you are already a member then feel free to login now. |
|
 |
2015/09/01 00:18:03
Subject: How to get an even finish with metallics?
|
|

Bounding Assault Marine
|
So I'm painting a drop pod and I'm trying to base coat the inserts on the buttresses with a very dark metallic mix I've made with Ironbreaker and black.
If I brush it on, it doesn't seem to matter how thin or thick I go with the paint, it dries streaky.
I bought a Citadel spray gun, and I'm now learning air guns in general don't work very well with metallics. The gun will run for a couple seconds, get clogged, run for a couple of seconds again, get clogged again. The panels I did manage to get some paint on dried all spoltchy looking with the exception of one of them. Is there another affordable gun I could use that would give better results with metallics?
What do I need to do to get a nice uniform look? Please help!
|
|
This message was edited 1 time. Last update was at 2015/09/01 01:22:04
|
|
|
 |
|
2015/09/01 00:20:41
Subject: How to get an even finish with metallics?
|
|

Legendary Master of the Chapter
|
Shake thoroughly
paint wet on wet.
Keep it relatively thin.
|
 Unit1126PLL wrote: Unit1126PLL wrote: Scott-S6 wrote: Scott-S6 wrote:And yet another thread is hijacked for Unit to ask for the same advice, receive the same answers and make the same excuses.
Oh my god I'm becoming martel.
Send help!
|
|
|
|
|
2015/09/01 00:24:42
Subject: How to get an even finish with metallics?
|
|
Mutated Chosen Chaos Marine
|
Step one: do some research before buying an overpriced air gun. GW's sprayer is worse than most rustoleum spray cans. Step two: thin some more. Step three: use multiple thin coats. One will not do it, but if the coats are thin, you don't have to worry as you should be able to put on numerous coats without loss of detail if you have the paint thinned adequately. Also, your primer should be close to the base color. It sounds like a black primer is what you need in this case. Finally, try a paint made specifically for airbrushes. Vallejo air metallics have a much finer grain of mica than GW'S paint line. Not sure about their new airbrush paints
|
|
This message was edited 2 times. Last update was at 2015/09/01 00:29:45
Help me, Rhonda. HA! |
|
|
|
|
2015/09/01 01:10:27
Subject: How to get an even finish with metallics?
|
|

Grizzled Space Wolves Great Wolf
|
You could try a Vallejo Air metallic through the citadel spray gun, but the citadel spray gun is pretty crappy, you're probably better off buying spray cans of metallic silver paint.
In general when it comes to avoiding streaks when painting large flat areas with a hairy brush. Thin it down plenty and use a large soft brush. If you use a small brush or a brush with stiff bristles it's hard to avoid streaks.
|
|
|
|
|
2015/09/01 01:16:24
Subject: How to get an even finish with metallics?
|
|
Bounding Assault Marine
|
 Desubot wrote: Desubot wrote:Shake thoroughly
paint wet on wet.
Keep it relatively thin.
How do you mean: wet on wet? Please elaborate.
Automatically Appended Next Post:
I've invested a lot of time and money in mixing up a pretty large batch of the shade that I'm using, so that I can keep it consistent across my army, so changing paints is not an option I'm going to look at. It's very dark, and yes, I'm painting it over a black undercoat. I've tried thinning it to the point where it's almost water, and although that's given me the best result yet, it takes like 10 coats and still looks a bit streaky.
Is there another affordable gun I could use that would give better results with metallics?
|
|
This message was edited 2 times. Last update was at 2015/09/01 01:22:45
|
|
|
|
|
2015/09/01 01:23:06
Subject: How to get an even finish with metallics?
|
|
Legendary Master of the Chapter
|
When painting a full coat. try to keep paint on the wet parts.
If you paint over dried areas you can get streaks since the layers are not blended and are just overlapped.
|
Unit1126PLL wrote: Scott-S6 wrote:And yet another thread is hijacked for Unit to ask for the same advice, receive the same answers and make the same excuses.
Oh my god I'm becoming martel.
Send help!
|
|
|
|
|
2015/09/01 01:24:31
Subject: How to get an even finish with metallics?
|
|
Mutated Chosen Chaos Marine
|
Wet on wet: try using a brush and just give a quick light coat of water before you spray paint on. It can sometimes help to smooth out the layer. Don't get it dripping wet, just make it somewhat moist.
|
Help me, Rhonda. HA! |
|
|
|
|
2015/09/01 01:32:19
Subject: How to get an even finish with metallics?
|
|
Bounding Assault Marine
|
Desubot wrote:When painting a full coat. try to keep paint on the wet parts.
If you paint over dried areas you can get streaks since the layers are not blended and are just overlapped.
Ok yes, I see what you mean, I'm making sure I get the whole panel before any of it dries, and am letting it dry completely before moving on to the next coat, yes Automatically Appended Next Post:  Gordon Shumway wrote: Gordon Shumway wrote:Wet on wet: try using a brush and just give a quick light coat of water before you spray paint on. It can sometimes help to smooth out the layer. Don't get it dripping wet, just make it somewhat moist.
Interesting, ok, if I can get some kind of gun setup to actually push the paint for me I will try this. Does it work well when brushing on too?
|
|
This message was edited 1 time. Last update was at 2015/09/01 01:34:35
|
|
|
|
|
2015/09/01 01:40:46
Subject: How to get an even finish with metallics?
|
|
Grizzled Space Wolves Great Wolf
|
Desubot wrote:When painting a full coat. try to keep paint on the wet parts. If you paint over dried areas you can get streaks since the layers are not blended and are just overlapped.
Are you talking about spray gunning or hairy brush painting? Doing wet on wet with a hairy brush sounds like you'll be liable to tear the half dry underlying layers and create more of a mess. What sort of hairy brush are you using? The brush you use is rather important as to whether you'll get streaky results. It's definitely possible to get a pretty damned smooth coat with a hairy brush if you use the right technique with the right brush. As for spraying Ironbreaker.... I avoid spraying non-airbrush metallics as much as possible because it's a nightmare I don't want to deal with... I think it'd be cheaper to buy a few vallejo air metallics and just spend a bit of time trying to mix up something that matches the paint you had reasonably closely.
|
|
This message was edited 2 times. Last update was at 2015/09/01 01:42:45
|
|
|
|
|
2015/09/01 01:48:27
Subject: How to get an even finish with metallics?
|
|
Bounding Assault Marine
|
It's a flat brush that's about a 1/4" wide. a fairly cheap one from the art store. it's not super stiff, but could maybe be softer, I dunno... Alegro is the brand says Sabelite on it, which I don't know if it's some kind of reference to what's made of? I didn't think it's synthetic. it looks like real hair; it's not white or anything.
|
|
|
|
|
|
2015/09/01 01:57:05
Subject: How to get an even finish with metallics?
|
|
Grizzled Space Wolves Great Wolf
|
Yeah I'm not familiar with it. I use pretty cheap soft large brushes (that die quickly, so it's good they're cheap  ). Are you alternating your stroke pattern from one layer to the next? One layer stroke one direction, the next layer stroke perpendicular to it, the next layer do circular motions.
Maybe you have too much paint on the brush?
One technique is to get most of the paint off the brush (not so much so that you're drybrushing, but less than you'd normally have) then use circular motions to slowly build up the colour (it is harsh on the brushes but tends to avoid brush streaks).
|
|
|
|
|
2015/09/01 02:16:23
Subject: How to get an even finish with metallics?
|
|
Mutated Chosen Chaos Marine
|
 Weboflies wrote: Weboflies wrote: Desubot wrote:When painting a full coat. try to keep paint on the wet parts.
If you paint over dried areas you can get streaks since the layers are not blended and are just overlapped.
Ok yes, I see what you mean, I'm making sure I get the whole panel before any of it dries, and am letting it dry completely before moving on to the next coat, yes
Automatically Appended Next Post:
Gordon Shumway wrote:Wet on wet: try using a brush and just give a quick light coat of water before you spray paint on. It can sometimes help to smooth out the layer. Don't get it dripping wet, just make it somewhat moist.
Interesting, ok, if I can get some kind of gun setup to actually push the paint for me I will try this. Does it work well when brushing on too?
Yes, you can. If you are going to go the bristle brush route as opposed to air brush, it's sort of like two brush blending to get a smooth transition between colors, except you are just using one color to try to avoid streaking. The water works as the second color.
What might be easier though is to put some flo aid into your paint mix. It gets rid of the surface tension of the water in the paint and allows for the paint to level itself out a bit before it dries. I just use future floor polish by the brand pledge. You can get a big bottle that will last forever for cheap in the floor cleaning aisle of your local supermarket. A few drops of hand/dish soap works too. Unscented!
|
|
This message was edited 1 time. Last update was at 2015/09/01 02:24:10
Help me, Rhonda. HA! |
|
|
|
|
2015/09/01 02:21:27
Subject: How to get an even finish with metallics?
|
|
Grizzled Space Wolves Great Wolf
|
I've actually never heard of anyone using wet on wet with a hairy brush to avoid streaking.... it normally creates streaking when I didn't leave the previous layer to dry properly before putting on the next one At least not with acrylics, I imagine it might work better with oils or enamels.
|
|
This message was edited 1 time. Last update was at 2015/09/01 02:21:46
|
|
|
|
|
190728634/02/19 16:43:16
Subject: How to get an even finish with metallics?
|
|
Mutated Chosen Chaos Marine
|
AllSeeingSkink wrote:I've actually never heard of anyone using wet on wet with a hairy brush to avoid streaking.... it normally creates streaking when I didn't leave the previous layer to dry properly before putting on the next one At least not with acrylics, I imagine it might work better with oils or enamels.
You want to make sure you are using just plain water or that the paint underneath is still totally wet. You are correct, if the paint is starting to dry, you will get streaks.
|
Help me, Rhonda. HA! |
|
|
|
|
2014/05/01 05:58:00
Subject: How to get an even finish with metallics?
|
|
Legendary Master of the Chapter
|
Well i usually use slow dry and paint quickly. but i can see dried layers getting pulled.
|
Unit1126PLL wrote: Scott-S6 wrote:And yet another thread is hijacked for Unit to ask for the same advice, receive the same answers and make the same excuses.
Oh my god I'm becoming martel.
Send help!
|
|
|
|
|
2015/09/01 16:57:50
Subject: How to get an even finish with metallics?
|
|
Grizzled Space Wolves Great Wolf
|
I'm still slightly confused... if the first layer is completely wet when you try and put down the second layer, won't it just get wiped away and act like a single thicker layer?
I can understand doing wet on wet when you want to blend one colour to another, but it doesn't quite make sense to me when you want to build up an opaque single colour.
Though maybe it's similar to the technique of putting down a layer with strokes in one direction and while its still wet, cleaning the brush off stroking perpendicular to it to blend the streaks? Though that's normally a technique for thicker paints rather than hobbyist acrylics.
|
|
This message was edited 1 time. Last update was at 2015/09/01 16:58:39
|
|
|
|
|
2015/09/01 17:01:55
Subject: How to get an even finish with metallics?
|
|
Legendary Master of the Chapter
|
OHH thats what you mean no.
When painting make sure the layer edge you are currently working on is still wet.
Especially on large areas.
Not to paint one layer then go over it again while its wet.
|
Unit1126PLL wrote: Scott-S6 wrote:And yet another thread is hijacked for Unit to ask for the same advice, receive the same answers and make the same excuses.
Oh my god I'm becoming martel.
Send help!
|
|
|
|
|
2015/09/01 21:33:29
Subject: How to get an even finish with metallics?
|
|
Bounding Assault Marine
|
Gordon Shumway wrote:What might be easier though is to put some flo aid into your paint mix. It gets rid of the surface tension of the water in the paint and allows for the paint to level itself out a bit before it dries. I just use future floor polish by the brand pledge. You can get a big bottle that will last forever for cheap in the floor cleaning aisle of your local supermarket. A few drops of hand/dish soap works too. Unscented!
A few drops in a pot of paint you mean? If I used the Future should I use the same amount? Would any cloor cleaner work? I'm not sure if I can get that here. If I was to run that same batch through the gun again with the floor cleaner would it go all sudsy? i imagine dish soap would for sure...
|
|
|
|
|
|
2015/09/01 22:05:46
Subject: How to get an even finish with metallics?
|
|
Mutated Chosen Chaos Marine
|
The only stuff I have heard of using is specifically future floor polish by pledge (it isn't a cleaner, but more of a liquid acrylic wax).. It's about $7.00 on amazon for 27 ounces. If you want to get the official stuff, Liquitex makes some flo aid, also on amazon. But it's $7.00 for 4 ounces, which would actually last a long time. I would start with maybe six or seven drops for a whole pot (one or two in your airbrush resivoir with paint if you are going that route) you can always add more it it isn't enough. I have heard of people who use air brushes using a drop or two of soap, but I haven't tried it as it does seem like it could foam up.
|
Help me, Rhonda. HA! |
|
|
|
|
2015/09/02 01:11:02
Subject: How to get an even finish with metallics?
|
|
Fixture of Dakka
|
Is this a duplicate post from the other thread?
Anyways: paintbrush solution --
1) prime the model black, or cover your color-sprayed model with black gesso (this is FAR easier than black paint).
2) brush on leadbelcher using a flat paintbrush (not a round!). You don't really need to thin it, but you DO need to make sure that it applies evenly. Think painting a wall with a flat (or angled) paintbrush; you want as few strokes as possible, slightly overlap the strokes, and don't gob it on with too much paint. Leadbelcher self-levels to a certain extent.
3) get it darker with black & brown washes (like Nuhln Oil and Agrax Earthshade). Leadbelcher + Nuhln looks really good.
Alternatively, use a dark Vallejo metallic paint (darker than gungrey); they make a bunch of them, all the way down to a black metallic. But personally, I am not fond of most Vallejo brush-on metallic paints, as I find that their coverage is not great.
|
|
|
|
|
2015/09/02 01:17:45
Subject: Re:How to get an even finish with metallics?
|
|

Longtime Dakkanaut
|
You might also find that a a simple coat of gloss varnish over the top makes it look a lot flatter, and it will take a wash better.
|
|
This message was edited 1 time. Last update was at 2015/09/02 01:18:25
|
|
|
|
|
2015/09/02 01:30:40
Subject: How to get an even finish with metallics?
|
|
Lieutenant General
|
VMC Gunmetal Grey is the darkest metallic paint in the Model Color line. The Vallejo Model Air line does have a Black Metal paint, but 'm not sure how much darker it is. Reaper also has a metallic black called Adamantium Black. IIRC, it's fairly dark but I'd have to try and find my bottle first and its been a while since I've used it.
|
'It is a source of constant consternation that my opponents
cannot correlate their innate inferiority with their inevitable defeat. It would seem that stupidity is as eternal as war.'
- Nemesor Zahndrekh of the Sautekh Dynasty
Overlord of the Crownworld of Gidrim |
|
|
|
|
2015/09/02 03:28:56
Subject: How to get an even finish with metallics?
|
|
Fixture of Dakka
|
 Ghaz wrote: Ghaz wrote:VMC Gunmetal Grey is the darkest metallic paint in the Model Color line. The Vallejo Model Air line does have a Black Metal paint, but 'm not sure how much darker it is. Reaper also has a metallic black called Adamantium Black. IIRC, it's fairly dark but I'd have to try and find my bottle first and its been a while since I've used it.
Black Metal is REALLY dark; it's much darker than Black Grey, if you're familiar with that Vallejo paint (darker than skavenblight dinge), pretty much a black, made metallic.
I could swear Oily Steel in Model Color is a darker metallic than gun metal (which I think is game color & air) -- but it's not a color I use frequently, so I could be wrong. Also, P3 has Pig Iron, which is really dark -- and a better paint than Vallejo metallics, IMO.
|
|
|
|
|
2015/09/02 17:58:59
Subject: How to get an even finish with metallics?
|
|
Trustworthy Shas'vre
|
Ghaz wrote:VMC Gunmetal Grey is the darkest metallic paint in the Model Color line. The Vallejo Model Air line does have a Black Metal paint, but 'm not sure how much darker it is. Reaper also has a metallic black called Adamantium Black. IIRC, it's fairly dark but I'd have to try and find my bottle first and its been a while since I've used it.
I have the vmc gunmetal and the vma black metallic - they are nearly identical - and both very dark.
Oily steel is also very dark - but a different color than the black metallic - it is a bit more warm as well.
The vma gun is much lighter, as is the vmc chainmail silver (they are close).
As far as airbrushes, you can get a starter airbrush and compressor for less than $100 - do a search, the "what airbrush do I buy" topic come up about once a week - and a lot of people take time to answer the same questions over and over again. I paint metallics (various kinds) through my airbrush, and get amazing coverage using the vallejo model air, and air color lines.
best of luck
|
|
This message was edited 1 time. Last update was at 2015/09/02 17:59:48
DavePak
"Remember, in life, the only thing you absolutely control is your own attitude - do not squander that power."
Fully Painted armies:
TAU: 10k Nids: 9600 Marines: 4000 Crons: 7600
Actor, Gamer, Comic, Corporate Nerd
|
|
|
|
|
2015/09/14 01:32:59
Subject: How to get an even finish with metallics?
|
|
Bounding Assault Marine
|
Thanks for all the advice guys. I'm working with the flo aid and using it to wet the surface first as well as thinning the paint with it, and the alternating strokes method. And I'm getting better, though varied results. Some of the panels are perfect. some not quite. I think part of the issue is it's a color I've mixed myself... Automatically Appended Next Post: davethepak wrote: Ghaz wrote:
As far as airbrushes, you can get a starter airbrush and compressor for less than $100 - do a search, the "what airbrush do I buy" topic come up about once a week - and a lot of people take time to answer the same questions over and over again. I paint metallics (various kinds) through my airbrush, and get amazing coverage using the vallejo model air, and air color lines.
best of luck
I wish I'd known that before I started with all this. Could have saved myself a bunch of trouble, and got better results for the same money....
|
|
This message was edited 1 time. Last update was at 2015/09/14 01:36:22
|
|
|
|
|
2015/09/15 19:29:42
Subject: Re:How to get an even finish with metallics?
|
|
Longtime Dakkanaut
|
Wargames Foundry do a set called 'Blackened Barrel' and it covers really well.
|
|
|
|
|
|
2015/09/20 21:28:16
Subject: How to get an even finish with metallics?
|
|
Fresh-Faced New User
|
As a Necron player my specialty is metallic paint. I've tried a lot of paint companies from Vallejo Model Air, to Game Air, to Createx, to thinning my own colors.
One of the main problems with metallics is the suspension of pigments in the paint. I had learned this the hard way when I decided to make my own custom metallic color, in purple and spray it through the air brush.
The base of this color was Americana lavender, genestealer purple, and Folk art's Metallic purple. These were all acrylic based paints that I've had some success with in the past.
First step is consistency, and this is one of the largest tricks to master, since the paint has to maintain certain characteristics. The biggest example is skim milk, which was hard for me who never drank skim milk before, which I ended up with some trial and error. The easiest way to accomplish this is with the use of a thinning medium like flo-aid, or I use Vallejo thinner.
Second step is the make sure that the consistancey is nice for spraying(Not to thin, or thick). Thick paint will stick in your air brush, thin paint will drip off your model. If this is an issue then go back to step one to re-add thinner. As a good rule of thumb I prefer to add thinner to paint little by little, because it's easier to thin then to re-add paint for a custom color.
Third step, is to use a paint retarder in the bottle. I have no idea why it does this but thinning then retarding paint allows the retarder to hold the metallic paint particles in suspension so they don't collect at the crevice of your minis.
Again this ratio is difficult to describe, but with vallejo I usually use a drop to a drop and a half from the bottle for a small cup of paint, and then mix the paint with a splayed brush in the cup.
A few tips, wear a glove, and spare on your glove instead of your hands, easier to clean and scrap from inside the glove.
If anyone has questions they are more then welcome to send me a PM.
Regards
Nemesor Blackwing
|
IT WAS ONLY A 5+ SAVE! HE SHOULDN'T HAVE SAVED EVERY WOUND! |
|
|
|
|
2015/09/21 04:54:02
Subject: How to get an even finish with metallics?
|
|
Fixture of Dakka
|
Here's my dirty little secret: crappy brushes! 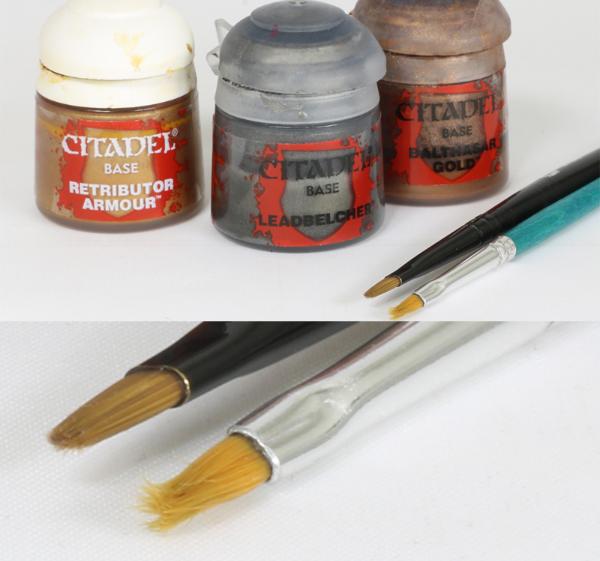 Now before anyone thinks I'm totally nuts, most of the metallics on this model were painted using those two brushes: The brush on the left is the Citadel Base brush; the brush on the right that is frayed to all crap is a super cheap, $1.50 PMX synethetic (I mean, really, they don't get any cheaper than that). What's the secret then? I put very little paint on the brushes. I actually put paint onto a wet palette, then wipe down the brush til it is almost dry, and then paint it on neat. No additional thinning. The metallic base paints by GW are highly adhesive, so you really don't need much to get it to stick. I use the medium base brush (in only slightly crudded up shape) to cut the edges, then use the messy junk brush to fill in the spaces between, before the paint on the edges dries. When it all dries up, it is perfectly smooth, with just enough texture that when you do a wash, it looks really nice. The breast plate on that Prosecutor was painted with that junk brush (with almost no paint on it). Most of the highlights were done using the tip of the flat edge of the filbert. Yeah, I used a tiny (good) brush for some highlights.. I'm not saying, ONLY use crappy brushes! That POS (that's piece of ....) brush is also nice for metallic blending; the results are diffused painting rather than solid lines with highly visible edges. Why doesn't a good brush work? I find the coarser bristles of the synthetic brush transfers just the right amount of paint (ie not too much). By the same token, I'd never use a W&N for a drybrush. The problem with the nice, sable brushes, or even good synthetics is that they hold *too much paint*, which means that too much paint goes onto the model. Coupled with most metallic paints thinning really badly... it's just not pretty. Also, I really like how GW metallic base paints have very good coverage, and layer paints are truly quite translucent. You can really use that to your advantage. to get nice TMM effects with very little work -- compared, for instance, with Vallejo water based acrylics or AP metallics, where they are all thicker, and are hard to thin.
|
|
This message was edited 3 times. Last update was at 2015/09/21 05:01:02
|
|
|
|
|
2016/03/24 05:06:04
Subject: How to get an even finish with metallics?
|
|
Bounding Assault Marine
|
I tried using minimal paint at first, and got quite good, but not perfect results. If you factor in time, that might be the best thing I've tried really. I will definitely give the lousy brushes a go! I've got 2 more drop pods to do, so hopefully I can get them looking better quicker this way! After that I've got 8 tracked vehicles to do...
|
|
|
|
|
|
2016/03/24 05:27:30
Subject: Re:How to get an even finish with metallics?
|
|
Guardsman with Flashlight
Victoria
|
Ironbreaker is a very high maintenance metallic. Usually I find the medium and metallics separate, and the metallic needs to be manually mixed back in -- usually with a bit of crushing -- with a paintbrush/toothpick. Otherwise I get a god awful consistency.
|
|
This message was edited 1 time. Last update was at 2016/03/24 05:28:21
|
|
|
|
|
|
|

