Forum adverts like this one are shown to any user who is not logged in. Join us by filling out a tiny 3 field form and you will get your own, free, dakka user account which gives a good range of benefits to you:
No adverts like this in the forums anymore.
Times and dates in your local timezone.
Full tracking of what you have read so you can skip to your first unread post, easily see what has changed since you last logged in, and easily see what is new at a glance.
Email notifications for threads you want to watch closely.
Being a part of the oldest wargaming community on the net.
If you are already a member then feel free to login now.
Hey guys, I just got some Tau decals from a friend and realised I never used mine before. So I have a bunch of transfer sheets and I thought I'll try to use some of them, but having no experience with those I want to avoid a messy outcome. Any tips? My plan is to cover them with some matt or satin varnish, as I want to avoid them looking glossy. Will it work?
I recommend attaching them using a dab of PVA glue. I have found that water alone does not have the lastability and without PVA they have a tendency to either flake or fall off completely. Just a small dab on the surface you want to apply and then wipe any excess off with a cotton bud or soft tissue.
I recommend cutting them out with a stanley blade and applying them with a hair tweezers - be careful!! some of them are very fragile after being soaked in the water to remove them from the baseplate.
Dab off excess water from them with the bud too.
I've never found decals to be particularly glossy so you might not need the matt coat. Try a few out and see first however.
Dman137 wrote:
goobs is all you guys will ever be
By 1-irt: Still as long as Hissy keeps showing up this is one of the most entertaining threads ever.
Thanks! I've been wondering about adding some glue. I will try some of them tomorrow after work. I am curious on how they will turn out, I always considered decals 'cheating', but they do look cool.
Cheers
Kahnawake
Brush over desired area with GW ard coat gloss, dry level, cut out desired decal and apply water to it, once the decal is movable, transfer to the desired area, use a dull xacto knife tip to align correctly with some water; once the water is dry apply GW Lahmian medium matte, make sure you shake it up real good, the goal is to get the medium underneath the decal and rid of the bubbles, dry even, apply additional coat if necessary.
If the printing of the decal is a bit off, you can touch it up between Lahmian medium coats. You can use a sharp xacto knife tip to pop the bubble under decal, then apply Lahmian medium to rid of some hard to rid bubbles.
1)If you're applying a coloured decal over a dark area, apply a coat of white (or a pale version of the base colour) to the area in question; it will make the colours stand out more.
2) gloss varnish the area the decal will be applied to. The smoother the surface, the less likely you are to have small air bubbles or dust particles trapped under the decal. Leave it to dry properly (overnight is best).
3) use a wet palette to soak the decals, not a pool of water. I use folded up kitchen towel soaked in water, placed in an old blister pack.
Get a good decal solution, and use it as directed. I use Humbrol DecalFix, which says to apply to the area the deal will be placed on, and then brushed over the top of the decal once applied. This is probably what Big Mac is trying to achieve with the Lahmian Medium, but you're always better off using the proper product. 4) Before applying, check the decal will fit. Don't be afraid to trim back the carrier film, or even remove parts of the decal, if need be.
5)Once the decal is in place (I use a large brush to transfer the decal from the backing paper to the model), dab any excess water/solution away with a paper towel or similar. you can also work the decal into depressions (such as panel lines) with a paintbrush, if you're careful.
6)Once the decal has dried (again, overnight), apply gloss varnish over the decal. Let it dry overnight again. Then, if need be, tidy up the surrounding paintwork, do any weathering you want and apply whatever varnish or sealer you normally use. Job done.
Decals will always have trouble going onto surfaces that curve in two directions (such as Space Marine shoulder pads). If need be, you can carefully cut a nick into a decal and fold it over itself, and a good solution will help soften it so it conforms to the surface better.
Don't be afraid to add shades and highlights to decals if you want, using paint.
This message was edited 2 times. Last update was at 2015/10/02 11:10:12
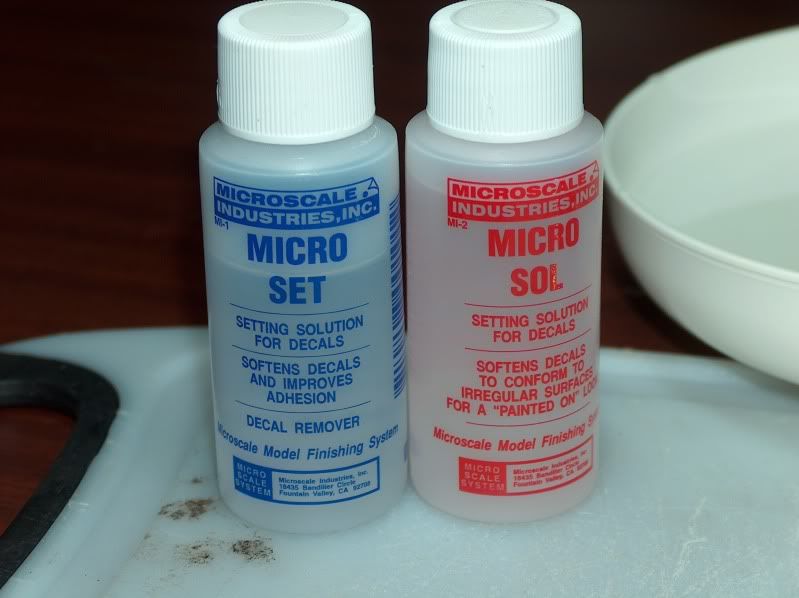
Have a look for some Microsol and Microset. Microset helps the decal cling to your model. Microsol is put on afterwards when the decal is still wet and softens it so that it conforms to all the details.
Always gloss varnish the area before applying decals, as this will help them go on smoothly and help hide the edges.
AndrewGPaul wrote: 1)If you're applying a coloured decal over a dark area, apply a coat of white (or a pale version of the base colour) to the area in question; it will make the colours stand out more.
2) gloss varnish the area the decal will be applied to. The smoother the surface, the less likely you are to have small air bubbles or dust particles trapped under the decal. Leave it to dry properly (overnight is best).
3) use a wet palette to soak the decals, not a pool of water. I use folded up kitchen towel soaked in water, placed in an old blister pack.
Get a good decal solution, and use it as directed. I use Humbrol DecalFix, which says to apply to the area the deal will be placed on, and then brushed over the top of the decal once applied. This is probably what Big Mac is trying to achieve with the Lahmian Medium, but you're always better off using the proper product. 4) Before applying, check the decal will fit. Don't be afraid to trim back the carrier film, or even remove parts of the decal, if need be.
5)Once the decal is in place (I use a large brush to transfer the decal from the backing paper to the model), dab any excess water/solution away with a paper towel or similar. you can also work the decal into depressions (such as panel lines) with a paintbrush, if you're careful.
6)Once the decal has dried (again, overnight), apply gloss varnish over the decal. Let it dry overnight again. Then, if need be, tidy up the surrounding paintwork, do any weathering you want and apply whatever varnish or sealer you normally use. Job done.
Decals will always have trouble going onto surfaces that curve in two directions (such as Space Marine shoulder pads). If need be, you can carefully cut a nick into a decal and fold it over itself, and a good solution will help soften it so it conforms to the surface better.
Don't be afraid to add shades and highlights to decals if you want, using paint.
I was going to write a long detailed post about thhe best way to apply decals and then saw that AndrewGPaul had already said everything i was going to say in a nutshell!!
One of the most important bits above is to leave the varnish time to dry out fully and i always leave mine overnight. You must leave the decal to dry out overnight as well before gloss varnishing it. This will prevent "fogging" which is where water moisture gets trapped under the varnish and makes your decals look misty.
The other important thing to remeber when applying gloss varnish to the area the decal is going is to varnish the entire area - in other words don't just paint a blob of varnish on or you wan't get the "painted on" effect.
And as has been mentioned MicroSol and MicroSet are a must - they make soooo much difference. I get mine from Amazon for a couple of quid each.
Thanks for the help guys! It would've taken me a long time to figure out some of those things. I'll try to get the stuff done using my vallejo varnishes and some glue as I don't have any of that GW stuff. Ordering the MicroSol now!
MangoChutney wrote: Have a look for some Microsol and Microset. Microset helps the decal cling to your model. Microsol is put on afterwards when the decal is still wet and softens it so that it conforms to all the details.
Always gloss varnish the area before applying decals, as this will help them go on smoothly and help hide the edges.
Agreed. Bought some for my decals and don't regret it at all, they look great.
There's quite a few tutorials out there on applying decals.
I recommend getting some decal solvent and settings solution, I've been using microset and microsol and they work well, though I think you need something stronger as well. People talk about solvaset as being a good option but it's hard to get in Australia, if you can get it I think you should give it a go.
Historically I've always used a gloss varnish when applying decals, but more recently I've been foregoing the gloss varnish and getting good results, but you need to make sure the surface is nice and smooth.
I like Paul Budzik's videos because they go in to detail that other tutorials don't cover (Paul makes some incredible models, he scratch built this Tempest)
This is also a good tutorial that covers the basics of decal application.
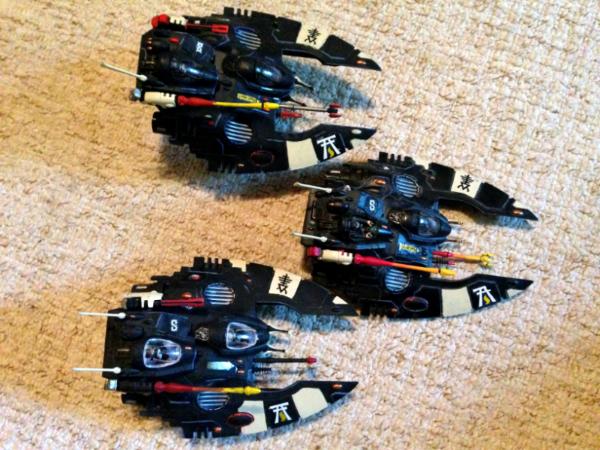
All right, I gave it a try - I am currently making some crashed drones objective markers. This one's not finished yet - the exhaust thing looks garbo, the broken antenna is not yet weathered, and the base is a bit rushed and unpainted yet - but overall this one's 90% done. I used some thinned down glue to place the decals on previously varnished surface, then varnished it again. The hardest part was to do the weathering effects on the decals themselves - I think gentle scratching once they're covered with varnish works best. I used vallejo varnishes and some army painter pva glue.
Any other suggestions? Thanks again everyone for your help! I can't wait to try out the MicroSol. Sorry for the crappy quality of the photos, done with a phone!
cheers
Kahnawake
This message was edited 1 time. Last update was at 2015/10/03 20:03:52