This week's battle report features a combined army of my White Scars and Innes' Mechanicus taking on Shaun's Tau (complete with Stormsurge!). Innes and I were practicing for an upcoming doubles tournament (the reports for which will be coming soon) and wanted to test our army against a tough force. Enter Shaun's Tau who have been racking up a string of victories in the Medusa IV campaign.
For the battle report with all the maps and photos, see
http://standwargaming.blogspot.co.uk/2016/02/battle-report-40-2000-pts-white.html
We would be playing a maelstrom mission at 2000 pts in what promised to be a hyper competitive game. Those with an aversion to cheese should look away now.
My 1000 points army consisted of:
Kor'sarro Khan- Moondakken
Librarian- Mastery level 1, Bike, Meltabombs, Hunter's Eye
5 Command Squad- 4 Grav guns, Apothecary, Storm Shield
5 Bikers- 2 Grav guns, sergeant has meltabombs
5 Bikers- 2 Grav guns, sergeant has meltabombs
5 Scouts- Bolt pistols, combat weapons, Sergeant has Meltabombs
Landspeeder Storm- Cerberus launcher, Heavy bolter
Drop Pod- Storm Bolter
Stormtalon-
TL assault cannons, Skyhammer missile launcher
Innes' 1000 points army consisted of:
Dominus Maniple
Tech Priest Dominus- Raiment of the Technomartyr, Volkite Blaster, Macrostubber, Conversion Field, Infoslave skull
10 Skitarri Vanguard- 3 Plasma Calivers, Omnispex, Vanguard Alpha with Arc Pistol and Arc Maul, Conversion Field and Radium.
Onager Dunecrawler- Neutron Laser and Cognis Heavy Stubber, Cognis Manipulator
Oathsworn Detachment
Mechanicum Cerastus Knight Atropos- Occular Augmetics.
Khan was the warlord to give me Scout and the Librarian rolled on Telepathy, actually managing to get Invisibilty, along with Psychic Shriek.
My army was design to be fast and hard hitting. Khan was there to provide Scout to the army, as well as a leadership buff thanks to his Warlord Trait. The Librarian was there to take the Hunter's Eye to give me some Ignores Cover shooting and the +1
BS should help out with the psychic shriek. He was also fortunate enough to get Invisibility.
The Command squad had a storm shield and Apothecary for added durability and 4 grav guns. Combined with the Hunter's Eye, these should do a lot of damage. Two units of bikers were taken for fast, scoring units, both armed with grav guns.
The Scouts in the Landspeeder Storm were taken as a fast, scoring unit. I have had a lot of success with these in other tournaments and games. The jamming beacon would also come in handy for any melta-troops in drop pods attempting to take out the Knight in the first turn.
The drop pod was there to be annoying and claim objectives and maybe even take some of Innes' units if he needed it. The Stormtalon would provide some anti-air firepower to the army.
I'm not too familiar with the Mechanicus, but I know that any Knight model is not to be taken lightly.
Shaun's army consisted of:
Tau Commander
3 Crisis Suits
3 Broadsides
6 Fire Warriors
6 Fire Warriors
6 Fire Warriors
6 Pathfinders
6 Pathfinders
5 Drones
Riptide
Riptide
Riptide
Stormsurge
Shaun rolled on the Tactical warlord trait table, giving him an additional tactical card on turn 1.
A pretty tough force featuring 3 Riptides, plenty of markerlights and a Stormsurge! I have not played one of these yet, but have read enough about their abilities to know that it would need to be dealt with quickly. Hopefully, I had enough Grav weaponry to deal with it and the Riptides.
We decided to play the standard maelstrom mission, with up to 3 cards drawn each turn. Impossible cards could be discarded and re-drawn for free, and one card could be discarded at the end of each turn. I was hopeful that my mobile force would be able to grab objectives over the static Tau gunline.
We placed the objectives as shown below:
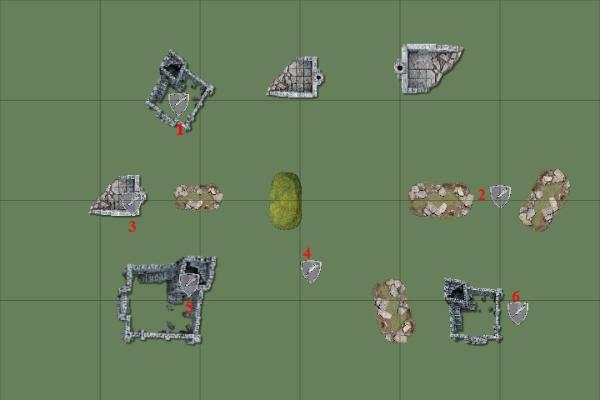

Innes and I won the choice of table side. We were playing Hammer and Anvil deployment, so chose the side with the most cover on our side and the least for Shaun. Shaun then won the roll for deployment and chose to go first.
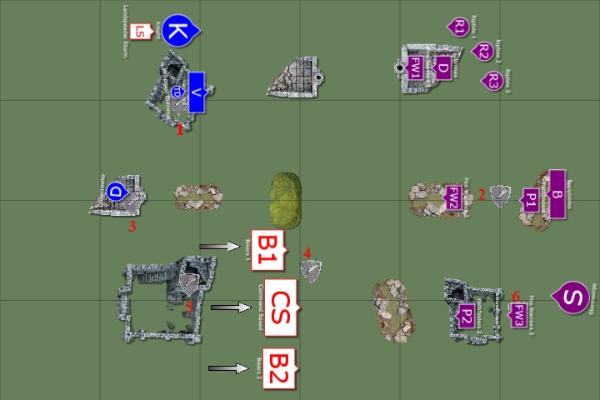
The Riptides went on the right flank, with the Stormsurge on the left flank. The Fire Warriors and Pathfinders went in between to give good coverage to both. The Broadsides deployed at the back of the board and the Tau commander and his bodyguard went in to reserve.
I chose to deploy all my Bike units on the right, opposite the Stormsurge. Innes deployed the Dunecrawler in the ruins in the centre with the Knight and Vanguard to the left. The Landspeeder Storm went beside the Knight.
For the Scout moves, I decided to move all my bikes forward. This was risky. In the unlikely event we could seize the initiative, they would be in perfect position to target the Stormsurge. Had I kept them back, the grav guns would struggle to get in range turn 1, while also being in range of the Tau weapons anyway.
We failed to seize the initiative and Shaun took the first turn.
TURN 1- TAU
This turn, Shaun drew Objective 3, Ascendency (control 3 objectives), Kingslayer (kill enemy Warlord) and Feigned Withdrawal (score if at least one enemy unit within 9" and not in their deployment zone).
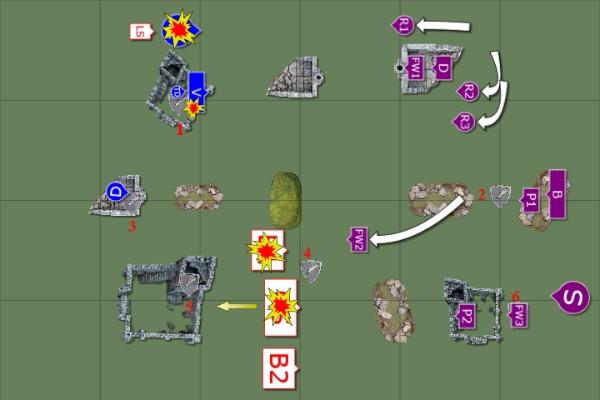
The turn began with the Riptides charging their Nova reactors to boost their shields, then advancing towards the enemy. The Fire Warriors in front moved towards the central objective, running to try and get in range, but failing to reach the distance. The Stormsurge anchored its position. We then settled in for the Tau shooting phase.
The two Pathfinder units and Fire Warriors on the left targeted the White Scars command squad. Their markerlights lit up the unit scoring 8 hits on the bikers. The Fire Warriors caused two wounds to the unit, but these were both saved by the armour of the marines.
The Stormsurge opened fire on the Command Squad, using the markerlights to ignore their jink saves and increase its
BS by 2. Four bikers died to a large blast as the Storm shield failed to block any attacks. It then fired its cluster rockets at the Command Squad, wounding Khan 5 times. He passed three armour saves, then managed to pass two Feel no Pain saves to survive unscathed. The Broadsides then opened fire with their missile pods on the Command squad. They wounded Khan 14 times. He finally failed 3 of his saves and was killed. The squad failed their morale check (on an 11!) and fled back 9" towards their deployment zone.
On the right flank, the drones hit the Knight with 4 markerlights. The Stormsurge used these to increase its
BS and fired two destroyer missiles at the Knight. Both missiles hit, with one of the weapons rolling a 6 on the Destroyer table and obliterating the Knight with a single shot. The resulting explosion killed one of the Vanguard sheltering nearby.
The Riptides fired at the bike squad in the centre. The combined fire of the three Riptides was enough to kill 4 members of the squad, but the survivor held firm.
At the end of the turn, Shaun scored Kingslayer, First Blood and Slay the Warlord for 3 points.
That was a brutal first turn. We had lost about 900 pts of our army in one shooting phase, including the hard hitters of the Knight and Command Squad. Without a doubt, our mood was pretty low at that point and we considered conceding there and then to play another game. However, we persevered and hope we could at least last until turn 3.....
TURN 1- WHITE SCARS/MECHANICUS
This turn, we drew Objective 2, Objective 3 and Assassinate (kill an enemy character). We had a good shot of getting 2 and 3, but the only character in Shaun's army was not currently on the board.

The drop pod came crashing to the battlefield, landing directly beside objective 2 in front of the Tau lines. The Librarian moved up to join the unharmed unit of bikers, as they advanced on the Fire Warriors in the centre. The lone biker and Apothecary moved backwards to escape the Tau firepower and be of use later in the game. The Landspeeder Storm advanced to target the fire warriors in the ruins in front of them.
I the psychic phase, I rolled a 6, the warp obviously knowing the help we needed. I threw 5 dice at casting Invisibility on the bike squad with the Librarian and managed to roll a single 4+ on 5 dice. So that was the way this game was going to go.....
He then cast Psychic Shriek on the Fire Warriors in front of him. Amazingly, it was cast on two dice (where were you 30 seconds ago?) and the Tau failed to block it. The shot hit and wiped out the unit where they stood.
The shooting phase began with the bikers targeting the Pathfinders near the drop pod (if we could eliminate the unit, we could score the objective). The bolters struck true, killing 4 of the squad. The Drop pod then fired its Storm Bolter, killing the last two in the squad.
The Dunecrawler fired at the Broadsides, killing one of them outright.
The Landspeeder storm fired at the Fire Warriors in the ruins. The Cerberus launcher hit, killing three fire warriors and one drone, as well as blinding both units. The Heavy Bolter claimed another fire warrior. The Vanguard added their fire power, killing another one of the Tau warriors.
At the end of our turn, we scored Objective 2 and 3 and discarded assassinate.
Victory Points:
Tau- 3
White Scars/Mechanicus- 2
TURN 2- TAU
This turn, Shaun still had Objective 3, Objective 2 and Ascendency.
The Riptides continued to move up on the enemy lines, while the rest of the Tau stayed put.
The Biker squad was lit up with 3 markerlights from the Pathfinders and Fire Warriors. The Broadsides and a Riptide fired at the bike squad, killing 5 of the bikers with ease. The Stormsurge targeted the Librarian with its cluster rockets. Thirty-two shots rained down on the Librarian, wounding hit 6 times. He failed 3 saves and was killed.
The second Riptide fired at the Dunecrawler, hitting the vehicle, but failing to damage it.
The drones fired their markerlights at the Landspeeder storm to increase the
BS of the last riptide (I'm not sure if we remembered that the Drones were blinded at this stage). The Riptide fired at the speeder, penetrating it 3 times. I failed two Jink saves and the speeder was destroyed. The Scouts climbed out of the wreckage, passing their pinning test.
The Stormsurge fired at the Vanguard in the ruins, the two large blasts finding their target and scoring 14 hits on the unit. Six of the Vanguard died in the ruins.
At the end of turn 2, Shaun scored no points for his maelstrom cards.
TURN 2- WHITE SCARS/MECHANICUS
This turn, we drew Objective 2, Objective 4 and Psychological Warfare.
At the start of turn 2, we had 14 of our 38 models left alive and had killed about 21 of the Tau. The Scouts and Vanguard moved up to target the nearby Riptide. The Apothecary advanced through the ruins, turbo-boosting to grab objective 4 in front of him.
The Scouts fired their pistols and a krak grenade at the Riptide, but caused no damage. The Dominus and Vanguard fired at the Riptide, causing one wound with their combined firepower.
The Dunecrawler fired at the Broadsides, killing another of the squad. The survivor failed his morale check and fled 6" away.
The Scouts assaulted the Riptide (just to shield the Vanguard from the overwatch fire). One Scout died to overwatch from the Riptide they were assaulting, while another died to supporting fire from a nearby Riptide. The Vanguard assaulted the same Riptide as the Scouts.
The Scouts used their Krak grenades to attack the monstrous creature and succeeded in wounding it once. The Vanguard then struck, wounding the Riptide once again and leaving it on one wound. The Riptide attacked back, killing two of the Vanguard. The Scout sergeant used his meltabombs on the Tau suit, wounding it, but it passed its invulnerable save and survived. The combat was drawn.
At the end of turn 2, we scored all three of our objectives thanks in part to the fleeing Broadside.
Victory Points:
Tau- 3
White Scars/Mechanicus- 5
TURN 3- TAU
This turn, Shaun still had Objective 3, Objective 4 and Ascendency.
The last Broadside failed to rally and fled off the board. The Riptides and drones advanced on the remaining enemy units.
The Stormsurge targeted the lone Apothecary. Its cluster rockets wounding the warrior twice out of 15 shots. The apothecary failed one saved, but then made his Feel no Pain. It then fired at him again, causing another three wounds. Again, a combination of armour and Feel no Pain rolls kept the lone warrior alive. The nearest Riptide had to spoil the fun, shooting at the Apothecary and killing him in a flurry of shots.
The drones fired their markerlights at the Dunecrawler, hitting twice. The Riptide used the lights to fire at the vehicle, but failed to damage it.
The Stormsurge assaulted the drop pod, failing to harm it with its attacks, but its Stomp was successful in wrecking the immobilised vehicle.
In the combat with the Riptide, the Scout's Krak grenades were unable to harm the Tau battlesuit this time around. The Riptide killed the last of the vanguard, while the Sergeant's meltabombs hit and wounded the Riptide, but it passed its invulnerable save. The Scouts broke from combat, fleeing 4" from the Riptide.
Again, Shaun continued to decimate our forces, but scored no points.
TURN 3- WHITE SCARS/MECHANICUS
This turn, we drew Objective 6, Behind Enemy Lines (have a unit in the enemy deployment zone) and No Prisoners (destroy an enemy unit). These would all be tough to get this turn as we had very little left on the board.
The Stormtalon arrived, moving on the right flank to avoid the Riptide with skyfire and Interceptor. The Scouts advanced on the Riptide once again, while the Magos and lone biker advanced on the other Riptide.
In the shooting phase, the Stormtalon fired at the central riptide, but was unable to get past its save. The grav biker fired at the same target, wounding the monstrous creature once. The Magos also targeted it, but failed to wound.
The Dunecrawler fired at the lone Fire Warrior in the ruins, killing him despite the Tau going to ground, and wiping the squad out.
The Scouts fired at the Riptide in front of them, but failed to damage it. They then assaulted it to try and take its last wound, but some great overwatch rolls by Shaun saw the three scouts perish before they could attack.
The Magos and lone biker charged the Riptide in the centre. The Magos took a wound to overwatch fire. The biker struck at the monstrous creature, but failed to harm it. The Magos was wounded twice by the Riptide, but survived thanks to a combination of Invulnerable and Feel no Pain saves. The Magos struck back, wounding the Riptide once. The Tau Battlesuit failed its morale test and fled, being easily cut down by the two Imperial warriors. The Magos and Biker consolidated back, the biker behind the Magos (Innes wanted me to shield the Magos with the Biker, but after taking what felt like my 20th Blind test thanks to successful saves by the Mechanicus, my biker was not feeling too charitable).
We managed to score No Prisoners and discarded Objective 6 (deep in the Tau lines).
Victory Points:
Tau- 3
White Scars/Mechanicus- 6
We were currently winning by double, but only had 4 models left on the board with at least 2 turns to survive.
TURN 4- TAU
Shaun still retained Objective 3, Objective 4 and Ascendency.
The Tau commander finally arrived, landing by deep strike behind the Dunecrawler. The Riptides moved up towards the centre of the board as the Stormsurge engaged its anchors once again.
The Dunecrawler was hit with 3 markerlights. This allowed the Stormsurge to target it with its destroyer missiles, easily obliterating the enemy vehicle.
The Riptide fired at the Magos, wounding him three times. Innes failed two of his invulnerable saves, but managed to make two Feel no Pain saves to save the Mechanicus commander. The other Riptide targeted the Magos, killing him off in a firestorm of shots.
The Commander's unit fired at the Stormtalon, hitting it with their fusion blaster and plasma weaponry, but failed to damage the White Scars flyer.
At the end of his turn, Shaun scored objective 4 and Ascendency for 2 points.
TURN 4- WHITE SCARS
This turn, we drew Objective 1, overwhelming firepower (destroy an enemy unit) and still had Behind enemy lines.
Our army now consisted of two models; a single biker and the Stormtalon. The Stormtalon turned towards the injured Riptide, while the biker moved towards objective 1, turbo-boosting to get into range.
The Stormtalon fired at the Riptide. The assault cannon wounded the battlesuit twice, but the armour of the Riptide saved the damage. The Skyhammer missiles smashed into the monstrous creature, finally finishing it off.
At the end of the turn, I scored overwhelming firepower and objective 1.
Victory Points:
Tau- 5
White Scars/Mechanicus- 8
TURN 5- TAU
Shaun drew Objective 4, Objective 6 and Hungry for Glory (issue a challenge).
The Tau moved to grab the objectives, while the Pathfinders hit the biker with 4 markerlights. The Commanders unit fired at the biker, easily downing the enemy warrior.
Stormsurge fired at the Stormtalon. It's combined firepower managed to glance the flyer twice. Predictably, I failed both Jink saves and lost the last of our units on the board.
Shaun scored objective 4 and 6 for 2 points.
Victory Points:
Tau- 8
White Scars/Mechanicus- 8
Technically a draw in victory points, but Shaun managed to table our army and get the win.
AFTER-BATTLE THOUGHTS
That was a hell of a game! When we asked Shaun to take a tough tournament army, he certainly did not disappoint.
In all honesty, Innes and I thought the game was pretty much over after turn 1. We had lost our biggest hitters in the Knight and grav command squad and only played on out of stubbornness. I think that this game was always going to come down to who got the first turn. Had we been able to get it, we may have been able to take out the Stormsurge with the massed grav weapons, and the Riptides with the Knight.
After the first turn, we decided to ignore killing the Tau as much as possible and focus on the objectives. This seemed to work quite well and we were actually ahead for most of the game. We could even have won the game if the Stormtalon had survived and the game had ended on turn 5.
I'm not sure what else we could have done to win to the honest. Scouting the bikers forward may not have been the best idea, but keeping them back may of only delayed the inevitable. We had to close the distance with the Stormsurge as fast as possible. I considered outflanking with the bikers, but with so much interceptor in the Tau army, they result would have most likely been the same.
In turn 2, I think I should have targeted the Pathfinders with Psychic shriek instead of the Fire Warriors. Doing this would have elimated most of the markerlights in the Tau army as we managed to kill the second squad in the shooting phase and the drones were blinded. This may have improved the durability of my bike squads as they could still Jink and reduced the effectiveness of the Stormsurge and Riptides as they could not boost their ballistic skill with the markerlights.
Overall, it was a nice test of our armies capabilities. I will probably keep my army the same, but I think Innes plans to modify his army slightly to utilise the drop pod. Fortunately, we should not face anywhere near as tough an army as the tournament as I don't think it could be build using the tournament rules.
Thanks to Shaun for a great game again. A slight change to the dice roll for first turn may have made all the difference.


 .
.
