Forum adverts like this one are shown to any user who is not logged in. Join us by filling out a tiny 3 field form and you will get your own, free, dakka user account which gives a good range of benefits to you:
No adverts like this in the forums anymore.
Times and dates in your local timezone.
Full tracking of what you have read so you can skip to your first unread post, easily see what has changed since you last logged in, and easily see what is new at a glance.
Email notifications for threads you want to watch closely.
Being a part of the oldest wargaming community on the net.
If you are already a member then feel free to login now.
Loving a lot of the work going on here. Currently I'm trying to master the use of powders, painting rust and I just bought an airbrush so let's see how that goes...
As for 'then and now', I don't have many picures from when I returned to the hobby in 2008 but suffice to say that it was 'tabletop standard' - flat colours, basic highlights, too thick paints.
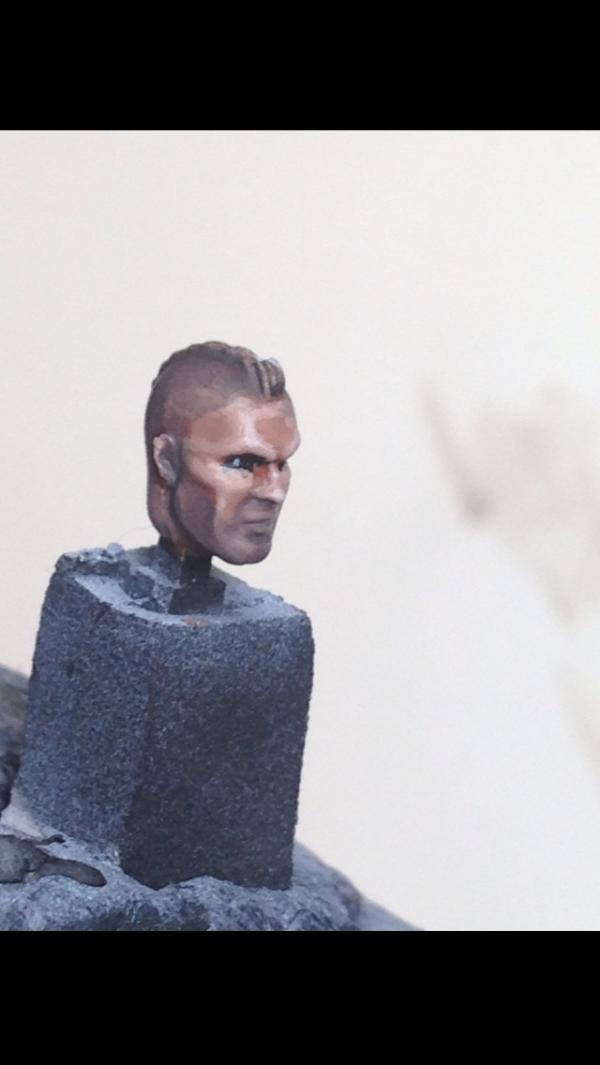
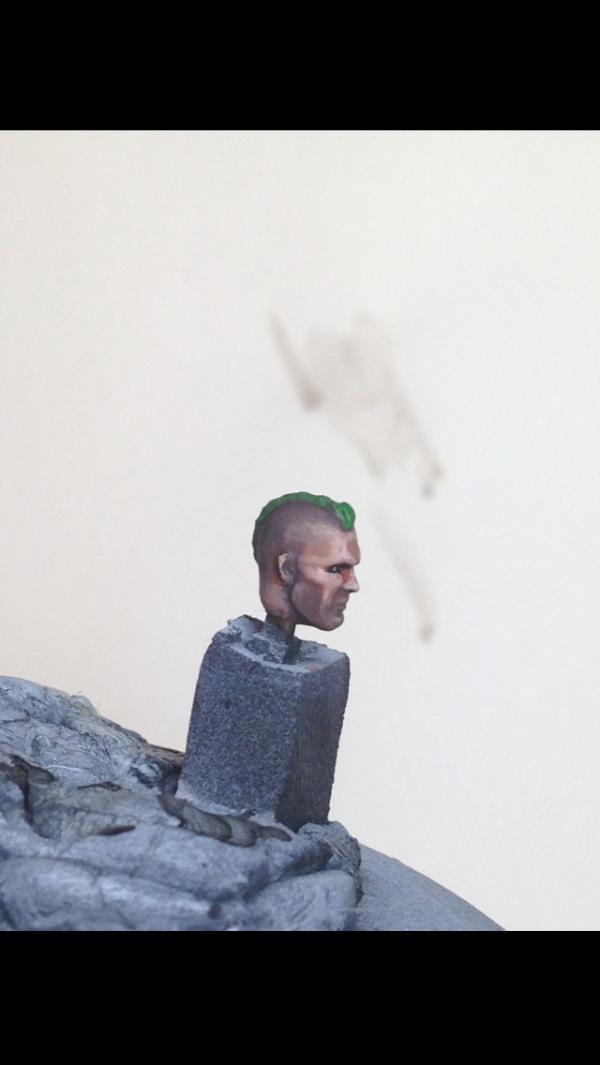
The best comparison I can give you is a Warlock from circa 2012, versus more warlocks from 2015. There are some advnaced things I actually find quite fun and easy (like NMM), versus some simpler things I struggle with (painting cloth and regular metallics).
I also struggle with freehand but am getting better. Compare the runes on the same warlocks' robes, with the cultist painted maybe six months' later:
Any tips on painting cloth in particular, I would love!
I took a look your work is very good but I cant say am a little reluctant to put an opinion to help you out with your endeavors for last time I got no response to my work or my apologies
@Aryllon : Best thing I can think of for cloth as opposed to other surfaces is a little more dry-brushing than normal. For me that pretty much means "any amount of dry brushing", but I find that the sort of powdery/grainy pattern dry brushing lays down looks nice on cloth.
Other than that... no real tricks that I can think of. Maybe mixing a flax or ivory in as a highlighting color instead of white, to sort of get that "natural fiber" look?
It seems weird to me that I can't think of how I paint cloth differently than anything else other than metals. Is that weird?
@tatt2014 : I wouldn't take it so personally. There's a mess of people posting in here, seemingly all in the same few hours every day. Lots of posts are going to get missed or not many responses. Most people don't respond in a busy thread unless they have something valuable to say, so it is entirely possible they just don't have a great insight to share.
If you are interested in getting more commentary on your work, you might consider consolidating your various P&M threads into one blog. That's a lot easier for people to follow. Starting a new thread for every project generally means people will lose track of you between projects, and not many new eyes will hit your projects after they fall off the first page (which happens REALLY fast.)
Yeah man. We live in the P&M blog section. We all usually start one or more main threads, and then keep it updated. All the rest of us then subscribe, and then work off of the subscribed threads list for updates. At least that's how I do it. The ones with new posts, show up at the top of the list. It's a thing. And Welcome.
"dave you are the definition of old school..." -Viktor Von Domm My P&M Blog : It's great how just adding a little iconography, and rivets of course, can make something look distinctly 40K-adamsouza
"Ah yes, the sound of riveting.....Swear word after swear word and the clinking of thrown tools" "Nope. It sucks do it again..."- mxwllmdr
"It puts together more terrain, or else it gets the hose again...-dangledorf2.0
"This is the Imperium, there is no peace, there are only rivets" -Vitruvian XVII
"I think rivets are the perfect solution to almost every problem"- Rawson
More buildings for the Building God! -Shasolenzabi
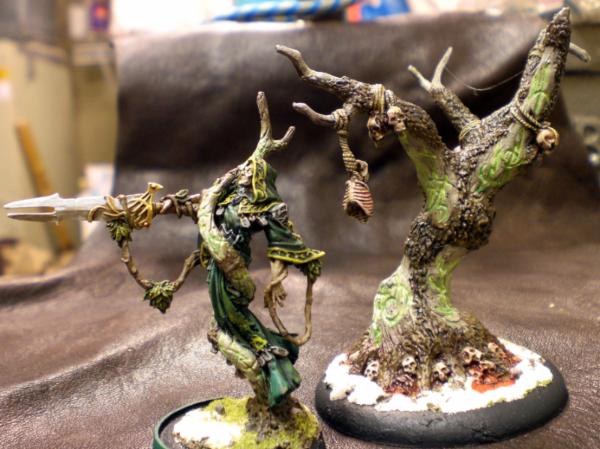
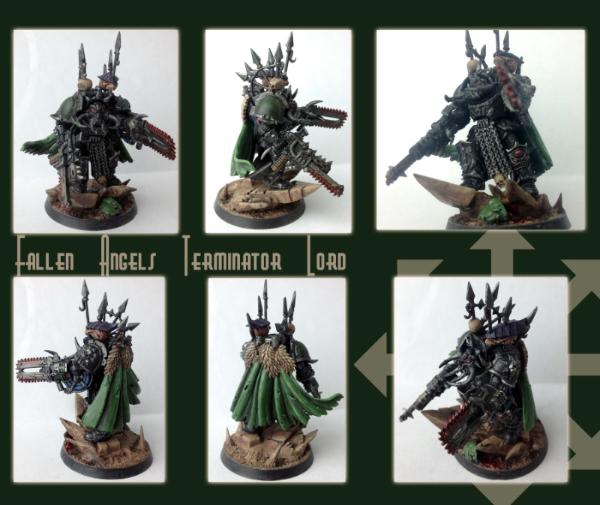
Here's my latest effort, he was a bit rushed because I have had limited time to paint lately and have been anxious to start the Terminator Lord I recently picked up.
Spoiler:
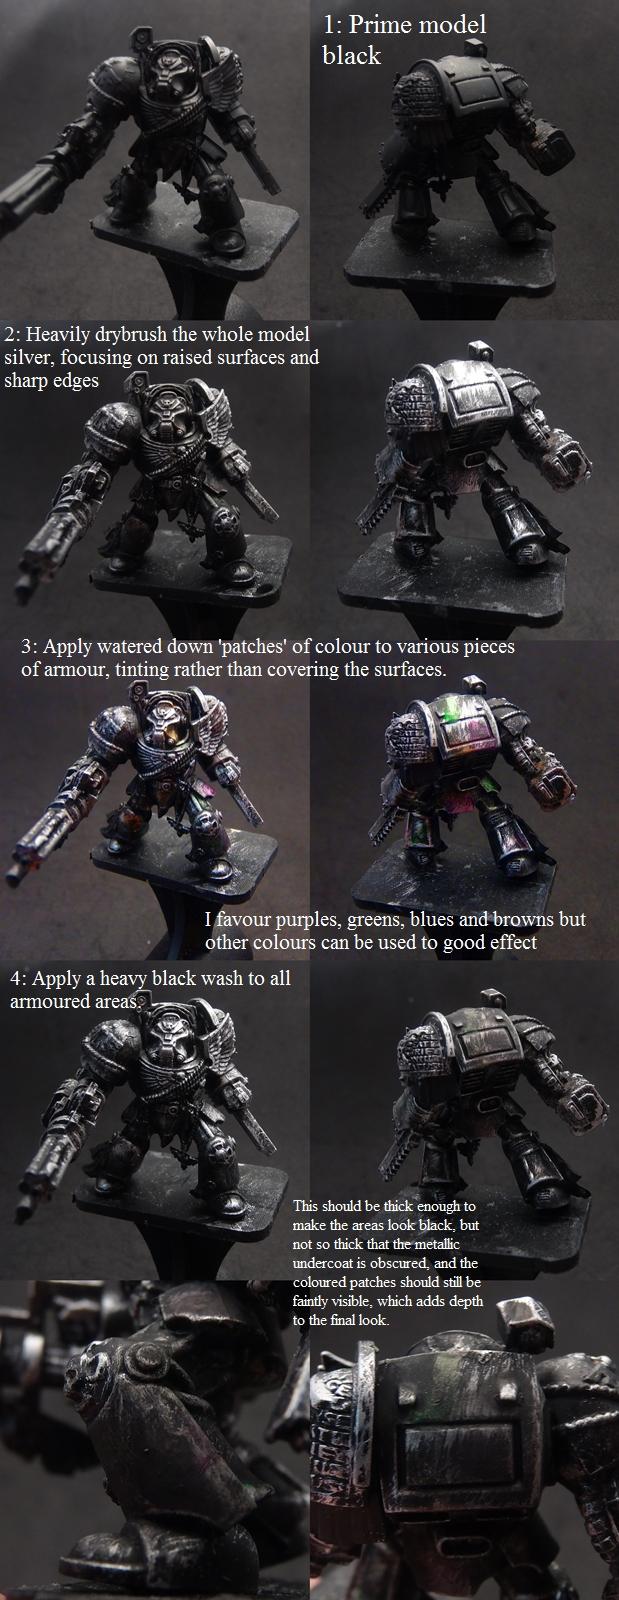
@Paradigm : when you say to paint (or dry brush) silver on a black mini, do you mean a metallic silver? I'm getting ready to do a predominantly "black" terminator lord, and I'm trying to wrap my head around your method. When you add the colors (before nuln oil), do you dry brush them as well?
This message was edited 2 times. Last update was at 2016/10/04 18:06:01
Yep, metallic silver, I tend to go for something quite bright (vallejo just call it silver, but in GW terms think Runefang Steel or Stormhost Silver rather than Ironbreaker or Leadbelcher.). As you're covering the whole thing, you want to have something pretty shiny in the first place so you don't lose the metallic quality after a few washes. The colours are more 'washes' in the sense that you want to be thinning them down a lot and tinting the area, but unlike normal there's no need to worry about patchy coverage as that just adds depth here.
Here's a quick mock-up from a failed attempt at the full Deathwatch tutorial I promised ages ago (that will still happen, this particular mini just wasn't working with the light well but I'll be doing more Deathwatch soon so I'll make one of them more photogenic), I've whacked up the saturation a load to show the colour placement, so they're not normally that strong, but it does cover the armour process.
Hi all!!!!! I know you probably think I've fallen off the map but really my tour schedule has been busy this last month so I don't start any projects until I know I can devote some time. But I will say, seeing all your guys' current works is so inspiring!!
@Cam. All I can say is WOW. That is the best thing I've seen from you in all the years of watching your painting You've paired down your palette and it really works. The mini has flow and is concise and I really think it's yours strongest work yet. ONward Cam!!!
@Tatt: my man, I do believe all of your posts have been responded to and i encourage you to continue to post! They are always viewed and welcomed There is never any need to apologize for anything here.
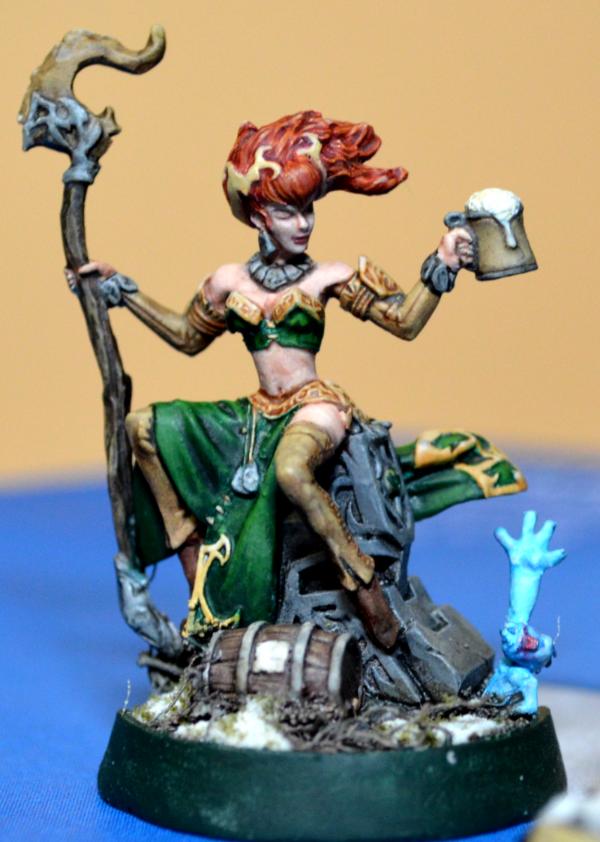
@Aryllon: Welcome! Gorgeous painting there on the Eldar. I agree with Weety, it's an extremely attractive color scheme. I've a question. We're the blue blades airbrushed or brush painted? I ask because the smoothness in transition is far cleaner than the rest of the model, which by no means is a critique. In fact I like that the blades are so clean vs the more rugged texture of the cloth because it really seperates it and gives it a different feel. However, if you are concerned with your ability to paint cloth, which you mentioned in the post, I suppose some efforts could be made to smooth your transitions a little bit on the other parts of the model. Either way, by accident or not, the finished result is really lovely and striking! The nurgle model I like less,...the colors are a bit too similar for me across the model and nothing really pulls my eye. I guess it's nurgle so that's part of it but I think creative steps can be made to make a bit bolder of a statement, like your eldar, and still keep it in the realm of gross mucusy, nurgle! Anyways, a big welcome and definitely looking forward to more of your efforts!!
@ Steingass!!!!! Where the hell have you been!!! You're doppelgänger has been kicking some major butt in my Catachan Kill teams!!
I'll never forget painting him for you!! Classic Bebop, circa 2010-11??
@ Heretic Tom: I Love this mini! The blue is clean and bright and the metals are nice and contrasting to the overall scheme. Also I think that it's a scheme that should paint up real nice!! I'm very excited to see more of these guys and I'll have to check your PM blog to see some progress
Finally, I'm going to just quickly repost my stubble tutorial because I've...got...nothing....else....to post......:(:(
OK SO HERES THE TUTORIAL ON STUBBLE (this is an excerpt from my PM blog that can be found here http://www.dakkadakka.com/dakkaforum/posts/list/395565.page)
Now i know there are lots of ways this is done, this is how i do it. It may or may not be the easiest or best, just illuminating a bit of what ive always thought was a bit of a mysterious technique. Hope it helps Step 1. Finish the Head including all details and highlighting etc etc
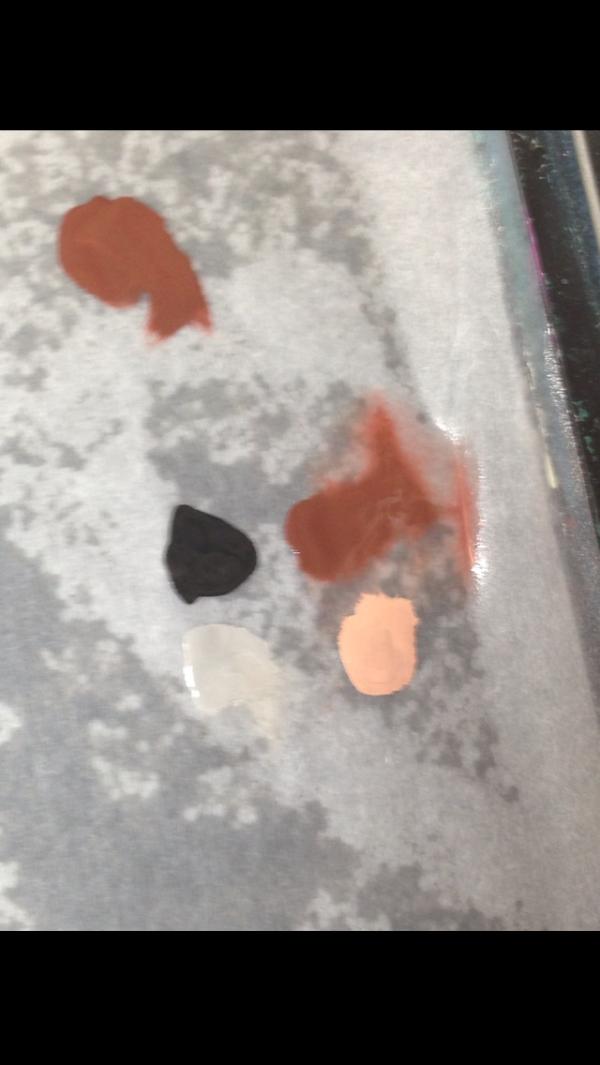
Step 2. Make four dots on your palette. Your flesh base (tallarn in this case) Black grey and brown
Step 3. Mix them and add water. Youll get this color...ish...
You Consistancy should be this...
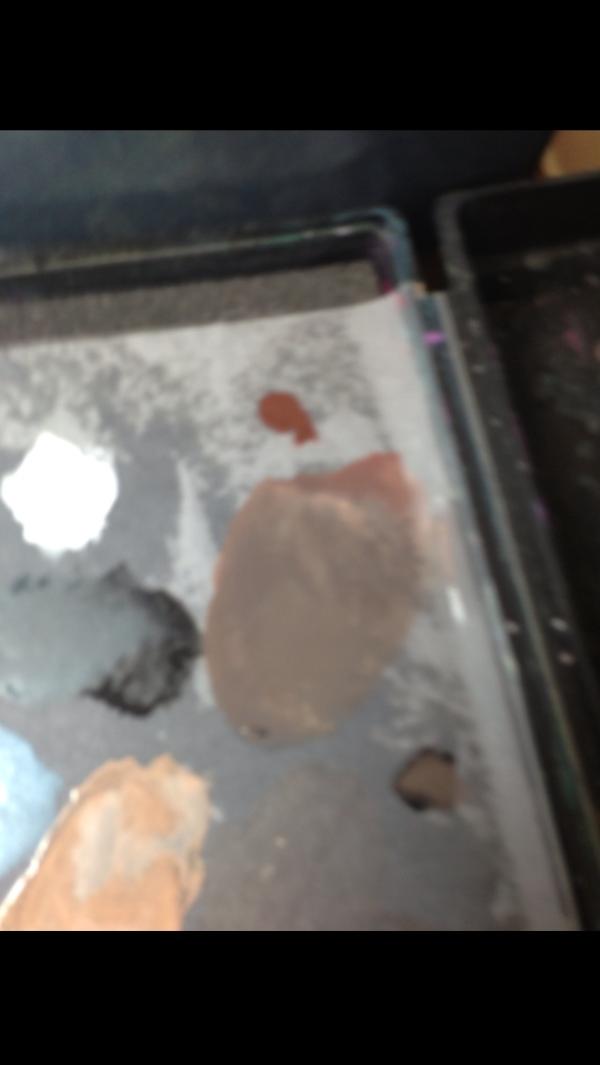
Step 4. Now, Slowly glaze on the wash to areas that naturally have hair. Be careful at this stage because you dont want him looking like the wolfman. If this isnt accurate the effect can be lost.
With just one or two glazes youll still have very sublte tint. Like So
Notice the already painted tat. And also notice that my paints are always very wet and thin...in this case even more so as its a glaze
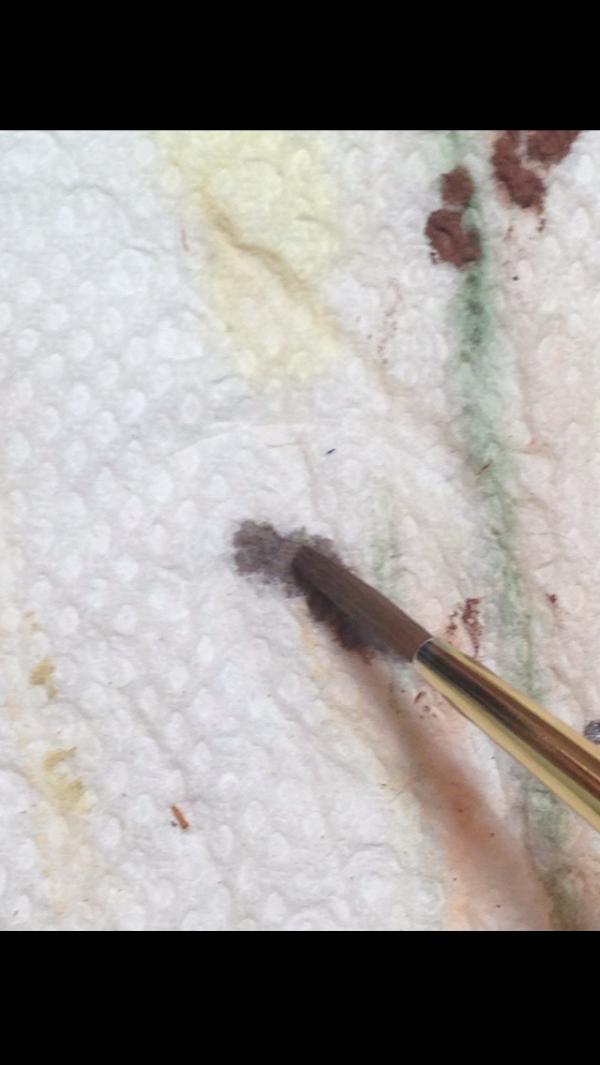
Now, heres something to expect. This glaze will act slightly different than an ink. Its milkier. The trick can be to find the right mix so its visible and doesnt look liight grey. Black is your helping hand here. I will generally pull the glaze to pull it into deep crevices where the stubble will be closer together, but because it isnt an ink sometimes things will dry a little bit hard edged like so:
Notice the hair line? Not terrible but we can go a step further.
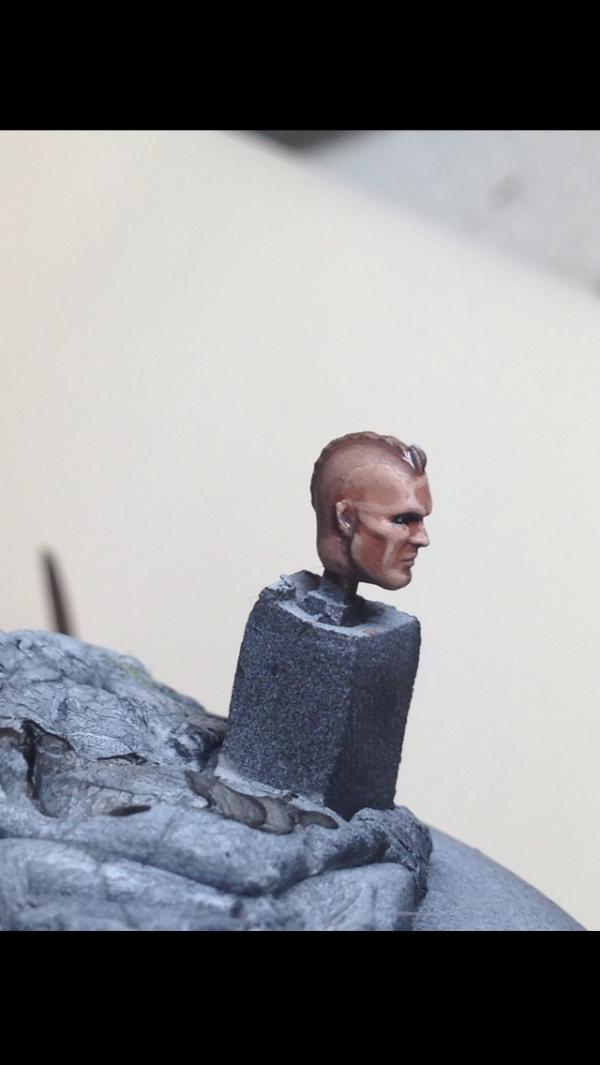
Step 6. Now Add your flesh base to your stubble glaze:
Step 7. Then we clean up the edges using the proper color in that mix. Also, that same color can be used to rehighlight areas that are now covered with stubble, like the chin and jawbones..Use your eye for color to determine this...the final effect is
See its subtle but blends the hair to your skin tone.
AND THATS IT!!!!
Hope You guys found this useful Thoughts are appreciated as usual Bebop
This message was edited 1 time. Last update was at 2016/10/04 18:42:30
Oh man! Life got at me, I'm so glad you're still at it, and jesus...total pro-level painter now! We've got so much to talk about dude. So glad to be here bruh!
It is still, an Honor to see that miniature! Glad the ol' Sarge is still full of Whiskey and hate!
This message was edited 1 time. Last update was at 2016/10/05 02:25:34
"dave you are the definition of old school..." -Viktor Von Domm My P&M Blog : It's great how just adding a little iconography, and rivets of course, can make something look distinctly 40K-adamsouza
"Ah yes, the sound of riveting.....Swear word after swear word and the clinking of thrown tools" "Nope. It sucks do it again..."- mxwllmdr
"It puts together more terrain, or else it gets the hose again...-dangledorf2.0
"This is the Imperium, there is no peace, there are only rivets" -Vitruvian XVII
"I think rivets are the perfect solution to almost every problem"- Rawson
More buildings for the Building God! -Shasolenzabi
"Your mumblings are awakening the sleeping Dragon, be wary when meddling the affairs of Dragons, for thou art tasty and go good with either ketchup or chocolate. "
Dragons fear nothing, if it acts up, we breath magic fire that turns them into marshmallow peeps. We leaguers only cry rivets!
@paradigm : I'm going to try this with my terminator lord, unfortunately I primed him grey (because that's the only primer I have, thanks "not as knowledgeable as you led me to believe" lgs owner) so I'll have to paint him black first.
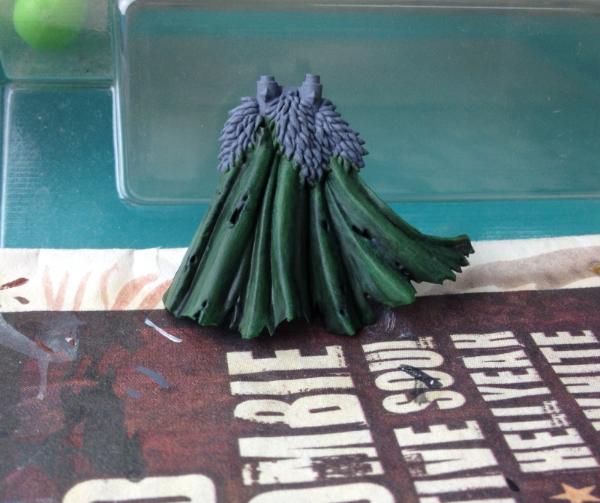
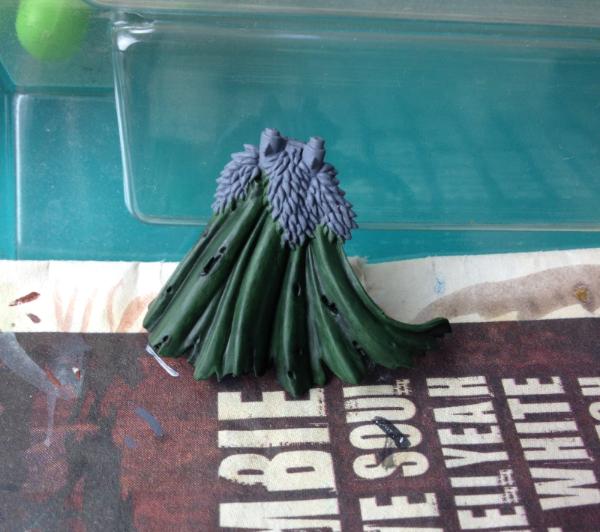
This is not the most intricate or detailed, certainly not the smoothest, way of doing a cloak using glazes but I thought i'd put it here anyway and let our resident pros give us some tips pertaining to this and other methods.
Spoiler:
Base coat and first nuln oil wash
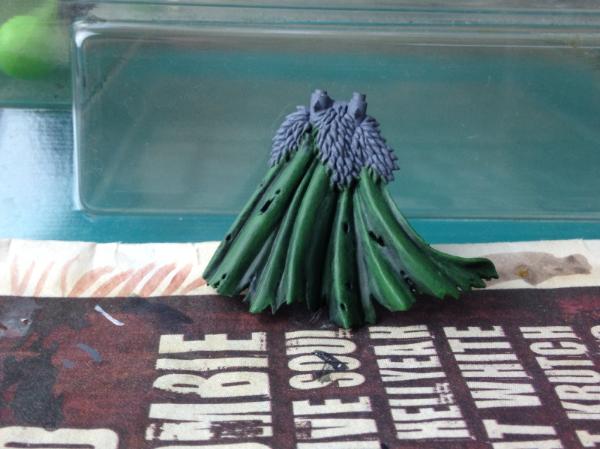
First glaze of highlight color
Several more glazes of highlight color
Even more glazes of highlight color, final nuln oil wash and painted brighter highlights under rips in the cloak
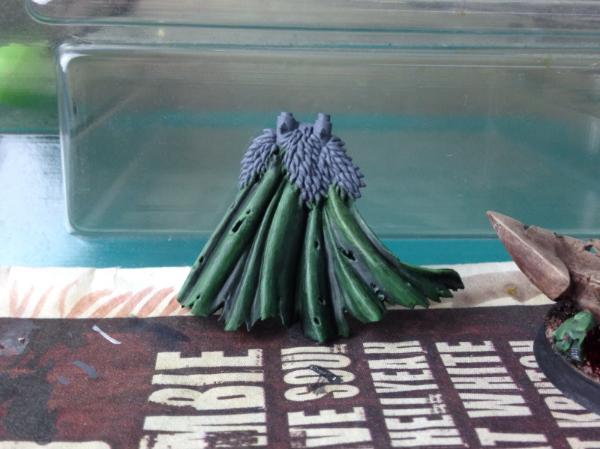
And this is it finished.
Note: the "glaze" I used is (approximately) 3 parts matte medium to 1 part paint.
This message was edited 3 times. Last update was at 2016/10/23 17:22:18
Once again I've returned from a long break from painting. If any of you have ever looked at my blog before, you'll know that I have always been about the painting rather than having enough miniatures to field an army in fact I've never played a game of 40k), so this seems like the right thread to join.
For me it's always been about colour, and trying to get those rich, bright jewel tones. Elder were the perfect vehicle for this, and although I love blues, I eventually found another colour scheme that worked for me.
In terms of painting and technique, what I want to achieve is smooth, seamless blends; what I want to work on are my metallics (maybe even give non-metallic metals a go at some point) and to improve my results when working with my arch-nemesis: greens (as I'm painting goblins at the moment, I'll have to face up to that sooner rather than later.
Here's a few pictures of my journey, from a Farceur I did when I re-entered the hobby as an adult after a LONG absence from painting, to more elder, and heavily converted Dark Eldar. The Wraithseer was an entry into Golden Demon a few years ago and got into the finalists, but not the final three in the category.
"Pit Crew! Take this box out back, throw in a rabid Honey Badger and SET IT ON FIRE!"
If I were an Eskimo, I'd build my igloo next to a supermarket on a tropical beach.
Heretic Tom wrote: This is not the most intricate or detailed, certainly not the smoothest, way of doing a cloak using glazes but I thought i'd put it here anyway and let our resident pros give us some tips pertaining to this and other methods.
Spoiler:
Base coat and first nuln oil wash
First glaze of highlight color
Several more glazes of highlight color
Even more glazes of highlight color, final nuln oil wash and painted brighter highlights under rips in the cloak
And this is it finished.
Note: the "glaze" I used is (approximately) 3 parts matte medium to 1 part paint.
That cloak looks really nice, even for a heretic You might find the process faster though if you move in the opposite direction: highlight with paint, then wash down, instead of glazing up. Especially for cloth I find that works pretty well. Basically, paint a 3-4 layer step highlight with a little blending, but make it a few shades brighter than your end target. Then use a wash or two to bring the whole thing down a bit and smooth the steps further. Then maybe put some highlighting glaze where needed. Here's some examples:
Her hair and cloth bits:
WoC on left's cloak:
Pretty much every part of these guys:
Cassius' cloak (green with brown and some blue):
The non-Privateer Press models in the middle were part of a big army project that saw a lot of washing after basic highlights. It is a LOT faster than glazes because you can push around the wash better and it doesn't matter that it gets onto highlights. You just plan to make things brighter than they will be after the wash. Here's a link to the part of the blog where I did that on the ogres, who go from nearly pale skin color to a dark nut brown, but with smooth highlights. It was 3 paint colors + brown wash only if I recall; I am about 90% sure I didn't do after highlights.
Anyway, that can be a really good way to go if you have a lot to do because it is very fast. It also looks good when combined with some glazing for faster results (although dry time can be a while).
Automatically Appended Next Post: And wow, pretty Eldar appear! Very nice!
This message was edited 1 time. Last update was at 2016/10/08 23:13:15
Hey guys, I'd love to hear some tips (or see some tutorials) on leather. I know a lot of you are really good at this and would love some advice. Thanks!!
Probably the best thing to do first is get some pictures of various types of leather. Full grain, or other leather cuts that include the skin, have that tough, hard sheen you see in shiny leather things, while suede is the middle cuts that have the fuzzy, soft feel.
Past that, there are different treatment methods to get it from skin to leather that change it a bit.
Then there is the question of how it is dyed and lacquered. I am not entirely sure how they get that super shiny, black with white highlight color. More basic (or primitive) dying tends to be more like tinting, so the tan or beige of the leather tints the color a bit, and highlights and folds tend to show that more. You can dye the bejesus out of it to cut down on that, but in my experience it is pretty impossible to remove entirely, especially as the leather wears.
Waxed leather (hardened) is shinier on the outside and harder. Boiled (hardened) is a little less shiny, and has a wood-like texture. Oiled leather (soft) has a darker, richer look from the oil. Waxed and Oiled can be stained by sweat and moisture (I don't know about boiled) but generally not a ton.
So... there's a bit to think about!
(Citation: I have been making leather armor and accouterments for about 12 years now, on and off, and so have given leather a lot more thought than is sensible )
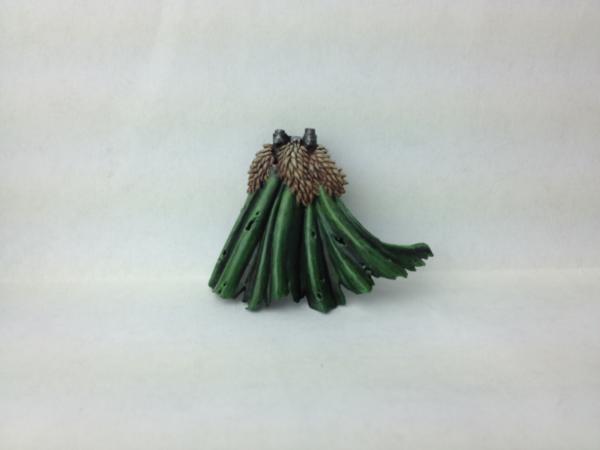
@wehrkind : thanks for the tip on the cloak, I'll give it a try next time.
Here is my attempt at Paradigm's black armor technique. Definetly need a bit more practice, but I'm not bothered by the result as I knew painting like paradigm wouldn't suddenly grant me the ability to paint like paradigm
Spoiler:
This message was edited 3 times. Last update was at 2016/10/23 17:24:04
That looks nice! The only thing that jumps out as something to add would be a highlight of yellow on the eye lenses. There is a lot of dark and grey on the front (which is probably partly camera), and cool green color, so a nice warm orangey yellow, or just straight yellow, would really pull the eyes nicely to the face.
On other notes, do any of you lads have a good use for "Metallic medium"? I have a bottle from Vallejo just sort of sitting around because I don't know what to do with it. It looks like just metal shiny bits floating in matte medium, so I assume I should put some colored paint or ink into it to make a colored metallic, but that's all I can imagine... Is there some cool trick to it?
@wehrkind : Thanks for the tip, I just picked up a "psycho" brush from army painter tonight, super small brush compared to the relatively huge "precise detail" brush I'd been using for things like eyes so I'm certainly more inclined to try some tiny highlights in the eyes now. It's a cheap ($5) brush, but definitely the best one I have at the moment. The new job is allowing me to finally start acquiring some decent paint too, so that's likely to be a huge help with future projects.
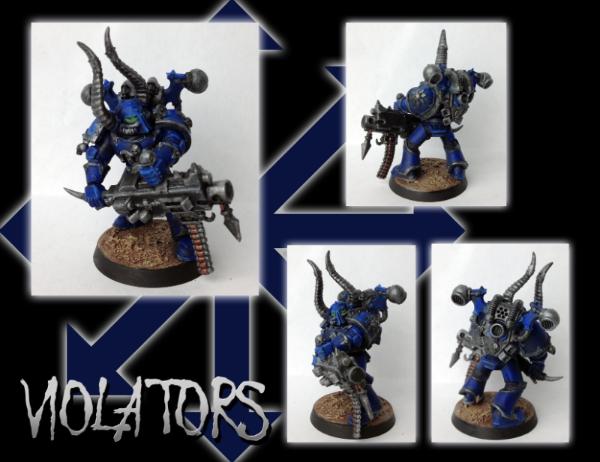
I considered buying a mettalic blue for the Violators chaos marine I finished recently, so my first thought was to use it to make colored mettalics for specific purposes. But maybe someone else has a more creative idea…
Matthew wrote: I need some C&C for my wolf lords cape! How do I make it brighter without making it orange/pink?
If you hadn't added that caveat, I would have said highlight with orange or pink You could always apply washes to the recessed areas to darken them until you have a good bit of contrast.
This message was edited 3 times. Last update was at 2016/10/13 06:24:39
@ Matthew like mentioned, purple in the recesses, and some times when I want something really red, I have a great pot of old humbrol gloss red, keeps it red but brings on the impression of brighter. Though I will get shouted at round here for suggesting gloss paint. You probably don't want a shiny cloak either.


 My P&M Blog :
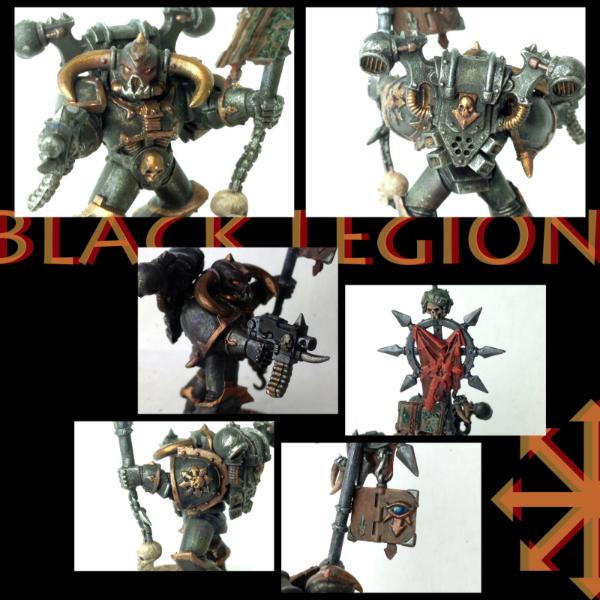
 Chaos Warband & Inquisition


 There is never any need to apologize for anything here.


 )
)

 ~2800 points