You can effectively make your own "ghost tint" or "clear" or whatever by mixing a very small amount of paint in with a couple of drops of varnish and then thinning it out to airbrush it. I sometimes shade models by mixing a tiny amount of black with a tiny amount of brown, mixing it with a few drops of varnish and then a few drops of airbrush thinner and flow improver.
You only need a very small amount of paint, it might be enough to dip a brush in your paint pot, wipe off the excess then stir it in. You're basically just trying to discolour the varnish/thinner mix.
With lacquers sometimes I forego the varnish and just mix a bees dick of paint in to several drops of lacquer thinner, again basically just trying to discolour the thinner, maybe around 5% paint and the rest is thinner and spray it very lightly from a decent distance away from the model. It works without varnish when using lacquers because lacquer thinner dries very quickly, so it's easier to avoid pooling. With acrylics or enamels you need the varnish to thicken up the mix a bit, if you just use thinners you'll end up with a puddle on your model.
If you use lacquers and no varnish, it does give a slightly different look to using acrylics with varnish, as the varnish has some body to it which gives the paint some depth, it's a subtle difference.
 Gunzhard wrote:
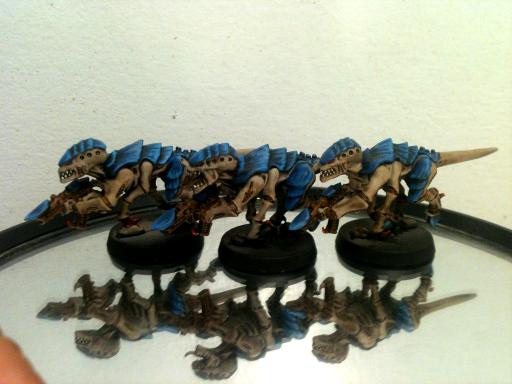
Hey not to hijack this thread, as I really haven't found a good way to Airbrush "wash" myself... but your Nids have the exact scheme I am looking for, can you share the colors?
Well the skin I mentioned in my previous post, white primer, thin coat of Rakarth Flesh (almost wash-like), then an Army Painter Strong Tone wash (used to use Devlan Mud). The darker fleshy areas are using
GW's old "Brown Ink", you could possibly substitute a burnt umber artists ink, I intend to do that when I run out of
GW ink. The armour plates are just very dark blue (I usually just mix a dab of blue in to black paint) for the base coat, then feather with long streaks using
GW enchanted blue and then a light blue highlight. The claws are red, an almost-black basecoat (bit of red mixed in to black), highlighted in streaks with Mephiston Red then Blood Red then if I can be bothered a final edge highlight of blood red mixed with a fleshy tone (something like Dwarf Flesh).
I do the skin on the big bugs slightly differently just to give them a bit more depth. Instead of a thin Rakarth Flesh over white primer, I go for opaque rakarth flesh, that makes the strong tone wash a bit darker and allows me to go back over with rakarth flesh to highlight areas for more contrast. It adds considerable time to do that though, so only the big bugs get that treatment.