| Author |
Message |
 |
|
|
|
|
Advert
|
Forum adverts like this one are shown to any user who is not logged in. Join us by filling out a tiny 3 field form and you will get your own, free, dakka user account which gives a good range of benefits to you:
- No adverts like this in the forums anymore.
- Times and dates in your local timezone.
- Full tracking of what you have read so you can skip to your first unread post, easily see what has changed since you last logged in, and easily see what is new at a glance.
- Email notifications for threads you want to watch closely.
- Being a part of the oldest wargaming community on the net.
If you are already a member then feel free to login now. |
|
 |
2016/09/07 17:41:12
Subject: My Airbrush Setup
|
|

Fixture of Dakka
|
So, I got around to taking some new pics of my airbrush area  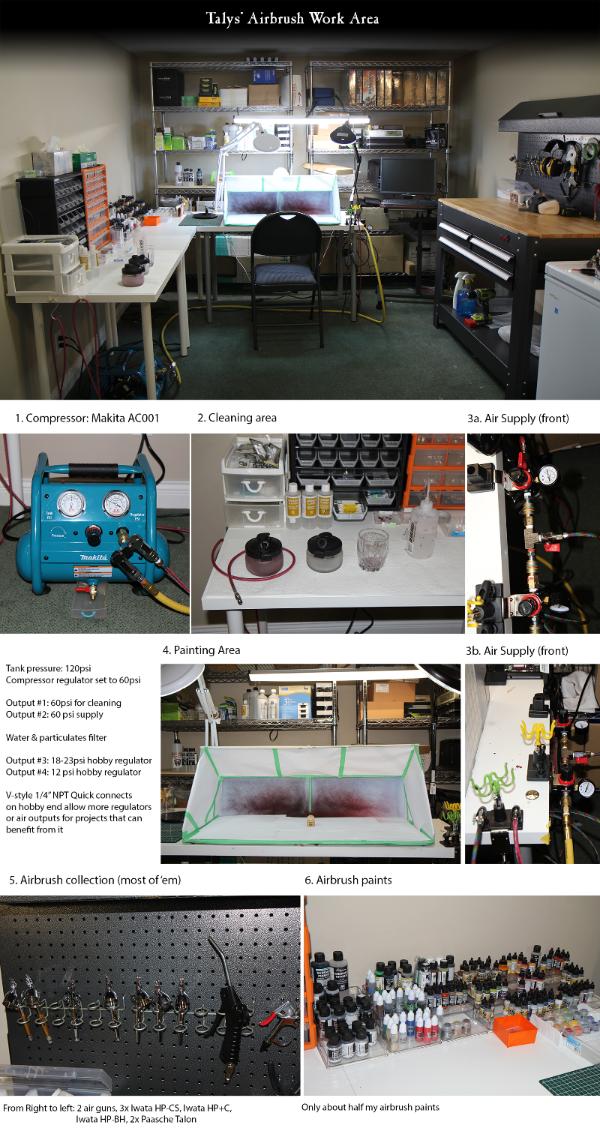 (sorry, dunno why it comes out so narrow -- click on it to get better pictures) Also, an old photo of my non-airbrush painting area (though I do have a small compressor and airbrush there for detailing): 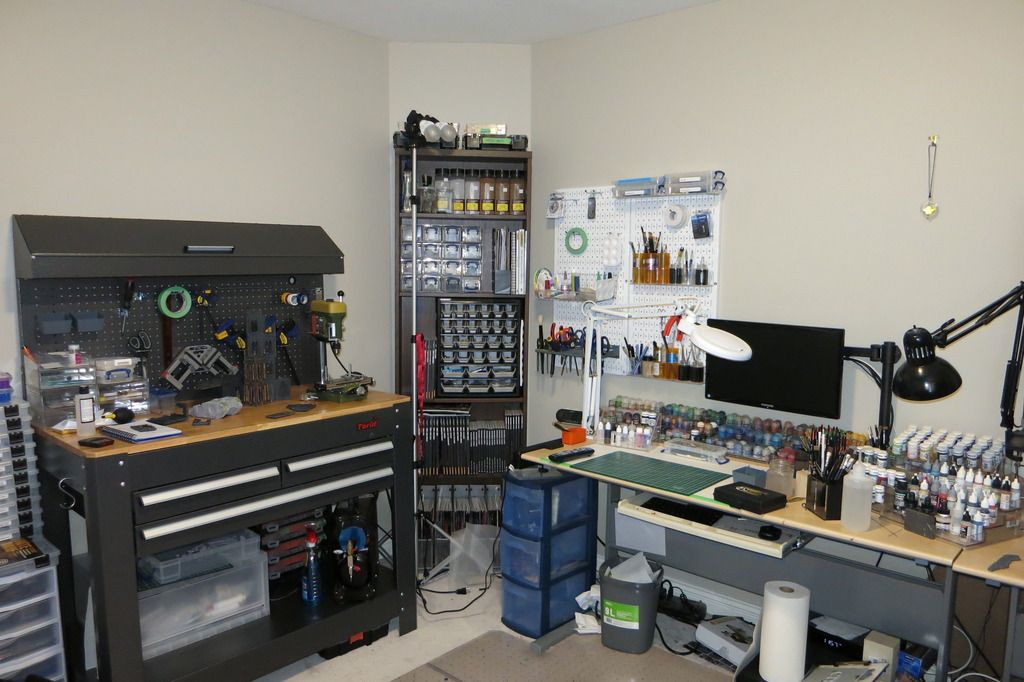 In my airbrush area, I have two of the Masters' paint booths joined up. For the longest time, I just ran one, but doing a lot of terrain recently, some of the stuff just doesn't fit well; plus, I find that having 2 fans extracting sucks out a lot more paint dust. In the center of the room (pictures 3a and 3b -- 3a should actually say "top"), I have 60 psi hitting a manifold made of 1/4" NPT v-style quick connectors and shutoff valves. That lets me configure as many pressure regulators as I need (very quickly), depending on the project. Here, I have configured one at 23psi (priming/basecoating) and one at 12psi (detailing). The hoses all have quick disconnects and also color-coded so that I don't pull the wrong one, and some of them have MAC adapters (the little dial at the end that lets you reduce pressure to a fine detail). The T-shaped connector between the 2 hobby regulators that you see turned to the right is normally pointing down, towards the ground, and may have other regulators along it; I just have it simplified and pointed that way to take a better picture. But they're all quick connects, so it's easy to rotate that assembly. On the left side of the room, I have my color change cleaning area, where pressure is set to 60psi. Basically, between colors, I'll first rinse out the brush with some water and a nail tee. Then, I'll add just a little bit of airbrush cleaner, put my finger on the tip of the airbrush, pull back, and let the backflow clear up the nozzle. I rinse that out with a water bottle, and repeat the procedure a couple of times, til it's clear. Then, I fill it with some more cleaner, and run it through, then run water through, to rinse out the cleaner. It's set far enough away that any output from the filtered cleaning tub won't contaminate my project. To the right, I have my staging area, where I keep my unpainted stuff (it moves to the left as I work on it, then back to the right to dry, usually overnight). There's also my airbrush collection there, which includes 3 Iwata HP- CS brushes (one has a 0.50mm needle, the other two have 0.35mm needles), an Iwata HP Plus C (0.30mm) that I use for shading and Iwata HP-BH (0.20mm) that I use for detailing. There are also a pair of Paasche Talons that I rarely use, and in the drawer, somewhere, I have some old, crappy airbrushes including a no-name brand Chinese thing, a Vaper, and a Paasche siphon-fed airbrush. You'll also notice a couple of air guns. I use those to dust off models before I work -- I'll hook up an air hose and blast off any dust, hair, etc. if necessary. It's one of the reasons I'm using a larger compressor -- a hobby compressor just can't keep up with an air gun. There's also a collection of about half to 3/4 of my airbrush paints and primers -- pretty much all the paints I use. The bottles with white caps are either custom-mixed paints or Citadel Air transferred to droppers. I have bought the entire Citadel air collection, but I only transfer colors as I need them. The bottles with black caps are Vallejo game air and model air, and the fat bottles to the left are the Vallejo metal color airbrush paints. Not shown: I have a bathroom that's essentially just for airbrush cleaning -- an industrial ultrasonic cleaner that can heat the water to a nice, toasty, almost-boiling, and some little tubs of isopropyl for the tips and other metal parts if necessary, different brushes, picks, and tools, and some drying area. I don't think you actually need an ultrasonic cleaner -- alcohol and a brush cleaned the front parts just fine for years -- but I invested in one when I saw it on sale. I also have a new addition to my air tools collection, a California Air 2010A compressor. This thing is awesomely, freakishly quiet. I mean, it's quieter than my hobby compressor upstairs, lol. Mostly, I have that for home DIY stuff that has nothing to do with hobby (brad nailer, spray paint gun, tire inflation, etc), but also to attach to an air gun to dust off my models before I play with them 
|
|
This message was edited 5 times. Last update was at 2016/09/07 17:46:44
|
|
|
 |
|
2016/09/07 17:45:30
Subject: My Airbrush Setup
|
|

Bryan Ansell
|
I envy your workspace!
My broken down shed has to do for me.
I also admire your ability to keep tidy. One of the things I constantly fight is my slovenly nature within my workspace!
|
|
|
|
|
2016/09/07 17:52:09
Subject: Re:My Airbrush Setup
|
|

Sagitarius with a Big F'in Gun
Boca Raton, FL
|
So uh, are you on AirBnB, or potentially looking for a roommate?
|
|
|
|
|
2016/09/07 18:03:37
Subject: My Airbrush Setup
|
|
Fixture of Dakka
|
@Mr. Burning - I confess, I tidied up a bit Normally, it's not THAT clean! Though I do clean up between projects (otherwise, I lose all the little bits rofl).
@hybridmoments82 - no, I would have to give up my gaming space for that, and then my friends would kill me
|
|
|
|
|
2016/09/07 18:44:14
Subject: My Airbrush Setup
|
|
Frenzied Berserker Terminator
|
I... Whoa.
|
|
|
|
|
2016/09/07 18:50:31
Subject: My Airbrush Setup
|
|
Sagitarius with a Big F'in Gun
Boca Raton, FL
|
Oh no, no need for that. I'll take the attic, or the porch, or a doghouse, or even a cardboard box on a dry part of the sidewalk on your block.
Is this getting creepy?
All half-joking aside (unless you'd consider it, in which case I'm not joking at all), that's a beautiful and inspirational workspace, and I promise you, my workspace will never see the light of day on Dakka as a result. 
|
|
|
|
|
2016/09/07 23:20:29
Subject: My Airbrush Setup
|
|
Fixture of Dakka
|
@hybridmoments82 - lol Thanks! If I ever need a roommate, I'll know who to ring up
But give it time. My first painting space was in a corner of my bedroom, with a wee table about the size of the surface I have the monitor on, in the airbrush room It just kinda grew... It's also much easier to keep a larger space neat than it is to do so in a space where there's just an exact spot for everything.
|
|
|
|
|
2016/09/07 23:47:44
Subject: Re:My Airbrush Setup
|
|
Sagitarius with a Big F'in Gun
Boca Raton, FL
|
@Talys - I know what you mean. My home office is undergoing the exact same evolution. It was full office (desk, computer, phone, printer, etc.) with a corner dedicated to my hobby, with a small workbench. I would say the ratio at the time was 90% office to 10% hobby area. I'm now currently at 55% office and 45% hobby area.
By the way, where do I get one of those airbrush "boxes" you have over there? Who manufactures it? Is it one of the ventilated ones or do you still need to wear a respirator?
|
|
|
|
|
2016/09/08 00:38:52
Subject: Re:My Airbrush Setup
|
|
Longtime Dakkanaut
|
Amazing setup, especially the multiple air pressures part.
What kind of light do you use? And do you have a paint shaker? I didn't see one.
Only thing I would change: the chair. I really doesn't look comfy.
|
|
|
|
|
2016/09/08 01:10:09
Subject: My Airbrush Setup
|
|
Fixture of Dakka
|
@hybridmoments82 - The airbrush booth is this one: https://www.amazon.com/Master-Airbrush%C2%AE-Portable-Airbrush-Extension/dp/B00B2TESUQ/ref=sr_1_2?rps=1&ie=UTF8&qid=1473296433&sr=8-2&keywords=masters+airbrush+booth&refinements=p_85%3A2470955011 They are specifically designed to allow you to join 2 up together to make a wide booth (there's a picture of it doubled up on the link). I just tape paper on it, because it's easier to take that off and replace it every few months than to clean up the surface. For $10 more you can get one with LED lights inside (one of mine is that model; I just took the lights out). The LED lights are not very good, because they have a very distinct blue tint; however, I suppose they're only $10 and a lot better than nothing, if you don't have lighting. Also, if you only use to basecoat/prime, in which case, the color of the light doesn't matter so much. I have a friend who adapted a different LED light strip to use the power source from the upgraded model, and it looks pretty darn good. @fresus - Thanks! I've tried different things. At the moment, there are 4 led lightbulbs in the ceiling that are 100W equivalent, 2 magnifier-type lights on those articulating arms (not for the magnifier; I just like the round bulbs), and the one LED bar that I got from Costco. In the past, I've tried some cheap photography lights, regular light bulbs on articulating arms, floor lamps, and so on. I think the key is to have enough light coming in from above/ behind the model, because that's where the airbrush is going to be hitting the model from. I use one of those battery operated paint stirrer things; I think this works better than a paint shaker, but I do have a reciprocating saw that I converted to a paint shaker All I did was take out the blade and guard, and replace it with a quick clamp. On another note though, I think the made for airbrush paints (as opposed to the ones I mix up myself from made for paintbrush paints) are very easy to mix up, with the exception of old Vallejo metallic paints. Much easier than some old non-airbrush paints. Oh, and chair I have a comfortable chair for brush painting, but for whatever reason, I'm happy with a folding thing in my airbrush room
|
|
This message was edited 3 times. Last update was at 2016/09/08 01:17:06
|
|
|
|
|
2016/09/13 00:29:53
Subject: My Airbrush Setup
|
|

Incorporating Wet-Blending
|
Lovely, Talys.
I've got a build coming up and collecting supplies - I finally get a child free hobby space.
|
|
|
|
|
2016/09/13 09:03:37
Subject: Re:My Airbrush Setup
|
|
Fresh-Faced New User
|
Man, you're set up is sweet!
|
|
|
|
|
2016/09/13 10:24:46
Subject: My Airbrush Setup
|
|
Grizzled Space Wolves Great Wolf
|
Nice setup. Though where are you exhausting? That's always my main concern, getting the paint away from me I use a 12" 35W fan that vents out a window, it's strong enough that I can use rattle cans in my spray booth (I absolutely do not recommend using rattle cans in your average airbrushing booth unless you have an overpowered exhaust fan).
I will admit your setup seems a bit overkill to me My setup is very simple and the only additions I'd like would be a room that was temperature and humidity controlled, but that's never going to happen, lol.
Though I do like the idea of an air gun to blow off dust before spraying, I sometimes forget to dust my models before spraying and it's very frustrating.
|
|
|
|
|
2016/09/13 12:23:38
Subject: My Airbrush Setup
|
|
Moustache-twirling Princeps
Gone-to-ground in the craters of Coventry
|
I have a cardboard box on a 3x5' table in the corner of a room. Time to get the garage sorted out.
So, looking at that setup is handy, that booth looks promising.
|
|
|
|
|
|
2016/09/14 05:35:45
Subject: My Airbrush Setup
|
|
Fixture of Dakka
|
AllSeeingSkink wrote:Nice setup. Though where are you exhausting? That's always my main concern, getting the paint away from me I use a 12" 35W fan that vents out a window, it's strong enough that I can use rattle cans in my spray booth (I absolutely do not recommend using rattle cans in your average airbrushing booth unless you have an overpowered exhaust fan).
the two fume hoods go straight back into the wall, where a duct has been run up into the drop ceiling, and another duct runs out of the house, terminating in a funny looking box (as I don't want paint dust blowing back onto my home...). There is a super powerful fan that vents it all out -- I can't recall the CFM, but it's easily as powerful as a leaf blower.
AllSeeingSkink wrote:I will admit your setup seems a bit overkill to me My setup is very simple and the only additions I'd like would be a room that was temperature and humidity controlled, but that's never going to happen, lol.
All you really need is air conditioning, IMO. That knocks the humidity way, way down anyhow, and besides, air con is much more comfortable in the summer
AllSeeingSkink wrote:Though I do like the idea of an air gun to blow off dust before spraying, I sometimes forget to dust my models before spraying and it's very frustrating.
If you go this route, get one that looks like this:
https://www.kmstools.com/titan-4-pistol-grip-blow-gun-10760
NOT like this:
https://www.kmstools.com/performance-tool-mini-blow-gun-11324
Not only is the one on top much easier to use cleaning models, but the one below outputs a lot more air so unless you have a pretty powerful compressor, you'll get a few seconds of blowing, and then your tank will be empty.
|
|
|
|
|
2016/09/14 08:07:39
Subject: My Airbrush Setup
|
|
Decrepit Dakkanaut
|
Amazing studio, fella. I hope to have a dedicated room st my next digs, but you just have that whole thing nailed down.
Any natural light in there?
|
|
|
|
|
|
2016/09/14 08:30:16
Subject: My Airbrush Setup
|
|
Fixture of Dakka
|
@Buttery - nope, no natural light (hence so many bulbs everywhere). My basement is such that half has natural light, and the other half doesn't. The half with, I use as an open area for gaming In the half without, I have my airbrush room, a storage room, and a second, small gaming room.
In my non-airbrush painting room, there are a bunch of windows, but I have them drawn shut and then sealed off with blackout blinds, because I have a few display cases there and don't want sunlight hitting them lol.
|
|
|
|
|
2016/09/14 11:35:21
Subject: My Airbrush Setup
|
|
Grim Dark Angels Interrogator-Chaplain
|
By the power of Grayskull...
|
|
|
|
|
|
2016/09/14 18:56:02
Subject: My Airbrush Setup
|
|
Sagitarius with a Big F'in Gun
Boca Raton, FL
|
Overkill? No such thing!!!!!!
While I myself may not even use 80% of the stuff in that room, it''s worth its weight in inspiration. I think my work output would be tenfold if I had such a room, which is why this post inspired me to make the investment and renovate my own workspace.
|
|
|
|
|
2016/09/14 19:06:28
Subject: My Airbrush Setup
|
|
Grizzled Space Wolves Great Wolf
|
 hybridmoments82 wrote: hybridmoments82 wrote:
Overkill? No such thing!!!!!!
While I myself may not even use 80% of the stuff in that room, it''s worth its weight in inspiration. I think my work output would be tenfold if I had such a room, which is why this post inspired me to make the investment and renovate my own workspace.
Well I think it's overkill in the sense that if I had that much spare room and some money I wouldn't bother expanding my airbrushing area, I'd probably turn it in to a proper spray booth for large stuff (cars, bikes) or I'd just turn it in to a display room, or maybe put in a mill and a lathe, that sort of stuff
|
|
|
|
|
|
|
 6000 pts - Harlies: 1000 pts -
  4000 pts -
  1000 pts -
  1000 pts


 Legion: Dark Angels