| Author |
Message |
 |
|
|
|
|
Advert
|
Forum adverts like this one are shown to any user who is not logged in. Join us by filling out a tiny 3 field form and you will get your own, free, dakka user account which gives a good range of benefits to you:
- No adverts like this in the forums anymore.
- Times and dates in your local timezone.
- Full tracking of what you have read so you can skip to your first unread post, easily see what has changed since you last logged in, and easily see what is new at a glance.
- Email notifications for threads you want to watch closely.
- Being a part of the oldest wargaming community on the net.
If you are already a member then feel free to login now. |
|
 |
2016/09/15 14:17:06
Subject: Brightening nodels
|
|

Regular Dakkanaut
|
Hi guys, I'm hoping you can help.
I'm not a particularly skilled painter, so in order to paint my yellow space marines I simply apply a wash of Casandora Yellow over a white primer. Not only does this make painting yellow easier, but it's also quick; produces great highlighting and shading, and is really thin so doesn't obscure any of the detail (which happens a bit when I use regular painting methods).
However the downside is that there is no margin for error. Once I I've done the yellow armour if I slip when painting another colour then it's very difficult to fix, due to no paint matching the colour that the Casandora Yellow produces over the White. The other issue that I've experienced with one squad is that I applied the wash too thickly, and the armour is closer to a browny orange than yellow. My question is, how can I fix this?
I don't want to re base coat the model white and try again, as I'm assuming two layers of spray paint is going to ruin the model. Will using several washes of Lamenters Yellow, or a really watered down bright yellow paint, over the washed armour work? If I paint these over the armour will it brighten it up and turn it from the browny yellow to the correct yellow colour?
Thanks for any help and advice.
I've attached an image showing how they're meant to turn out.
![[Thumb - image.jpeg]](/s/i/at/2016/9/15/f8a8875da97fe6c8ef2306bb9ba6d0b7_104910.jpeg__thumb)
|
|
|
This message was edited 1 time. Last update was at 2016/09/15 14:18:44
|
|
|
 |
|
2016/09/15 14:22:13
Subject: Brightening nodels
|
|

The Marine Standing Behind Marneus Calgar
|
I have no idea how to deal with your issue, but just wanted to post to say I really like the way your marines look.
Best of luck getting your problem sorted out!
|
|
|
|
|
|
2016/09/15 15:18:36
Subject: Re:Brightening nodels
|
|

Nurgle Predator Driver with an Infestation
|
I can only agree with Nevelon, great looking models. Amazing that all you did is apply a wash. Regarding your problem I would suggest painting all the detail first and then cleaning up with white paint where you "slipped". Afterwards you should have the model done and can wash it to finish it up. Hope that helps 
|
|
|
|
|
|
2016/09/15 15:43:43
Subject: Brightening nodels
|
|
Longtime Dakkanaut
|
It's very difficult to match a wash finish once you've ballsed it up.
You can try layering on light yellow paint, but you're going to have to be super-smooth with it. Very little margin for error.
You could also try repainting just the areas where it's off, white, and washing again. But your white coat will have to be as smooth as the primer was.
Fastest will unfortunately be respray and try again.
|
|
This message was edited 1 time. Last update was at 2016/09/15 15:44:44
|
|
|
|
|
2016/09/15 16:08:17
Subject: Brightening nodels
|
|
Regular Dakkanaut
|
I don't mind respraying and trying the wash again and try and get it right second time round, but won't doing a second coat of spray, over the existing spray and paint, obscure the details of the model?
I have a yellow glaze so could try several washes of that to try and brighten up the armour. Does a bright glaze over a darker colour lighten up the overall colour?
Thanks to the above for the compliments on my marines. They're a really quick and simple paint job (assuming you get the wash right haha) and I can paint a squad of five in an evening, except for their bolters which seem to take ages to paint! All I do is spray white, apply two washes of Cassandora Yellow to the whole model, paint the logo wings, Aquila and any skulls bone, all the metal areas grey and the eyes green, use Earthshade on all these details, and then go over again with the same bone and green, and a lighter grey. Aside from the sergeants helmet that's everything done 
|
|
|
|
|
2016/09/15 19:51:43
Subject: Brightening nodels
|
|
Rotting Sorcerer of Nurgle
|
This tank was once green:
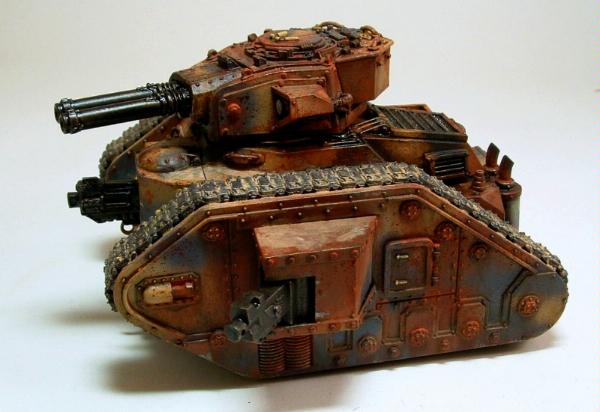
2nd primer didn't do too much damage imo.
|
Check out my gallery here
Also I've started taking photos to use as reference for weathering which can be found here. Please send me your photos so they can be found all in one place!! |
|
|
|
|
2016/09/15 20:14:22
Subject: Brightening nodels
|
|
Sagitarius with a Big F'in Gun
Boca Raton, FL
|
Being a big IF fan and hobby enthusiast, two things:
1. Genius technique with the washes. Absolutely brilliant.
2. Your models look fantastic. Your painting is quite sharp. I don't know where you get off calling yourself a "not particularly skilled painter", but I very much disagree. You are quite skilled and if this is an example of your work on nothing but pure talent and no training whatsoever, I hope you take the bit of time to hone your skills. I don't think I'm alone on that one.
3. To directly answer your question, other than re-priming/basing them, I'd say there's really no way to match the color of the wash against the basecoat with paint. Can you show an example of some of these errors? Because you may get away with a few spots here and there, but if they're big, noticeable mistakes, then you may just have to bite the bullet and re-prime/base. You will lose detail, but you have control over how much you will lose -- keep it thin, keep it far, and be patient.
4. I would keep going with the earthshade in some of those joint crevices too to really make it stand out.
Keep it going man! I hope you heed my advice and hone those skills because clearly you're a natural. Would love to see some final results.
EDIT: Come to think of it, depending on the size, you can try to apply white paint to the errors and then re-apply the wash to just the white area. It probably won't come out exact, but I think it will do the trick.
|
|
This message was edited 1 time. Last update was at 2016/09/15 20:17:33
|
|
|
|
|
2016/09/15 21:11:21
Subject: Re:Brightening nodels
|
|
Regular Dakkanaut
|
Thank you for the really positive feedback. I didn't start the thread to see what you guys think of my marines, but it's really nice to hear your thoughts and encouragement I've gone for an IF successor chapter (as I like yellow, but not the IF symbols). I've used dark angel shoulder pads and named them Knights of Terra.
These aren't the best quality pictures and the lighting isn't great, but hopefully they give an idea of the issue I'm facing. Below are two squads that I've finished, and the third image is of the WIP devastated squad where the issue lies. As you can kind of see, the wash is darker on these guys so they appear more orange than yellow. Maybe it's not hugely noticeable, but I can certainly see the difference haha.
|
|
This message was edited 4 times. Last update was at 2016/09/15 21:13:11
|
|
|
|
|
2016/09/15 22:28:04
Subject: Brightening nodels
|
|

Fixture of Dakka
|
One way you can mitigate the issue is to do the yellow glaze *last*. Paint your silver armor pieces, white aquillas green eyes, and all the rest of it, touch up with white, and do the yellow glaze as a last major step, taking care to minimize getting the glaze onto non-white other colors. You'll stain some of the other colors, but it's (much) easier to touch those colors up than to fix the yellow.
Another way to cover up wash errors is to make a little ding with a dark color (like black or dark brown) and then paint a little silver over that, making it look like battle scarring on the armor.
Incidentally, what your describing is the reason I don't wash my whole models. I prefer to wash just the crevice, and leave the large armor plates a color that I can use off the shelf so that I can fix dings easily. It's not just painting errors -- it's also little dings that happen in the course of gaming. Like dropping the model 
|
|
|
|
|
2016/09/16 10:44:52
Subject: Brightening nodels
|
|
Regular Dakkanaut
|
Yeah like you say Talys, the bits where I slip other colours onto the armour when painting details isn't such an issue, as if it's small I can just paint over with white and re wash, or hide with battle damage.
The biggest issue is where the entire armour is too dark due to the wash being applied too thickly in the first place (as in the third image above). The most appealing fix is to apply several coats of Lamenters Yellow glaze over the armour, but I don't know for sure that this will brighten the armour and make it more yellow (how I want it) than orange (how it is now)
|
|
|
|
|
2016/09/16 10:59:57
Subject: Brightening nodels
|
|
Longtime Dakkanaut
|
You could also try a yellow ink.
|
|
|
|
|
|
2016/09/16 19:52:06
Subject: Brightening nodels
|
|
Sagitarius with a Big F'in Gun
Boca Raton, FL
|
 Talys wrote: Talys wrote:Another way to cover up wash errors is to make a little ding with a dark color (like black or dark brown) and then paint a little silver over that, making it look like battle scarring on the armor.
Brilliant idea!
|
|
|
|
|
2016/09/16 20:05:09
Subject: Brightening nodels
|
|

Aspirant Tech-Adept
|
What about doing the yellow first and then sealing it with a varnish? It might be easier to clean up if you're quick enough?
|
Poor ignorant guardsmen, it be but one of many of the great miracles of the Emperor! The Emperor is magic, like Harry Potter, but more magic! A most real and true SPACE WIZARD! And for the last time... I'm not a space plumber.
 1K Vostroyan Firstborn 1K Vostroyan Firstborn
 2K Flylords 2K Flylords
 600 Pts Orks 600 Pts Orks
 3K Ad-Mech 3K Ad-Mech |
|
|
|
|
2016/09/16 20:12:10
Subject: Brightening nodels
|
|

Grizzled Space Wolves Great Wolf
|
 The Grumpy Eldar wrote: The Grumpy Eldar wrote:What about doing the yellow first and then sealing it with a varnish? It might be easier to clean up if you're quick enough?
That's what I was going to suggest. Spray it with a bit of gloss varnish, wait a day or so before painting the details, then if you slip up use a clean brush moistened with thinners to clean off the mistake. Even if you don't varnish, if you just wait a few days, maybe a week or two, between painting the yellow and painting the details hopefully the yellow will be tough enough that you can just clean up mistakes on it. You can also try masking off the area where you made the mistake and respraying it white, but the chance of messing up the mask and getting white somewhere you didn't want is pretty high. It's made extra hard because yellow has such poor coverage, if it was a colour with better coverage you could try fixing mistakes by just manually mixing a colour that looks close and applying it very thinly in multiple layers until the mistake is hidden. One thing I occasionally do if I make a mistake on a model that I can't fix is just integrate it with some weathering. Make it look like an intentional scratch in the armour (paint it a very light yellow in a scratchy fashion), apply a paint chip, maybe have a build up of dirt in that area. Or put something over to cover it (like a purity seal maybe).
|
|
This message was edited 4 times. Last update was at 2016/09/16 20:20:34
|
|
|
|
|
2016/09/16 20:53:22
Subject: Brightening nodels
|
|
Regular Dakkanaut
|
Hi guys, thanks for the tips about fixing paint slippages. As mentioned above though the issue I'm looking to fix is ways to brighten up the whole of the armour when I've applied the wash too darkly, as shown in the pictures above.
I'll try applying several layers of yellow glaze over the too-dark armour, to see if that helps, unless anyone has any other ideas that might work?
|
|
|
|
|
|
|
 Ultramarines, 3rd Co. and friends, 16k+
  4k
4k  4k Points
 Competition Index