| Author |
Message |
 |
|
|
|
|
Advert
|
Forum adverts like this one are shown to any user who is not logged in. Join us by filling out a tiny 3 field form and you will get your own, free, dakka user account which gives a good range of benefits to you:
- No adverts like this in the forums anymore.
- Times and dates in your local timezone.
- Full tracking of what you have read so you can skip to your first unread post, easily see what has changed since you last logged in, and easily see what is new at a glance.
- Email notifications for threads you want to watch closely.
- Being a part of the oldest wargaming community on the net.
If you are already a member then feel free to login now. |
|
 |
2017/01/20 16:16:51
Subject: Table in 4 hours, DIY store materials only?
|
|

Raging Ravener
|
My friend came up with an idea to make a 40k table, cheap, extra fast (in 2 hours or so), using only the materials we can get from a DIY store. It sounds crazy but cool. The table should:
1) be movable.
2) have a decent size (48 x 48 at least).
3) have some terrain.
2) look reasonably decent.
The ideas I got so far:
- using some plywood planks covered with a piece fabric for maximum movability.
- using cardboard boxes + masking tape + cheap paint for painting walls to get texture for buildings.
- hot glue gun + plastic pipes for Giger shenanigans.
- lots of drybrushing (limits drying time).
- this: http://deltavector.blogspot.com/2014/04/cheapest-fastest-infinity-terrain-ever.html : terrain from foam cans.
If we do that, we do that tomorrow. Do you have any tips or ideas?
|
|
This message was edited 1 time. Last update was at 2017/01/22 11:12:26
|
|
|
 |
|
2017/01/20 16:22:04
Subject: Table in 2 hours, DIY store materials only?
|
|

The Marine Standing Behind Marneus Calgar
|
Ridged foam insulation and a hot wire cutter will get you all the hills you need quick and easy.
|
|
|
|
|
|
2017/01/20 18:03:16
Subject: Table in 2 hours, DIY store materials only?
|
|
Powerful Phoenix Lord
|
Folding tables with a gaming mat...pink foam hills.
|
|
|
|
|
2017/01/20 18:29:47
Subject: Re:Table in 2 hours, DIY store materials only?
|
|
Pestilent Plague Marine with Blight Grenade
|
Why must you do this in 2 hours? Why not take the time to make sure it looks good?
My buddy and I made a 6x4 a few years back... looked fantastic... we did a sand top coating. I did half of it, and wanted to wait to do the other half so the bagged sand we bought would dry out completely... well when i left my buddy grew impatient and put damp sand on the half.....
all in all.. it looked awful.. around $100 down the drain because he couldnt wait an extra hour or 2.
|
|
|
|
|
2017/01/20 18:43:51
Subject: Re:Table in 2 hours, DIY store materials only?
|
|

Grizzled Space Wolves Great Wolf
|
 Snoopdeville3 wrote: Snoopdeville3 wrote:Why must you do this in 2 hours? Why not take the time to make sure it looks good?
That was my though too  Though I was actually thinking I'd probably take a finger off while cutting the wood if I tried to rush myself Make a basic frame, nail down some panels to it, if you need it portable, make it in multiple sections and perhaps hinge the sections so you can fold it up or leave the hinges off so you can just move it in sections. Put it on some fold out trestle tables. Throw a mat over it. Make some scatter terrain to throw on top of it. Once you start making more complicated terrain and cutting terrain in to the board itself, having it movable and/or easily stored becomes more difficult, but it will typically look better. But a 2 hour job? Eh, more like a day or weekend job for me (especially if you include the terrain), but maybe I'm just not handy enough
|
|
This message was edited 2 times. Last update was at 2017/01/20 18:45:36
|
|
|
|
|
2017/01/20 20:30:01
Subject: Table in 2 hours, DIY store materials only?
|
|

Dakka Veteran
|
I'm on board with the biggest reply question going - Why Two Hours?
Do you have a tournament that's coming to your house, and you only realized last minute that you need tables?
The DIY store plan isn't that bad, but you want to take your time.
You'll want a good supply of at the bare minumum PVA glue, though Wood Glue can be a bit more secure. Especially if you're sticking the insulation foam to the sections (Hands down, insulation foam in either blue or pink, common stuff around a DIY store, cheap and quick for basic work).
A bag of playground sand is good for some texture, but like Snoop said, set it aside, spread it out a little and let it dry fully. Otherwise it gets clumpy, and problematic. You might even consider using a strainer to force it to thin out as you spread it onto the board sections.
Of course, at a DIY store you're not going to find Trees or other foliage, well, not in any ready to use form. If you want to avoid pre-made trees, there are more than a few model railroad tutorials on making really nice trees with wire, putty and some flock.
You CAN get single-strand 20 gauge wire decently cheap for a hell of a lot if you want to do a few extra characterful trees. When I say a hell of a lot, I mean that, like several meters worth for under $10. Also doubles wonderfully for Pinning, if you use a 1/32" drill bit, but I digress.
You can find other materials, like MDF and Particle board, which can be cut to shapes and build some structures with. Careful while handling, some of it gets dusty and you don't want to inhale a lot of that.
The BASIC profile of a board is easy enough to do from a DIY store, but for advanced work on scenery, you'll want to consider a few other sources. There's nothing to be gained by rushing it, though.
|
|
|
|
|
2017/01/20 22:04:27
Subject: Table in 2 hours, DIY store materials only?
|
|

Towering Hierophant Bio-Titan
|
Here's a super quick/cheap table that I made and have built on a few occasions while travelling.
http://www.dakkadakka.com/dakkaforum/posts/list/232189.page
|
|
This message was edited 1 time. Last update was at 2017/01/20 22:04:43
|
|
|
|
|
2017/01/20 23:52:33
Subject: Re:Table in 2 hours, DIY store materials only?
|
|
Raging Ravener
|
Whoah, that's a lot of replies! Thanks guys.
~~~
I made some reconnaissance at the store. I read safety precautions for the insulation foam, and it feels like this thing is goddamn radium! So probably I will go with cardboard + rigid polystyrene instead. I'm still unsure about the hot wire cutter - it costs as much as a Start Collecting box, but, guys, the power! It's tempting.
~~~
The 2 hours limit is just for motivation - if we decided to make a perfect-looking table, it would take days, so we would never get down to it. But with some good planning, we can make a decent-looking table, and then upgrade in the next days or weeks, if we feel like that.
Also, we want to play on the table we make the same day!
That said, I suspect it will take a bit more than 2 hours after all
Alex, your cardboard buildings - not bad at all! I can be making something like that tomorrow.
Snoopdeville3, but maybe you would be able to remove sand later on? This way you would at least save the money that went for the table surface.
Currently I'm thinking of using as little PVA as possible, because of the drying time. I think I will be able to get a decent texture with stippling and sprays, and if we ever want to add sand, it should be possible later.
|
|
This message was edited 1 time. Last update was at 2017/01/20 23:53:08
|
|
|
|
|
2017/01/21 02:14:18
Subject: Table in 2 hours, DIY store materials only?
|
|
Stealthy Warhound Titan Princeps
|
Rocks, cloth, gravel and downloaded and printed paper fold files -
|
|
|
|
|
2017/01/21 13:39:25
Subject: Re:Table in 2 hours, DIY store materials only?
|
|
Raging Ravener
|
Paper fold looks good.
We bought the supplies - around 200 PLN (or 50 Euro / USD, or 40 pounds, or 6000 yen, or half an Imperial Knight). The tabletop is in one piece, around 48 x 48 - and we got two of them, because that was the only size they would sell us. The terrain will be cardboard + polystyrene. So far so good.
|
|
|
|
|
|
2017/01/21 14:24:07
Subject: Table in 2 hours, DIY store materials only?
|
|
The Marine Standing Behind Marneus Calgar
|
I made some reconnaissance at the store. I read safety precautions for the insulation foam, and it feels like this thing is goddamn radium! So probably I will go with cardboard + rigid polystyrene instead. I'm still unsure about the hot wire cutter - it costs as much as a Start Collecting box, but, guys, the power! It's tempting.
Just work in a ventilated space, and should be fine. I’m not sure what hot wire cutter you are looking at; this is what I’m talking about:

It’s basically just a tube to hold batteries, a wire, and a simple frame. I forget how much I paid for it, but it couldn’t have been more then $20.
|
|
|
|
|
|
2017/01/21 22:01:58
Subject: Re:Table in 2 hours, DIY store materials only?
|
|
Raging Ravener
|
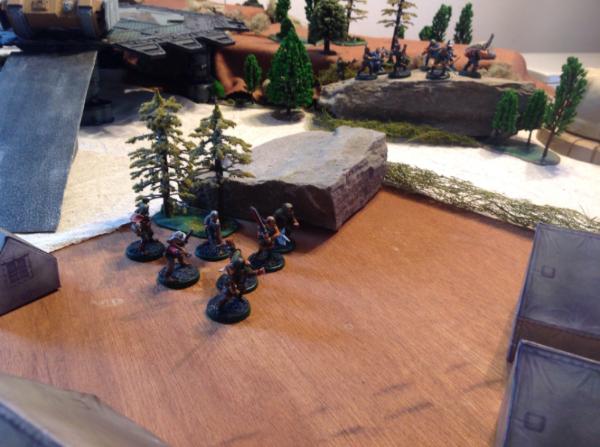
4 hours in the making and it's done!
The tabletop is low grade plywood. It's a bit smaller than 48' x 48' (give or take 2', we had limited trunk size). It's 1.5 cm thick, and it's massive. 1 cm could probably do the job, too, and be much lighter - but at least we have a tabletop on which tired wargamers can rest their shoulders without flipping the table.
Most of the terrain is rigid insulation foam, glued with a hot glue gun. So far - unpainted. The rest is cardboard, and parts of my friend's Aegis defence line.
No hot wire cutter for us (if we could get one like Nevelon's, we would - but the available ones were all expensive). But my friend got two Olfa blades, these things are katanas of craft knives, so cutting was OK.
And we had a battle the same day - 650 points, and a well-earned Ork victory.
If I was making the second table, I would make some different choices. That said, I really like this one. It may be simple, but feels much, much better than piles of books and boardgame boxes. Totally worth it 
![[Thumb - plansza.JPG]](/s/i/at/2017/1/21/8eb7850430346202115be7e727b369b1_87339.jpg__thumb)
|
|
|
This message was edited 1 time. Last update was at 2017/01/21 22:07:52
|
|
|
|
|
2017/01/21 23:26:34
Subject: Re:Table in 2 hours, DIY store materials only?
|
|
Anti-Armour Swiss Guard
|
 skybax wrote: skybax wrote:Whoah, that's a lot of replies! Thanks guys.
~~~
I made some reconnaissance at the store. I read safety precautions for the insulation foam, and it feels like this thing is goddamn radium!
Nah, you can safely lick the foam. Lick radium and it WILL kill you. (and brushlickers are worse - there are some heavy metals used in specific paint pigments and you don't want to ingest them, either).
Hot wire cutters will cut it (but ventilation is something that is needed, but it's also needed for many paints and glues, so that's normal).
Don't burn it (that's bad) but you CAN cut it with a sharp blade as well.
Why a 2 hour limit?
My first gaming table came from a hardware store. Folding blow-moulded table (1800x750 unfolded, 900x750 folded up). One full sheet of 12mm mdf (2400x1200) cut into 4 pieces (600x1200). I normally only use 2 sections because I play skirmish games on a 1200x1200 (48"x48"). Paint from paint section. Insulation foam sheet and a box cutter (extendable blade with snap-off sections).
|
I'm OVER 50 (and so far over everyone's BS, too).
Old enough to know better, young enough to not give a ****.
That is not dead which can eternal lie ...
... and yet, with strange aeons, even death may die.
|
|
|
|
|
2017/01/22 01:57:04
Subject: Re:Table in 2 hours, DIY store materials only?
|
|
Longtime Dakkanaut
|
Hey, that's a nice table to play on! Having a cool terrain board really changes the game for me (I have three full 6x4's about...) I really like your little stonehenge in the bottom. Big thumbs up for the effort and sharing. As to a well deserved Ork victory...is there such a thing ya greenskinned xenos!!! The Imperium reels at the very thought!
|
Keeping the hobby side alive!
I never forget the Dakka unit scale is binary: Units are either OP or Garbage. |
|
|
|
|
2017/01/22 11:08:27
Subject: Re:Table in 2 hours, DIY store materials only?
|
|
Raging Ravener
|
I like Stonehenge too! My friend's idea, one of the best parts of the table.
So, some thoughts if anyone wanted to make a tabletop quickly for themselves:
- rigid polystyrene is good, even without a hot wire cutter.
- you can cut rigid polystyrene in simpler, less detailed shapes. The terrain has then a sketchy, a bit cartoony look - a bit like something taken from Warcraft. Still looks good, and is faster to make and easier to paint.
- cardboard + hot glue gun + spray paints - you can make ruins with these, take no time at all, with black and white spray they look quite nice, too. With spray paints, the cardboard doesn't get deformed. Use Alex Kolodotschko's thread for inspiration. Higlhy recommended.
- craft acrylics need more than one layer and drying takes a while (more than 15 minutes if you use quite thick layers for maximum coverage). For speed painting, use big brushes (mine was around 3 cm wide).
- flexible corrugated plastic tubes - they take some time and good ideas to use, not recommended.
- wire, masking tape, small saws - we bought these and never used them. Not necessary.
As to the Ork victory, they were fighting Chaos forces, so I think an Imperial can be satisfied either way
|
|
|
|
|
|
|
|
 Ultramarines, 3rd Co. and friends, 16k+
  4k
4k  4k Points
 Competition Index