Forum adverts like this one are shown to any user who is not logged in. Join us by filling out a tiny 3 field form and you will get your own, free, dakka user account which gives a good range of benefits to you:
No adverts like this in the forums anymore.
Times and dates in your local timezone.
Full tracking of what you have read so you can skip to your first unread post, easily see what has changed since you last logged in, and easily see what is new at a glance.
Email notifications for threads you want to watch closely.
Being a part of the oldest wargaming community on the net.
If you are already a member then feel free to login now.
I've looked up painting tutorials and after I got some cheap acrylic paint I began painting my first model, I looked up the different chapters and picked the Imperial Stars based on two reason, one their color scheme is simple, the second was that there was no lore besides their colors and chapter symbol.
Here is my first model, I had to mix the purple myself to get a color that looked similar to the picture and after three coats of thinned base I applied a black wash to pick up on the details and then painted the under armor black. after that I painted the gun and backpack grey and then painted the eyes and trim. i finished him off with painting the chapter symbol and squad designation.
Tell me what you think and any pointers you guys have would be appreciated.
Great start- good contrasting colour blocks, and good brush control , particularly on the squad shoulder pad.
It’s s really nice purple- but you haven’t made life easy for yourself! Mixing your own colour for the main armour base means that colour matching across your squads will be a nightmare!! Picking a lesser known chapter means you get a freer reign on what you want to do, but you lose shortcuts like commercial decals for fine detail.
You might want to think about a thin black wash for the Bolter to pick out detail.
Your brave by doing those shoulder symbols. Next time I would try a smaller brush for them tho, you'll probably find it easier. Overall it's a good looking marine. I also like your niche chapter.
thanks for the feedback, I've added a black wash from watered down acrylic and it really pops.
After that I mixed a larger batch of purple and did the rest of the squad. All thats left is to paint the gun and packs grey and the first squad of the 4th company will be completely painted, a little touch up after that and a matte clear coat will keep the colors from rubbing off while i handle them. I've got a squad of 4 bikes next to paint and I'll share those here as well.
This message was edited 2 times. Last update was at 2019/02/04 06:19:15
Hey you're doing great here! First set of marines and they look good. I really like that you did a little research, picked a chapter that appealed to you (and one leaving you a lot of room to customize) and got stuck in! Nothing beats the feeling of putting down a painted squad, army, etc on the table. The work, the imagination that went into it, it just feels great.
Keeping the hobby side alive!
I never forget the Dakka unit scale is binary: Units are either OP or Garbage.
Better than mine first models for sure. I used oil paints...
3 stars for chapter symbol is hard to do. But It reads from a far, solid work!
I do same thing, simple paint for body and leave the details for the shoulders
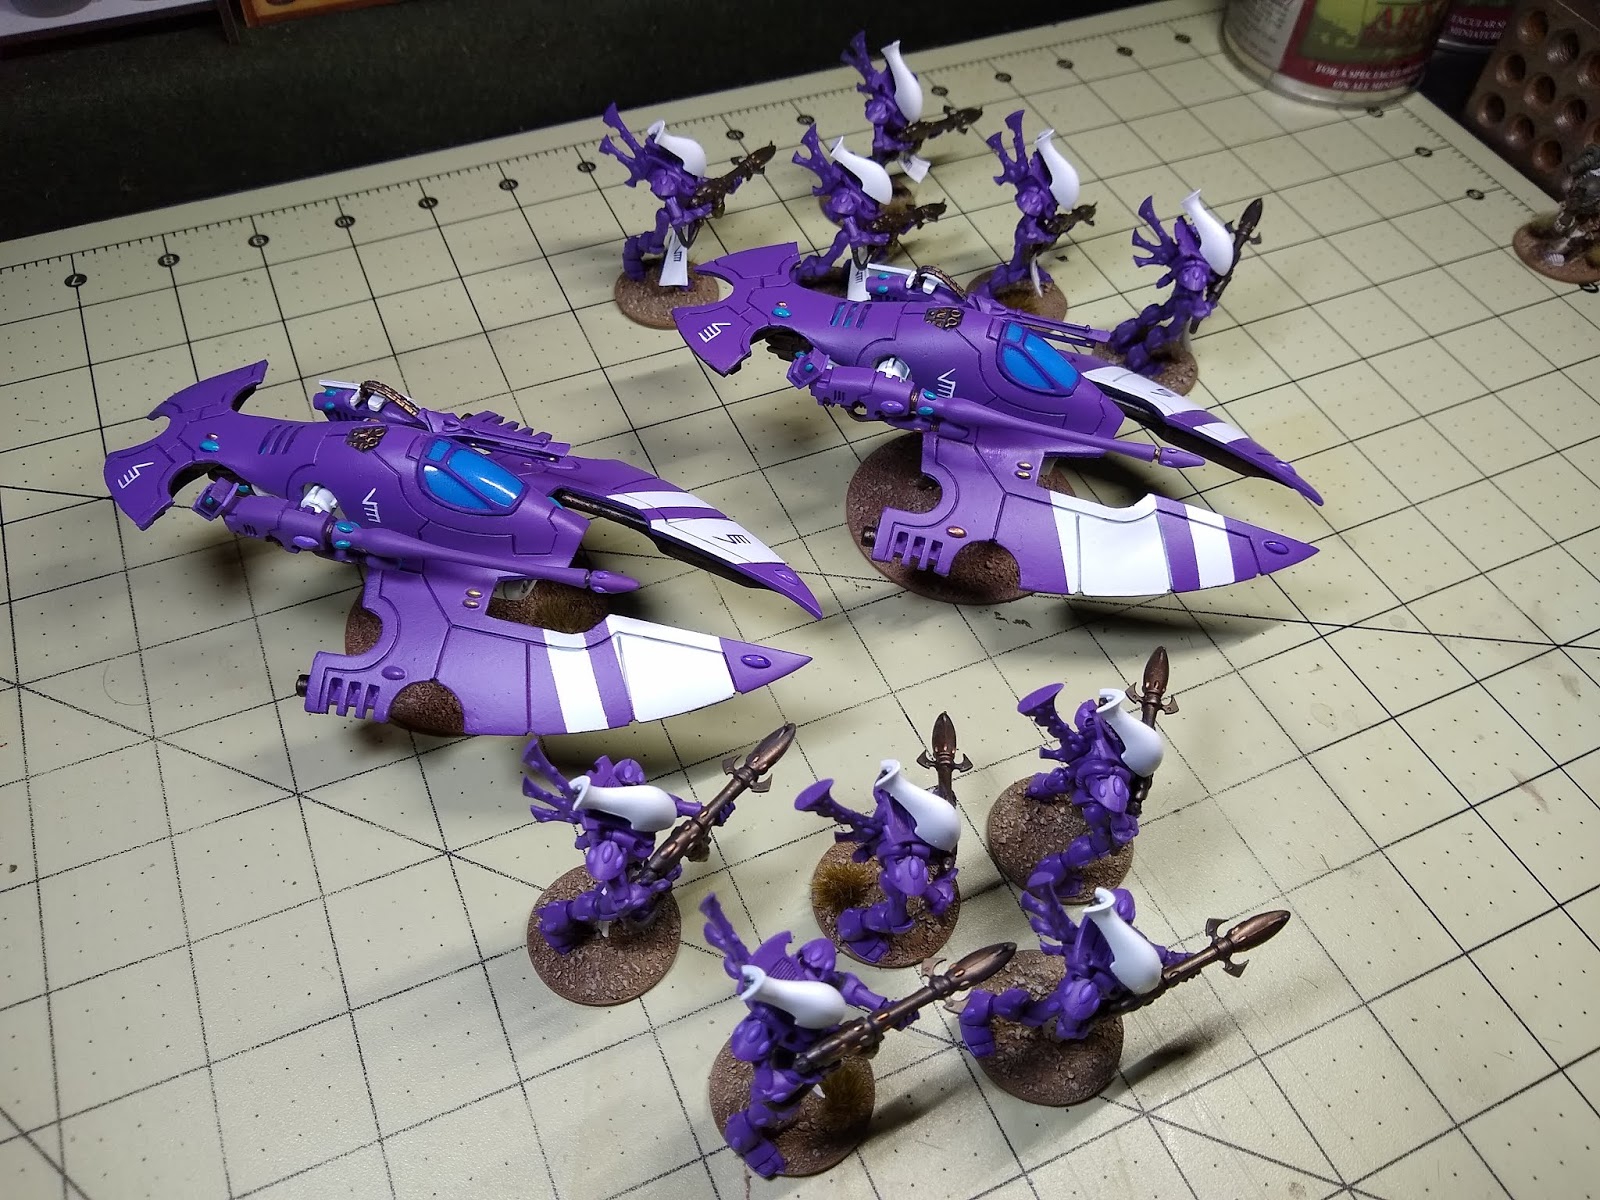
Heres the first of my bike squad, the larger planes make it easier to paint on the symbols but are just a little more difficult to coat evenly, this took 4 coats of purple before I got even coverage. The top have of the marine is made from metal so he fell over every time i put him on the bike. To fix that I made a simple rock from CA glue and baking soda and I glued it to the base of the bike.
First photo is the bike without the marine so you can see the cushions of the bike which I had to highlight to obscure the mold line on the bike.
Something to consider for future paintings is different colors or variation of a color on different sections of the model. For example: Like it is already done with purple for the armor, and metal for the metal parts, and green for the shoulder trim, and gold for the bike trim. Each color representing different part and perhaps different material. Trying the next level, of the color/material variations for a leg - (purple armor, metal boot rand/outsole, lighter or darker purple for the boot guard, lighter or darker purple for the knee cap)
The difference in color between the pieces, or highlighting different pieces of same color will create contrast and detail. And contrast is always a friend to a miniature.
I liked the effect it had in my work, and perhaps this will help in your work.
Hope that makes sense.
This message was edited 2 times. Last update was at 2019/02/07 07:42:15
Still going strong and I can see the improvement as painting becomes more natural. I run a bike army and yeah, the metal ones can be a pain to paint (I actually pin my metal onto the plastic as I find no glue works well between plastic and metal, even superglue seems to degrade). Stars are looking good, and still loving the unusual chapter.
Tips: I think a circle of black on the end of the plasma gun is needed (to simulate the barrel). Some people here will say you need to drill it, that's up to you. I do so with a generic 1/16" bit bought for a few dollars at any hardware store. I have done this so much I just use it in my regular drill, but many simply hold the bit between two fingers and twist. Lead takes a bit longer than plastic of course. You only need to get a tiny impression, not drill the whole thing out, just a lip around the outside.
This is purely optional just for added spunk. I put mud on my wheels and fenders using a tiny bit of white glue squeezed onto a paper plate, then mix dark brown into it, let it thicken slightly (like a minute maybe) and dab it on. The glue hardens clear and the brown can look wet. Try this on a paper plate and let it harden and see if you like it. For extra, when the glue is on your wheels and wet, sprinkle brown flocking (basing material on it)
edited: for clarity
This message was edited 2 times. Last update was at 2019/02/10 15:45:49
Keeping the hobby side alive!
I never forget the Dakka unit scale is binary: Units are either OP or Garbage.
I'm not going to surgar coat this because it's disingenuous, and harmful. You're painting sucks. And that's okay. It's not a good start at all.. You're going to need to do more testing on cheaper models before you spend money on 40k you will be far happier later on.
You can accomplish test painting on dollar store army men use your color scheme and the instructions below. I can't for the life of me figure out why no one is trying to help you.
1. Thin your paints., sand down your undercoat with a toothbrush or scour the model before base coat after your undercoat. Use a rattle can for your base coat after under coat for a more solid color as you have gaps.
2 graidiant and lightsources and blending.
3. And use a sharp exacto knife to clean your unwanted paint away by shaving it off carefully without scratching the finish. Especially important for shoulder trim. Make sure you're not priming to heavily, and for the second time water down your paints with a thinner.
Use Games Workshop or P3 paint Make sure your using base paint, followed by layers paint followed by shades/washes and highlights with more layer paint. The layer being translucent it helpful to highlight details.
Don't listen to the people above. Being needlessly positive hurts people that are looking for better results. You suck. But that's nothing to be ashamed of, I sucked once. Now not as much. Get better.. don't shy away from adversity push to be better. So unless you're 11 years old the above comments are completely useless to you.
Automatically Appended Next Post: Likewise you can get better stars by using a star sticker from a dollar store/craft store stick them on use a rattle/spray can/ or airbrushing than pull off the sticker your stars will look clean and crisp. You can do the lines of the triangle between the stars with the same method by using painters tape cut into strips.
This message was edited 5 times. Last update was at 2019/02/10 16:27:51
The Allfather wrote: I'm not going to surgar coat this because it's disingenuous, and harmful. You're painting sucks. And that's okay. It's not a good start at all.. You're going to need to do more testing on cheaper models before you spend money on 40k you will be far happier later on.
You can accomplish test painting on dollar store army men use your color scheme and the instructions below. I can't for the life of me figure out why no one is trying to help you.
1. Thin your paints., sand down your undercoat with a toothbrush or scour the model before base coat after your undercoat. Use a rattle can for your base coat after under coat for a more solid color as you have gaps.
2 graidiant and lightsources and blending.
3. And use a sharp exacto knife to clean your unwanted paint away by shaving it off carefully without scratching the finish. Especially important for shoulder trim. Make sure you're not priming to heavily, and for the second time water down your paints with a thinner.
Use Games Workshop or P3 paint Make sure your using base paint, followed by layers paint followed by shades/washes and highlights with more layer paint. The layer being translucent it helpful to highlight details.
Don't listen to the people above. Being needlessly positive hurts people that are looking for better results. You suck. But that's nothing to be ashamed of, I sucked once. Now not as much. Get better.. don't shy away from adversity push to be better. So unless you're 11 years old the above comments are completely useless to you.
Automatically Appended Next Post: Likewise you can get better stars by using a star sticker from a dollar store/craft store stick them on use a rattle/spray can/ or airbrushing than pull off the sticker your stars will look clean and crisp. You can do the lines of the triangle between the stars with the same method by using painters tape cut into strips.
I'm aware of my lack of strong painting skills but that's why I'm painting 40K models, to get better. I'm also not spending a ton of money on models because all of them are rescues from eBay and Craigslist. I am thinning my paints, my problem is more learning what the consistency should be because it either ends up too runny or too thick and I'm zeroing in on it as I paint.
As for my base coat, I've said before that I have to mix two different purples to achieve the color I'm looking for and as a result I can't just get a rattle can of the color I want. They are either too pale and look lilac or too dark and look like eggplant skin. What I've been doing is applying 3-4 coats of my purple color and that gets most of it. I am aware of gaps and intend to do something about it once I finish blocking out what I have left.
I've got a kitbashed Captain that I'm taking extra care and time on and a dreadnought that I've almost finished pictured below. Since I knew I was going to have a difficult time making sure I would get even coverage on the big panels, I applied a stippling effect to not only make it easier to get coverage but add some character to it. All that I have left to paint is his underside and the backs of his legs.
Okay so far it seems to be that whatever you used for an undercoat has ruined your models finish. That's why your finish looks like sandpaper. Secondly you're paint is thin. Now apply more coats to bring it to a more evenly solid look. If that's what you're going for.
Another thing to note is that you can paint over a spray can to lighten it up. that's why layer paint exists. So you could spray dark and than paint up to lighter. it actually gives great results.
You're miniatures basically look like you either sprayed your undercoat to close or they got snowed on. That is why I suggested that after undercoating you scour your model with an old toothbrush. It will mitigate the above.
Also what paint are you using? I strongly suggest GW paints. it doesn't look like you're using inks shades washes or other stuff to bring out the detail.
Hopefully you're finding the above helpful. Which is the intention to give you the tools to get the results that you want.
Some people enjoy the texture.. I think that it looks better smooth given it's the future. You can simulate battle damage for the gritty look.
Are you having issues in other areas? Maybe you need a variety of brushes for details.
Anyways don't take the suggestion of practice painting to hard. It's great advice for anyone that does not have an endless stream of cash.
Turn to Youtube for painting help. Lots of instructions on how to get better in videos.
I'd def drop the Dreadnaught into some simple green clean it off entirely of paint. Than scour the model with a toothbrush, spray with a GW rattle can undercoat black.. Scour again with the brush, Than base-coat purple and scour again.. Another quick spray. Than layer paint to get to the color your interested in. Leaving the darker areas darker and the light areas highlighted.
Another helpful tip when working with gradient colors is to know where your light source is supposed to be if it was a photograph.
Anyways good luck. The last video seems to have the best looking results.
This message was edited 5 times. Last update was at 2019/02/11 04:25:49
Okay so far it seems to be that whatever you used for an undercoat has ruined your models finish. That's why your finish looks like sandpaper. Secondly you're paint is thin. Now apply more coats to bring it to a more evenly solid look. If that's what you're going for.
Another thing to note is that you can paint over a spray can to lighten it up. that's why layer paint exists. So you could spray dark and than paint up to lighter. it actually gives great results.
You're miniatures basically look like you either sprayed your undercoat to close or they got snowed on. That is why I suggested that after undercoating you scour your model with an old toothbrush. It will mitigate the above.
Also what paint are you using? I strongly suggest GW paints. it doesn't look like you're using inks shades washes or other stuff to bring out the detail.
Hopefully you're finding the above helpful. Which is the intention to give you the tools to get the results that you want.
Some people enjoy the texture.. I think that it looks better smooth given it's the future. You can simulate battle damage for the gritty look.
Are you having issues in other areas? Maybe you need a variety of brushes for details.
Anyways don't take the suggestion of practice painting to hard. It's great advice for anyone that does not have an endless stream of cash.
Turn to Youtube for painting help. Lots of instructions on how to get better in videos.
I'd def drop the Dreadnaught into some simple green clean it off entirely of paint. Than scour the model with a toothbrush, spray with a GW rattle can undercoat black.. Scour again with the brush, Than base-coat purple and scour again.. Another quick spray. Than layer paint to get to the color your interested in. Leaving the darker areas darker and the light areas highlighted.
Another helpful tip when working with gradient colors is to know where your light source is supposed to be if it was a photograph.
Anyways good luck.
When I got the dreadnought in the mail it had broken arms and was pink and white, I soaked it in Super clean (purple) overnight and came to discover that it had been painted over a quality ultramarine paint job. After soaking it overnight again i got it to a black primer that would not come off I am using the primer pictured and following instructions on the can. The paints pictured are what I'm using and the brushes pictured are what I have to paint with. the #4 FLAT brush is messed up and I use it to mix paint and dry-brush.
This message was edited 3 times. Last update was at 2019/02/11 05:42:15
I can honestly say that you're tools as in your paint choice is holding you back. If possible buy the paint and washes/shade they talk about In the video. It will just work better. You're welcome to continue using your own paints. But you're going to continue to get spotty results. GWs paints are formulated to go on plastic, as is P3 and Vallejo Paints.
The proper tools for the job. If you're interested in getting better you're going to find yourself stuck in a rut. You might be more interested in the hobby with outstanding miniatures. . maybe not. Maybe you're just interested in the playing the game. It's your models. Still the best advice for you is work with the right tools. You can buy all the paint featured in the wurm video to get the colors on your dreadnought in style.
Anyways good luck. The Emperor Protects.
Automatically Appended Next Post: It also sounds like you have encountered the army painter problem.. Army painter spray is harder to get off than alot of stuff. I think google search will reveal the stuff needed to get the black off. Which actually might be a problem for you later on because you could have some solvents trapped under the black undercoat or bonded with it.
Might be prudent to start over. It's terrible but it's worth it. I understand it's difficult. I've stripped models a few times. It's kinda an annoying part of the hobby.
This message was edited 1 time. Last update was at 2019/02/11 06:55:58
Sorry for the lack of posts, had to deal with some RL stuff and haven't painted minis. But now I'm back and I've got a WIP to show what i've got.
I stripped everything but the dreadnought because i'm content with the purple on the dread and don't want to repaint it. So far all I've got is everything re-primed in white and this tactical marine in a mixed purple. Based it in Naggaroth Night then went over it with a 1:1 ratio of Xereus Purple and Genestealer purple in two coats.
AngryAngel80 wrote: I don't know, when I see awesome rules, I'm like " Baby, your rules looking so fine. Maybe I gotta add you to my first strike battalion eh ? "
If you're really into that shade of purple, I'd HIGHLY suggest Army Painter Alien Purple spray/primer. If it's anything like the shade you want, it'll save you all of the time.
These models were done with the spray - and just added details, some wash, etc. It's absolutely the way to go if the colour is what you like.
Argive wrote: Looking much much better. You haven't got thick paint on. I guess you've improved the way you prime ?
No actually, I used citadel paints rather than walmart acrylics. While it did produce a smoother texture it left the model feeling like rubber.
Elbows wrote: If you're really into that shade of purple, I'd HIGHLY suggest Army Painter Alien Purple spray/primer. If it's anything like the shade you want, it'll save you all of the time.
These models were done with the spray - and just added details, some wash, etc. It's absolutely the way to go if the colour is what you like.
Spoiler:
Thanks for the tip, this will definitely save me some painting.
I've finished the model and while I was cleaning off his face i pushed on the knife a little too hard and ended up digging into his face which left a nice gouge, I cleaned it up as best as I could and decided to give him a nice deep facial scar and since I don't have any flesh toned paints I gave him black skin and red eyes and decided that the Imperial Stars are a successor of the Salamanders in my own head canon.
Models looking much nicer with the switch in paints!
I can tell your freehand is coming along too, its getting neater.
One suggestion for the stars, try painting them in black first and then painting the white inside, leaving the hint of an outline, would definitely help contrast and make them stand out more.
I know these are your first models, so the only thing I would add, is to maybe limit your palette a bit. The red on the gun looks out of place, maybe go with a really light grey or white there? or even metallic grey!
Great job all told and keep supplying more pics! Always awesome to see someone starting anew!
Current Project: Random quaratine models!
Most Recently Completed: Stormcast Nightvault Warband
On the Desk: Looking into 3D Printing!
Instagram Updates: @joyous_oblivion


 [1,600] Chaos Knights |
  [1,000] Grey Knights |
  [1,100] Thousand Sons | 40K editions: RT, 8, 9, 10 |


 Eldar- 4436 pts