| Author |
Message |
 |
|
|
|
|
Advert
|
Forum adverts like this one are shown to any user who is not logged in. Join us by filling out a tiny 3 field form and you will get your own, free, dakka user account which gives a good range of benefits to you:
- No adverts like this in the forums anymore.
- Times and dates in your local timezone.
- Full tracking of what you have read so you can skip to your first unread post, easily see what has changed since you last logged in, and easily see what is new at a glance.
- Email notifications for threads you want to watch closely.
- Being a part of the oldest wargaming community on the net.
If you are already a member then feel free to login now. |
|
 |
2019/10/09 13:34:26
Subject: Want to learn how to use an airbrush
|
|

Fresh-Faced New User
Barnsley, South Yorkshire
|
I posted in my introduction post why I was here but thought that was probably the wrong place to begin a full blown conversation on airbrushing.
I've been painting with a brush for probably close on 20 years but the time has come where I'm wanting to do things on my models that simple can't be done with a brush.
I always use google images when I start with a new army for inspiration and I always get some magnificent looking models which I just can't replicate, mainly Eldar, some of the work done on Eldar models is sublime!
Well now I've decided I want to learn how to airbrush so I can take my models to that next level (as well as learning how to make spectacular looking bases but that's a topic for another day)
Talizvar was kind enough to give me some advice in my original intro post but I want to open it up to the wider community for tips and advice.
Initially I will be using it for priming and base coating until I get used to it, advantage there is I can prime and base indoors rather than relying on the good old English weather to break right for me.
I've found some rather awesome colour change paints on green stuff world and think they would be ideal for a unique Eldar scheme but there's questions.
Pre shading - I interpret this as painting a dark colour into recesses before applying the base colour. I would probably use a dark blue to pre shade say an Eldar tank before applying the colour I found but if I spray blue in to the recesses and then use an airbrush to spray my base colour, won;t the base colour then go into the recesses rendering my previous step pointless?
That is just one of many questions
|
|
|
 |
|
2019/10/09 13:49:11
Subject: Want to learn how to use an airbrush
|
|

Adolescent Youth with Potential
|
One thing you should keep in mind about airbrushing is that you can lay down pretty thin layers that will allow that undercoat to show through still. So with preshading you would lay down your shadows and highlights and then lay down a thin layer of your base color, essentially tinting the preshade. however, I'm not sure how this would interact with the Green stuff world chameleon paints as I have no experience with those.
|
|
This message was edited 1 time. Last update was at 2019/10/09 13:50:46
|
|
|
|
|
2019/10/09 13:55:27
Subject: Want to learn how to use an airbrush
|
|
Fresh-Faced New User
Barnsley, South Yorkshire
|
I'm wondering if with those paints I might be better laying down a base colour and then using say a blue ink to shade the recesses after, ink is thin enough that I should be able to control it and keep it to the recesses and if I do make a mistake and hit my base coat I have time to wipe it off with a damp brush
|
|
|
|
|
2019/10/09 13:59:56
Subject: Want to learn how to use an airbrush
|
|
Tail-spinning Tomb Blade Pilot
|
 Dr.Scheme wrote: Dr.Scheme wrote:One thing you should keep in mind about airbrushing is that you can lay down pretty thin layers that will allow that undercoat to show through still. So with preshading you would lay down your shadows and highlights and then lay down a thin layer of your base color, essentially tinting the preshade. however, I'm not sure how this would interact with the Green stuff world chameleon paints as I have no experience with those.
Yeah, exactly this.
For an actual example of this, check out this video (hopefully it cues up to the time I want, but the whole thing addresses this point, but especially demonstrative of it at about 18 minutes in) where you will see that his undershade is pretty clearly visible after he goes with his "final" red.
I think one thing that might be "confusing" here is this concept/term "basecoat." See, in the video, Vince is not using a "basecoat" really, since it would, largely, be pointless. Rather, he primes, then gets in a highlight, then a shade, then comes in with his "final" color. It's a totally different conceptual space to the idea of basecoat/highlight/shade process.
|
|
This message was edited 2 times. Last update was at 2019/10/09 14:00:29
"Wir sehen hiermit wieder die Sprache als das Dasein des Geistes." - The Phenomenology of Spirit |
|
|
|
|
2019/10/09 14:06:20
Subject: Re:Want to learn how to use an airbrush
|
|
Fresh-Faced New User
Barnsley, South Yorkshire
|
I'm wanting to try and replicate something along these lines. I want a short of black and purple look to my Eldar......it's very hard to explain
The flyer doesn't seem to need any recess shading however I think the colour looks too solid on the tank so those recess areas need darkening somehow.
|
|
This message was edited 1 time. Last update was at 2019/10/09 14:06:59
|
|
|
|
|
2019/10/09 14:12:39
Subject: Want to learn how to use an airbrush
|
|
Adolescent Youth with Potential
|
The flyer on the bottom seems to be using two different color changing paints and still uses recess shading on the purple parts. If you don't want to go that route then I think airbrushing in an ink would help achieve the effect you're looking for.
|
|
|
|
|
|
2019/10/09 14:20:59
Subject: Want to learn how to use an airbrush
|
|
Tail-spinning Tomb Blade Pilot
|
Dr.Scheme wrote:The flyer on the bottom seems to be using two different color changing paints and still uses recess shading on the purple parts. If you don't want to go that route then I think airbrushing in an ink would help achieve the effect you're looking for.
Hmm, I'm not sure, but to my strictly amateur eye, it looks like one could likely achieve that bottom look by a black primer, then applying the "purple metallic" over it in a very precise, careful manner, avoiding the deepest recesses and/or applying extremely minimally into/around them. Possibly there might have been an addition of a "lighter" colored metallic to achieve the max highlight in the highest/brightest points. But I am certainly not sure that is what they did there, or if that is just the "gloss" of the metallic in-itself.
|
"Wir sehen hiermit wieder die Sprache als das Dasein des Geistes." - The Phenomenology of Spirit |
|
|
|
|
2019/10/09 14:33:21
Subject: Want to learn how to use an airbrush
|
|
Fresh-Faced New User
Barnsley, South Yorkshire
|
Well myself was thinking just a flat black base then using the purple metallic to fade as it gets further down the body of the flyer. So the purple would be more prominent at the front and round the edge of the wings then faded as you move further into the bod of it, would I be right in assuming to get a lighter coat like that with an airbrush would be done by spraying from further away?
|
|
|
|
|
2019/10/09 14:36:58
Subject: Want to learn how to use an airbrush
|
|
Adolescent Youth with Potential
|
You wouldn't achieve that by spraying further away, an airbrush has an optimal range so to speak where you have to spray from. in order to fade out the color, you would just do less passes of the airbrush. Because the paint is so thin out of the airbrush you would need multiple coats to get a solid coat, so to fade it out you would just need less coats.
|
|
|
|
|
|
2019/10/09 14:40:00
Subject: Want to learn how to use an airbrush
|
|
Tail-spinning Tomb Blade Pilot
|
KhaosOP wrote:Well myself was thinking just a flat black base then using the purple metallic to fade as it gets further down the body of the flyer. So the purple would be more prominent at the front and round the edge of the wings then faded as you move further into the bod of it, would I be right in assuming to get a lighter coat like that with an airbrush would be done by spraying from further away?
If you have a dual-action airbrush (and most that we miniature painters have are), you don't really need to increase your distance, per se, rather, you can control the mix of air to paint with your trigger. So, in that case, more air and less paint will equal less coverage. I am definitely not an airbrush expert though, so some element of distance might come in to play, but I think it really is more the fine control of the air and paint mixture that the airbrush gives you. It isn't like a rattle can where you have no real control over the propellent/paint mix, that is one reason why a dual-action airbrush can do some of the pretty neat things it can do that a rattle can(s) can't really do.
|
"Wir sehen hiermit wieder die Sprache als das Dasein des Geistes." - The Phenomenology of Spirit |
|
|
|
|
2019/10/09 14:40:21
Subject: Re:Want to learn how to use an airbrush
|
|

Ancient Venerable Black Templar Dreadnought
|
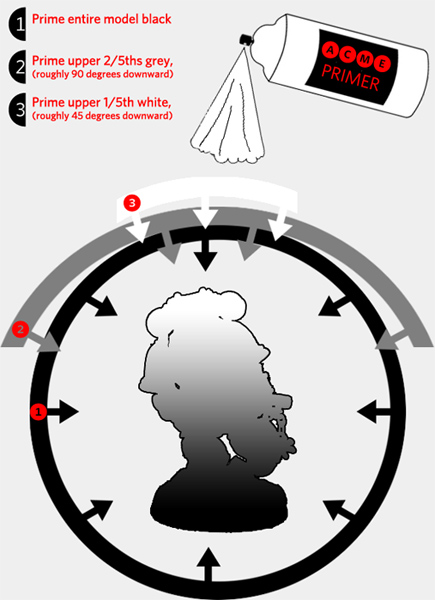
The cool thing with airbrush is that if your panel lines are black you can mist-on a coat of a different colour and the black shows-through.
As pointed out, this is a method of priming that can also be applied to any surface to get a really nice transition, just use 3 shades of the same colour, OR use this method and apply a wash, shade or high contrast paints (I use them for rough surfaces, smooth are not quite as good):
https://www.powerfisted.com/?p=199
|
A revolution is an idea which has found its bayonets.
Napoleon Bonaparte |
|
|
|
|
2019/10/09 14:49:25
Subject: Want to learn how to use an airbrush
|
|
Fresh-Faced New User
Barnsley, South Yorkshire
|
Thanks guys for helping, you must get fed up of repeating yourselves with newbies but I do appreciate it.
I've even started looking at stencils for added effect, think I'm definitely down for trying out this airbrushing stuff. I can always just paint on waste materials until I get the look I'm after.
I've found plastic spoons and plasticard rather handy for practicing paint schemes without wasting models. I reckon with some practice I could get my Eldar army looking rather good.
I just need to learn the art of masking because I'm going to want to air brush different colours in to different areas. E.g. the purple metallic for my wraithknight but a different metallic or even a stencil over the visor part of the helmet.....you guys get the idea I'm sure.
Those metallic paints also recommend applying over a gloss primer so then I need to work out if my normal GW paints will still look right painted over a gloss primer or if I'll need to re-prime areas I don't want painted in the metallic.
So much to figure out lol
|
|
|
|
|
2019/10/09 15:00:06
Subject: Want to learn how to use an airbrush
|
|
Tail-spinning Tomb Blade Pilot
|
KhaosOP wrote:Thanks guys for helping, you must get fed up of repeating yourselves with newbies but I do appreciate it.
I'm a noob as well, since I don't ever actually get to do anything, so explaining it to any one else, is explaining it to myself. So, I'm always learning myself.
KhaosOP wrote:Those metallic paints also recommend applying over a gloss primer so then I need to work out if my normal GW paints will still look right painted over a gloss primer or if I'll need to re-prime areas I don't want painted in the metallic.
So much to figure out lol
You can just mask back off the areas you did with metallics and hit the gloss primer with a matte varnish before you apply the non-metallic paint. There is an old idea (that I have too) that varnish is only a "final" step, but that is not really true. You can get a nice, thin, matte varnish through your airbrush to kill the gloss on the primer fairly easily. It might or might not be necessary, but it is simple to do and there is no harm at all to varnishing "in the middle" of the paint process.
|
"Wir sehen hiermit wieder die Sprache als das Dasein des Geistes." - The Phenomenology of Spirit |
|
|
|
|
2019/10/09 15:04:23
Subject: Want to learn how to use an airbrush
|
|
Fresh-Faced New User
Barnsley, South Yorkshire
|
You can just mask back off the areas you did with metallics and hit the gloss primer with a matte varnish before you apply the non-metallic paint. There is an old idea (that I have too) that varnish is only a "final" step, but that is not really true. You can get a nice, thin, matte varnish through your airbrush to kill the gloss on the primer fairly easily. It might or might not be necessary, but it is simple to do and there is no harm at all to varnishing "in the middle" of the paint process.
So rather than using a matte primer over the area I can just use a matte varnish, I guess that would reduce the risk of losing details from too much paint
|
|
|
|
|
2019/10/09 15:13:58
Subject: Want to learn how to use an airbrush
|
|
Tail-spinning Tomb Blade Pilot
|
KhaosOP wrote:So rather than using a matte primer over the area I can just use a matte varnish, I guess that would reduce the risk of losing details from too much paint
Right, you can likely even thin the varnish down a good bit too and go for a very light coat, since it is not a "finish" coat. Way less likely to obscure detail or anything. Plus, there is no need for additional primer really, all you want to do is dull the gloss. Then go right in with your "base" color.
|
"Wir sehen hiermit wieder die Sprache als das Dasein des Geistes." - The Phenomenology of Spirit |
|
|
|
|
2019/10/09 17:25:07
Subject: Want to learn how to use an airbrush
|
|
Fresh-Faced New User
Barnsley, South Yorkshire
|
You guys are legends, thank you
|
|
This message was edited 1 time. Last update was at 2019/10/09 17:25:34
|
|
|
|
|
2019/10/09 17:53:35
Subject: Want to learn how to use an airbrush
|
|
Thane of Dol Guldur
|
I'd take it easy before you go into stencils and masking and colour change stuff.
As you said, get used to your chosen airbrush by starting small. Basecoats are fine but can actually be time consuming using an airbrush.
Preshading is a good technique to practice with as you don't need to be super accurate as you're just applying a basic shadow to areas of your model.
Try a few colour transitions on a larger panel, and also try basic techniques like just pulling straight lines and rat tails, because I can almost guarantee that you're going to make mistakes like firing with the pressure too high, firing too close to the model, overthinning, under thinning etc, and airbrush mistakes can be a pain in the ass to correct. Automatically Appended Next Post: Also, for that purple metallic flyer, you want to have a transitional basecoat (eg one that fades from white or light grey to black at the back) rather than just a flat black, before you lay your purple metallic. This will give a much more pronounced effect, and will actually make it easier to acheive the transition. Automatically Appended Next Post: KhaosOP wrote:I'm wanting to try and replicate something along these lines. I want a short of black and purple look to my Eldar......it's very hard to explain
The flyer doesn't seem to need any recess shading however I think the colour looks too solid on the tank so those recess areas need darkening somehow.
Normally for a vehicle with a solid colour like your grav tank, you'd need to shade the panel lines with your airbrush, before applying your base colour. This gives subtle depth to the paint job. You could also do this for the transitional paint job at the bottom, but that might possibly affect the visuals of the transition, so I'd recommend getting a fine brush and doing your panel lines by hand, or possibly using an oil wash.
|
|
This message was edited 2 times. Last update was at 2019/10/09 18:01:20
  Heresy World Eaters/Emperors Children Heresy World Eaters/Emperors Children 
Instagram: nagrakali_love_songs |
|
|
|
|
2019/10/10 07:01:33
Subject: Re:Want to learn how to use an airbrush
|
|
Fresh-Faced New User
Barnsley, South Yorkshire
|
Would this be a good option to start learning with?
|
|
|
|
|
2019/10/10 07:43:32
Subject: Re:Want to learn how to use an airbrush
|
|
Mekboy on Kustom Deth Kopta
|
I've not been airbrushing long and this is the exact model that I purchased. It works a charm for my limited needs but I haven't used it a ton yet. I've largely been painting small infantry models and detailed characters lately so my use of the brush has been limited.
The key for getting skilled with the airbrush seems to be twofold and the same as any other skill, really - practice and research.
Watch videos on Youtube - there are plenty of tutorials and hints/tricks/tips on airbrushing. The consistency of the paints is quite important so look for videos around that specifically.
As to practicing, have a crack at models that you're less invested in before you commit to painting one of your new flyers or vehicles. For me this was terrain - practice on terrain or something else until you feel comfortable with the brush. It's a great tool but it isn't for every situation and as with anything it requires skill to use properly.
|
|
|
|
|
2019/10/10 08:36:15
Subject: Want to learn how to use an airbrush
|
|
Thane of Dol Guldur
|
That's what I have. Cheap, not particularly amazing, but will do the job and is good to start out with. Sort of like your first car.
Ive had mine for about 6 years and it's fine for panel lining, doing weathering, laying basecoat etc. It's only recently I've considered upgrading to a decent brand.
|
Heresy World Eaters/Emperors Children
Instagram: nagrakali_love_songs |
|
|
|
|
2019/10/10 09:01:15
Subject: Re:Want to learn how to use an airbrush
|
|
Fresh-Faced New User
Barnsley, South Yorkshire
|
An Actual Englishman wrote:
I've not been airbrushing long and this is the exact model that I purchased. It works a charm for my limited needs but I haven't used it a ton yet. I've largely been painting small infantry models and detailed characters lately so my use of the brush has been limited.
The key for getting skilled with the airbrush seems to be twofold and the same as any other skill, really - practice and research.
Watch videos on Youtube - there are plenty of tutorials and hints/tricks/tips on airbrushing. The consistency of the paints is quite important so look for videos around that specifically.
As to practicing, have a crack at models that you're less invested in before you commit to painting one of your new flyers or vehicles. For me this was terrain - practice on terrain or something else until you feel comfortable with the brush. It's a great tool but it isn't for every situation and as with anything it requires skill to use properly.
I've been looking at paints which are apparently ok to go straight in to an airbrush ( GW air and Vallejo air) that way I don't have to stress too much about the consistency of paint....that's something I can learn with some thinner from Vallejo later down the line, I'll practice on cardboard and paper until I get the results I should get.
queen_annes_revenge wrote:That's what I have. Cheap, not particularly amazing, but will do the job and is good to start out with. Sort of like your first car.
I've had mine for about 6 years and it's fine for panel lining, doing weathering, laying base coat etc. It's only recently I've considered upgrading to a decent brand.
Mainly all I'll be using this for, wanted to start out with priming and base coats to get larger blocks of colour down faster and smoother than with a brush then I can practice getting my hand steady enough for detail work and stencil work etc.
|
|
This message was edited 1 time. Last update was at 2019/10/10 09:26:31
|
|
|
|
|
2019/10/10 09:40:52
Subject: Want to learn how to use an airbrush
|
|
Rampaging Khorne Dreadnought
|
Re the Voidraven picture, it looks to me like that's just a purple-green flip paint...
|
|
|
|
|
2019/10/10 09:55:43
Subject: Want to learn how to use an airbrush
|
|
Fresh-Faced New User
Barnsley, South Yorkshire
|
Crispy78 wrote:Re the Voidraven picture, it looks to me like that's just a purple-green flip paint...
Yeah that's the kind of paints I'm looking at.
Green Stuff World have their own range of colour changing paints specially designed for miniature painting 
|
|
|
|
|
2019/10/10 09:59:20
Subject: Want to learn how to use an airbrush
|
|
Rampaging Khorne Dreadnought
|
KhaosOP wrote:Crispy78 wrote:Re the Voidraven picture, it looks to me like that's just a purple-green flip paint...
Yeah that's the kind of paints I'm looking at.
Green Stuff World have their own range of colour changing paints specially designed for miniature painting
Yep, I'm using Psychotic Illusions (with a hex mesh stencil) on my Dark Eldar aethersails... 
|
|
|
|
|
2019/10/10 10:19:25
Subject: Want to learn how to use an airbrush
|
|
Fresh-Faced New User
Barnsley, South Yorkshire
|
Crispy78 wrote:KhaosOP wrote:Crispy78 wrote:Re the Voidraven picture, it looks to me like that's just a purple-green flip paint...
Yeah that's the kind of paints I'm looking at.
Green Stuff World have their own range of colour changing paints specially designed for miniature painting
Yep, I'm using Psychotic Illusions (with a hex mesh stencil) on my Dark Eldar aethersails...
That's exactly the kind of thing that's made me want to learn how to airbrush
|
|
|
|
|
|
|