| Author |
Message |
 |
|
|
|
|
Advert
|
Forum adverts like this one are shown to any user who is not logged in. Join us by filling out a tiny 3 field form and you will get your own, free, dakka user account which gives a good range of benefits to you:
- No adverts like this in the forums anymore.
- Times and dates in your local timezone.
- Full tracking of what you have read so you can skip to your first unread post, easily see what has changed since you last logged in, and easily see what is new at a glance.
- Email notifications for threads you want to watch closely.
- Being a part of the oldest wargaming community on the net.
If you are already a member then feel free to login now. |
|
 |
2020/01/03 07:23:14
Subject: My first ever miniature
|
|

Regular Dakkanaut
|
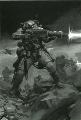
This is my very first miniature which I ever had assembled or painted. It is from Retribution of Scyath starter pack, warcaster.
There are few things which I'm thinking of redoing, though it is for all intents and purposes 99% complete. I need to finally get his face right. Model with which I work is quite of low quality. Mine in particular has blurry details and face comes with scars. So, this is why you are seeing his face being scared. I wanted to add eyes and various effects, but damn, model is already damn small as it is. I had to redo face entirely once, because I put too many layers. With such small model it is difficult to work with, because if you add several more layers, model's details gets buried under the paint. Yet, I need to try and smooth his face little bit more or maybe somehow to work with that I have and to try and make it to look like actual scars. Then I want to improve snow effect. I went for showing that there is just little bit of snow on a ground. I'm not quite satisfied at how snow particles stuck on grass, I could do it more evenly by removing snow and redoing it again. Then I need to remove paint from base, because I left little bit of mess there if you had noticed. There are also few other very minor places where I think paint was scratched from a surface and I need to re-apply another layer.
I had only GW w40k essential paintset to work with. Later I bought few more key colours to work with face for example. I tried to use every color I had just to experiment with them. Though, it also had meant that I had just very basic colors and ways I could paint. Most of what you are seeing are just bases being painted over bases.
I'm also disappointed with a quality of the set which is known problem. Details lack resolution, other models are pain in the ass to glue due to their either round joints or ridiculously narrow and uneven contact surfaces.


Overall, I'm quite happy at how this turned out to be. Though, for some reason my machine spirit in my phone really did not wanted to focus on this miniature! Like, whenever I would get close, it will start struggling to process the glory it was witnessing and image would get all blurry. It took a lot of coercion and tricks to get any decent pictures in a first place!
|
"If the path to salvation leads through the halls of purgatory, then so be it."
Death Guard = 728 (PL 41) and Space Marines = 831 (PL 50)
Slaanesh demons = 460
Khorne demons = 420
Nighthaunts = 840 points Stormcast Eternals = 880 points. |
|
|
 |
|
2020/01/05 20:10:52
Subject: My first ever miniature
|
|

Regular Dakkanaut
|
Great start!
Base looks brilliant and the painting on the model is very neat and tidy.
My only recommendation would be to add shade (a wash) to pick out the details and make it more realistic. Literally a 30-second job!
|
 For the Emperor and Sanguinius! For the Emperor and Sanguinius! 
40K Blood Angels ; 1,500pts / Kill Team: Valhallan Veteran Guardsmen / Aeronautica Imperialis Adeptus Astartes; 176pts / AoS Soulblight Gravelords; 1,120pts |
|
|
|
|
2020/01/06 04:21:56
Subject: My first ever miniature
|
|
Walking Dead Wraithlord
|
Hey there fella!
Welcome to the grind.
Not bad at all for a first effort.
As mentioned I'd look into shading/washing and watch some tutorials covering the basics. Also maybe a look at a wet palette as some of the paint kind of looks a bit thick. Could just be the photos.
You have really nailed the base! I really like it.
A lot of people don't look at the base as part of the miniature and its an afterthought. To me its something really important one thing that really brings the piece together, so well done for sticking to the detail and putting so much effort into that.
Looking forward to seeing you improve 
|
|
|
|
|
|
2020/01/06 08:08:24
Subject: My first ever miniature
|
|

Regular Dakkanaut
|
Thank you. Other people also liked my base in particular. Funnily enough, it was easiest thing to do. Cape was a real pain to do, because paint will easily spill out into white lines, but face was the part where I spent most time painting. Something would always go wrong and I would have to spend just little bit more time in improving it. If you would look at first and third photo you would see that there is seemingly little blue paint on his face. I had to go back, apply miniscule amount of paint in that spot and take photo again. So in third photo you see this model without this defect. I had to scrub face off completely at one point, because it had too much paint and it looked deformed, like an Orc from Lord of the Rings. I also was limited to GW, Citadel paints. Ones from essential kit, so my colours were pretty limited. I purchased few more later on which I deemed would fit best with what I had used already. I had prefered to use paint as thick as possible, because I had trouble and fears of it going over lines where I would not want to. I tried to make my model clean first of all. I did some shading on my cape and weapon. Weapon has very limited shading and cape is shaded, but you need to inspect model personally to see it. Also, starter kits have quite poor quality miniatures to begin with. Details weren't sharp and model leaves much to be desired. I had glued yesterday GW demon and base model looks a lot more promising than one from this starter kit.
I need to come back to this model to remove brown paint on my base, but outside of that I consider my model finished. This was my experiment to see how well I could assemble and paint a model without any guides and aid. I spent quite a bit of time painting and repainting model as I would mess up. This little model had built my confidence up, had given me practical experience and I feel it had improved my ability to paint those small details. I struggled at first to properly paint without slightly going over lines. Now I will start reading guides and look basic techniques of what others are doing in order to paint my further miniatures.
|
|
This message was edited 4 times. Last update was at 2020/01/06 08:17:10
"If the path to salvation leads through the halls of purgatory, then so be it."
Death Guard = 728 (PL 41) and Space Marines = 831 (PL 50)
Slaanesh demons = 460
Khorne demons = 420
Nighthaunts = 840 points Stormcast Eternals = 880 points. |
|
|
|
|
2020/01/06 22:35:01
Subject: My first ever miniature
|
|
Walking Dead Wraithlord
|
I would suggest you keep the model as it is. And move onto the next one.
If you intend to continue with the hobby, there will be many many more models to paint and you will see your progression by comparing your latest models to your first model. I wish I had my first ever painted model.
|
|
|
|
|
|
2020/01/08 11:39:46
Subject: Re:My first ever miniature
|
|
Regular Dakkanaut
|
Nice first mini. I have a couple suggestions that probably would help you out.
- Thin your paints. By looking at the miniature it seems that you took the paint directly out of the pot. Thinning the paint makes your life unbeliably easier. You can apply thinner, more precise and better coats or lines. It allows for fixing mistakes quickly, prevents details to get buried under paint, allows you to get different effects in terms of opacity... etc. You can do that just by using a plastic surface and a super tiny amount of water. Most of the time, sinking you brush in water, tap it a couple of times and leaving half a drop on your mix is enought. Too much water will prevent you from getting enought pigments, and the liquid will go all over the place on your mini, but you can fix that by absorbing the water with some WC paper.
My preffer method, and cheap, is make a home made wet pallet. There are tutorials on youtube and you can get one done in 5 minutes.
- You got a first basecoat, but from now on you need to dive into detail. Once you get all the base colors in place, you could apply a wash first, avoiding pooling, and then look into at least 1 level of highlights. This would not only make all the detail and volumes pop up, it will alow you to be a bit more creative with the miniature, adding brighter highlights arround the top and important areas, suchs as the face or weapon. For highlights I do recomend the thinning of the paint, otherwhise you end up with a massive opaque ugly line on the edges of your mini. You can also create blendings, specially to darks, by using a 50/50 water/paint mix.
- Mix your paints. You dont really need 30 paints to be able to get a good pallete. If you have the base colors for your mini and black and white you can get really far with mixing. Specific paints help to get easier acces to your most used colors, and alows you to reach bright and saturated colors. Other than that, you can create the color you need with a bit of practice.
- Most importantly, have fun! There is a learning curve, and you will improve with practice. Once you get the very basics, I find myself improving a lot by pushing myself to try different things every time. I do recomend watching beginner youtube tutorials, but there are certain aspects, such as paint thinning, precision, pacience and artistic taste that you have to develop by working it. You'll be amazed with the resutls the time you paint your 5th mini if you keep learning between each one. If you tackle all in a row with the same approach you might find yourself stuck. Try to learn from each mini and research how to approach your problems for the next ones.
|
Serve the Emperor today, for tomorrow you may be be dead.
Painting blog:
https://www.dakkadakka.com/dakkaforum/posts/list/793314.page
 |
|
|
|
|
2020/01/08 14:02:11
Subject: Re:My first ever miniature
|
|

Regular Dakkanaut
|
Killatores wrote:Nice first mini. I have a couple suggestions that probably would help you out.
- Thin your paints. By looking at the miniature it seems that you took the paint directly out of the pot. Thinning the paint makes your life unbeliably easier. You can apply thinner, more precise and better coats or lines. It allows for fixing mistakes quickly, prevents details to get buried under paint, allows you to get different effects in terms of opacity... etc. You can do that just by using a plastic surface and a super tiny amount of water. Most of the time, sinking you brush in water, tap it a couple of times and leaving half a drop on your mix is enought. Too much water will prevent you from getting enought pigments, and the liquid will go all over the place on your mini, but you can fix that by absorbing the water with some WC paper.
My preffer method, and cheap, is make a home made wet pallet. There are tutorials on youtube and you can get one done in 5 minutes.
- You got a first basecoat, but from now on you need to dive into detail. Once you get all the base colors in place, you could apply a wash first, avoiding pooling, and then look into at least 1 level of highlights. This would not only make all the detail and volumes pop up, it will alow you to be a bit more creative with the miniature, adding brighter highlights arround the top and important areas, suchs as the face or weapon. For highlights I do recomend the thinning of the paint, otherwhise you end up with a massive opaque ugly line on the edges of your mini. You can also create blendings, specially to darks, by using a 50/50 water/paint mix.
- Mix your paints. You dont really need 30 paints to be able to get a good pallete. If you have the base colors for your mini and black and white you can get really far with mixing. Specific paints help to get easier acces to your most used colors, and alows you to reach bright and saturated colors. Other than that, you can create the color you need with a bit of practice.
- Most importantly, have fun! There is a learning curve, and you will improve with practice. Once you get the very basics, I find myself improving a lot by pushing myself to try different things every time. I do recomend watching beginner youtube tutorials, but there are certain aspects, such as paint thinning, precision, pacience and artistic taste that you have to develop by working it. You'll be amazed with the resutls the time you paint your 5th mini if you keep learning between each one. If you tackle all in a row with the same approach you might find yourself stuck. Try to learn from each mini and research how to approach your problems for the next ones.
Thank you for recommendations. This my first mini was done on purpose without any help or information at all. I wanted to see how good my base, untrained skills are with no input from outside whatsoever. I'm planning to follow some tutorial every time I paint a mini. One might be about shading, another about contrast paint, another might be about technical paints, etc.
Yes, I had applied thick paints on purpose, but only because I sucked at first with controlling my brush. I wanted to make my miniature clean, without paint spilling where it didn't belonged to. I tried putting water, but it made paint harder to control, so I did not gave it too much thought and just simply did with small amounts of raw paint. This had helped me alot to get paint exactly where I wanted. In my next painting project, I will definitely put miniscule amounts of water into my GW Citadel paint (you know, that place in a bottle where you can place your paint) and will dry my brush afterwards as to better control where the paint goes.
|
"If the path to salvation leads through the halls of purgatory, then so be it."
Death Guard = 728 (PL 41) and Space Marines = 831 (PL 50)
Slaanesh demons = 460
Khorne demons = 420
Nighthaunts = 840 points Stormcast Eternals = 880 points. |
|
|
|
|
2020/01/08 16:22:46
Subject: Re:My first ever miniature
|
|
Regular Dakkanaut
|
 Ernestas wrote: Ernestas wrote:Killatores wrote: Yes, I had applied thick paints on purpose, but only because I sucked at first with controlling my brush. I wanted to make my miniature clean, without paint spilling where it didn't belonged to. I tried putting water, but it made paint harder to control, so I did not gave it too much thought and just simply did with small amounts of raw paint. This had helped me alot to get paint exactly where I wanted. In my next painting project, I will definitely put miniscule amounts of water into my GW Citadel paint (you know, that place in a bottle where you can place your paint) and will dry my brush afterwards as to better control where the paint goes.
Good start I do understand what you say, but in my experience adding a small amout of water helps massively with presiscion and paint control. You don't have to sink the paint into water, otherwhise it goes absolutely crazy, just put a super small amout to change the consistency enought so it would flow out of your brush just by slithly touching the surface of the mini. If you dont thin your paints, the paint will be more sticky and in some cases and brands, behave like glue or have bloobs Sometimes you even need to push your brush into the miniature to get it to leave thr brush, causing big thick irregular lines like the white ones you can see in the mini. Having the pacience and temper to put your brush what you need is userless if the paint does not what it should do. This is something you learn by experience and feeling it out. Check tutorials about it and do some tests on a random plastic surface, you'll notice the difference inmidiately. Raw paint is hardly ever in a decent enought condition to use it straight out of the pot. It will also stick much more to your brush, you will dry your paints faster, and switching from one paint to another is much more time consuming. Do not add the water on the GW bottles. Not even on that little are that you mentioned. There is a good chance that you might ruin the paints by over flowing it. I advice to take a medium brush, take a drop of paint and place it in a plastic surface that works as a pallette. Close the paint bottle. Pick the same brush, slightly touch some water and leave a drop half the size of the paint you have in the pallete next to the paint. Clean and dry the brush, and slowly try mixing paint and water for different results, and test them in other parts of the pallete, or another surface (not paper, it will behave differntly than the surface of a miniature). In minutes you should be able to find easely the right consistency, and not fall into using too much water or no water at all. This sounds tedious and time consuming, but I asure you it becomes second nature, it will save you tons of time and will alow you to improve much faster. I hope that helps. Thinning pains has been a game changer for me, and I was really ecceptical about it before I tried it and I got the hang of it.
|
|
This message was edited 1 time. Last update was at 2020/01/08 16:23:01
Serve the Emperor today, for tomorrow you may be be dead.
Painting blog:
https://www.dakkadakka.com/dakkaforum/posts/list/793314.page
|
|
|
|
|
2020/01/08 17:06:29
Subject: My first ever miniature
|
|

Junior Officer with Laspistol
|
When starting out, just dipping your brush quickly into water before you touch the paint in the pot can help. Dip in water, dip in paint, swirl it a bit at the top of the pot rim to get a milky consistency, and you're laughing.
I like your Hellena model. The base looks great.
I would suggest picking up a few washes. Reikland Flesh Shade mixed with a touch of your base flesh colour tends to turn out great. I personally like starting with a white primer, apply a "lighter" shade of colour, and then washing over it to help with details. WMH models, particularly Retribution, have a lot of natural materials that look quite... natural... with the slight imperfections that washing does. Even their armour tends to have the recesses that washes can smooth into, and then a quick drybrush / tidy up around the recesses will smooth out the colours.
When starting, I think it helps to keep in mind that the *purpose* of painting the miniature, and then shading and highlighting, is to create an artificial degree of contrast. Emphasizing the darkness of shadows, and increasing the highlights on the brightest spots. If you start with a "medium" darkness as your base, then add a wash for shadow, you can then use a few techniques to brighten the tops, like drybrushing or edge highlighting.
With your darker blue / purple (?) cloth, I'd suggest that it's hard to see the details because it all looks like shadow. If you start with a lighter version of that colour, then apply a wash, you wind up with that artificial contrast I was referring to, where the tops will appear brighter, and the mid / recesses will be darker. If you look at the front shin-guard, you can see how the light naturally creates bright / shadow? by adding a wash, you're artificially creating a greater sense of light / dark, which tricks the eye into giving more depth to the model than it actually has.
One other thing! Take your photos from about 18" away from the subject, as a rough guideline. If you're using a camera phone, the picture will still appear huge on the screen.
Some of the Ret Models are fiddly, but I love them.
|
|
This message was edited 2 times. Last update was at 2020/01/08 17:15:32
|
|
|
|
|
2020/01/09 08:18:31
Subject: My first ever miniature
|
|
Regular Dakkanaut
|
Hmm, but I'm not putting water directly into bottle of paint. GW Citadel paints have that thing near their cap where you can place your paints. I prefer using that instead of normal palette which I use mostly for storing water and cleaning my brushes. I use very small amounts of water to dilute the paint those things and I'm not sure if it could ruin the entire bottle.
For my next project, I'm thinking maybe Plague Champion from Dark Imperium starter set. I have idea of painting his puss and worms falling out of him and he leaving a trail of spoiled liquids and maggots! I just need to figure out if there are any bits which I could use as small little maggots. If I'm ambitious, I want to show how ground dies before his feet. You would have green grass around the base, but the closer you get to the model, more lifeless ground becomes. I might even use bigger base for this effect. Well, I can get quite ambitious, maybe I will do something simpler with Age of Sigmar model first. I have currently plenty of demons to paint.
Edit: I already found perfect maggots for this project. I will be ordering them today!
|
|
This message was edited 3 times. Last update was at 2020/01/09 08:48:11
"If the path to salvation leads through the halls of purgatory, then so be it."
Death Guard = 728 (PL 41) and Space Marines = 831 (PL 50)
Slaanesh demons = 460
Khorne demons = 420
Nighthaunts = 840 points Stormcast Eternals = 880 points. |
|
|
|
|
|
|
|
 Eldar- 4436 pts