| Author |
Message |
 |
|
|
|
|
Advert
|
Forum adverts like this one are shown to any user who is not logged in. Join us by filling out a tiny 3 field form and you will get your own, free, dakka user account which gives a good range of benefits to you:
- No adverts like this in the forums anymore.
- Times and dates in your local timezone.
- Full tracking of what you have read so you can skip to your first unread post, easily see what has changed since you last logged in, and easily see what is new at a glance.
- Email notifications for threads you want to watch closely.
- Being a part of the oldest wargaming community on the net.
If you are already a member then feel free to login now. |
|
 |
2022/09/25 10:23:32
Subject: 10-15mm Spess Mehreens
|
|

Grizzled Space Wolves Great Wolf
|
 Albertorius wrote: Albertorius wrote:AllSeeingSkink wrote: Albertorius wrote:I absoloutely think it's not worth it to add shoulder emblems. Vehicles, yes, but shoulder pads is a lot more work than it's worth.
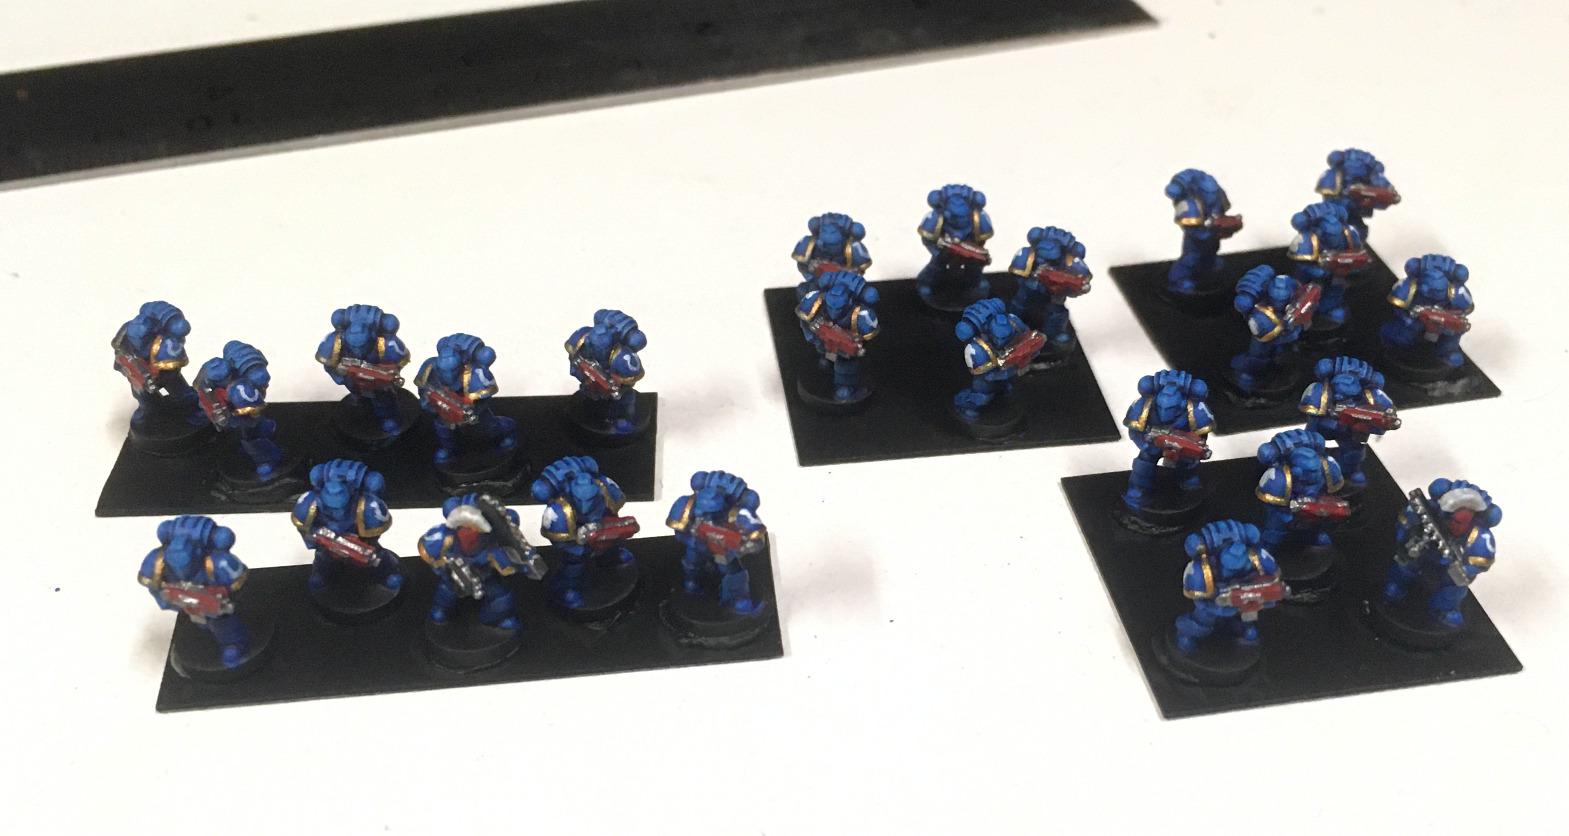
Did some test prints of some Epic Ultrasmurfs and decided to throw your advice out the window  Actually I had already added the emblems to the STLs before you posted, so figured I might as well see how they printed. The Ultra symbols are a lot easier to paint than the TSons, the arrows were more tricky than the U symbol and I think for TSons with their more "complex" symbol I probably wouldn't bother trying to paint it at this scale.
I mean, as long as it works for ya, it's all right xD. That said, yes, Ultramarines would be much easier than, say, Dark Angels, in that regard.
...although I did paint a full Epic: 40.000 DA army with painted-on shoulderpad emblems. It's not something I'd really like to do again, TBH, not even with the added easiness of having it actually modelled.
Yeah, I think it's good to have *something* on the shoulder pad just to add an extra colour to the model, if you had a complicated symbol maybe figuring out a simplified way of painting it?
Anyway, I posted these over on the Epic thread but figured I'd also post them here to chronicle my 3D printing headaches.
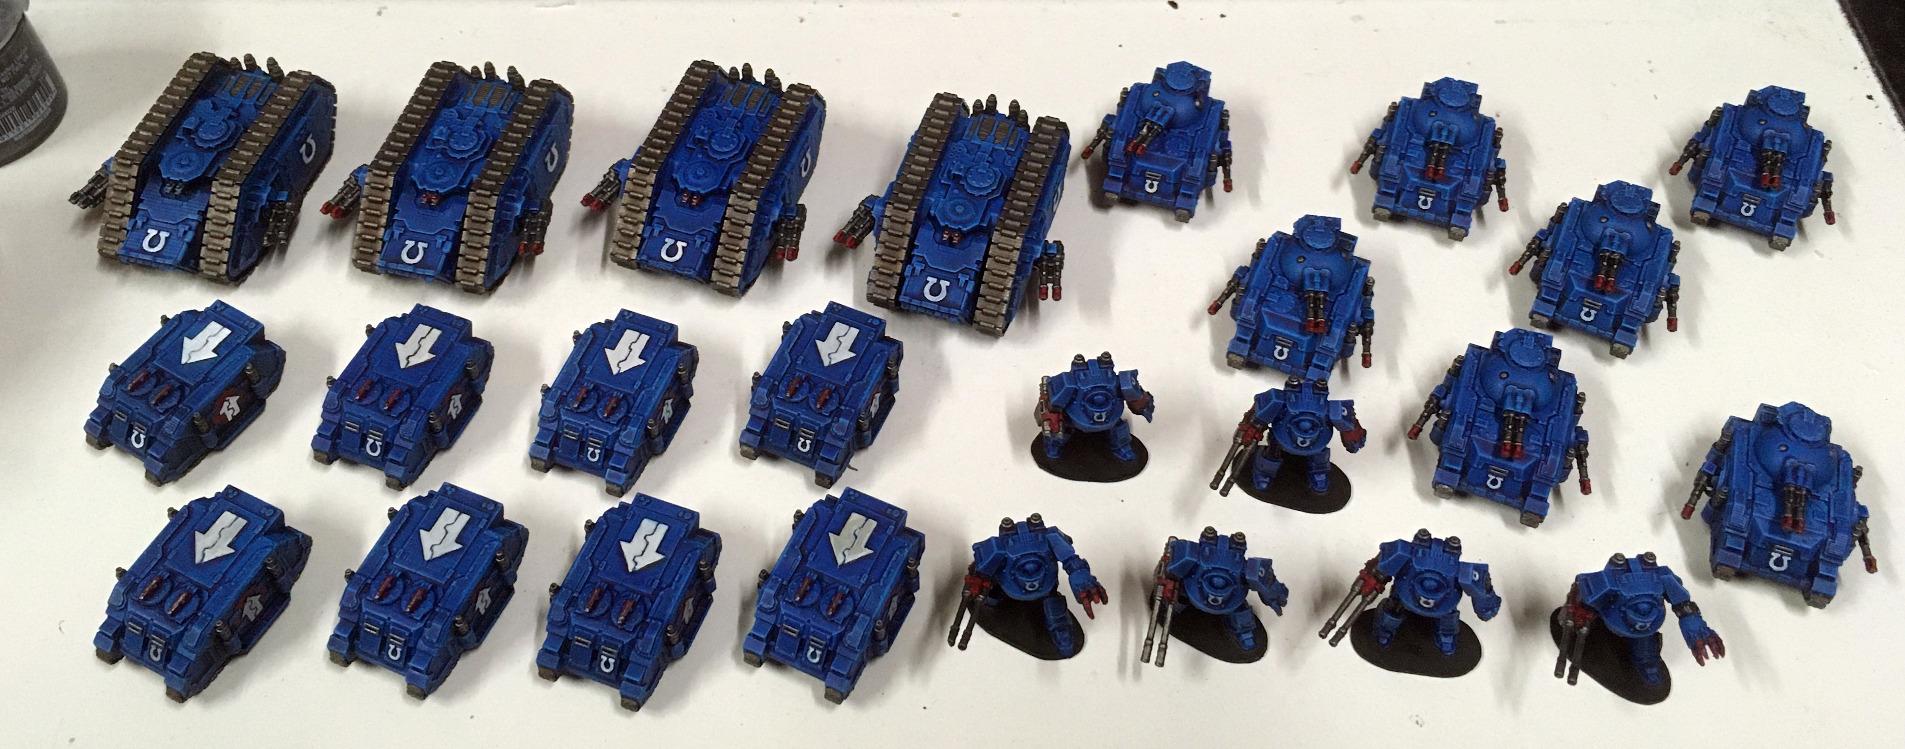
One issue I was having was delamination within the raft, which seemed to be caused from the transition from the "base layer" exposure of 15-20s to the "normal layer" exposure of 1.2 to 1.5s. In the end, the fix was to reduce the base layer exposure to 10s. I did screw around with "transition layers", but the mono SE doesn't support them natively so I was literally manually changing the exposure time on the machine while it was printing, which worked, but in the end, yeah, just lowering the base layer exposure time until it stopped having that problem also worked.
The other issue I'm been running into is that my raft is waaaay too thick and sometimes looks like there's some slippage occurring where one layer is not directly above the previous one. I set the raft 1mm thick in Lychee with a 2 to 3mm gap to the model, but the final result is that the raft is almost touching the model because it's too thick (in the case of the Contemptors, some of them had their feet melded to the raft and I could only remove them by gradually chipping away at the raft). I think this maaaaaybe also leads to my tanks being slightly wedge shaped, because the z distance isn't exactly what it should be due to the excessively thick layers early on in the print, and since the tanks are angled if the z distance is changing during the print it'll be causing the top and bottom edges to form wedges instead of being parallel.
I still haven't fixed this issue, but I THINK it's because the weather is too cold which is causing the resin to be too thick so it can't squeeze out from the gap between the build plate and the FEP before the screen turns on and cures it, so perhaps the solution is to either pre-heat the resin or turn up the "off time". It's set to 0.5s currently, which I think was the default value, I don't recall changing it, though I've heard mixed opinions on how this is measured. Some people say it's the total time the screen is off, so it won't do anything unless it's larger than the time it takes the plate to rise and fall back onto the FEP, but if the default value is only 0.5s then surely it'd be waiting 0.5s after build plate lowers? Dunno, might have to play around with it.
|
|
This message was edited 2 times. Last update was at 2022/09/25 11:19:19
|
|
|
 |
|
2022/12/18 04:11:38
Subject: Skink's Random Printing Stuff
|
|
Grizzled Space Wolves Great Wolf
|
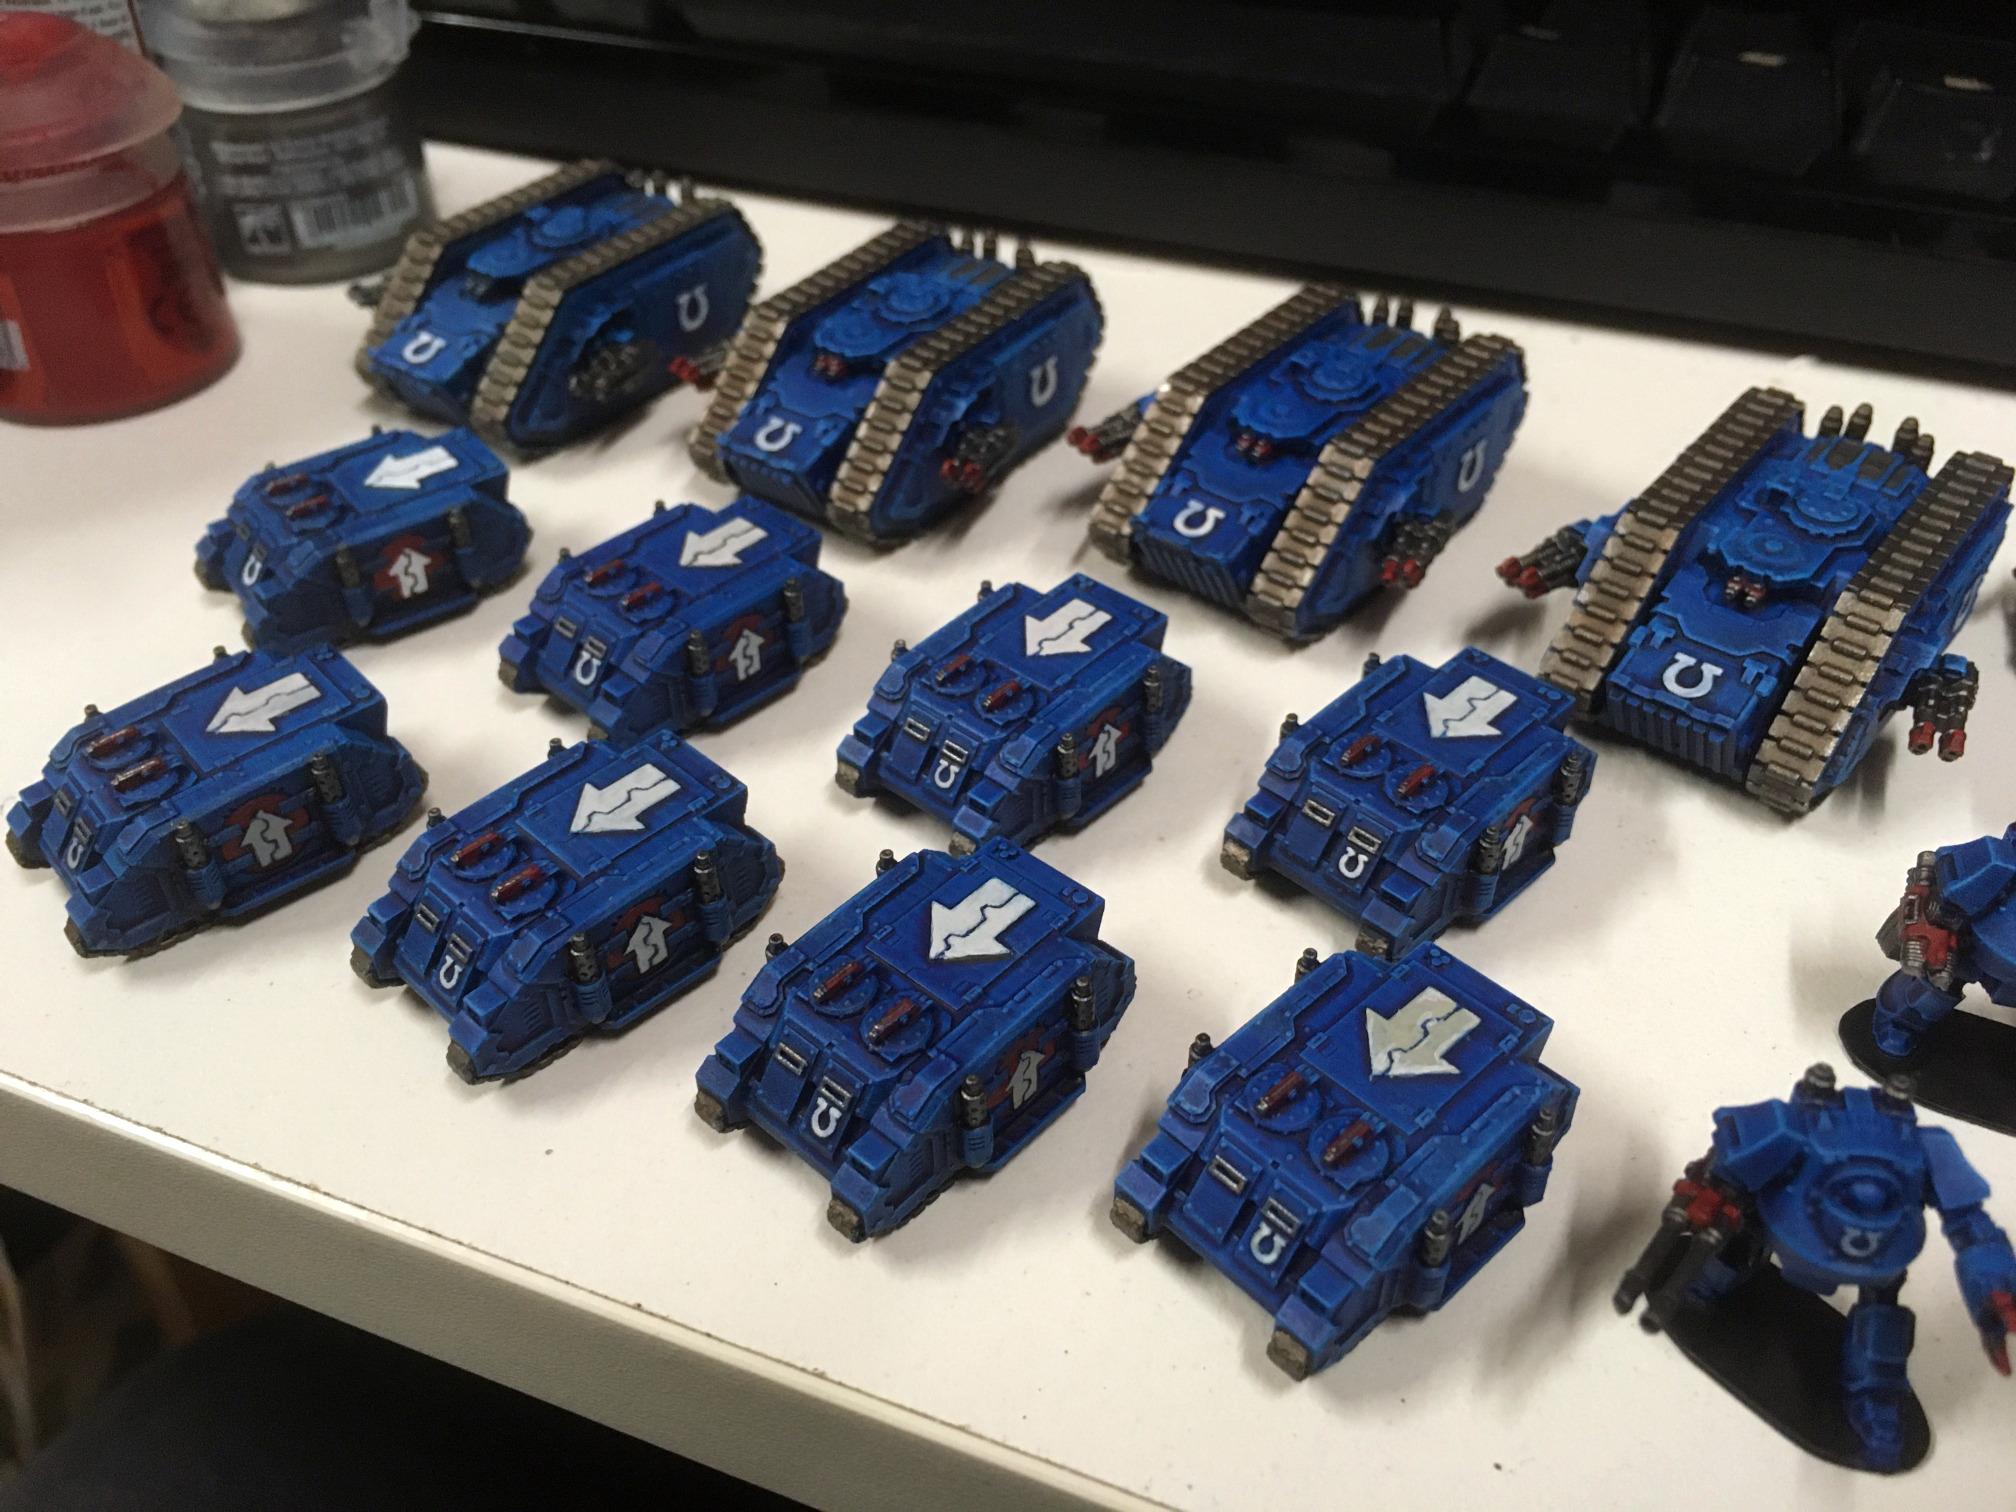
Posted over on the Epic thread, but figured I'd post it here too. Printed some Falchions.
It's been a while (several months I think) since I last printed something, and I've solved a couple of my issues.
The default "off time" in the slicer was set to 0.5s, I bumped that way up (10s for the base layers, then manually drop it to 5s then 2s once it's finished printing the raft).
That solved two issues, it solved the issue where my layer thickness seemed to be randomly varying throughout a print (turns out it wasn't random, it was because there wasn't enough time for the resin to squish itself into a thin film prior to the light turning on to cure it.
The second issue it fixed was my layer lines are now much less visible, I guess because the resin was still in the process of being squeezed out when the light came on to cure it.

|
|
This message was edited 1 time. Last update was at 2022/12/18 04:12:19
|
|
|
|
|
2022/12/21 10:09:15
Subject: Skink's Random Printing Stuff
|
|

Inspiring SDF-1 Bridge Officer
|
I've personally also found that adding a decent amount of light off delay to allow the resin to settle propery between layers helps a lot with the quality of the print 
Looking great so far!
|
|
This message was edited 1 time. Last update was at 2022/12/21 10:09:40
|
|
|
|
|
2022/12/22 06:48:08
Subject: Skink's Random Printing Stuff
|
|
Grizzled Space Wolves Great Wolf
|
Yeah, for all the damned 3D printing tutorials and whatnot that I read/watched, I managed to miss that detail, lol.
It makes sense because my print room is way colder than the recommended temperatures for any resins, so more time for the thing to settle makes sense.
|
|
|
|
|
2022/12/22 09:59:59
Subject: Skink's Random Printing Stuff
|
|
Inspiring SDF-1 Bridge Officer
|
AllSeeingSkink wrote:Yeah, for all the damned 3D printing tutorials and whatnot that I read/watched, I managed to miss that detail, lol.
It makes sense because my print room is way colder than the recommended temperatures for any resins, so more time for the thing to settle makes sense.
Yeah, viscosity of the resin will have an impact on that.
|
|
|
|
|
2022/12/22 14:41:03
Subject: Skink's Random Printing Stuff
|
|
Grizzled Space Wolves Great Wolf
|
Bunch of Imperial Guard tanks (gonna use as Imperial Army in HH era).
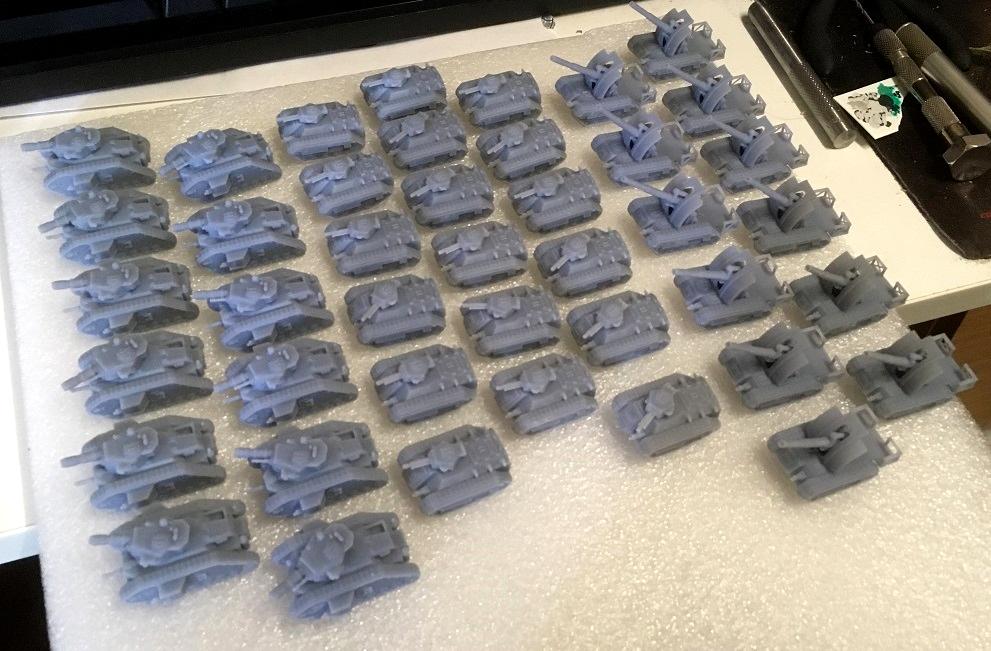
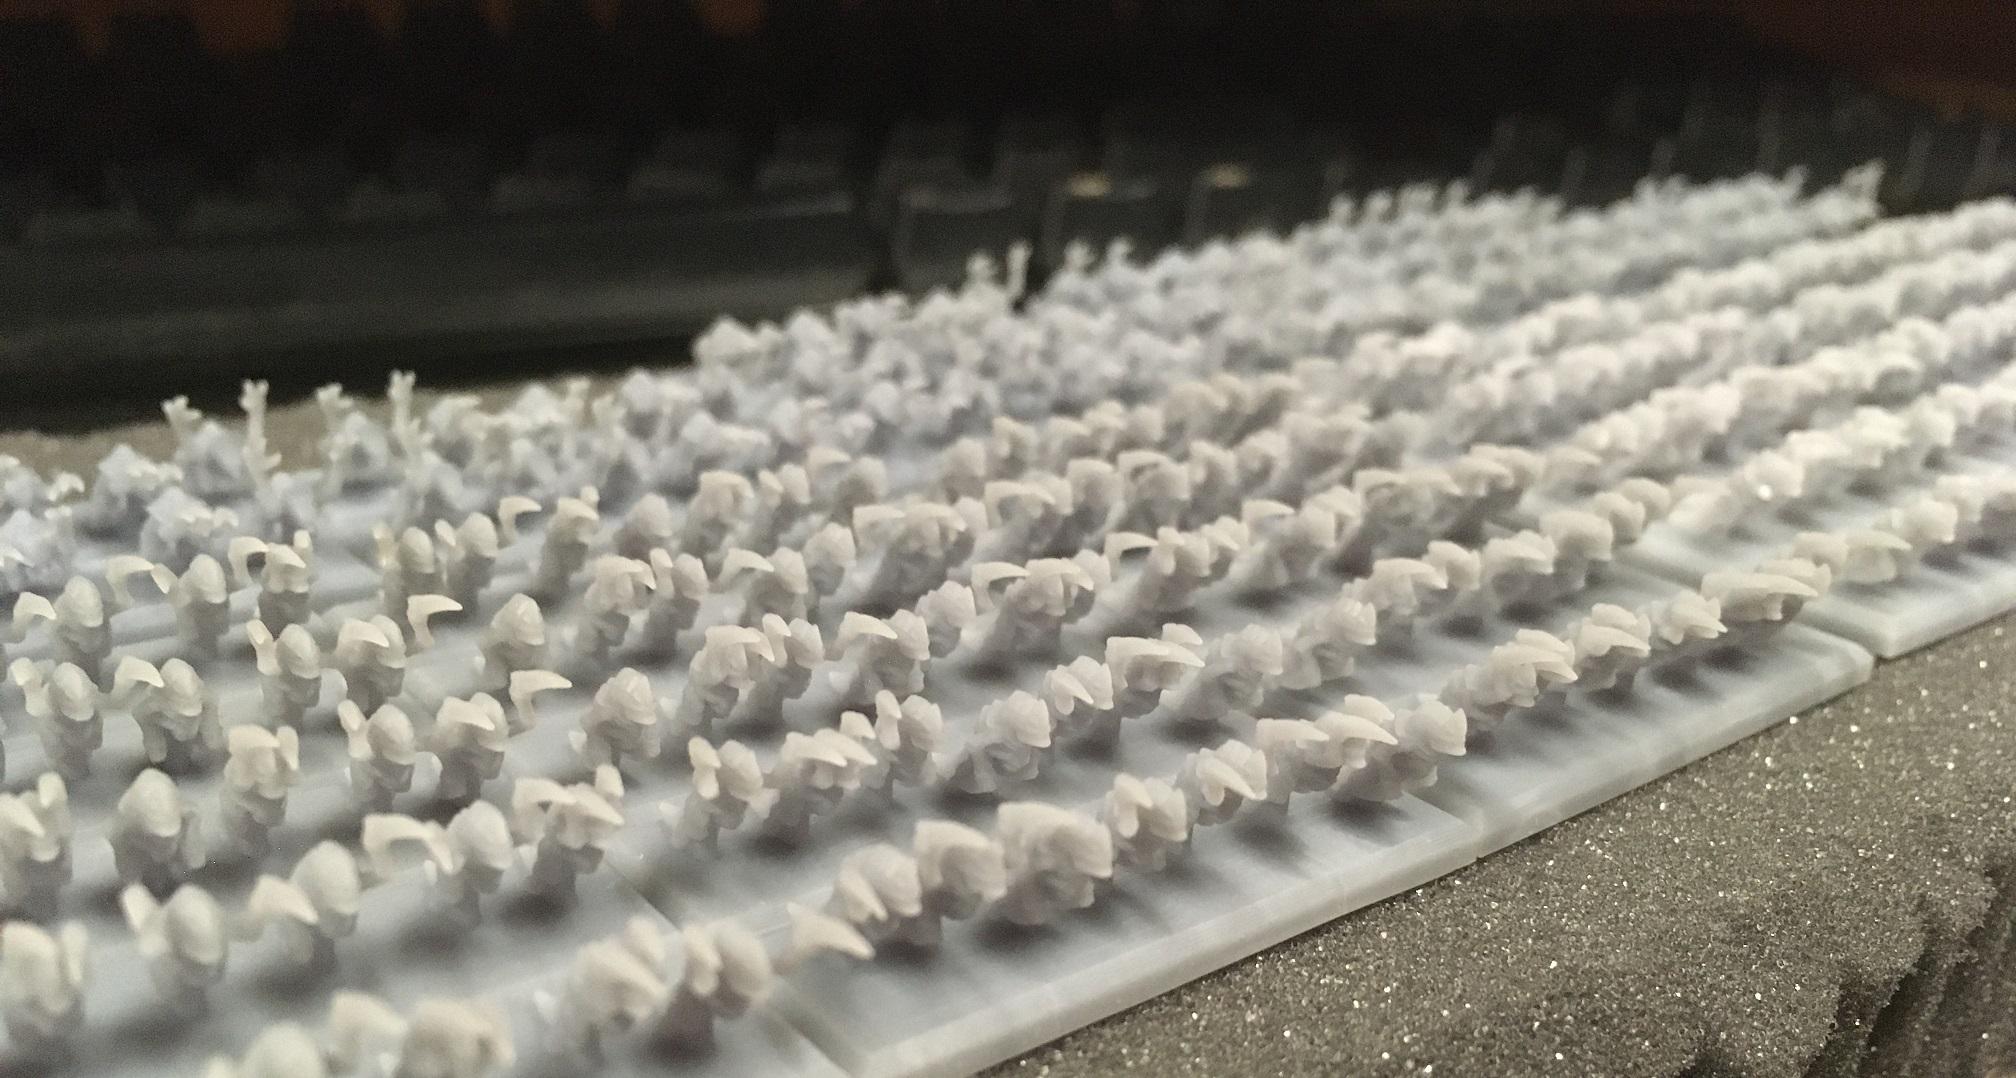
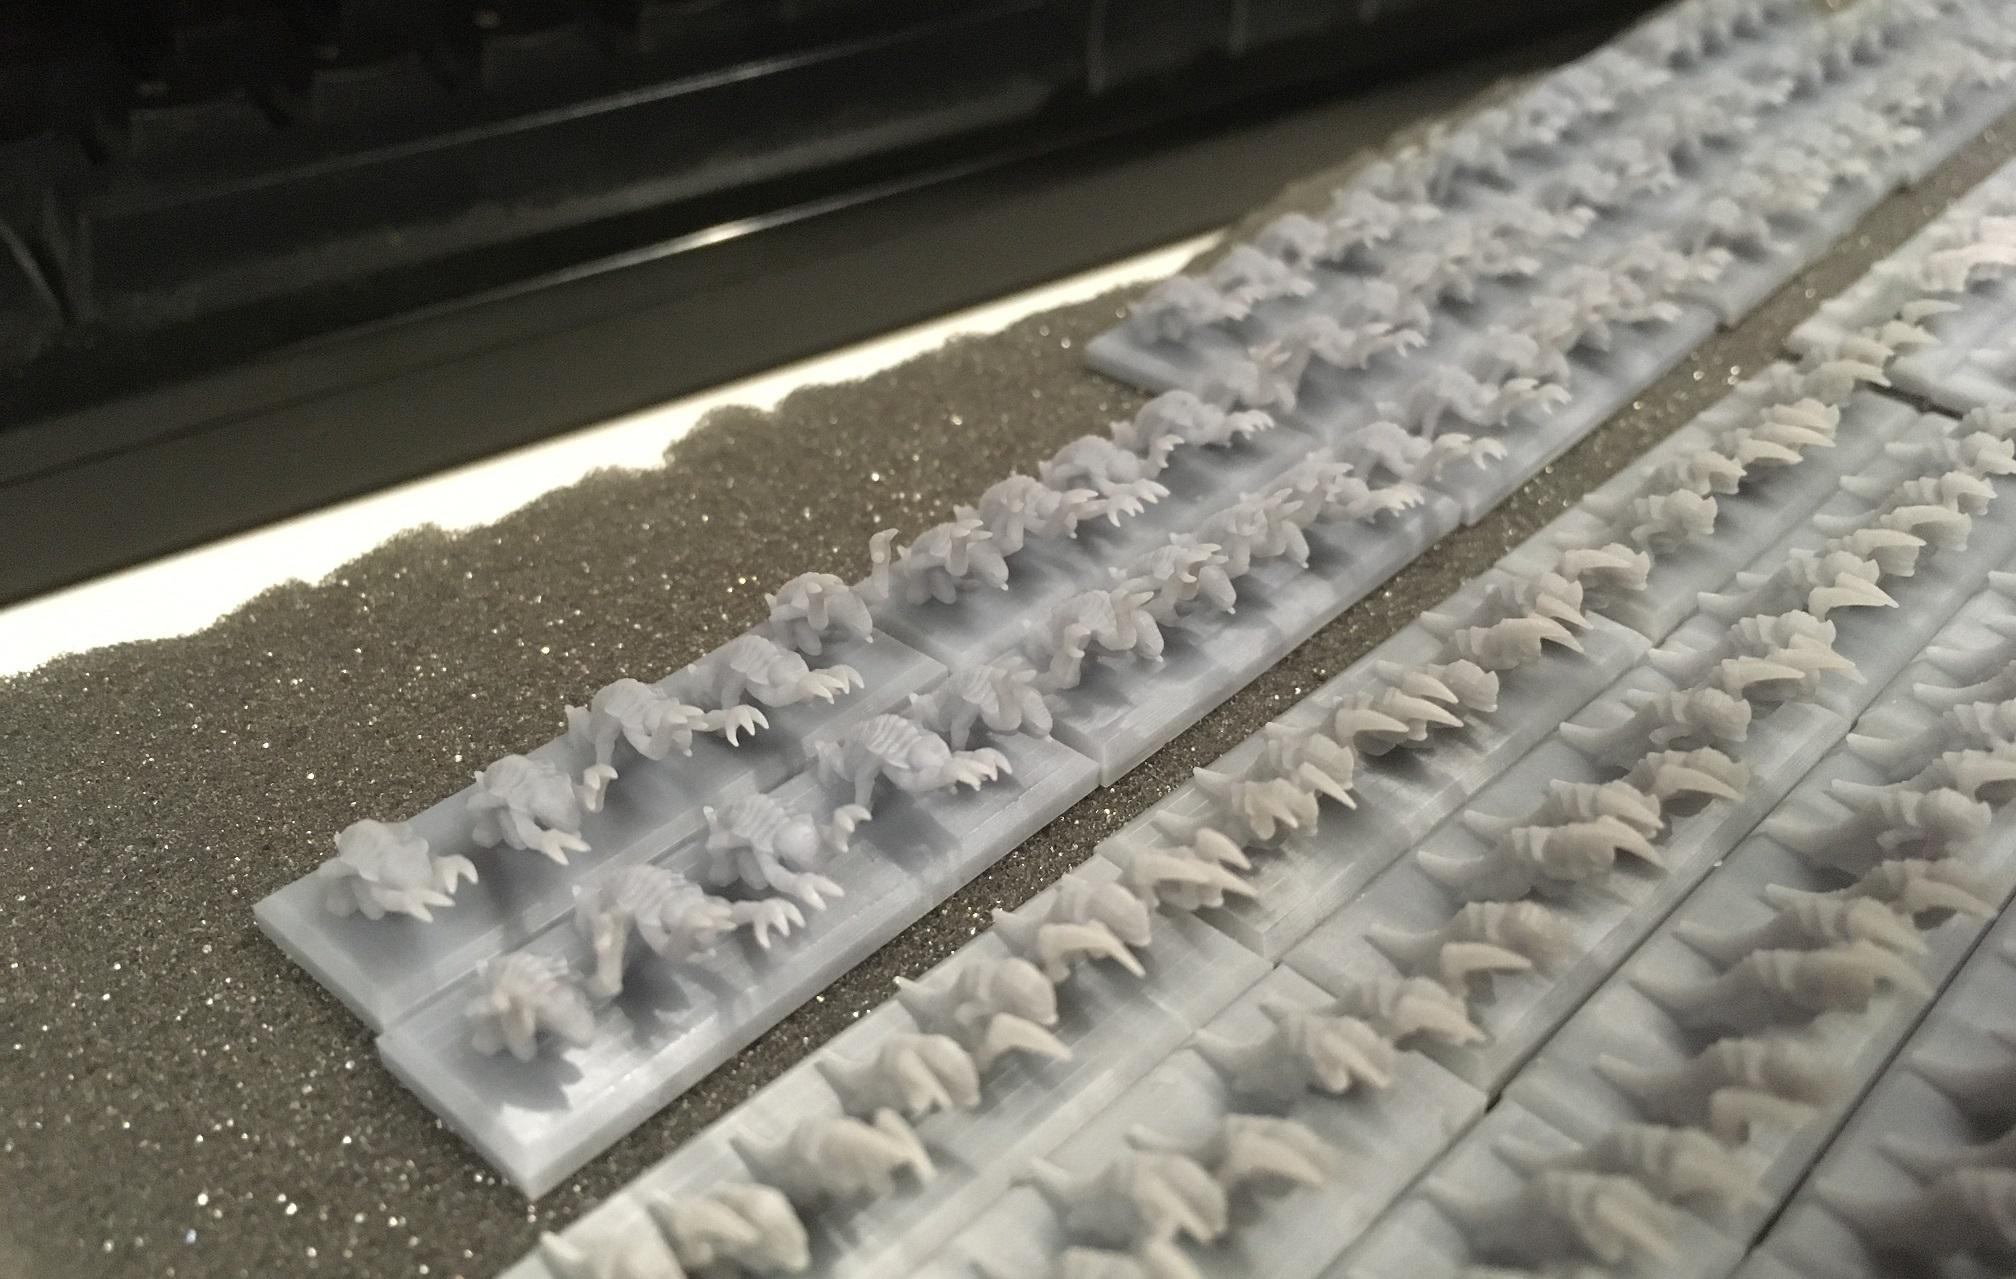
And a bunch of bugs. 150 Hormagants and 75 Genestealers, another 75 Stealers and 36 Tyranid Warriors on the way.
The Hormagant scything talons are super delicate, I broke a bunch of them off on the first 75, the 2nd 75 I was super careful removing supports to not put any pressure on the talons, now I'm hoping that they're fully cured they won't snap off so easily. In hindsight, I should have beefed up the Talon arms in the STL file before printing, but oh well, can't really be bothered doing it now and reprinting them, lol, we'll see how they go.
I decided to base them prior to printing, these models print unsupported (and the Warriors only need 2 of 3 supports) so I figure it'll save me a lot of time basing them later, and also the base has a hollow on the bottom for me to glue on strips of steel so I can use a magnetic tray for transport and hopefully prevent the bases from warping down the track.
It also meant I could do 7 Hormagants to a base and have them unevenly spaced to give that "horde" vibe.

|
|
This message was edited 2 times. Last update was at 2022/12/22 14:43:06
|
|
|
|
|
2022/12/22 17:28:59
Subject: Skink's Random Printing Stuff
|
|
Inspiring SDF-1 Bridge Officer
|
That's a proper horde
Well, two, counting the tanks xD
|
|
|
|
|
2022/12/23 16:51:01
Subject: Skink's Random Printing Stuff
|
|
Grizzled Space Wolves Great Wolf
|
Noooo, I was having such a good run. 12 prints in a row without a fail, without having to drain the vat, and only 1 plate realignment.
But on number 13...
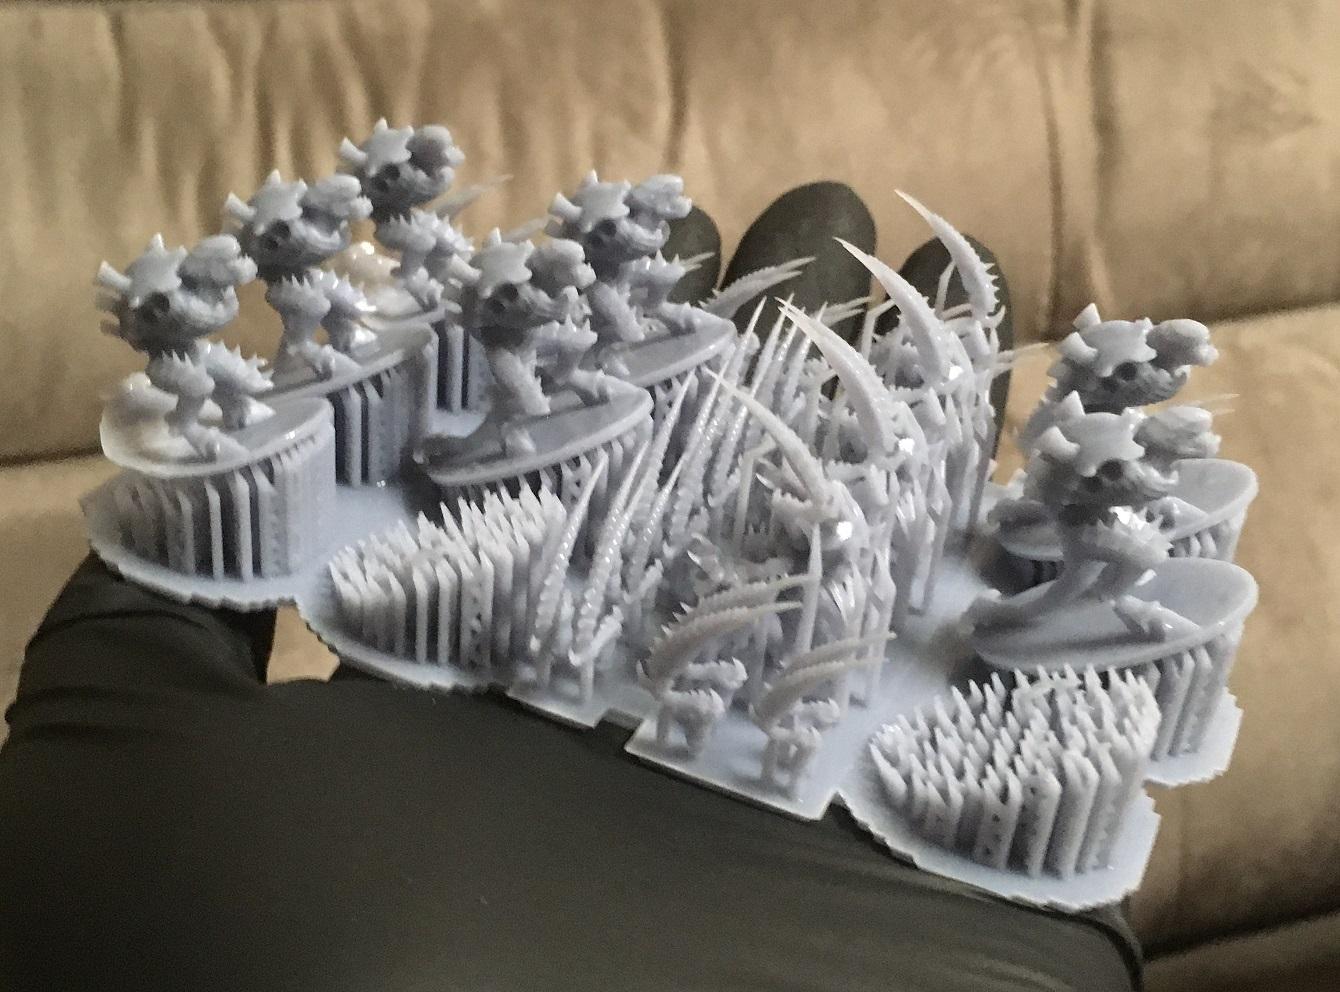
Tried to print 9 Carnifex and 3 Hive Tyrants, 5 of the Carnies came out fine, 2 seemed to have failed at the back of their bases (tails are missing, but probably okay to use if I trim off the bad part of the base), and 2 only printed the supports.
I'm still figuring out how to read fails... my understanding is that this was simply and issue of insufficient supports? I thought I had tons of supports on it, guess not.
The Tyranid models have been a bit of a pain in the arse. The Scything Talons on so many of the models either have weak skinny arms or the talons themselves are very narrow. If I was doing them again I'd load them into Blender and beef up all those parts, as I don't think these models are going to last too many games. Then also a lot of them have bad geometries, some have been hollowed out and a pain in the arse to unhollow. Lots of holes, non-manifold geometries, inside out geometries, etc. I don't understand how people can be so good at sculpting amazing looking 3D models, but the models themselves are so broken Maybe I'm being too hard because I come from an engineering background where it's not enough to have CAD that looks good, it has to be functional.
Oh well. I used the "exposure test" function on the printer to clean the vat and am doing 1 last print then I think I'll pack it away for the rest of the holidays. I'm out of resin anyway, I was going to buy some more but this whole 3D printing thing is starting to feel too much like a job and I need to take a break before I have to go back to my real job, lol.
|
|
This message was edited 1 time. Last update was at 2022/12/23 16:51:22
|
|
|
|
|
2022/12/29 21:39:32
Subject: Skink's Random Printing Stuff
|
|
Been Around the Block
|
Always hesitant to weigh in on others' print fails becuase the possibilities are endless. That said, your image of the failed big-nids speaks to me of a problem I've not heard mentioned elsewhere. I think it's a problem I've encountered before, and in fact it's accounted for literally every print fail I've ever had (been lucky I guess). When you load the plate heavy after a long run without realligning, the layout of the load can mess with the FEP as slight variations in z-height become more extreme with each print. From what I can tell in my examples, the z-height shifts slightly as per standard with each print (dependent on your machine I'd imagine) and if you're printing dozens of tiny miniatures (gaunts) on supported bases, you probably won't notice. But behind the scenes, the z-height variation is pushing against the FEP and LCD beneath, creating unwanted physical flex, increasing with each print. So when you switch over to heavier prints, the z-height variation creating the flex compromises the structures at the edges of the plate first, with flow-on malfunctions throughout the rest of the plate as the FEP and LCD flex under the pressure of the plate/print pressing against it in an unforeseen manner. It's the warping in the FEP from the flex which creates the weird results which can't be traced back to any singular part of the plate.
That's my guess, for what it's worth. I habitually reallign after every half-dozen prints for this reason. Not had a fail in months.
I also share your puzzlement over the weird models that sometimes come out of the online download pipeline. It's truly confounding. Certainly in video games the "artistic" artists are often kept in a creative box to one side, away from the "tech" artists, and perhaps it's these guys who are typically drawn to making amazing models which ultimately need to be scrubbed clean. There have been times I've found it easier just to make my own.
Your nids are cool though - it takes steel to tackle all those supports.
|
|
|
|
|
|
2022/12/31 05:06:03
Subject: Skink's Random Printing Stuff
|
|
Grizzled Space Wolves Great Wolf
|
K.B. wrote:Always hesitant to weigh in on others' print fails becuase the possibilities are endless. That said, your image of the failed big-nids speaks to me of a problem I've not heard mentioned elsewhere. I think it's a problem I've encountered before, and in fact it's accounted for literally every print fail I've ever had (been lucky I guess). When you load the plate heavy after a long run without realligning, the layout of the load can mess with the FEP as slight variations in z-height become more extreme with each print. From what I can tell in my examples, the z-height shifts slightly as per standard with each print (dependent on your machine I'd imagine) and if you're printing dozens of tiny miniatures (gaunts) on supported bases, you probably won't notice. But behind the scenes, the z-height variation is pushing against the FEP and LCD beneath, creating unwanted physical flex, increasing with each print. So when you switch over to heavier prints, the z-height variation creating the flex compromises the structures at the edges of the plate first, with flow-on malfunctions throughout the rest of the plate as the FEP and LCD flex under the pressure of the plate/print pressing against it in an unforeseen manner. It's the warping in the FEP from the flex which creates the weird results which can't be traced back to any singular part of the plate.
That's my guess, for what it's worth. I habitually reallign after every half-dozen prints for this reason. Not had a fail in months.
Hmm, yeah, possibly. Though I would have guessed if that were the issue it would have failed closer to the build plate? I got really good build plate adhesion and the raft was solid, so I figured any z-alignment issues would have rectified themselves in those first few layers.
Some prints I did I noticed the raft was thicker on one side than the other, but the prints still came out, so I figured whatever Z issues were happening were small enough to be solved by the raft. Basically all my epic prints, small and large, have had a full-sized raft that covers the entire print area (minus a few mm here and there).
I was thinking the problem might be that I only put supports on the bottom of the Carnifex bases, so they were all angled the same direction, and perhaps the very first layers of the Carnifex base tore away and then I was just lucky that further down the base they started to adhere again and pulled the bad stuff off the FEP. So maybe I should have put some supports on the back of the base to have some supports going the opposite direction in order to triangulate the pull forces in the early stages, then once those layers were down it'd form a better base for the rest of the model.
But maybe you're right, perhaps I just went too long without a level. I think it was probably about 8 prints without levelling.
My printer is a pain in the arse to level, it has a single screw which doesn't hold the build plate very well, so I have to overtighten the hell out of it to make the build plate rigid, so if I'm getting successful prints I don't like to retighten it... I know I'm eventually going to tear the head off the screw or strip the threads.
I also share your puzzlement over the weird models that sometimes come out of the online download pipeline. It's truly confounding. Certainly in video games the "artistic" artists are often kept in a creative box to one side, away from the "tech" artists, and perhaps it's these guys who are typically drawn to making amazing models which ultimately need to be scrubbed clean. There have been times I've found it easier just to make my own.
Yeah, probably it's different people that make something look nice versus making something functional, lol.
Your nids are cool though - it takes steel to tackle all those supports.
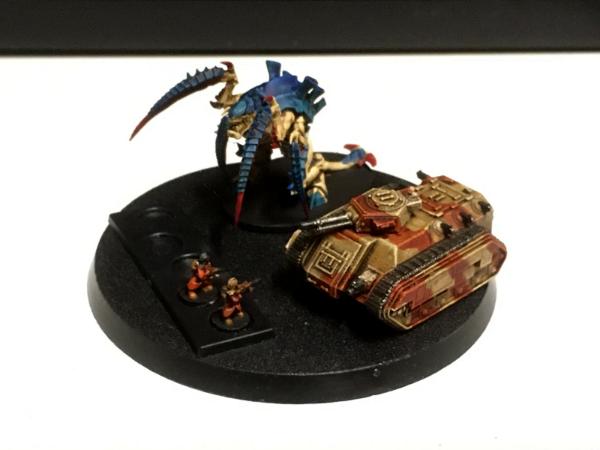
If I weren't on break from work, there's zero chance this army would have happened So many of the nid models are a mess, but I did strike gold by figuring out I could print Genestealers, Hormagaunts and Termagants directly on their bases with no supports beyond what is needed to support the base. It's slightly slower to print them that way, but it reduces the prep time so much, basically just print them, pop them off, and they're ready to paint and play with. Here's some painted models that I posted over in the Epic thread...

|
|
|
|
|
2022/12/31 22:34:08
Subject: Skink's Random Printing Stuff
|
|
Been Around the Block
|
AllSeeingSkink wrote:I would have guessed if that were the issue it would have failed closer to the build plate?
Problem only occurs when the heavy distribution on the plate breaks up and becomes weighted either toward the edges or some non-uniform point (because the bowing flex of the FEP becomes more unpredictable that way). In your case, you're using a big raft, which is fine, but by the time you get to the first layers of the bases, there's a lot of stuff being printed at the edges of the plate, and a lot of space (unused pixels) in the centre. Sure enough, the carnifex bases at the centre of the plate (or toward the edge which may have more "slope" space like you mentioned) are fine, while those at the edges fail. You can probably address the issue with more supports (as you say) but I doubt that's the original cause - your supports look good, and they mostly worked, even with the fails on the same plate.
Let me guess just for fun: when you zero the Z height with the plate, you send the plate to "home" automatically, then apply pressure to the top of the plate with your fingers, holding it against the FEP to keep it in place as you tighten the annoying screw.
That's what you're supposed to do, and that's fine, but I've noticed how applying pressure with your fingers this way (specially if you have a tricky screw in need of extreme tightening) can physically flex the FEP and LCD beneath. Most printers have a built-in flexiness in these components to account for this. For most people, the zeroed Z height includes this slight bowing flex in the FEP and LCD. As a result, there's typically more Z space in the centre of the FEP (where it's most flexy) comapred to the edges (where the edges make it ridgid). But the default flex for the flat plate will necessarily remain the same for the entire print and not just the first few layers - so if the plate load changes to be something other than flat, the flex gets weird. Z height variations per print (or even per layer) occur naturally in addition to this, meaning that even if you get away with it for your first few prints, it'll eventually catch up with you. Each pixel space on the build plate would ideally sit 1 layer off the FEP surface every time, but it's an analogue process and almost never perfect that way.
A common solution is to weight your plate toward the centre. In your case, you'd put all the carnifexes in the centre of the plate, and their arms at the edges with the highest points of the scythes pointing inward... Which is the opposite of how you have it set up in your photo. Obviously I can't bank on that solution, but I'm told it's common practice, and it works well enough for me. Placing an entire row of replicated figures on the same X or Y value can help diagnose other problems that way too, to ensure you're not shaving off a pixel from your supports somewhere (if the entire row fails, you'd need thicker support contacts). I'm always printing 1mm scale stuff, and when I'm printing thousands of tiny troops alongside massively thick siege towers, I'll always print them in a uniform grid pattern, putting the siege towers in the centre of the plate and the tiny troops at the edges. It's not so much the height of the object that matters this way, but the volume of pixels in each layer of the object, and its relative position on the plate. There's probably some special 3D printing name for this technique, I don't know.
AllSeeingSkink wrote:So many of the nid models are a mess, but I did strike gold by figuring out I could print Genestealers, Hormagaunts and Termagants directly on their bases with no supports beyond what is needed to support the base. It's slightly slower to print them that way, but it reduces the prep time so much, basically just print them, pop them off, and they're ready to paint and play with.
That's sumpremely awesome. If your gaunts had their scythes raised just a little more, they could probably be printed with no supports at all! Your carnifexes might even be the same - if you grafted the arms on "about to strike" you might print them all in one piece. Longer print, but more room on the plate to print more at once...?
Your painting is real cool. Shows how 6mm can be painted pretty much exactly how 28mm would be.
|
|
|
|
|
|
2023/01/07 15:18:29
Subject: Skink's Random Printing Stuff
|
|
Grizzled Space Wolves Great Wolf
|
Hmm, yeah, you might be right. I do normally try to centre my models more, in this case I guess I just thought the models were small enough to not make a big difference (and by small, I mean even though the Carnies are roughly tank sized, no layers through the Carnifex have a large exposed area like a tank might). Though it's still probably bad to unbalance the plate.
I'm using a mono SE, which has a spring that pushes the build plate into the screen during leveling, I still do apply a bit of pressure just to keep it in place, but I figure the idea is for it to be level, not smashed into the screen, lol.
That's sumpremely awesome. If your gaunts had their scythes raised just a little more, they could probably be printed with no supports at all! Your carnifexes might even be the same - if you grafted the arms on "about to strike" you might print them all in one piece. Longer print, but more room on the plate to print more at once...?
You mean print the gaunts flat on the build plate without supports? I guess that would be possible, the rib cages might overhang too much and need supports though. It's probably easier to remove them like this and there's no elephant foot to deal with.
The Carnifex, they could possibly be printed all in one, probably still need a few supports, I did consider fitting the arms on before printing but I figured it'd be better to have them loose so I could glue them on in slightly different positions so they don't look all perfectly identical. I figure I'll have 10 or so Carnifex by the time I'm done, so some variation is good.
Your painting is real cool. Shows how 6mm can be painted pretty much exactly how 28mm would be.
Cheers! They are super simple to paint, my 40k Hormagaunts take me about 45 minutes to paint, these guys are probably 1 to 2 minutes on average, lol. Basically just washes and contrasts, those sorts of paints work really well at this scale. Automatically Appended Next Post: I posted these over on the Epic thread, but I think maybe different people frequent the different forums, so here it is again. Where I'm up to with the Epic nids...

|
|
This message was edited 3 times. Last update was at 2023/01/07 15:26:47
|
|
|
|
|
|
|
|