Switch Theme:

Painting Rust in Two Colors  [RSS] Share on facebook Share on Twitter Submit to Reddit
»
Author Message
Advert


Forum adverts like this one are shown to any user who is not logged in. Join us by filling out a tiny 3 field form and you will get your own, free, dakka user account which gives a good range of benefits to you:
  • No adverts like this in the forums anymore.
  • Times and dates in your local timezone.
  • Full tracking of what you have read so you can skip to your first unread post, easily see what has changed since you last logged in, and easily see what is new at a glance.
  • Email notifications for threads you want to watch closely.
  • Being a part of the oldest wargaming community on the net.
If you are already a member then feel free to login now.


Made in us
[DCM]
Illustrator


North Carolina


+++++++++++++++++++++++++++++++
Friday Quick Tip: Painting Rust in Two Colors
By: grey_death


Some time ago we covered painting rust with just two colors, and at the time I thought I was happy enough with the result, but since then I've found myself more given to a more natural look than the stippled effect I suggested.  This tip will go over a few things I've found myself doing when applying rust in the updated method.  


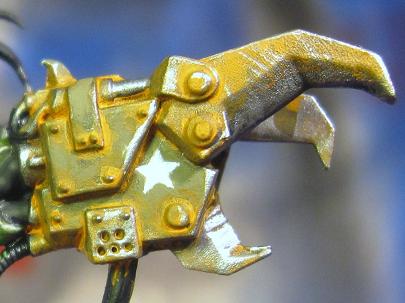
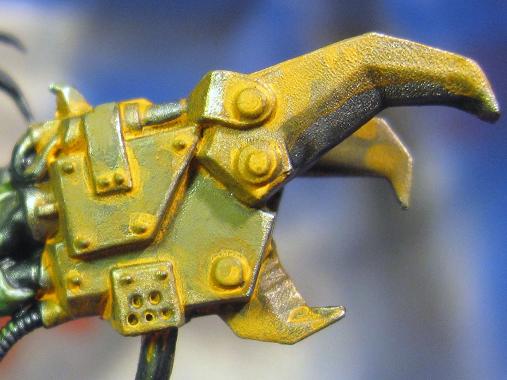
As my jumping off point I get my metallic parts to a single washed shade.  In this case I've painted the power claw with Boltgun Metal.  The green is VMC Brown Violet painted on in splotchy fashion to create a chipped look straight away.  The entire claw was washed with GW Badab Black and the green was then touched up in a few spots with the Brown Violet to add some depth.


Some people might not have a grasp of using regular paints as a wash but it's really quite simple to do.  You simply need to take your given color and dip your brush in, then using a good amount of water, thin the paint down to a consistency like above.  I usually only dip the tip of my brush in the paint, touch it to my palette and then load my brush with water.  Swirl your brush through the paint until it has an even consistency and load your brush with the mixture. 


The first color washed on is Vermin Brown.  In this example I've actually gone too light and would likely make it heavier still than this.  This layer though acts more as a filter for the areas you are going to build up more with your second color.  Pay special attention to spots unlikely to have much wear and rub, like around bolts and along joins of armor plates in the crevices. 


The second wash is made of Fiery Orange in this example, but should you not have it on hand, any light orange would do just fine.  Again paying special attention to areas not likely to be worn down too much or those that would gather a fair amount of moisture, I applied the wash heavily and after the initial pass was down, I went back to some areas and stippled more of the wash mixture in.


To finish the effect, I've gone back in with Boltgun Metal along a few edges and touched up the Brown Violet again.  The added detailing of the star was painted freehand and will likely still get a few scratch marks painted in with Brown Violet.

In the end, the effect is far more natural and more controllable.  It's also more conducive to batch painting that I'll be using to finish off Pattun's Boyz!  Now, to finish off the rest of the model...

Want more? Then don't forget to visit The Painting Corps for regular updates with tips for the newest wargamer to the most grizzled veterans. There's something for everyone. Head over and join the conversation!

-Aaron
Call For Fire

DA:80+S+GM(DPC)B++++I+Pw40k99+D++A++/mWD247R++T(M)DM+++++ 
   
Made in au
Courageous Questing Knight


Australia

thats really cool. Good read, thanks.

EDIT: Mispelling

This message was edited 1 time. Last update was at 2010/06/26 22:41:52


DR:90S+++G++MB+I+Pw40k096D++A+/areWD360R+++T(P)DM+
3000 pt space marine 72% painted!
W/L/D 24/6/22
2500 pt Bretons 10% painted
W/L/D 1/0/0
http://www.dakkadakka.com/dakkaforum/posts/list/337109.page lekkar diorama, aye? 
   
Made in gb
Monstrous Master Moulder


I dunno...

I dunno, looks a bit yellow for realistic rust

Bewhiskered Gasmasks: For the Post-Apocalyptic Gentleman

And to this day, on darkest nyte
It can be seen, they tell
A Prynce of Rattes, in finery
Upon a horned bell.
 
   
Made in us
[DCM]
Illustrator


North Carolina

The lighting is less than optimal, but even then the spectrum of rust colors allow for even a brighter end color like this, example from wikipedia:


-Aaron
Call For Fire

DA:80+S+GM(DPC)B++++I+Pw40k99+D++A++/mWD247R++T(M)DM+++++ 
   
Made in gb
Monstrous Master Moulder


I dunno...

Fair enough.

Bewhiskered Gasmasks: For the Post-Apocalyptic Gentleman

And to this day, on darkest nyte
It can be seen, they tell
A Prynce of Rattes, in finery
Upon a horned bell.
 
   
Made in fi
Utilizing Careful Highlighting


Finland... the country next to Sweden? No! That's Norway! Finland is to the east! No! That's Russia!

Schorched brown
vermin brown
blzing orange

Sweet Jesus, Nurgle and Slaanesh in the same box!?
No, just Nurgle and Slaanesh, Jesus will be sold seperately in a blister.


Made in us
Been Around the Block


I use Dark Flesh plus Blazing Orange and then shade up to Blazing Orange for my rust. All the other ways posted above me work just as well. Look at the 4th plaguebearer example here http://www.games-workshop.com/gws/content/article.jsp?categoryId=cat440166a&pIndex=1&aId=5400009&start=2.
   
Made in us
[ARTICLE MOD]
Huge Hierodule


North Bay, CA

I mix vermin brown and blazing orange and splotch the wash in various places then overbrush with a gunmetal grey

   
Made in gb
Grovelin' Grot


Todmorden

i find the best way to rust is something i picked up recently, try mixing 1:1 Blazing Orange and Beastial Brown with a sprinkle of Bicarbonate Of Soda. it turns into a slight paste and when applied looks like flakey rust when dried!


Forum Index » Painting & Modeling Tutorials
Go to: