Arranged to have a large 6k game between five of us, though due to one thing or another two guys had to drop out. So game changed to 4k and two vs one. Both lists were combined together to make a big ass force.
Here's the two Blood Angel lists:
Blood Angels "Book of Blood" - 2,000 points
HQ
Librarian - jump pack, shield of sanguinus & unleash rage
Librarian - jump pack, shield of sanguinus & unleash rage
Honour Guard - jump packs & 4 x meltaguns
Elite
2 x Sanguinary Priests - jump packs
Troops
10 x Assault Marines - 2 x meltaguns - Sgt w/ power fist
10 x Assault Marines - 2 x meltaguns - Sgt w/ power fist
10 x Assault Marines - 2 x meltaguns - Sgt w/ power fist
10 x Assault Marines - 2 x flamers
5 x Assault Marines - plasma gun
Heavy Support
5 x Devastators - 4 x missile launchers
5 x Devastators - 4 x missile launchers
5 x Devastators - 4 x missile launchers
Blood Angels "Wing Striker" - 2,000 points
HQ
Librarian - shield of sanguinus & unleash rage
Librarian - shield of sanguinus & unleash rage
Honour Guard w/ Razorback - 2 x flamers - Razorback w/ las/
plas
Honour Guard w/ Razorback - 2 x meltaguns - Razorback w/ las/
plas
Elite
Sanguinary Priest
Troops
5 x Assault Marines w/ Razorback - meltagun - Razorback w/ las/
plas
5 x Assault Marines w/ Razorback - meltagun - Razorback w/ las/
plas
5 x Assault Marines w/ Razorback - meltagun - Razorback w/ las/
plas
5 x Assault Marines w/ Razorback - flamer - Sgt w/ power weapon - Razorback w/ las/
plas
5 x Assault Marines w/ Razorback - flamer - Sgt w/ power weapon - Razorback w/ las/
plas
5 x Assault Marines w/ Razorback - flamer - Sgt w/ power weapon - Razorback w/ las/
plas
Heavy Support
Vindicator
Vindicator
And here's the Tyranids:
Tyranids "Hive Fleet Dave" - 2,000 points
HQ
Tyranid Prime - bonesword & lashwhip
Tyranid Prime - bonesword & lashwhip
Elite
2 x Hive Guard
2 x Hive Guard
2 x Hive Guard
Troops
3 x Warriors - rending claws & devourers
3 x Warriors - rending claws & devourers
20 x Termagants
20 x Hormagaunts
12 x Genestealers
12 x Genestealers
Fast Attack
4 x Raveners - rending claws
Heavy Support
Tyrannofex - rupture cannon
Biovore
Trygon - adrenal glands & prime
Tyranids "Hive Fleet Kraken" - 2,000 points
HQ
Hive Tyrant - bonesword & lashwhip, devourers, old adversary & wings
Tyranid Prime - bonesword, lashwhip & deathspitter
Elite
2 x Hive Guard
2 x Hive Guard
2 x Hive Guard
Troops
4 x Warriors - scything talons & deathspitters
4 x Warriors - scything talons & deathspitters
20 x Termagants - fleshborers
20 x Hormagaunts - toxin sacs
20 x Hormagaunts - toxin sacs
Heavy Support
Trygon - adrenal glands
Trygon - adrenal glands
Trygon - adrenal glands
Game: Capture and Control + Pitched Battle
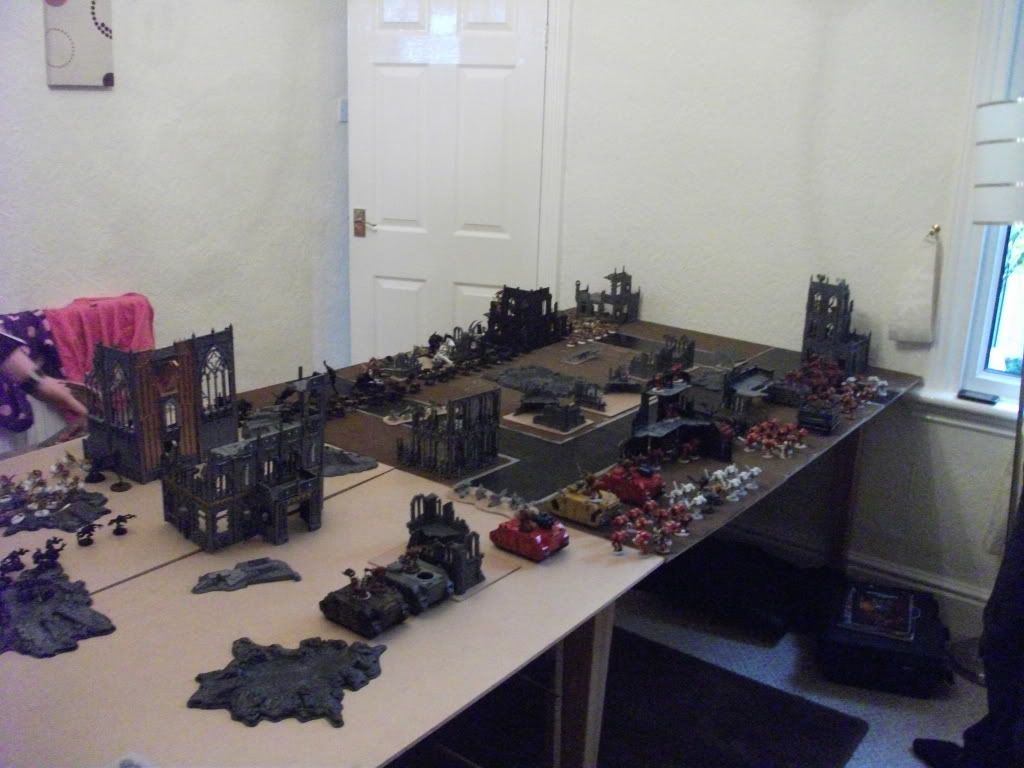
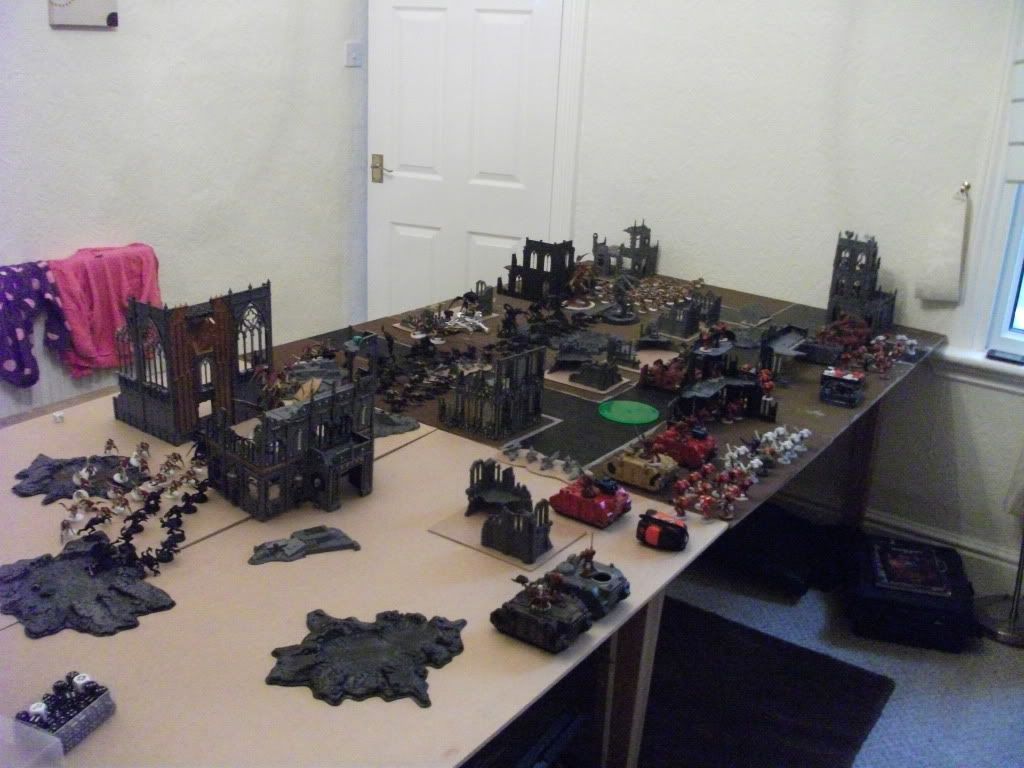
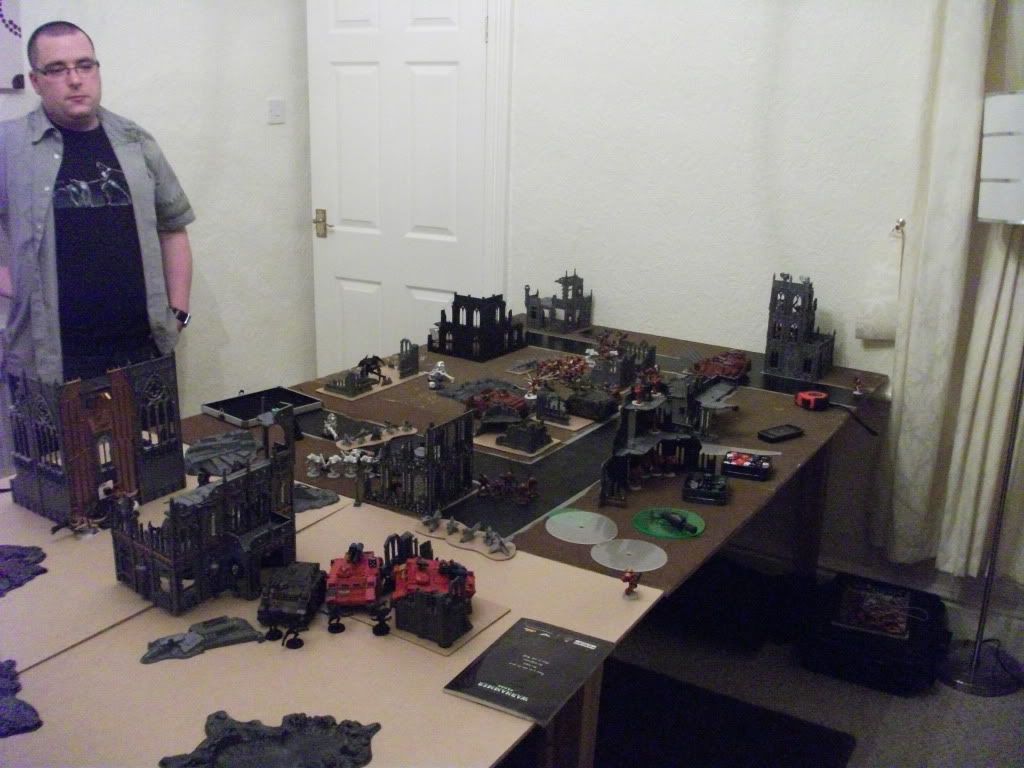
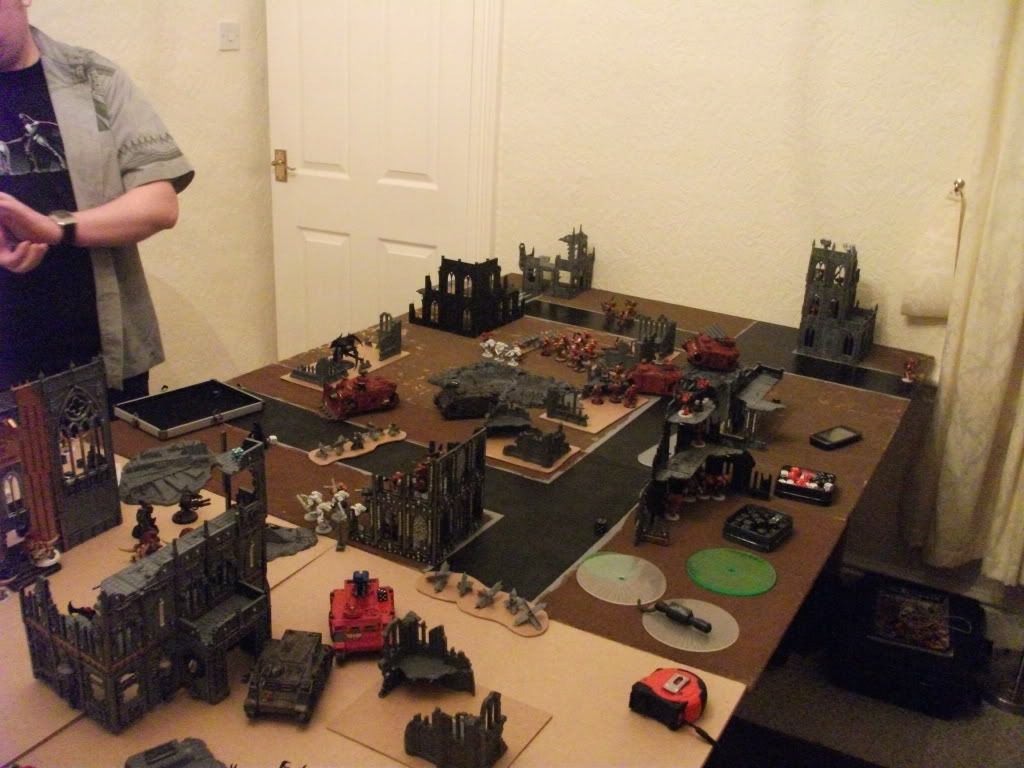
Deployment
Angels won the deployment and decided to go first - this would mean the Tyranids won't get into assault as quickly and get shot up before even moving. I deployed my Razorbacks with the flamer units on the left flank and then meltas the right flank, I left some room from the edge of the table so Kris (other Angel player) could deploy his Assault Squad with jump packs behind my tanks for cover - he put meltas with my flamers for support against bigger bugs. Kris deployed his
Devs in a central ruin our deployment side along with the 5 man Assault Squad - a objective was here so it meant they claimed it straight away. The other two
Devs were put in the large tower ruin giving them
LOS across the entire battle field.
Dave (Tyranid player) deployed his force of Tyranids. He used the terrain his side to cover his big bugs while he put Warriors, Tyrannofex, Raveners, Hive Guard and Biovore in terrain with a line of Hormagaunts and Termagants as a bullet shield - on the left flank he put a unit of Hormagaunts with Stealers while the other unit of Stealers outflanked, also was two Trygons and the Hive Tyrant. Right flank a unit of Hormagaunts and Termagants along with the Trygon Prime and a supporting Trygon.
Objectives are placed in the large ruin on front of the shrine (left flank objective), two more or less in centre ruins (centre objectives 1 & 2) and one just outside the Angel deployment zone (Angel objective)
 Tactical Notes
First turn movement will be pretty simple - stay put and torrent the big bugs. No point moving forward for only lascannons still to fire, maybe the odd plasma gun and then get charged next turn. With the Razorbacks holding back and being used as shields for the jump pack Assault Marines it will give us several turns of shooting before the Nids even come into range.
Plan is to blast away Trygons at first seems how quickly they can move - will also blast the Tyrannofex with lascannons in time. Main threat is Trygons and Hive Guard, but the Guard won't be in range for two turns, maybe.
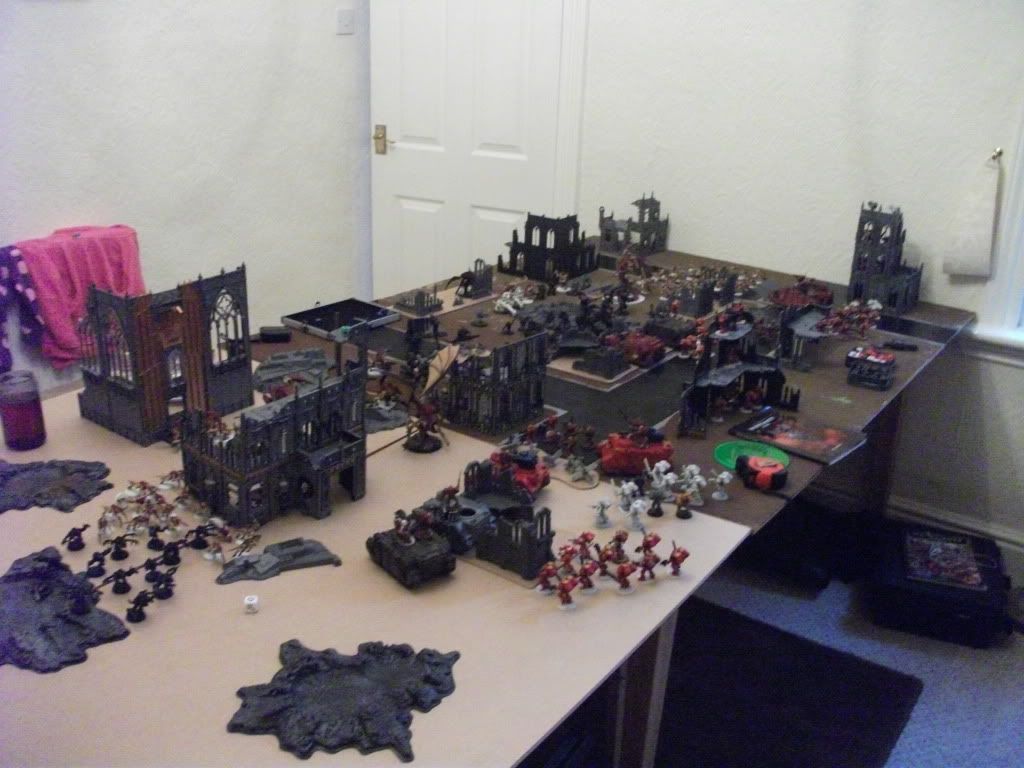
Turn 1
Dave attempts to steal the initiative, but fails :(
Angels first turn and only movement is from the Vindicators moving forward to get into range and two Razorbacks with flamer Assault Marines on the left flank moving away from Genestealers which had infilitrated - don't want them assaulting my tanks next turn!
Shooting a Trygon on the left flank gets nailed by krak missiles then by lascannons wiping it out. Vindicators blast at Hive Guard in terrain, the blast hits wounding a Tyrannofex and killing a Hive Guard. The Trygon Prime gets blasted by krak missiles and lascannons leaving it with only 2 wounds remaining.
Tyranids turn and everything moves out moving as fast as it can towards the Angels lines using cover on route.
Shooting Hive Guard and Tyrannofex fire at the two Vindicators, both suffer weapon destroyed losing the demolisher cannons and one is stunned.
 * Tactical Notes
Ok not a too bad first turn. A Trygon is down and the Prime is running out of steam, plus a Hive Guard is down and the Tyrannofex starts taking some wounds. Angels have lost the main use of both Vindicators but they will do at least for contesting the centre objective, if not both of them.
Next turn will be blasting again, going for the Trygons, Tyrannofex and Hive Guard - just waiting for Tyranids to come to us  Turn 2
Razorbacks on the left flank move to target a Trygon through cover, it will still get cover saves but at least it's in rapid fire range to dish out plasma death. Vindicators move up contesting the centre objective with a melta jump pack Assault Squad support. Right flank three Razorbacks move up, jump infantry holds position.
Shooting on the left flank the Trygon gets blasted, but survives with two wounds thanks to cover. Trygon Prime gets blasted and is dusted and the other Trygon is left with a single wound. Tyrannofex also takes a wound from a lascannon shot.
Tyranids turn and the bugs move in more.
Shooting Hive Guard pop the melta Honour Guard Razorback on the right flank leaving them in a crater - no one luckily dies from the blast - got to love feel no pain! Left flank the other flamer H.G Razorback is popped, the H.G are then blasted by the Tyrants devourers but all Honour Guard are ok. Another Razorback gets blasted by Hive Guard leaving it with no weapons remaining and it's also crew stunned.
 * Tactical Notes
Ok the Trygon Prime is dead and the last remaining Trygon on the right flank has one wound left. Tyranids this turn however have dealt some damage by wrecking two Razorbacks and causing massive damage to the other which makes it only good for tank shocking and contesting objectives.
Plan next turn is to blast that Hive Tyrant to kingdom come as it's right in the Angels faces, also I'll bail out my flamer Assault Squads and move to the Genestealers and dish some flamer death - Kris will bring his melta Assault Squad up for support, I'll also introduce those Hormagaunts to flamer templates too, just need to make sure the Trygon and Hive Tyrant are dead on the left flank. Right flank some Raveners can be assaulted by a jump pack melta Assault Squad, could also blast some with melta shots and I.D them though the Assault Squad may not reach assault then, so melta shots from any other units will go on the last Trygon that side - Termagants and Hormagaunts will get charged by Kris' Honour Guard, melta Assault Squad and by my Honour Guard and melta Assault Squad out of a Razorback.
Turn 3
Angels movement turn sees three 5 man flamer Assault Squads disembark and move to the 'Stealers and Hormagaunts on the left flank, a jump pack melta Assault Squad follows. All Razorbacks along with a melta jump pack Assault Squad aim for the Hive Tyrant and or Trygon. Right flank my available meltas target the single wound Trygon while Kris' Honour Guard, Assault Squad move to assault Termagants - one of my melta Assault Squads bails out a Razorback ready to assault Hormagaunts.
Shooting the Trygon gets blasted by krak missiles but passes cover :( a las/
plas Razorback finishes it off though. The Hive Tyrant gets blasted by melta, lascannons and plasma and is dead. Hormagaunts and Genestealers get blasted by flamer, bolt pistols and meltas - Dave cleverly removes the 'Stealers at the front so Kris cannot make assault and back me up, though there isn't a huge amount of 'Stealers left...a unit of 3 Warriors on the right flank gets I.D'd by krak missiles leaving no synapse on the right flank. The single wound Trygon gets dusted by a melta shot as the Termagants and Hormagaunts take wounds from mass melta and bolt pistol shots. In the centre my Honour Guard blasts some Termagants with double flamers.
In assault my 5 man flamer Assault Squads charge the Genestealers and Hormgaunts - 'Stealers cause a single wound but a ultimately wiped out along with the Hormagaunts. Honour Guard assault Termagants wiping them out thanks to synapse making them fearless. Termagants on the right flank and multi assaulted and wiped out, Hormagaunts on the right flank take a beating and fall back out of combat - I follow after them so they cannot regroup. Assault Marines charge the Raveners, they lose some to rending but the Raveners go down themselves.
In Tyranids turn the Genestealers finally come in from reserve appearing on the left flank ready to multi charge two Assault Squads; one of mine and one of Kris'. The Hormagaunts on the right flank fall back some more as I'm within 6" which stops them from regrouping as Warriors move to blast some Assault Marines which killed the Raveners.
Shooting Hive Guard blast the Assault Marines which killed the Raveners, the S8 disallowing
FnP and wiping the squad out after failed armour saves leaving the objective only contested by a Vindicator. Tyrannofex fires at
Devs by the Angel objective and kills the Sgt - always the Sgt hey?
lol.
In assault Genestealers multi charge Kris' Assault Marines and my 5 man Assault Squad which has the Priest attached, 'Stealers win combat though due to rules confusion on wound allocation I lost more of my squad than I should have - also Space Marines are not destroyed by sweeping advance and should have taken no retreat! saves. Warriors charge my Honour Guard which are now contesting the centre objective 2, combat is a draw. Tyranid Warriors on the left flank objective multi charge two of my Assault Squads, a Warrior is killed but it's not enough as rending and power weapon attacks slay both squads - the Warriors consolidate onto the left flank objective and claim it.
 * Tactical Notes
Well I must say that went well for Angels that turn. In a combined shooting and assault turn a Hive Tyrant, two Trygons, squad of Warriors, 2 x Hormagaunt units, Genestealer unit, Ravener unit and Termagant unit were all destroyed with the except with a single Hormagaunt unit which failed morale and is being chased off, pretty good! Tyranids didn't do too bad wiping out a Assault Squad with Hive Guard shooting, Warriors killing two 5 man Assault Squads in combat and the 'Stealers killing two Assault Squads also - admittly the 'Stealer combat didn't work out well due to wound allocation which could have left more of my squad alive and Space Marines aren't destroyed by sweeping advance either - mental notes for next time!
Next turn is to move the weaponless Razorback onto the left flank objective and use the Razorbacks to blow away the 'Stealers. Kris will send his Assault Squad to support my Honour Guard in combat with the Warriors on the centre objective 2 while in the centre objective 1 we will use melta to I.D some Warriors as a smaller Assault Squad of mine will claim the objective.
Turn 4
On the left flank the weaponless Razorback moves onto the left flank objective passing terrain test and now contesting the objective. Other Razorbacks position so 'Stealers have to hit in assault if they're not killed. Kris moves his Assault Squad ready to assist my Honour Guard in combat against the Warriors.
Shooting I blast the Genestealers but fail to wipe them out. Vindicators and a Assault Squad with meltas blast remaining Hormagaunts and finish them off. Warriors get blasted by melta shots, but get cover, though some are still wiped out thanks to instant death. A squad of Hive Guard is wiped out by krak missiles on the right flank leaving it pretty much in Angel control. Another squad of Hive Guard gets pounded by krak missiles, but a single Hive Guard still remains from that squad after cover saves.
In assault Honour Guard and Kris' Assault Squad kill the Warriors leaving the centre objective 2 in Angel hands. Assault Squad on the centre objective attempts to move through terrain to assault the other Warrior squad but fails to reach them.
Tyranids turn sees the Genestealers on the left flank go towards the mass of Razorbacks which just shot at them. The Warriors move through terrain towards the Assault Squad which failed to reach them in assault.
Shooting Hive Guard blast some Assault Marines, Tyrannofex does some damage to a Vindicator though I cannot remember what. Warriors blast the Assault Marines with deathspitters.
In assault 'Stealers multi assault three Razorbacks and cause weapon destroyed on one Razor losing the plasmagun and shakes another. Warriors stay in combat with the Angels, though not a lot of Warriors left! Warriors on the left flank objective assault the Razorback which is contesting but just crew stun it.
 *Tactical Notes
This turn hasn't seen massive damage to Tyranids, though a large bulk of Tyranids were destroyed last turn and I think the damage has been done now - just appears Angels are mopping up and just clearing out bug infestations around the objectives.
Next turn is could be all over so will bring a small Assault Squad of mine more into terrain on the centre objective 1 so at least if they do get assaulted terrain tests are needed and the attackers go last. Centre objective 2 I'll bring up my melta Assault Squad to claim it as Kris' squad could be attacked, just in case you know.
Turn 5
I move a small melta Assault Squad onto the centre objective 2 while the H.G in the same ruin move onto the upper floor. I move another of my squads move in terrain on centre objective 1.
Shooting I blast the Genestealers but fail to kill them all. Kris unloads krak missiles killing another Hive Guard as storm bolters rip into the Biovore leaving it with a single wound. Kris Honour Guard unleash melta at another single Hive Guard making sure it's also dead.
In assault the Warriors get beaten up and are killed.
Tyranids turn, Hive Guard blast Kris' Assault Squad by centre objective 2 but half of them still remain.
At this point we call it a day due to time but also Angels have 3 objectives and contest 1 and the Tyranids and no or little chance of winning.
Blood Angels win!
 Summary
That was a very cool epic large ass battle! I really enjoyed it! Gaming wise the combined mech and jump Angel lists worked together very well, the jump infantry hides behind the Razorbacks and the Librarians use shield powers to give the tanks cover -which
btw work 4 times as I passed 4 cover saves, not bad considering people say it's a crap power!
Tyranid did ok - I think what hurts them is the Angels deploying back and those Tyranids not getting into combat until turn 3, though turn 2 the Hive Guard were kicking serious ass mauling Razorbacks.
I enjoyed the game and tactics worked well - jump infantry pops up when Tyranids draw close. I think turn 3 was really a game changer with Angels taking out so many Tyranid units as they did.
Not bad all in all!


 Blood Angels - 2000
  Iron Warriors - 2000
  Orks -2000
  Imperial Guard - 2000
 Eldar - 2000
  Hive Fleet Krakken - 2000
  Dark Eldar - 2000
  Necrons - 2000
  Grey Knights - 2000
  Daemons - 2000
  Ravenwing - 2000

 .....LVO GT 2014 Team Tournament - Best Generals

 oh and no offence taken, was just a general question when I asked why
 Grey Knights -2500
 D'haran First File - 2500
 D'haran Great Company - 1500