| Author |
Message |
 |
|
|
|
|
Advert
|
Forum adverts like this one are shown to any user who is not logged in. Join us by filling out a tiny 3 field form and you will get your own, free, dakka user account which gives a good range of benefits to you:
- No adverts like this in the forums anymore.
- Times and dates in your local timezone.
- Full tracking of what you have read so you can skip to your first unread post, easily see what has changed since you last logged in, and easily see what is new at a glance.
- Email notifications for threads you want to watch closely.
- Being a part of the oldest wargaming community on the net.
If you are already a member then feel free to login now. |
|
 |
2012/08/16 14:01:23
Subject: Waterfall terrain
|
|

Fresh-Faced New User
|
Hi people,
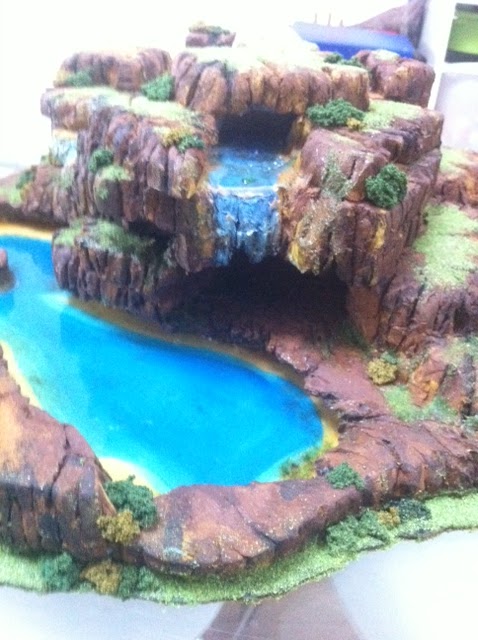
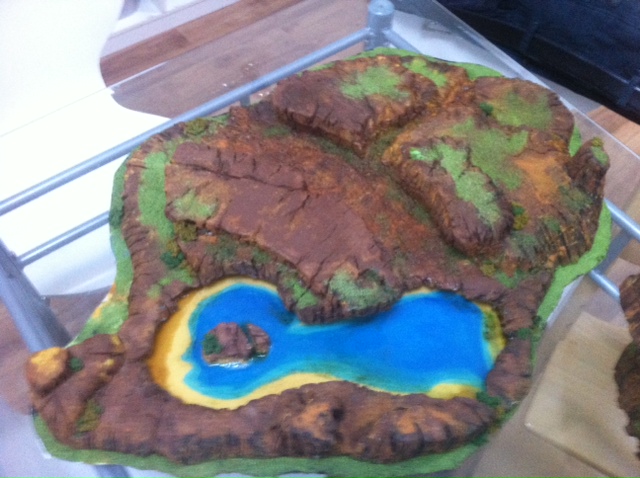
I recently made this:

It was not so hard to do although I had some troubles on the way... anyways please let me know if you want some step by step photos and guidelines on how to do it...
Cheers
Ivan 
|
|
|
 |
|
2012/08/16 14:52:07
Subject: Waterfall terrain
|
|

Shrieking Traitor Sentinel Pilot
|
That is pure win. Your prize? 40,000 WARHAMMERS!
I would love to see a step by step on this.
|
|
|
|
|
2012/08/16 14:54:50
Subject: Re:Waterfall terrain
|
|

Long-Range Land Speeder Pilot
|
amazing!
please could you make a guide?
*typo
|
|
This message was edited 1 time. Last update was at 2012/08/16 14:55:05
|
|
|
|
|
2012/08/16 15:14:47
Subject: Re:Waterfall terrain
|
|
Longtime Dakkanaut
|
i'd be real interested to see how you achieved the waterfall!
|
|
|
|
|
|
2012/08/16 18:34:28
Subject: Re:Waterfall terrain
|
|

Dark Angels Neophyte Undergoing Surgeries
UK
|
Yes please, I would love to see a tutorial. 
|
James
SANITY - Minds are like parachutes. Just because you've lost yours, doesn’t mean you can borrow mine.
 |
|
|
|
|
2012/08/17 13:26:32
Subject: Waterfall terrain
|
|

Norn Queen
|
Beautiful, give us a how to please.
|
Dman137 wrote:
goobs is all you guys will ever be
By 1-irt: Still as long as Hissy keeps showing up this is one of the most entertaining threads ever.
"Feelin' goods, good enough". |
|
|
|
|
2012/08/17 14:25:13
Subject: Waterfall terrain
|
|
Longtime Dakkanaut
The ruins of the Palace of Thorns
|
A tut would be great.
|
|
|
|
|
|
2012/08/17 21:13:03
Subject: Waterfall terrain
|
|
Fresh-Faced New User
|
Glad to hear you like it, I will post tut next weekend when i'll be home. cheers!
|
|
|
|
|
2012/08/29 19:19:02
Subject: Re:Waterfall terrain
|
|
Traitor
|
YES! Please educate me!
|
|
|
|
|
2012/08/29 20:22:51
Subject: Re:Waterfall terrain
|
|
Dark Angels Neophyte Undergoing Surgeries
UK
|
I too would like a tutorial
|
James
SANITY - Minds are like parachutes. Just because you've lost yours, doesn’t mean you can borrow mine.
|
|
|
|
|
2012/08/30 09:52:12
Subject: Re:Waterfall terrain
|
|
Fresh-Faced New User
|
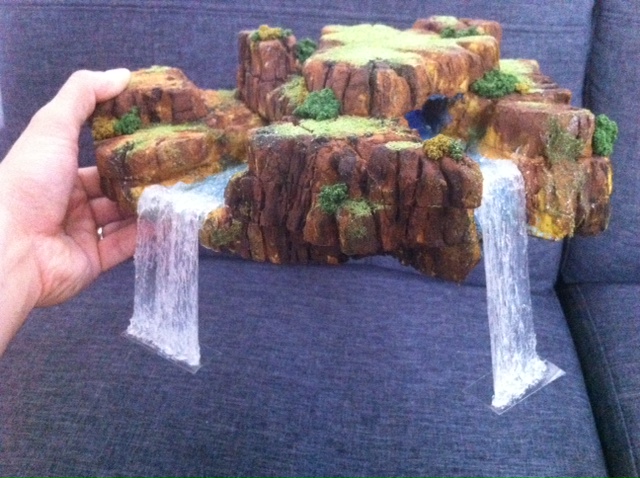
Step 1
I got some high density polystyrene from the shop near by (Bauhaus - German Home Depot). It is used for isolation and is really cheap, it costs something like 3-4$
What you also need is some knives, scalpels (cheapest you can get), PVA glue (cheapest you can get), toothpicks, piece of plywood for the base (I used some thin kapa fix board which turned out not to be a good choice couse it doesnt hold shape on higher temperatures is not paint friendly), acrilyc (hobby) paints and some brushes (both cheapest you can get), silicone (clear transparent type), plastic bottle (clear, not colored), acrylic based artifical water (I used Vallejo still water). Keyword is, you gessed it - CHEAP!
|
|
This message was edited 1 time. Last update was at 2012/08/30 10:02:29
|
|
|
|
|
2012/08/30 10:21:21
Subject: Re:Waterfall terrain
|
|
Fresh-Faced New User
|
Step 2
I have sketched really rough sketch on paper, then make cut lines with pencil on styrofoam, cut the parts and arranged the hill with cutted pieces.
|
|
|
|
|
2012/08/30 10:26:45
Subject: Re:Waterfall terrain
|
|
Fresh-Faced New User
|
Again keep in mind bases of your minis must fit...
|
|
This message was edited 1 time. Last update was at 2012/08/30 10:34:41
|
|
|
|
|
2012/08/30 10:33:24
Subject: Re:Waterfall terrain
|
|
Fresh-Faced New User
|
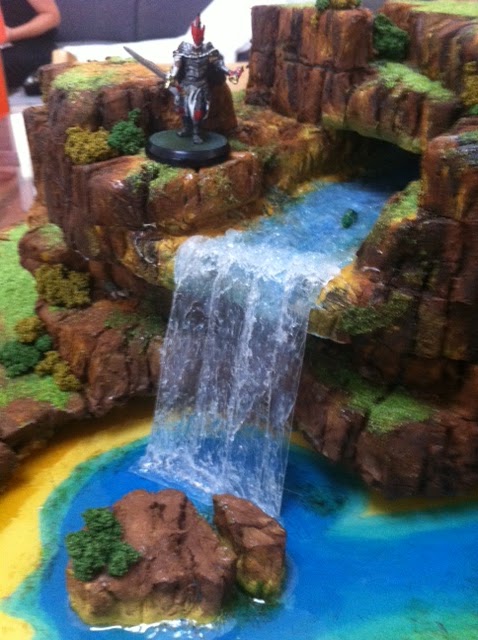
Step 3
I wanted a tunnel from one side to another... soooo the top of the hill had to be detachable 
I then glued layers but the detachable layer was glued very lightly so it could be removed after curving. It is good to put some toothpics to connect layers and make them more sturdy.
|
|
This message was edited 2 times. Last update was at 2012/08/30 15:02:21
|
|
|
|
|
2012/08/30 10:58:28
Subject: Re:Waterfall terrain
|
|
Fresh-Faced New User
|
Step 4
Carving
It is done by knives which I found in the kitchen draw and by scalpel(s). Scalpel is quickly abated so do not use exacto knives or any other expensive tools... Don't curve with strokes toward you... it is a bit dangerous Just play ith it and give it a go, PS is great for carving rocks...
I did also the tunnel since it will be visible when top is detached.
I curved the lake also in this stage.
|
|
|
|
|
2012/08/30 11:00:07
Subject: Waterfall terrain
|
|
Storm Trooper with Maglight
|
wow nice im subbed im about to start a waterfall feature for my terrain board im making.
|
|
|
|
|
2012/08/30 11:05:46
Subject: Re:Waterfall terrain
|
|
Fresh-Faced New User
|
The tunel is tall enough for a trooper but anything bigger won't fit :(
You can carve the floor also so you don't need much flock, it will look like a dry riverbed. Also this PS board had currogated surface which I leveled with knife and it turned out nice, bit cracked... imo nice anyway... Automatically Appended Next Post:  brainscan wrote: brainscan wrote:wow nice im subbed im about to start a waterfall feature for my terrain board im making.
Hope this help, it was fun for me but I made some mistakes on the way... Automatically Appended Next Post: Oh... forgot to say, PS stays for high density Polystyrene foam.
|
|
This message was edited 2 times. Last update was at 2012/08/30 12:09:44
|
|
|
|
|
2012/08/30 14:38:59
Subject: Re:Waterfall terrain
|
|
Fresh-Faced New User
|
Step 5
Paintin'
If you have some black/brown acrilyc save it for minis. This is best done with plain ol' brushes and cheap acril hobby paint because you have to put paint in all dents and cracks and spray can would be gone in minutes... I used these brown, light brown and black. aply generously and let it splash and mix while the paint is wet, dont wait to long for one layer to dry, again just play with it, if not satisfied just paint it again.
|
|
|
|
|
2012/08/30 14:54:18
Subject: Re:Waterfall terrain
|
|
Fresh-Faced New User
|
Step 6
Somewhere during painting I put some PVA glue and dipped some stones, also I mixed PVA glue and water and applied it with brush and then sprinkle some fine sand onto it...
Automatically Appended Next Post: Soe of this pics ar bad quality, please forgive me for that, they are taken in the heat of the battle ...
|
|
This message was edited 2 times. Last update was at 2012/08/30 15:00:33
|
|
|
|
|
2012/08/30 15:07:47
Subject: Waterfall terrain
|
|
Longtime Dakkanaut
The ruins of the Palace of Thorns
|
Great stuff. Thanks for this.
|
|
|
|
|
|
2012/08/30 15:27:53
Subject: Re:Waterfall terrain
|
|
Fresh-Faced New User
|
Step 7
DISASTER ON THE HORIZON
Making the lake (1 attempt)
So until now it was all fun... I painted the lake in blue and yellow and made a small island... also I painted the riverbeds on upper levels. After that I glued everything onto kapa fix board and left it overnight to dry...
Then I decided not to puchase Acrilyc water effect but to go with much cheaper poliester resin... BIIIIIG mistake, it just ate through PS and small island almost entirely dissolved... I waited to dry which thankfully happened fast and with deep breath cutted the bottom from the upper part and then glued what was broken... The damage was not big but it could have been... Then I went and bought Vallejo Still water and repeated the process. It turned out great
|
|
|
|
|
2012/09/02 07:43:00
Subject: Waterfall terrain
|
|
Fresh-Faced New User
|
After cleaning and repairing the mess i did with poliester resin I finally decided to spend some money and buy Vallejo still water. I glued the rocks unto base with lake painted on it and pured about 3 mm thin layer of Still water and then the second layer after first one has hardened (12 houers or so). It tourned out nice but crackled a bit around the island. It doesn't bother me a lot and it maybe could be avoided if i waited more to add second layer. One thing i did wrong is that it turned out that the borders of lake and waterbeds must be sealed tighter, i lost plenty off Still water since my sealing was not that tight.
Please excuse the amazing amount of grammar/spelling mistakes. I'm Croatian and writing in a bus on my iphone keyboard.
cheers
|
|
|
|
|
2012/09/06 11:08:32
Subject: Waterfall terrain
|
|
Erratic Knight Errant
|
Fantastic tutorial! Thanks for the warning about the dissolving stuff, I'm always worried about that when I consider trying water for my bases.
i-one wrote:
Please excuse the amazing amount of grammar/spelling mistakes. I'm Croatian and writing in a bus on my iphone keyboard.
That is the best excuse ever.
|
|
|
|
|
|
2012/09/06 12:45:01
Subject: Waterfall terrain
|
|

Synchronized Devabot
Adelaide, AUS
|
Think I'm gonna build a big ass hill with some water on it now! haha
Looks nice, good job.
|
|
|
|
|
|
2012/09/07 08:51:34
Subject: Waterfall terrain
|
|

Thunderhawk Pilot Dropping From Orbit
|
This is great, nice job.
I am going out to get some stuff and build my own.
|
|
|
|
|
|
2012/09/07 09:54:26
Subject: Waterfall terrain
|
|
Warp-Screaming Noise Marine
|
this is marvelous im gonna make 1 for my desert board as a oasis sort of things
|
|
|
|
|
2012/09/12 18:11:12
Subject: Waterfall terrain
|
|
Blood Angel Neophyte Undergoing Surgeries
|
So cool! I'm totally going to use this when I make my table.
|
 7000 7000 |
|
|
|
|
2012/09/18 15:47:11
Subject: Re:Waterfall terrain
|
|
Imperial Recruit in Training
Casper, Wyoming
|
Very Nicely done. An excellent piece of wargamming terrain.
|
 3000 3000
 10000+ 10000+
 3200 3200
 2600 2600
 500 500
 1800 1800
 4500 4500 |
|
|
|
|
2012/09/19 08:59:31
Subject: Re:Waterfall terrain
|
|
Fresh-Faced New User
|
Hi guys...
After some time here are some new pics.
After the fiasco with above mantioned resin I poured some Still Water and it turned out quite nice.
Beware however that it is very liquid and it has to be sealed tightly. I lost quite a bit because of bed sealing (don't use clay).
 Automatically Appended Next Post:
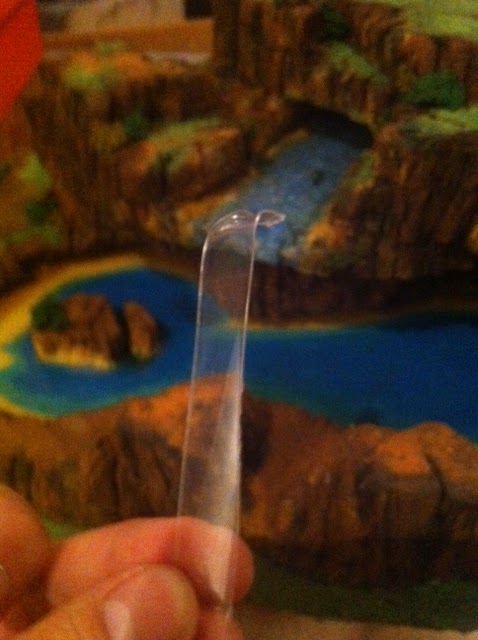
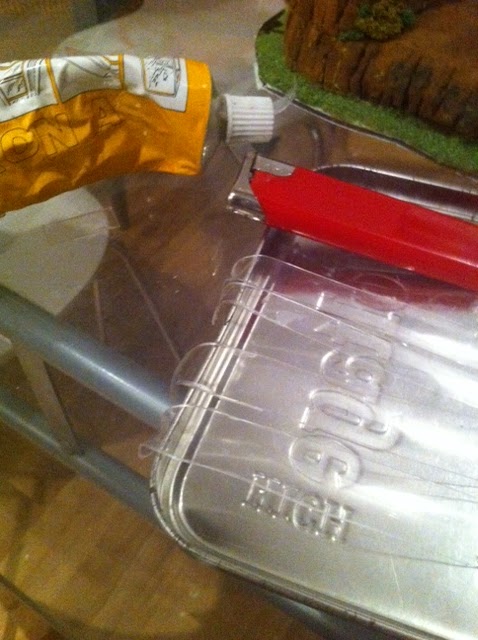
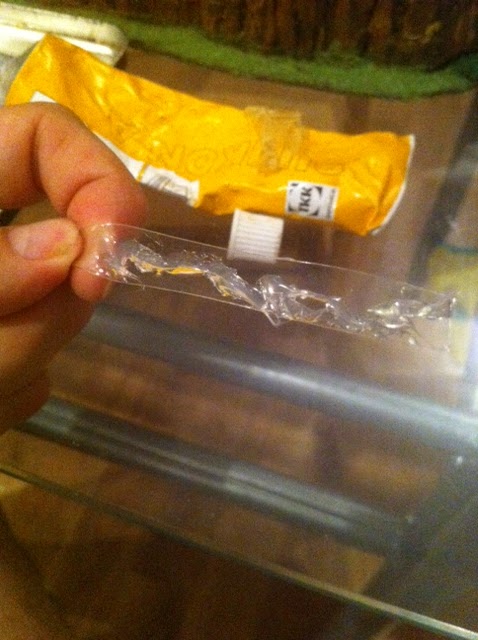
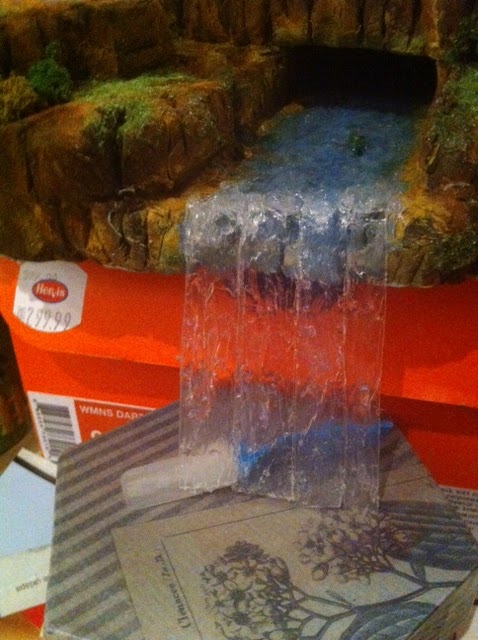
 Step 8
Making the waterfalls
- paint the riverbed if you haven't and seal the surface with Still water (jut use your brush) so silicone would not eat the styrofoam (not sure if it would without the still water - probably not)
- cut some ribbons of plastic from plastic bottle. The height should be a bit larger than height of the waterfall
- heat the top of the ribbon with a lighter (gently, do not touch it with flame it will turned black) to have a curved surface
- put some clear silicone on it and spread it in the direction of falling water with a popsicle stick
- let it dry (day or two)
- attach the ribbons to the riverbed with a superglue and put some superglue to connect ribbons together.
- attach smaller ribon on lower end of waterfall with some silicone to simulate splashing of water and to have the nice connection with lake below. This will also be a nice foothold when upper part is placed on top. also the lowerpart can function as lake since all of the elements of waterfalls are on the upper part which can be removed and instead of it you can plase a mountain pice and so can have more variations of terrain 
- put some silicone on the riverbed which you painted blue and cover with some Still water and splash it in direction of waterfall with a popsicle stick
- flock it some more if you heaven't (I use Jarvis stuff)
DONE!
Here are the pics for above mentioned steps

Again, please excuse any typing/spelling/grammar mistakes 
|
|
This message was edited 1 time. Last update was at 2012/09/19 09:15:25
|
|
|
|
|
2012/09/19 14:45:46
Subject: Waterfall terrain
|
|

Krazed Killa Kan
|
This is quite amazing. I really appreciate this tutorial and will most certainly try this out in the future.
Thanks
|
 2500 2500  4000 4000  4000 4000  5000 5000 5000 5000
DE 2500 TS: 2500  2500 2500 |
|
|
|
|
|
|


