Forum adverts like this one are shown to any user who is not logged in. Join us by filling out a tiny 3 field form and you will get your own, free, dakka user account which gives a good range of benefits to you:
No adverts like this in the forums anymore.
Times and dates in your local timezone.
Full tracking of what you have read so you can skip to your first unread post, easily see what has changed since you last logged in, and easily see what is new at a glance.
Email notifications for threads you want to watch closely.
Being a part of the oldest wargaming community on the net.
If you are already a member then feel free to login now.
2012/10/30 20:04:26
Subject: How to make Storm Shields on the cheap, from spare bits any self respecting Space Marine should have
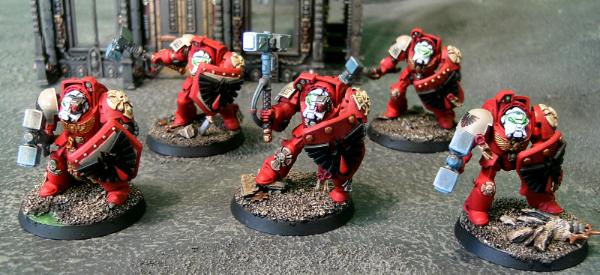
Hi guys. Basically, I am going to show you all how to make a Storm Shield, simply and effectivley using spare bits. I was telling friend how I would make them should I need them, and decided to put up a tutorial.No fancy cutting or sculpting, just these.
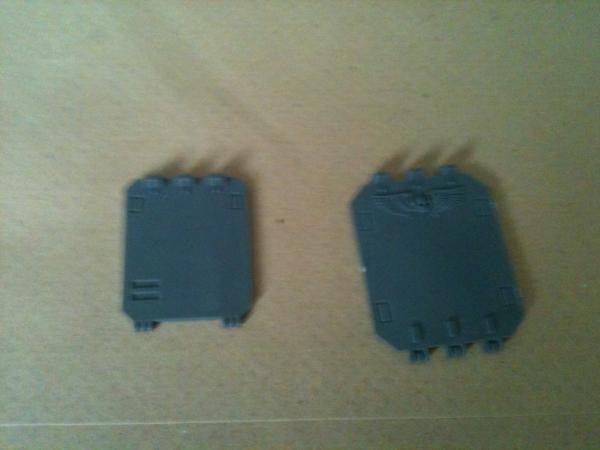
On the left is a Rhino Door, the right a Land Raider door. Personally I find Land Raider one a little big but play around, see what you like.
I am making this one here for the friend mentioned above, and he has Blood Angels so I will be making a BA version.
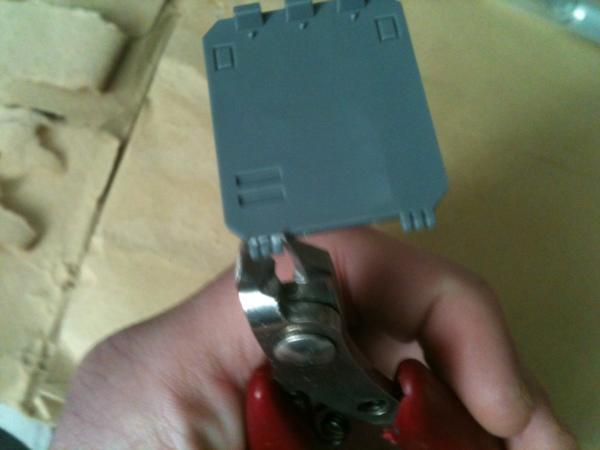
Simply remove the hinges as above, and if you wish you can take offthe bolts andbits at the top but I am leaving mine on. Then clean and flie as normal.
Next, take
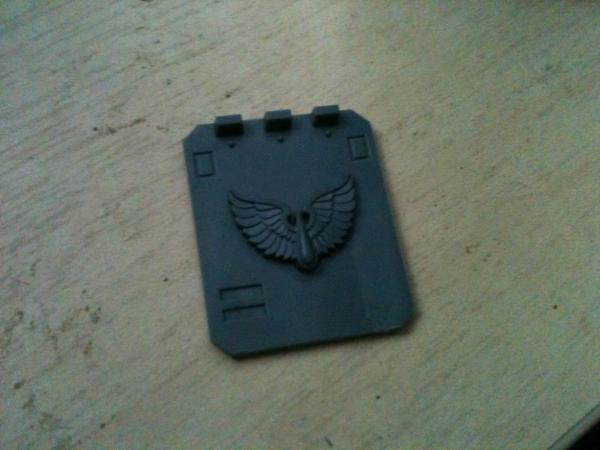
1- A raises decal. The ones from the Drop Pod work well on the Rhino but are tiny on the LR. I am using the BA icon from the Stormraven kit. These and the GK icon from the SR work well. Note that the LR door already has a raised winged Skull at the top.
2- A transfer. Easy to do and find.
3- paint some freehand.
Take your decal and simply glue it on.
And it you wish to add a handle all you need is this
A meltabomb.
There you have it. Cheap, and everyone should have at least 1 rhino door on hand.
I'm celebrating 8 years on Dakka Dakka!
I started an Instagram! Follow me at Deadshot Miniatures! DR:90+S++G+++M+B+IPw40k08#-D+++A+++/cwd363R+++T(Ot)DM+ Check out my Deathwatch story, Aftermath in the fiction section!
Credit to Castiel for banner. Thanks Cas!
2012/10/30 20:26:12
Subject: How to make Storm Shields on the cheap, from spare bits any self respecting Space Marine should have
Yeah, I'd like to see it on a model. Looks a little bit big to me.
Looking for great deals on miniatures or have a large pile you are looking to sell off? Checkout Mindtaker Miniatures.
Live in the Pacific NW? Check out http://ordofanaticus.com
2012/10/30 20:37:48
Subject: Re:How to make Storm Shields on the cheap, from spare bits any self respecting Space Marine should have
To clarify, what I mean is that I still feel like it's just a Rhino door. I mean, I'm pretty sure my roommate's Blood Angels have that exact same bit glued on their actual Rhino doors.
I'm not saying it's bad, I'm just saying it's only a start. It needs more.
If you want a cheap stormshield, go for the rhino hatch (the round ones), chop off the hinges , smooth out the zigzaggy line with some GS and then put an icon on that.
Looking for great deals on miniatures or have a large pile you are looking to sell off? Checkout Mindtaker Miniatures.
Live in the Pacific NW? Check out http://ordofanaticus.com
2012/11/24 19:29:12
Subject: Re:How to make Storm Shields on the cheap, from spare bits any self respecting Space Marine should have
I have to concur that these will be way too big for a tac marine. I do like the idea of using a handle from a meltabomb though.
I made some scratchbuilt storm shields as well. I'll spoiler it to not threadjack too badly.
Spoiler:
1.) This was pretty easy. All you need is some scratch stryene - I used some a little thicker than a credit card, and some molding\casting material. If you aren't set up for casting, I imagine you can use greenstuff and that reusable quickmold stuff. Or, you can just make them all manually, it's not too tedious.
2.) Cut a shield shape from the styrene. Cut another one that is similarly shaped but a little smaller. Glue the smaller one atop the larger one, and add some rivets. Make a cast of these.
3.) Pour the resin and wait until it's almost cured. You can test by touching it with a toothpick it will be soft but not sticky. Carefully demold it, and then stick it to the side of a bottle to give it a curve.
4.) At this point, you can add some iconography to it, such as the icons from the drop pod box or whatever, or just use decals after painting. I went with a Blood Raven icon that I made the same way as the shield - cut out of styrene, cast, and soft-molding to the shape of a bottle.
lord_blackfang wrote: Respect to the guy who subscribed just to post a massive ASCII dong in the chat and immediately get banned.
Flinty wrote: The benefit of slate is that its.actually a.rock with rock like properties. The downside is that it's a rock


 7000
7000