Forum adverts like this one are shown to any user who is not logged in. Join us by filling out a tiny 3 field form and you will get your own, free, dakka user account which gives a good range of benefits to you:
No adverts like this in the forums anymore.
Times and dates in your local timezone.
Full tracking of what you have read so you can skip to your first unread post, easily see what has changed since you last logged in, and easily see what is new at a glance.
Email notifications for threads you want to watch closely.
Being a part of the oldest wargaming community on the net.
If you are already a member then feel free to login now.
2023/11/02 06:26:07
Subject: The (Mini) Details of Dr H: Now: Messerschmitt Bf 109 in flames.
This time with some wip. I'll spoiler life stuff at the bottom (and type this here to remind me to add it)
Full disclosure, this is not my idea: I saw a photo pop up on Mastodon and had to make one of my own (well, as a present).
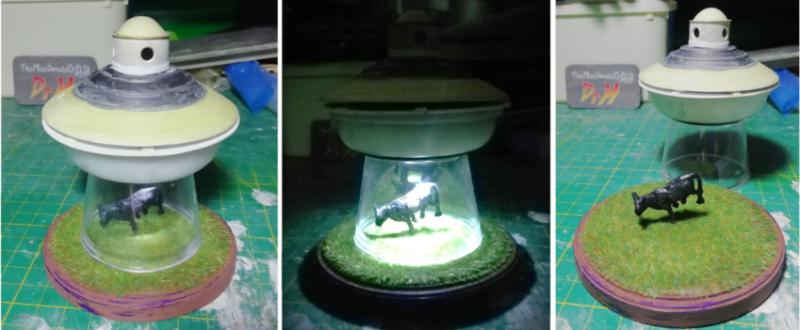
UFO abducting cattle.
First, I had to find a tiny cow model. Check! There was one amongst the model train stuff.
Then a clear, cone-shape. To act as the traction beam and support the UFO. I had a couple of options in my junk collection, selected the best. Check!
And find bits to create the UFO out of. Check! Back into the junk collection...
Pick out suitable and working LEDs and design a functioning circuit. This is explained below...
Obviously, if the UFO is to be standing on a clear cone, the battery for any LEDs has to be in the UFO.
If the battery and LEDs are in the UFO, so to does the circuitry and "switch".
Therefore you need to access the interior of the UFO if only to replace the battery.
Long story short; I decided that I'd use magnets to afix the top to the bottom of the UFO, AND use them to complete the electric circuit.
You may be able to twist the top to act as the switch (this did not pan out).
Starting from the bottom.
I have an LED pointed down and the legs drilled through the plastic support and spread in opposite directions.
I built a battery housing out of plastic with a piece of metal to act as contact to the underside of a button battery CR2032.
This metal folds under the plastic and was soldered to the negative side of the lower LED and to a free wire (that will be for the upper LED).
Another wire was soldered to the positive side of the lower LED, but not connected to anything yet.
This is the first picture below.
Using hot glue I insulated all that and afixed the battery housing to the top of the lower LED housing.
Leaving the battery roughly in line with the mid-point of the UFO between upper and lower halves.
This is the second picture below.
The upper half would therefore contact the positive side of the battery in a sandwich.
The upper LED was attached to a plastic support and the legs soldered to wires, like the lower one.
The wires were left relatively long to allow me to position it into the upper half of the UFO after checking the circuit.
The ends of all 4 free wires (2 in top and 2 below) were soldered to pieces of metal (that were electrically conductive AND magnetic),
And one final wire was soldered to the positive end of the upper LED and to another piece of metal (this would lead to the top of the battery).
The theory being that with the battery sat in the lower half, the negative underside would contact the metal that would take it to the negative contact of the bottom half, and the -ive side of the lower LED.
A magnet would connect that to the -ive side of the upper LED in the top half.
With the top half attached, the central contact would join the positive side of the battery to the +ive side of the upper LED (completing it's circuit), and to the positive contact of the upper half.
Another magnet would connect this to the +ive side of the lower LED (completing it's circuit).
This is the 3rd (middle) picture below.
In reality, both LEDs would not reliably light at the same time.
So I settled on creating a two-position setup where you can have one or the other LED lit.
I fixed the contacts in place using putty (big blob, press both halves together, remove excess).
I added a third magnetic attachment point to give a firm join, but this does nothing electrically.
I used 2 pegs (plastic rod) in the upper half and 4 holes (plastic tube) in the lower half to position the contacts in one of 2 options.
Getting everything lined up reliably has been tricky, but if you work on one at a time it's much easier than you expect at first.
I filled in around all these various attachment points to make it neater.
And this is the final picture below.
With it all together you have the unpainted result below:
It amuses me that there is clearly not enough room for that cow in that UFO.
Now to paint it.
Life:
Spoiler:
Has not been very exciting.
My absence it not the result of terrible news. Such as alien abduction.
No, it's just low motivation and easy distractions.
I haven't reopened my shop, so I don't "need" to build anything for that,
And I found that building 4 projects ready for Christmas every year was too much, so I've cut down there too (hence the dice towers previously):
I did try to create some game token trays for this past Christmas, but didn't make anything that worked satisfactory and so just bought some. (and so I had nothing to show you lot).
As for creativity; No new Fallout 4 settlement builds, because I've been editing my "How I build in Fallout 4" video series for my YT channel.
Dipping in and out, these take a long time to edit. but do somewhat satisfy creativity.
I have shared these videos on here before, but if you want to check out the tours of finished settlements, or see the effort that goes into building them:
https://www.youtube.com/channel/UCv_FpU4V0PkDHZjkXubkW9Q Should work.
In other news...
I am deep in Baldur's Gate 3.
I started a second playthrough before finishing the first and played them in tandem.
Then when I finished the first, started a 3rd and am playing that in tandem with the 2nd (that is nearing the end).
Life is mostly BG3.
And that is the main reason for my absence.
If you are ever looking for signs of life, I am active on Mastodon. Follow me at @DrH@warhammer.social
I'm always reposting past works daily, but am willing to chat there.
My Facebook page only gets posts of new, finished projects (such as models and videos). But you get that here anyway.
I log in, post, and log out.
And I deleted my Twitter not long after it was bought by a facist idiot.
I don't miss it, only the artists I followed there, that haven't migrated to Mastodon.
So, I'm still kicking.
Hope you are all well.
I'll try and check in on your work soon.
Thanks for sticking around.
Mastodon: @DrH@warhammer.social
The army- ~2295 points (built).
* -=]_,=-eague Spruemeister General. * A (sprue) Hut tutorial * Dsteingass - Dr. H..You are a role model for Internet Morality! // inmygravenimage - Dr H is a model to us all Theophony - Sprue for the spruemeister, plastic for his plastic throne! // Shasolenzabi - Toilets, more complex than folks take time to think about!


 // inmygravenimage - Dr H is a model to us all