| Author |
Message |
 |
|
|
|
|
Advert
|
Forum adverts like this one are shown to any user who is not logged in. Join us by filling out a tiny 3 field form and you will get your own, free, dakka user account which gives a good range of benefits to you:
- No adverts like this in the forums anymore.
- Times and dates in your local timezone.
- Full tracking of what you have read so you can skip to your first unread post, easily see what has changed since you last logged in, and easily see what is new at a glance.
- Email notifications for threads you want to watch closely.
- Being a part of the oldest wargaming community on the net.
If you are already a member then feel free to login now. |
|
 |
2013/10/27 02:14:01
Subject: battle damage and weathering power armour
|
|

Regular Dakkanaut
|
I have been doing the rounds on Google and searching forum threads but wanted to ask the question anyway in case I missed neat tips etc
I've started a custom SM chapter which is to be comprised solely of old models I've found cheap as chips or traded for, stuff I've had to strip of paint and that's generally not good enough to be in my precious SWs or shiney IFs lol
As a result I want them to look purposely worn and damaged, also fits nicely with the fluff I'm making for them
the scheme is a light green (think camp green more or less) one black shoulder, one scab red shoulder, with bone color trims and back pack.
Any tips, links to relevant tutorials etc on how to make said light green scheme damaged from various weapons (blades type damage in particular right now) would be very helpful
|
|
|
 |
|
2013/10/27 03:40:13
Subject: battle damage and weathering power armour
|
|

Monstrous Master Moulder
Space Cowboy Cruising Around Olympus Mons
|
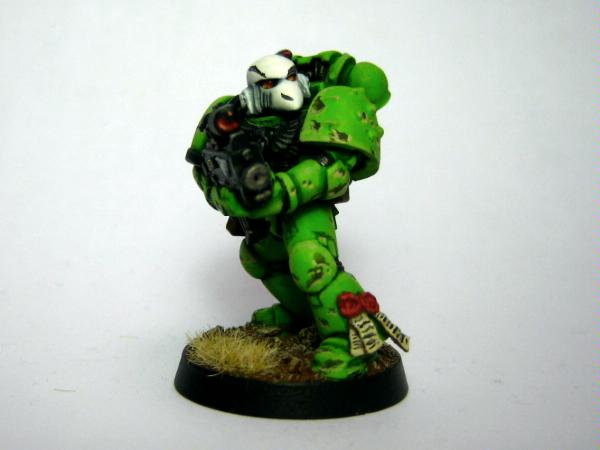
Well with blade damage I have seen people actually cut little marks into the plastic/resin and then just paint it a silver on the inside and edges.
Or you can make some knicks and dents with a hobby knife and then paint the power armour green and then a lighter green around the edges of the damage then black or silver inside the damge.
Something like this?
|
|
|
|
|
2013/10/27 11:08:10
Subject: battle damage and weathering power armour
|
|
Regular Dakkanaut
|
You'd do a lighter green edge? I wasn't sure if it should be a darker green or black see
|
|
|
|
|
2013/10/27 12:13:49
Subject: Re:battle damage and weathering power armour
|
|
Pustulating Plague Priest
|
I tend to dry brush boltgun metal after painting a marine to make it look like some of the armor paint wore off. Don't know how well that would work with light green though...
|
|
This message was edited 1 time. Last update was at 2013/10/27 12:15:23
   Faithful... Enlightened... Ambitious... Brethren... WE NEED A NEW DRIVER! THIS ONE IS DEAD! Faithful... Enlightened... Ambitious... Brethren... WE NEED A NEW DRIVER! THIS ONE IS DEAD! |
|
|
|
|
2013/10/27 12:20:14
Subject: Re:battle damage and weathering power armour
|
|

Bounding Black Templar Assault Marine
|
http://www.dakkadakka.com/gallery/images-71585-34964_Dark%20Angels.html
I did the damage on my dark angels by taking small bits of sponge, cut/ripped to different shapes, dipped them in chainmail silver, blotting the sponge onto a paper towel to get a fair amount of the paint off, then dabbing the parts of the model I wanted to look chipped. It's not as nice looking as some of the mode in depth methods out there, but served the purpose I was after. You could change the color you use to a dark gray or dark green and do the same thing. After it's sponged on you could do the edging to give it more depth...I just chose not to.
|
 1300 points 1300 points
|
|
|
|
|
2013/10/27 13:56:56
Subject: Re:battle damage and weathering power armour
|
|
Regular Dakkanaut
|
 wikkedj wrote: wikkedj wrote:http://www.dakkadakka.com/gallery/images-71585-34964_Dark%20Angels.html
I did the damage on my dark angels by taking small bits of sponge, cut/ripped to different shapes, dipped them in chainmail silver, blotting the sponge onto a paper towel to get a fair amount of the paint off, then dabbing the parts of the model I wanted to look chipped. It's not as nice looking as some of the mode in depth methods out there, but served the purpose I was after. You could change the color you use to a dark gray or dark green and do the same thing. After it's sponged on you could do the edging to give it more depth...I just chose not to.
That's a tactic I considered as it happens, I think it looks good on your dark angels. Maybe something like that and then physically scar some of the models too
|
|
|
|
|
|
|