| Author |
Message |
 |
|
|
|
|
Advert
|
Forum adverts like this one are shown to any user who is not logged in. Join us by filling out a tiny 3 field form and you will get your own, free, dakka user account which gives a good range of benefits to you:
- No adverts like this in the forums anymore.
- Times and dates in your local timezone.
- Full tracking of what you have read so you can skip to your first unread post, easily see what has changed since you last logged in, and easily see what is new at a glance.
- Email notifications for threads you want to watch closely.
- Being a part of the oldest wargaming community on the net.
If you are already a member then feel free to login now. |
|
 |
2018/02/11 23:02:51
Subject: Assembling legs with many points of articulation (knights etc) - any tricks?
|
|

Last Remaining Whole C'Tan
|
Hi guys,
I recently built a Chaos Knight, and yesterday I built a Thanatar. I have a few models left like that to assemble so I need to try and figure something out now. I'm having a hell of a time getting the legs to "level" out when the model is done, even with heavy pinning all throughout. Each leg has around 4 different points of articulation - ankle, knee, 2 different hip connections - so there is a total of like 8 moving parts. That makes for some pretty dynamic models but it also makes it really hard to get the robot or knight assembled and have the feet be level on the floor when it's done.
Do you guys have some kind of trick for holding all of these components in place when assembling? Doing them 1 joint at a time left me with one join creaking or cracking every time I re-positioned another one, it seems like.
Thanks!
|
 lord_blackfang wrote: lord_blackfang wrote:Respect to the guy who subscribed just to post a massive ASCII dong in the chat and immediately get banned.
 Flinty wrote: Flinty wrote:The benefit of slate is that its.actually a.rock with rock like properties. The downside is that it's a rock
|
|
|
 |
|
2018/02/11 23:09:28
Subject: Assembling legs with many points of articulation (knights etc) - any tricks?
|
|
Regular Dakkanaut
|
Does the model have a base? If so, then perhaps you don't need to worry about level feet... level it out with terrain on the base!
I had the same problem when building Meka-G, and he has hardly any points of articulation! (just ankle and knee, but his hips still didn't end up level). I ended up with a slice of plasticard under his left foot to bring him level.
|
|
|
|
|
2018/02/11 23:15:05
Subject: Assembling legs with many points of articulation (knights etc) - any tricks?
|
|
Last Remaining Whole C'Tan
|
Coh Magnussen wrote:Does the model have a base? If so, then perhaps you don't need to worry about level feet... level it out with terrain on the base!
 Yeah, they do. I tried that with first one, I think - the Knight - and it still was kind of screwed up. But maybe that's because it was the first time I built one with complex legs like that. Probably a good place to start.
In retrospect I also had the feet backwards on the knight initially, which didn't help.
|
|
This message was edited 1 time. Last update was at 2018/02/11 23:15:41
lord_blackfang wrote:Respect to the guy who subscribed just to post a massive ASCII dong in the chat and immediately get banned.
Flinty wrote:The benefit of slate is that its.actually a.rock with rock like properties. The downside is that it's a rock
|
|
|
|
|
2018/02/11 23:15:32
Subject: Assembling legs with many points of articulation (knights etc) - any tricks?
|
|
Utilizing Careful Highlighting
|
Generally for that kind of situation, I’ll set up the model and kind of eyeball what sort of pose I’m going for. Then I’ll set up a single leg and glue it into the posture it will have. Once it’s dry I’ll set it on the base, assemble the second leg into position, and glue it into place as well using the first leg as a framework.
It’s a lot easier with plastic models where you can just use plastic glue and move it around until you’re satisfied, but superglue does have a very brief window it’s still flexible enough that you won’t weaken the strength by adjusting it a bit.
If it’s a situation where you’re going to be pinning legs though, then you’ll probably have to set them in place then adjust the terrain to match up to the feet.
|
|
|
|
|
2018/02/11 23:16:09
Subject: Re:Assembling legs with many points of articulation (knights etc) - any tricks?
|
|

Longtime Dakkanaut
|
Masking tape / blutack / props to hold things in position temporarily while you sort the pose.
Remove the tape from, and work on, one joint at a time. Usually a good idea to start with the hips, as this sets the position for the overall pose/feel.
Use a sharpie or similar marker to make alignment marks before pinning each join.
When pinning, drill one hole on one part, put blutack on the other, wet liberally with lubricant (saliva works very well unless you want to use vaseline or similar then clean up with alcohol prior to priming), then press together. This produces a nub with acts as both location and indicator of direction for the second hole.
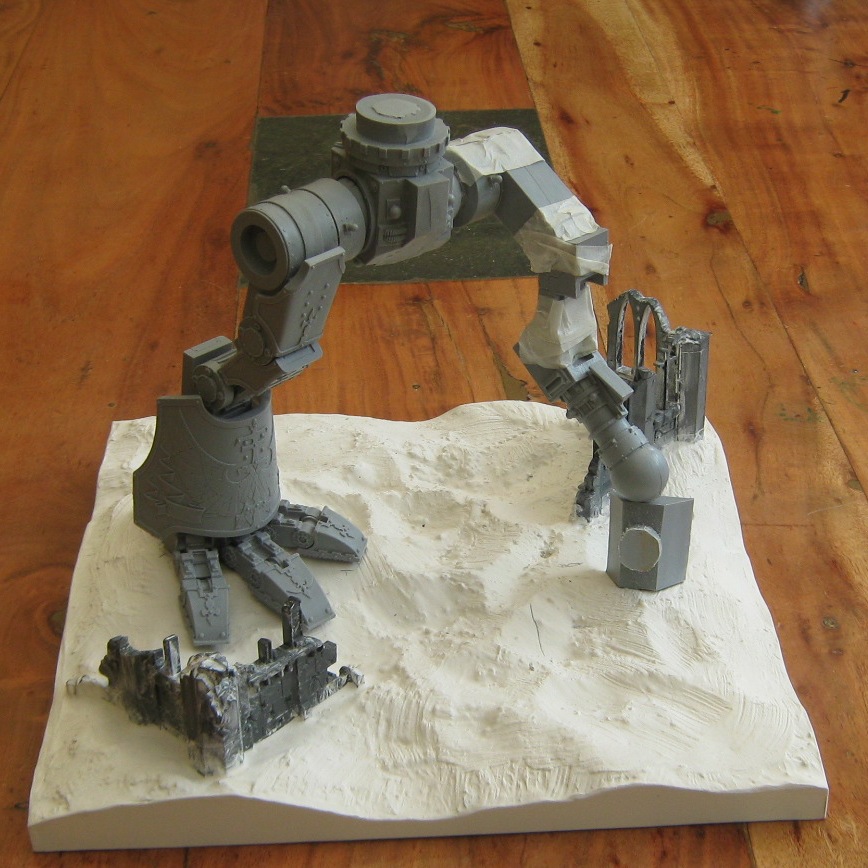
After pinning each join, check / set the overall pose again, and repeat the process pinning the next. Take your time, and do check each time.
Looks a bit like this as you go, though that's actually an incorrect part (mid leg awaiting replacement) that's taped up there.
|
|
|
|
|
|
2018/02/11 23:50:48
Subject: Re:Assembling legs with many points of articulation (knights etc) - any tricks?
|
|
Last Remaining Whole C'Tan
|
Masking tape - that's a cool idea. Thanks! Along with the alignment marks.
I'm working my way up to finally building my warhounds so better get this figured out now.
|
lord_blackfang wrote:Respect to the guy who subscribed just to post a massive ASCII dong in the chat and immediately get banned.
Flinty wrote:The benefit of slate is that its.actually a.rock with rock like properties. The downside is that it's a rock
|
|
|
|
|
2018/02/12 11:30:13
Subject: Assembling legs with many points of articulation (knights etc) - any tricks?
|
|
Fixture of Dakka
|
I finally assembled the hip joint of my Warhound last night, as it happens.  I'd planned for a walking pose, with the torso being horizontal on the hip section. as it turned out, after assembling the legs (separately, for painting, they didn't quite line up, so the torso would be tilted slightly (right side slightly lower than the left). After finally pinning and gluing the hip joint together, the torso also leans upward slightly. Oh well, nothing too important, I suppose. the pose still works.
I could have had the torso at the angle I wanted by building up the base, but it's not going on a base, so it'll stand as it is.
|
|
|
|
|
2018/02/12 12:33:19
Subject: Re:Assembling legs with many points of articulation (knights etc) - any tricks?
|
|
Douglas Bader
|
Pin it, pin it again, pin it some more. Ideally your glue shouldn't be doing anything but keeping the pins from sliding back out of their sockets, the whole thing should hold together with just the pins. For complex legs what you can do is drill in from the outside and into/through the joint. Drill your hole from the outside on one part, then position the other part and finish your hole. Since the first half is already drilled the drill bit will immediately go into the second piece and lock the joint in position, and then you can finish the necessary depth without worrying about the alignment shifting. Work your way along the leg, and by the end of it you'll have a solid structure that can sit there as long as necessary for the glue to dry. And don't worry about damaging the surface, as long as you don't drill through sculpted detail bits you can easily cover up the hole with a little green stuff once the model is assembled.
Also, since your goal is to get the legs sitting level on the floor (instead of on a scenic base where you can adjust the base surface to meet the model) you probably want to start at the feet, level on the floor, and work your way up. Use tape or whatever to hold the joints in place so you can get a rough idea of what angle each joint needs to be so that it all ends up in the right pose, but then start making the final holes from the feet up. By the time you get to the top and the hip joints, the last opportunity to adjust the angle, you'll have some rock-solid legs sitting there and all you have to do is align the final joint so that it sits exactly how you want the upper body to line up.
|
|
This message was edited 1 time. Last update was at 2018/02/12 12:34:19
There is no such thing as a hobby without politics. "Leave politics at the door" is itself a political statement, an endorsement of the status quo and an attempt to silence dissenting voices. |
|
|
|
|
2018/02/12 18:14:25
Subject: Re:Assembling legs with many points of articulation (knights etc) - any tricks?
|
|
Last Remaining Whole C'Tan
|
Thanks guys. The second set of legs went a lot smoother.
|
lord_blackfang wrote:Respect to the guy who subscribed just to post a massive ASCII dong in the chat and immediately get banned.
Flinty wrote:The benefit of slate is that its.actually a.rock with rock like properties. The downside is that it's a rock
|
|
|
|
|
2018/02/13 13:00:04
Subject: Re:Assembling legs with many points of articulation (knights etc) - any tricks?
|
|
Fixture of Dakka
|
 Peregrine wrote: Peregrine wrote:Also, since your goal is to get the legs sitting level on the floor (instead of on a scenic base where you can adjust the base surface to meet the model) you probably want to start at the feet, level on the floor, and work your way up. Use tape or whatever to hold the joints in place so you can get a rough idea of what angle each joint needs to be so that it all ends up in the right pose, but then start making the final holes from the feet up. By the time you get to the top and the hip joints, the last opportunity to adjust the angle, you'll have some rock-solid legs sitting there and all you have to do is align the final joint so that it sits exactly how you want the upper body to line up.
As a variant on that, what I should have done is start with one leg - the one where the toes are flat on the ground, assembled upwards to the hip joint, then done the other leg back down again, so I was sure the hip joint was sitting at the angle I wanted, and not got a surprise three months later when I finished painting the thing.
Another thing I did was to use a small amount of superglue on the Warhound's hip ball joints to glue it into position while I drilled the initial pin holes, then broke it apart to finish the holes, before gluing properly with 2-part epoxy.
|
|
This message was edited 1 time. Last update was at 2018/02/13 13:01:29
|
|
|
|
|
|
|
