Written by by Redbeard
This article will go into the construction of a box that hosts display bases, for tournament use.
Why Build This Box
At Adepticon 2008, I noticed that Brian Carlson had his display base for his Player's Choice winning 40k Championship army mounted on a box. And, in that box, he had a CD player, playing music to add to the theme of his army. I thought, wow, that's cool, and thought that I could do quite a bit with something like that.
My design goals for the project were as follows:
- Must be reusable. I have more than one army, and if I'm going to spend the time and money on a display box, I want to be able to use it with whichever army I want to play at the time.
- Must be a reasonable size for actual use in tournaments. There's no point making a monster 5x5 display, as that will be useless at a tournament.
- Must have handles, for ease of moving between tables in a tournament setting. We're looking for functional here.
- Must have space to hold gaming equipment (books, dice, templates, etc).
- Should be able to host gadgets used for cool displays (CD player/speakers, lighting electronics, etc...)
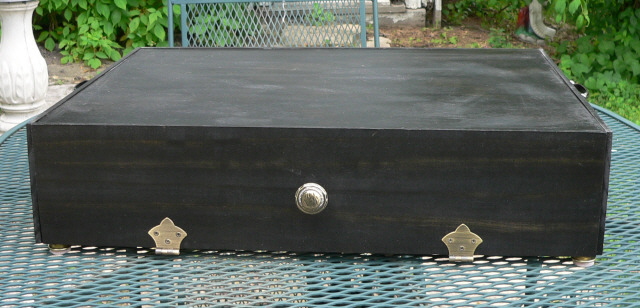
What follows are pictures of what I ended up with, and instructions for how to make one for yourself.
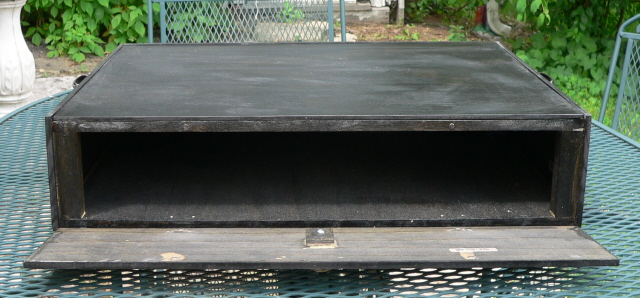
As you can see, the box front opens, allowing access to space to store your books, dice, and so on.
The top is removable, which allows you to interchange displays for whichever army you want to use. Each display board is a 24"x18"x1/4" plywood sheet, easily obtained at local home improvement stores.
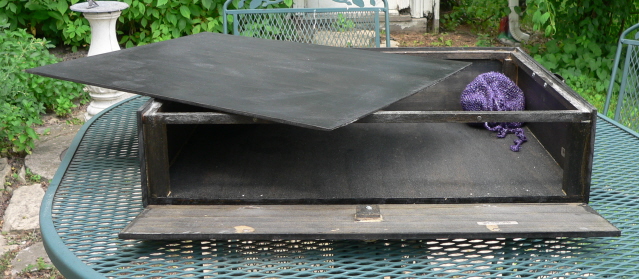
As you can see here, I've changed it from a generic boxtop to the snow base I use for my Slaanesh armies.

Tools Needed
Basic Tool list:
You can make this box with just the hand tools below. Some steps will take longer without using power tools, but it is still possible.
- Drill
- Hammer
- Saw
- Sandpaper
- Wood File
- Screwdriver
- Rag (for applying wood stain)
Advanced Tool List:
Kids - If you're trying this and you're not 18, get your parents to help with any use of powertools. I'm not responsible if you cut your arm off and bleed to death.
- Circular Saw
- Jigsaw
- Powerdrill
- Power Sander
- Clamps
- Dremel w/ Cutting Disc, Sanding Disc attachments
Materials Needed
I'm not a cabinet-maker, so I don't know all the official names for the wood I used. Feel free to edit in the correct names for anything if you know it.
- 18"x24"x1/2" plywood sheet for the bottom of the box.
- Any number of 24"x18"x1/4" plywood sheets for display tops.
- 2 24"x5-1/2"x1/4" boards for back/front. You can use plywood for this, but most home improvement shops will stock higher quality wood that's used for floor/ceiling edging with these dimensions - that's what I used.
- 2 18-1/2"x5-1/2"x1/4" boards for the sides. These should be the same material as above.
- 4 1"x1"x4" square dowels. I found these in the same aisle as the above boards. You'll have to cut them to the right length.
- 2 1/2"x1/2"x 18" square dowels. You'll also have to cut these to the right length.
- 2 1/2"x1/2"x 23" square dowels. You'll also have to cut these to the right length.
- 4 furniture feet
- 2 hinges for the front door - I used cabinet hinges, there's usually a lot of choice in terms of cabinet parts, so pick something you like the look of.
- 1 cabinet knob - should come with mounting screw
- 2 cabinet handles - also should come with mounting screws
- 2 very small hinges - also also should come with mounting screws
- Wood Glue
- Short Wood Screws
- Wood Stain (pick a colour - I used black because it's a neutral colour and will therefore work with any display.
- Polyurethane Finish - I used a spray version of this, but you can use brush-on version with a little more effort.
- Small magnets to hold front door closed. The same kind you use on miniatures will work, or get specific stuff at the hardware store.
Initial Preparations
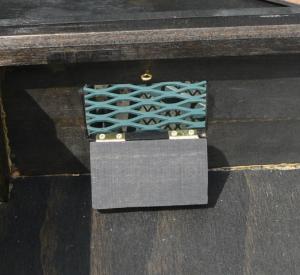
Here's the hatch open, allowing wires out of the box.
First, make sure you have all the parts cut to the right size. The square dowels and box sides will not come in the lengths that you need, so cut them to size, and sand away any rough edges. The home improvement store near me sells pre-cut 24"x24" plywood sheets, so I need to cut them down to 18"x24". A circular saw is the best hand tool for long, straight cuts like this, though a jigsaw or handsaw will work if you don't have a circular saw. If you have a tablesaw, even better...
Second, you're going to cut a small door out of the back wall board. This door is going to allow you to put electronics that need AC power inside the box, and run the power cord out through the hole. This step is optional - if you don't see yourself using AC power in your display bases, feel free to skip it. To cut the door out, draw the outline that you want. 1-1/2"x 2" is plenty of space. Drill a hole at one corner of the door, and then use your jigsaw to cut out the door. You're going to have to sand the door piece (the part you cut out) quite a bit so that it will be able to fit inside the hole, with the hinges, and still open.
Phase One Assembly
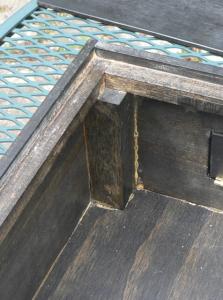
The intersection of the side
and back rails, on the support dowels.
When doing woodwork, it is preferable to do your basic constuction first, then stain/varnish your work, and then attach any hardware. This way, you do not get stain on the hardware and make it look bad.
A basic rule for using wood glue is that once you glue something, you should leave it clamped tightly together for at least 30 minutes before moving on. Furthermore, any glue that runs over the edges should be wiped up with a damp cloth as soon as possible. Glue that spreads into the inside of the box isn't as important as glue overruns on the outside which would be seen.
Step one: Glue the four 1"x1" dowels to the four corners of the base plywood board. Let the glue set.
Step two: Glue the back panel into place. The bottom of the back edge should be flush with the bottom of the plywood sheet, and the sides of the edge should be flush against the dowel posts already glued in place. Glue along the length of the bottom and on both dowels. Clamp and let set.
Step two-a: Optional: Add a couple of wood screws between the posts and the back.
Step three: Glue the sides in place. As with the back, the bottom of the side should be flush with the bottom of the plywood sheet. The back edges should be flush with the back edge. The front edges of the sides will extend 1/4" past the front corner posts. Again, glue along the entire length of the bottom, and along both the dowels and the edges of the back.
Step three-a: Optional: Add a couple of wood screws between the posts and the sides.
Step four: Glue side rails in place. Side rails should be flush against the sides and back, and sit on top of the four corner dowels. Glue along the length of the rail, and where it touches the back, and dowels. Clamp and let set.
Step five: Glue front and back rails in place. You may need to file or sand a little to get a snug fit. For the back, glue along the entire length. For the front and back, glue to the side rails, and dowels.
At this point, you should also test fit the front panel to make sure everything lines up.
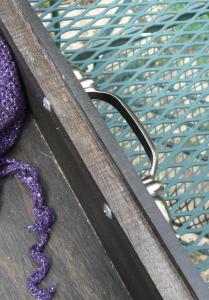
The handles need to be secured
to the rails.
Step Six: Place the handles in the center of the side. You want them to be dead-center, for ease of carrying the box. Measure the distance between the screw holes on the handle, divide that by two, and then measure 18-1/2" - this number from both the front and the back. Mark these locations, and then drill through both the side and the rail. Make sure the handles fit, but do not screw them in yet.
Step Seven: Do the same for the knob on the front. Mark a hole as close to the center of the front panel as possible, and drill a hole so you can attach it later. The front panel is probably too thin for the hardware supplied, so glue a scrap piece of wood over the hole and drill through this too. (You can see this in the photo of the box door open, above).
Step Eight: Place the front panel in position and mark where the rails meet the panel. Drill small holes where you will place the magnets that will hold the door closed.
Step Nine: Sand the exterior surfaces, especially where different pieces of wood meet.
Stain and Varnish
At this point, you have a three-walled box, a small hatch door, and a front door panel assembled.
When staining wood, you want to use a rag. Make sure the stain is mixed, then dip the rag in the stain and wipe it over the wood. Always go with the grain of the wood. After about 15 minutes, use a second rag to wipe off any excess stain. You will probably want to do a couple of coats; you can do as many as you want, and each coat will deepen the colour a little more. Let each coat dry for a couple of hours before applying the next coat. After you're happy with the colour, let it sit for 24 hours. Stain the hatch and front panel doors as well.
You don't need to stain the inside of the box unless you want to. I did on mine though.
Why stain instead of paint? Stain actually penetrates the wood, while paint sits on top of the wood. This isn't a piece of furniture that is going to sit in one place for years, it's going to be moved around in crowded halls. Staining the box means that any minor nicks or bumps won't be too obvious, while paint would chip off and be very obvious.
After the stain has sat for 24 hours, apply the polyurethane finish. This is a protective coat that will guard your product from minor scratches and dings. Polyurethane comes in different finishes, from super-ultra-shiny to matte. Pick what you like - I used a matte finish. Applying this with a spray can is the easiest way to get a smooth coat. Spray a layer, wait 15 minutes, spray another layer, and so on. After a few coats, let it sit for 2 hours. If you like how it looks, great. If not, use a very fine-grit sandpaper, sand gently, and apply another couple of layers. Repeat until you're happy.
Some polyurethane finishes have to be applied with a brush. This is harder to do, but similar rules to painting miniatures apply. Do multiple thin coats instead of one thick coat, because thick coats will lead to drips and they don't look good. As with the spray coat, sand with a fine-grit sandpaper between coats.
When you're done with the finish, wait 24 hours before moving on to the next phase.
Phase Two Assembly
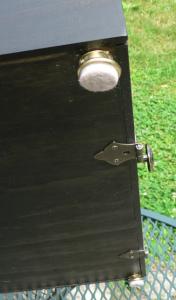
The hinges sit over the bottom
of the front door.
Step One: Attach the handles with the hardware they came with.
Step Two: Place the front door panel in position. Place the hinges so that the door will be open to swing down. See the picture to see how they should be oriented. Position the hinges about 6" in from either edge. Draw a dot for each screw, and drill a guide-hole with a small drillbit.
Screw the hinges to the door front first. The hardware that comes with the hinges will probably be longer than the width of the panel, so you will need to use some clippers, or a dremel cutting disk, to cut the tips of the screws off. Then attach the door to the box. Again, if the screws are longer than the width of the botom, clip the tips off.
Step Three: Glue the magnets into the holes that you drilled for them. Superglue works well for this. Be sure to pay attention to polarity when glueing these in place, and give the glue some time to dry before you test the magnets or it might end up pulling the magnet out.
Step Four: Attach the knob to the front door.
Step Five: Use the small hinges to attach the hatch to the hole it came from. Make sure that it can swing open with the direction that you oriented the hinges before securing it.
Step Six: Attach the feet onto the bottom of the box. You need the feet for two reasons. One, because the hinges that attach to the front door will be lower than bottom of the box, so the feet elevate the box body, alieviating this problem. Two, the felt feet are respectful to the surfaces that you're going to be playing on, and prevent your box from scratching any gaming surface.
The feet that I used are little brass feet that came with a nail fixture embedded inside them. Whether attaching the feet with a nail or a screw, you want to have the feet attached both to the base, and to the four corner posts, so position them with this in mind.
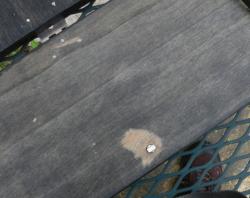
The magnets are embedded
in the front door panel.
Make the display boards
And, from here on, it's like making any other display board. Any 24"x18" board will fit on the top of this box. Prepare the surface of this board like any other display base. You can drill through a board to allow any electronics that you house inside the box to work on the top, or not. One possible gotcha here is that sometimes plywood will warp when wet (as it will get if you paint it) so work on a flat surface. If you find that your board warped, simple spray some water on it and place it on a flat surface, with a weight on the other side, and that should flatten it out again.