Article contributors:
Introduction
How many times have you heard people say or write: "I can't take good picture of my miniatures because I have bad photography skills or my camera sucks."
Or even worse, so many people that do take pictures of their models constantly upload images that are blurry, rotated sideways/upside down or so poorly lit to the point where you can't even really see what is going on with the model in the picture.
I'm here to tell you that it doesn't matter what excuse you want to try to use, there is literally no reason for anyone to take these kinds of model pictures in this day and age...the only answer is that you haven't (yet) taken the initiative to solve the problem, because the solutions are out there and they're usually pretty cheap or even free!
As long as you can honestly say to yourself that you want to take better pictures of your miniatures and you're willing to put a little bit (and I do mean just a little bit) of time and money into this, you can dramatically improve the quality of your pictures.
My camera just sucks!
The only people who can really legitimately use this as an excuse are those poor tweens and teenagers out there who are somehow still rocking a non-smart phone cell phone camera as their only means to take pictures.
If you've got any kind of standard digital camera in this day and age that is 4 megapixels or more (and they pretty much all are now) or you have a smartphone with a built-in camera (like an Android or iphone) then you already have a good enough camera in your possession to take decent pictures of your models with.
And if you are one of those poor souls still rocking a non-smart phone cell phone camera as your primary camera or you've got a really, really old digital camera that takes shots under 4 megapixels, then I've got some good news for you:
digital cameras are ridiculously cheap now!
That's right, if you do a quick google shopping search for cheap digital camera , you should get a bunch of results for cameras that are over 10 megapixels, that are all under $100 or even under $60!
In case you have no idea, the megapixel count on a camera is essentially what quality of resolution the camera's pictures are. To be honest, 10 megapixels is way, way beyond what you would need for taking miniature pictures and displaying them online. So basically for the cost of a Space Marine Land Raider kit you can buy yourself a camera that will once and for all let you put away your cell phone when it comes time to take pictures of your models (and all the problems it brings with it).
So seriously, the next time you're going to go buy a new bunch of models for your favorite game, skip it just that once and instead make the one time purchase of getting yourself a nice (but affordable) camera instead...trust me, you won't regret it!
And while you're picking up your new camera, do yourself a favor and buy a cheap mini-tripod. Again if you do a google shopping search for mini-tripod you'll find several really cheap options (like under $5 cheap), any of which will make a world of difference when taking miniature pics.
The pictures my camera takes are crappy!
 example of a typical gamer workspace
Many people want to claim that their cheapy (aka affordable) digital camera or smartphone camera just takes 'crappy' pictures, when of course the real problem is that they don't want to take the time and energy to figure out what they're doing wrong.
Smartphone cameras (like those on the iphone) are typically good enough to get a decent (but not great) picture of your miniatures. Smartphone cameras do have a lot of negatives against taking miniature pics:
- As they typically don't have easy tripod access, you'll get blurry photos much more often.
- They typically have no flash or a poor flash.
- They typically have no internal white balance feature (more on what white balance is later).
But even with those negatives, the camera itself is still fine. If you take a little time and effort into your preparation and set-up an iphone camera (for example) can produce some decent results.
To the right you'll see a picture of a typical gamer's workspace that they paint on. Often mainly lit by a single desk lamp, plenty of crap all around their desk area, etc. Sadly, it is from this exact kind of environment that many people take the pictures of their models. They often pull the desklamp down really close to their model, or hold the model in their hand right next to the desklamp and then snap the picture with their smartphone camera.
Under those conditions, let's see how an iphone 3GS (which doesn't have a flash) takes a picture of a model. The desklamp pictured to the left was given a 100 watt light bulb and pulled down really close to the model. The iphone was rested on the desk and a photo-stabilization app called darkroom was used to ensure the picture was taken without blur:
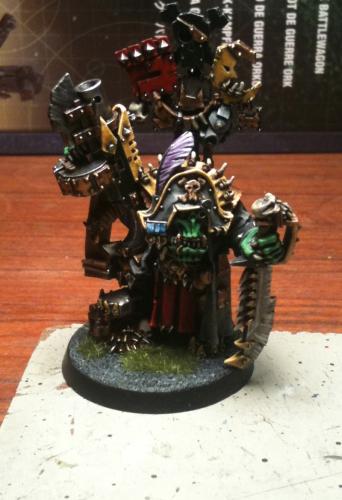 iphone 3GS picture, no enhancements
Not horrible, but as you can see, the lighting is too directional and that has left much of the model in complete shadow.
Now let's see what kind of a picture the iphone can take when we use a decent background, a much better (although not expensive) lighting configuration, and some free online photo enhancements:
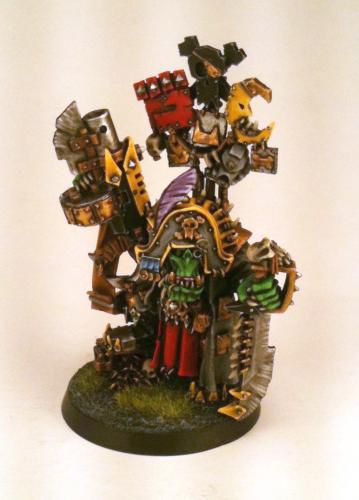 iphone 3GS picture, with enhancements
As you can see, although its not the greatest picture in the world, adding a proper background and lighting configuration and doing a bit of digital fixing to the image really makes a world of difference between the two examples.
The point I just wanted to get across is: as long as you've got even a decent camera, you can take nice pictures with it, you just need to know how!
It's too expensive to buy lights!
Popycock! First of all, there are plenty of light box kits you can buy online that are really cheap. Many of them even come with lights included.
But typically these are $40-$60 bare minimum and even more expensive for that the nicer you want to go. Let's say you took my advice before and went out and bought a new digital camera for $60 and now you're angry because I'm saying you need to go buy a light kit for another $60.
Well, I'm going to show you how to do it for even cheaper than that!
The backdrop
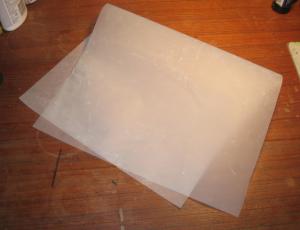
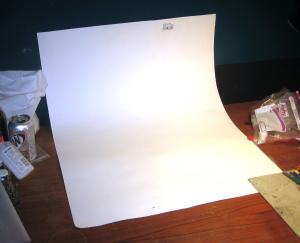 example of a simple white art paper backdrop
In many ways, the most important thing you can do to improve the pictures of your models is to get a decent backdrop for your models to be photographed in front of. I highly recommend you go with a pure white backdrop for the simple reason that it will make your images easier to white balance (again more on white balance later).
In my experience, the easiest and cheapest way to get yourself a backdrop is to buy a big sheet of white art paper. You can find these in just about any arts & crafts store. They tend to be a thicker than your standard paper you say print from your computer on, but certainly nowhere near as think as matte board.
A sheet of this paper should only run you a few dollars and once you have it you can lean it up against the wall on your desk to create a subtly curved white backdrop for you to photograph your models on as shown in the picture to the right.
The lights & bulbs
The next thing thing you need is light...and lots of it. Good photography is really all about lighting. Typically the more you have, the better off you are. But you can't just add a ton of light and expect things to look great. If that were the case then I would be able to pull down my desk lamp really close to my model and it should look awesome, but we already established that isn't the case.
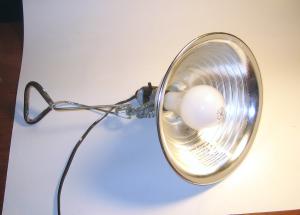 example of a cheap industrial 150 watt work light
The key here, is that we need soft (non-directional) light, and in order to get that, we have to diffuse the light we have. Now, those online light boxes do exactly that...they go in between the lights and your models and therefore diffuse the light and make it soft and good looking.
But since we're not going with a pre-made light box kit we've got to diffuse that light on our own. Now, there are a bunch of really great tutorials online about how to make cheap light boxes on your own. If you want to make yourself a light box, I highly recommend it, although you will typically need a place to store it unless you design it to break down between uses.
But I'm going to go even simpler than that...just lights and diffusion here!
So if you're still going with me, then first you're going to need some cheap lights. I recommend two of the 150 watt industrial work lights (pictured to the right) that you can pick up from your local Home Depot or whatever home improvement stores you live near. These lights typically only cost around $6-7 each.
Next up, you're going to need light bulbs, the brighter the better. You can literally find your standard light bulbs just about anywhere, but since you're already at Home Deport picking up your lights, you might as well grab some bulbs too. Make sure you get some 150 watt bulbs to make sure you're packing as much light as possible with the few lamps you have. Also, pick up a few spare bulbs in case you break or burn out any along the way and one for your existing desk lamp too!
Diffusion gel
 example of frosted diffusion gel
Now that we have our lights & bulbs we need some diffusion to to put over the lights to make the light they project soft on our models.
Do a google search near you for photography shops. Go to the closest one and ask them for sheets of diffusion gel or frosted gels. These are basically sheets of opaque material that are designed to go in front of photography lights in order to soften them.
There are quite a few different variations, but the key here is that you're looking for the frosted (colorless) variety as opposed to the colored lighting sheets of gel that change the actual color of the light. Also within the frosted gel family, there are still different levels of diffusion. Some sheets soften (block) more light than others, while others let more light through, but that means the light that's coming through is less diffuse.
For you, frankly any level of frosted diffusion will work, so when the guy at the photography store asks you just tell him you want one that will still let quite a bit of the light through. Pick up a couple sheets of this diffusion gel, which again will cost you a few dollars each.
Creating your photography studio
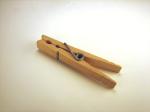 standard old clothes pins
The last thing you'll need is a way to attach the diffusion gel to the lights. That's where the good old clothes pins come in. For a couple of bucks you can buy these at Home Depot when you pick up your lights and light bulbs, or you can grab them at just about any store anywhere, I think!
Next up you're going to cut your sheets of frosted diffusion gel in half, just so you have more reasonable sizes to deal with. Diffusion gel is highly heat resistant, but even so you don't want to put it so its directly sitting against the light bulb or given enough time it will melt a nice little hole in the gel where it touches the bulb. So when using the clothes pins to attach the diffusion gel to the light, leave yourself a little bit of slack so the gel kind of bubbles up over the top of the bulb as pictured below.
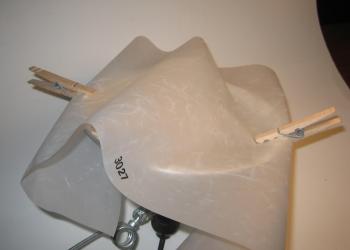 leave a little space between the bulb and the diffusion gel
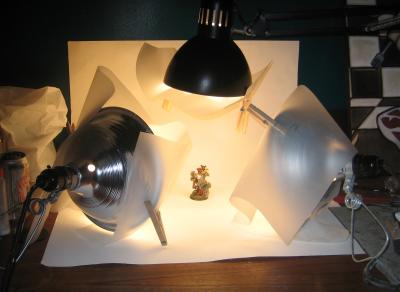 example of a completed light set-up ready for photography!
These work lights are made of metal, so they will get hot to the touch after they've been on for a while...be sure you're careful when handling them! But don't worry about the diffusion gel, as long as it isn't sitting against the actual light bulb, they'll be just fine.
Once you've finished putting the diffusion gel on your two work lights, go ahead and throw a 150 watt bulb into your desk lamp and put diffusion gel on that too.
Now that all your lights are properly diffused, you can feel free to put them right up to your models knowing that the light will be nice and soft.
Here's an example of what my light set-up looks like when I'm taking pictures, and the one used for the second iphone example picture above in this article.
I've got lights, but my pictures still look bad!
Assuming you've gone out and bought a decent camera and have made or bought a light box or other lighting set-up, you may find that your pictures still don't look all that great.
For example, using the lighting set-up I've shown above (with and without using the camera's flash) generates pictures that look like this:
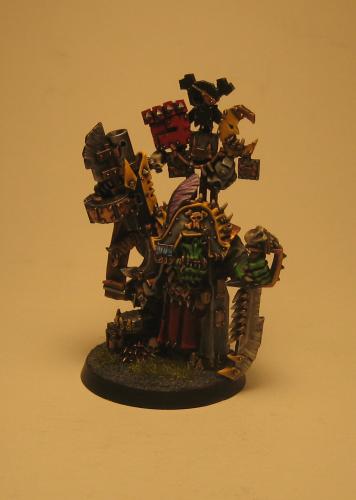 un-enhanced picture - no camera flash used
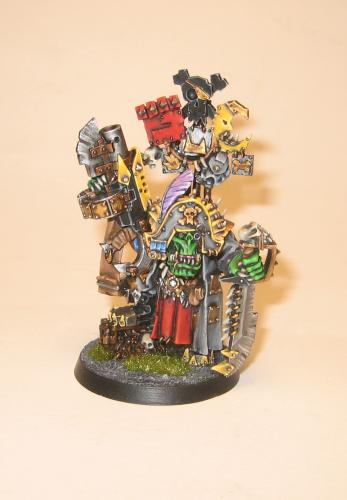 un-enhanced picture - flash used
These problems are what can be addressed with photo enhancements, including white balance.
White Balance
You may not be aware, but different types of light actually have a different color from each other, which is especially noticeable when you take photographs. Outdoor sunlight appears white, while your standard indoor lights appear reddish/yellow. Flourescent light appears green/blue, etc. The point is, when taking a pictures, the color of the light you're using will dramatically effect how your pictures look.
Because of that it is very important to always white balance your pictures.
In-camera white balance
If you're using a digital camera (as opposed to a phone camera) you can white balance the camera. This feature is sometimes a little difficult to find, but if you look through your camera's manual, you will find it. Many cameras have an auto-white balance setting that will do its best to figure out what the right white balance should be, but this is never as accurate as manually setting it yourself. In all cases, manually setting the white balance with a camera involves pointing the camera at a pure white image that is under the type of light you will be photographing in, and then pressing a button to 'set' the white balance.
Obviously if you change your lighting conditions later (like bringing in a new light), you will have to reset your white balance and it also means that when you're done taking pictures of your miniatures you want to make sure you set the white balance back to automatic or else your next set of family pictures you take are going to look really strange!
Manually setting the white balance on your camera is now where the genius of using a white backdrop comes into play. You now have a pure white source sitting right in the light where you will be taking your photographs. You can therefore zoom in on the white backdrop and use this to set your white balance. Perfect!
The other way to fix the white balance of your pictures is to do so after your pictures have already been taken. In my examples above, I purposely did not white balance my camera so as you can see, the color of the white background is anything but white!
Photo Enhancements
Photo enhancements is a simple way of saying you're using some sort of computer application to digitally alter what your photos look like after you finish taking them. There are many, many complex ways that you can manipulate your photos using these types of programs, and I'm not going to even really begin to discuss them much. But what you do need to know is that these programs are out there online for free!
Doing a google search for online free photo enhancement turns up a number of good results including this article from a few years ago covering a number of the best free options out there.
For my (free) money, I'd go with Photoshop Express because it is easily the most robust one I've found (and it has a white balance tool). It does require you to create an account, but it is free!
Using a photo enhancer can allow you to fix the white balance of your photos after they've already been taken. It can also be used to adjust the brightness and contrast of the picture, as well as dozens of other things you can experiment with to your heart's content. But just using white balance and brightness contrast allows me to 'fix' the above pictures to what you see below.
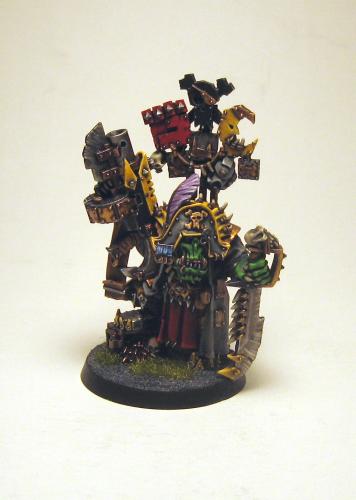 enhanced picture - no camera flash used
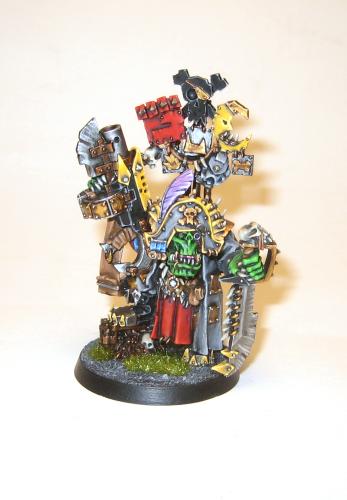 enhanced picture - camera flash used
As you can see, in both cases the photo enhancement really helped make the images look much, much better than before. Of course, from these two examples it may look like using the flash on the camera is the way to go, which is actually not usually the case.
While a direct flash on a camera does make the subject quite bright, it is a direct (harsh) light that often obscures details of painting. your best bet (if possible) is to stick with not using the flash BUT using the in-camera white balance ahead of time. In this example, by not balancing the camera beforehand I ended with a picture that had a couple different colors of light in it (the reddish color from my work lights and a greenish tint from the fluorescent light on the ceiling. Because of this, I had a really hard time getting the white balance and other levels looking just right.
But compare that with a similar picture I took, again using no flash, but this time with the camera's white balance properly set ahead of time:
 enhanced picture - no camera flash used
& camera white balanced
In my humble opinion this combination produces, by far, the best possible results. So while you can absolutely get your pictures to look pretty darn good just using photo enhancement software, if you have access to a digital camera that can be white balanced ahead of time, as well as some photo enhancement software (which you should since its free online), this is really the best way to proceed.
Smart phone photo enhancement apps
If you are using a smart phone (like an iphone or android) to take your pictures, while this is certainly not the ideal situation, what it does give you access to is a wide variety of photo enhancement apps right on the phones themselves. There are quite a few that are very cheap and/or free and all you need to do is browse through the ratings in your phone's app store or do some online searching of what photo enhancement apps are rated the best vs. the cost of the app.
And of course, regardless of what you use to take the pictures, those free online enhancement options are always going to be available to help you try to fix your pictures.
But my pictures are still all blurry!
Blurred pictures obviously occur when the camera moves while its shutter is open. Most simple cameras use an automatic shutter which stays open longer in darker environments and closes quicker in lighter environments. That means, if you're using a flash you tend to not have as many blurry photos and if you're not using a flash then its much easier to get a blurred photo.
However, typically as long as you have plenty of other lights (as shown in our lighting set-up above), then you are better off not using a flash, which obviously makes getting blurry photos a real problem.
Tripods - purchased or made
As discussed earlier in the article, there are really cheap mini-tripods that you can buy for your standard digital cameras. I highly recommend using one of these if possible. However, if you're using a camera phone or just haven't purchase a tripod yet, then you can always make do by setting up a makeshift tripod of just about anything for you to lean your camera/phone against. Heck, even making something to rest your hand on while taking the picture can make a massive improvement in picture quality!
Use the camera's self timer
One issue can be that the actual act of hitting the shutter button causes you to jiggle the camera...which in turn makes the image blurred. Not even a tripod can necessarily fix this problem completely. A really simple way to solve this issue with a digital camera (and some smart phone cameras that have this feature) is to use the self-timer. You know, this is the feature that normally allows you to set the camera up and then take a picture of yourself and your family together?
Activate this feature on your camera and then just let it sit there without touching it until the picture is taken. This way you can absolutely guarantee that your hand touching the camera will not cause the image to be blurred.
Smart phone stabilization apps
If you're using a smart phone (like an iphone or android) to take your pictures, there may be apps on your phone that will help with stabilization. As I mentioned above, for iphones I personally use an app called darkroom that basically does not take a picture until the camera phone is held perfectly still. Obviously this doesn't help you trying to take pictures of action shots, but when it comes to taking pictures of miniatures that don't move, an app like this is absolutely perfect!
Conclusion
So there you go. If you follow the simple steps I've outlined for you above, never again should you find yourself amongst the ranks of those who just don't have any photography skills.
Besides, there's plenty of other tips for photographing miniatures both here on Dakka and around the internet. There's simply no reason that you should ever take a sub-standard miniature picture again!