This article will deal mostly with how I went about modeling my Shadowsword kit to allow me to field it as any of the variants I want. Since I had already altered one of my Baneblades to be either the original tank or a Stormlord I have never fielded this tank as anything other than a Shadowsword. I need a titan killer and that’s what this thing does. Just food for thought since the path you are about to take leads to madness.
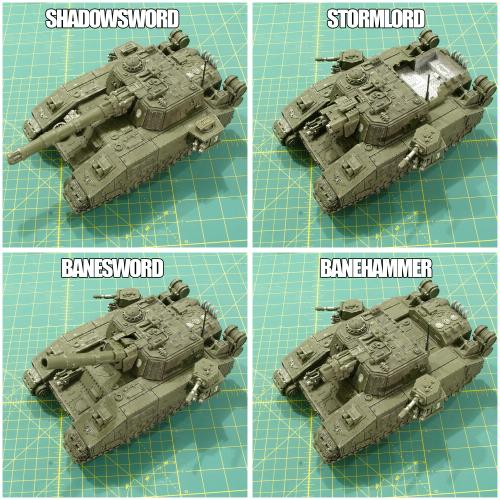
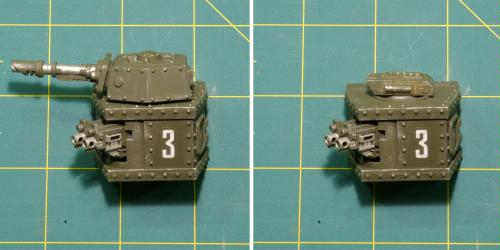
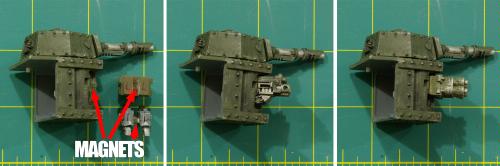
Pictured above are the 4 basic variations of the kit. The other two variants (Stormsword & Doomhammer) simply use the end piece from the volcano cannon and the nose cone piece over the breach barrel section. I simply place these pieces on without using any pins or magnets and it works fine so I’m not going into any detail about making those variants. It should also be noted that my version of the Banesword is a bit different from the norm. I used the Vulcan Mega-Bolter mount so the thing could be angled up. How else could the thing fire indirectly?
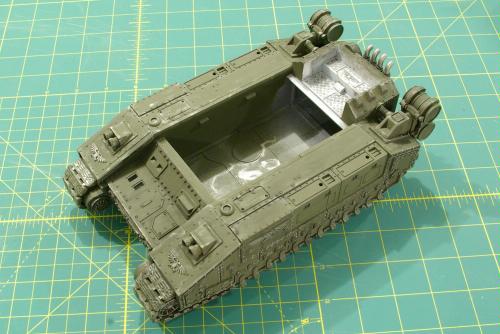
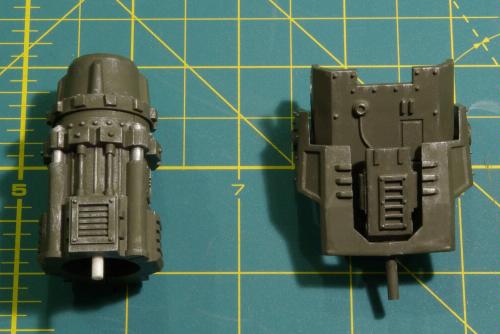
Pictured below is the main chassis. It is safe to glue the kit together to this point and still be able to make the variants. If you want to make life easier though you’ll want to read through the entire article first since there are some parts that are easier to perform minor surgery on when they’re not attached. On all of my Baneblades I have ended up going back and breaking pieces to add variability later. Learn from my mistakes!
Section 1 – The Floorplate, Superstructure, and Engine
Floorplate
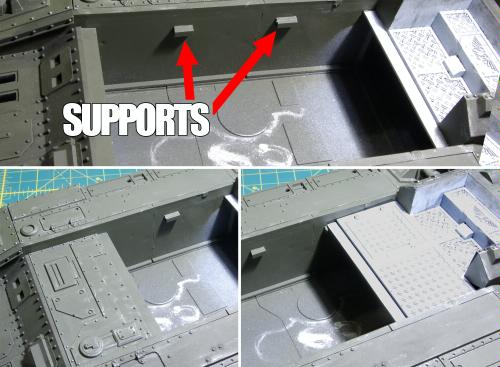
Probably the most daunting part is trying to figure out how that floorplate is going to work for both the Shadowsword and Stormlord. After looking at the pieces for a while and drinking heavily it occurred to me that none of it needs to be magnetized as it can just sit on supports. I used pieces of the sprue to make my supports. I fit tested all of the pieces and drew a line where it needed to go and then glued them on.
Superstructure
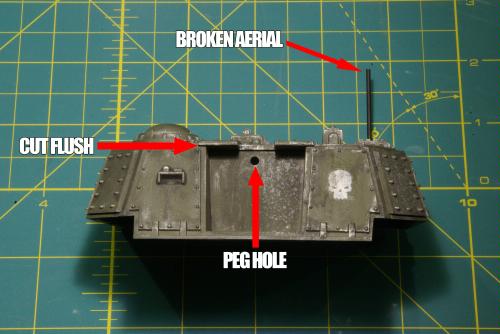
No problem. Once I figured out the floorplate the superstructure was easy as it just sits on top using the two tread housing sides and the floorplate for support. I glued the superstructure together using the front armor plates with the straight edge along the inside. These are NOT meant to be used with the Stormlord Vulcan mount but with a little minor surgery work just fine. These pieces could be made removable too but that seemed like more work than what it was worth. I drilled a hole the same diameter a some styrene tubing I have in the back of the gun mount to accept a pin from either gun assembly. This could be done using magnets but when I’m not going to lose detail on a kit by drilling or if it’s stable enough to use the pin method I do it. I also shaved the little lip off of the top cover of the gun mount. That way either gun will slide in easily. Finally, as any good tanker will do, I broke the aerial off of the kit just to get it out of the way and not give some ham-fisted idiot the satisfaction of doing it “accidentally” later.
Engine
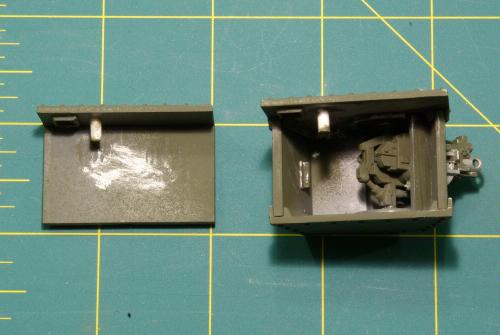
The engine was also easier than I thought it would be. I simply set the vertical piece where it needed to be and then glued the top piece onto it. As I displayed a rare ability to not dump half a bottle of superglue onto it the two-parts remained unattached to the main hull and could be lifted out and set back in as desired.
Section 2 – The Sponsons
Fitting The Sponsons
The mistake I usually see when people try to make the sponson positions interchangeable is that they never quite fit flush with the body. After using magnets on a previos Baneblade kit I decided to use the pin method instead and I have done it that way ever since. The trick to get all of the armor pieces and sponsons to line up correctly is to drill the hole in exactly the same spot every time. So first, I laid one of the armor plates over the tread section exactly where I wanted it and drilled through both pieces with a drill bit the same diameter as my styrene tube. Now you’ve got a perfectly lined up hole that you can use to drill the other armor plate and the top of the sponson. If you’ve already glued the tread pieces together you obviously can’t drill through it like that so the other method is to just line up the armor plates and sponson top under the already drilled armor plate and use that as your guide. Now you can drill the other two holes in the tread assembly top and you’ve got your holes done for that side.
note: For this kit I only did this to the back two positions as I knew I’d never mount the sponsons in the forward most one.
Below you can see the styrene tubing pins attached to the pieces. I put the piece on the tank over one of the holes and then slid the styrene tubing in to assure proper alignment. Then, I glued it in place. Once the glue was dry I cut it off as flush as possible, shaved it flat, then used gap filler to completely hide the tube on the top. If any of you are really interested in how I did the same thing using magnets let me know and I can add it to this article.
The Sponson Weapon Options
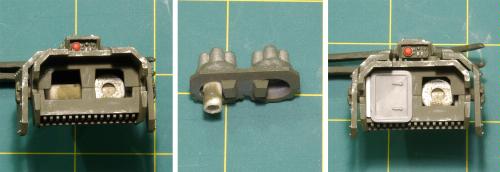
Sure, we can move the sponsons around but what if we want the BS4 targeter (yes please) or heavy flamers? Well, now we’ve got to get crazy and make those weapons swappable. Making the swappable Lascannon/Targeter was easy. I made a mold of the targeter piece that sits on top of the Stormlord’s Vulcan Mega-Bolter and cast two of them with styrene tubing on the bottoms so they would pit into the same hole that the sponson/turret Lascannon fits into. The Lascannon turret seems to stay there fine by just gluing the pin piece to the turret and then not gluing the pin to the sponson. If needed it could be made longer with styrene tubing or magnetized but I haven’t had any problems the way I did it.
The Heavy Bolter/flamer swap is where it gets interesting. I glued the two bolter halves to the gun mount thingy (the really cool part with all of the pistons and stuff that you never see when the kit is finished. Then, I lined it up with the half tube part and figures out where I would need to put the magnet to hold it on there and cut out a section to inset the magnet. I didn’t worry about making it too pretty since the weapon would cover it up. Then, I used my JLC saw (super jeweler’s saw) and cut the bolters off as straight as possible. Then, I placed one of the bolters flush with the back part and lined it up to figure out where to put the magnet on that side(I like to leave a gap between the magnets so that the plastic is sure to be flush while the magnets pull toward each other). Once that side was dry I could line it up with the second half and glue it together. I use JB weld for stuff like this since it’s slightly magnetic anyway and it is rock solid. Superglue will not always make the best bond to these magnets. For the Flamers I just eyeballed where to cut them and then performed the same procedure to make them magnetized.
They’re flush enough. If you’re standing this close to my model you have invaded it’s personal space anyway.
Section 3 – Twin-Linked Hull Heavy Bolter
Heavy Bolter – Wheel & Tread Swap
I wasn’t joking when I said the Shadowsword is just a titan killer so by getting rid of the useless Str 5 weapon we can free up the gunner for more important duties like making a scrumptious banquet in the dining hall of the tank for the other 30-40 crewmembers. The premise is simple enough – make the bolters removable and make something else to cover up the holes left behind.
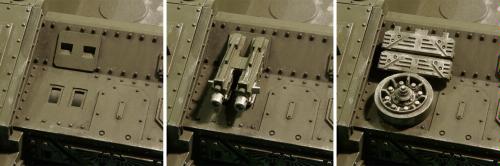
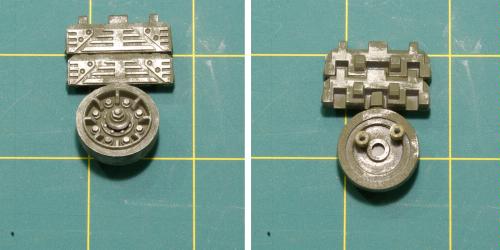
I just laid the wheel over the holes and then pushed some styrene tubing up through the belt-feed holes and glued it together. Make sure the tubing is flush with the front of the hole to keep the thing from sliding forward. Then, it’s just a matter of setting the tread so it’s resting on the wheel and gluing it together. I also added a Grantline nut to the hub of the wheel but that’s not necessary.
Again, this can also be accomplished with magnets but what fun is that?
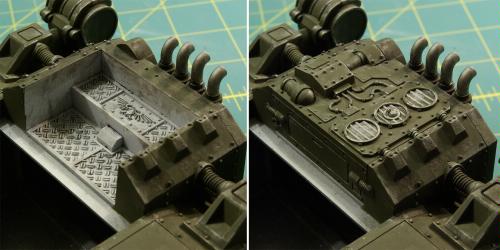
Section 4 – Stormlord Stubber Mounts
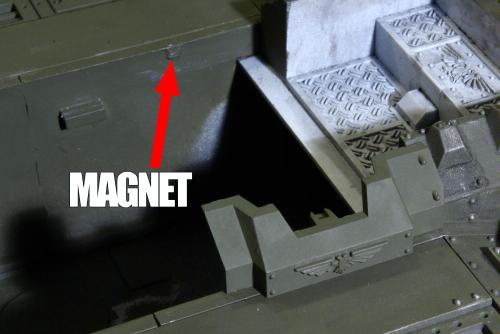
The Magnet On The Hull
I decided to magnetize these parts so I inset a tiny magnet into the inner side of the tank tread pieces. Hopefully you can see the one in the photo below. Then, I cut a washer in half and glued it to eh inside of the armored side piece (also pictured below). I forgot to take a picture of that but I promise I’ll update this article with one soon.
Section 5 – The Main Guns
The Gun And The Superstructure
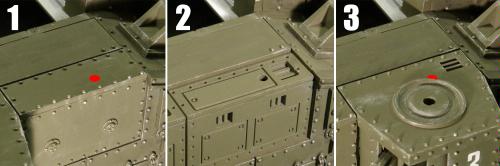
Remember earlier when we drilled that hole in the superstructure? Well here comes the peg! Make that last part sound as naughty as you like when you read it and then get down to business! I suggest setting the gun parts in the superstructure then using the existing hole as a guide and drilling through the back of the superstructure piece. As you can see below the peg is attached to the top of the Shadowsword gun piece and the housing around the Vulcan Mega-Bolter not the actual Vulcan Mega-Bolter itself to allow it to swing up and down. I also shaved the gun mount slightly to accommodate the armor plates on the front of the superstructure too. If you decided to make those armor plates swappable you don’t have to do this.
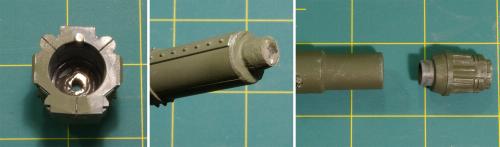
The Vulcan Mega-Bolter
I placed a washer in the left side of the main body of the weapon. This was to create a magnetic surface to attract the small magnet I installed in the actual barrel assembly. I put the small magnet into a piece of styrene tubing and measured it so there was a tiny gap when the piece was attached. I also used some sprue to make guides for the piece but it fits so flush against the inner wall of the body that turned out to be unnecessary. Finally, I added a small piece of styrene rod to one of the Leman Russ side hatches to act as a filler when the main barrel is attached to make the Banesword. This piece is held firmly in place when the barrel is attached so there’s no need to magnetize it or pin it but you can if you want.
The Volcano Cannon
First, I dropped a washer into the main gun mount piece. I used JB Weld to set it but superglue would probably be fine here. Next, I inset a cylindrical magnet into the back of the main barrel. Once that was all dry I tapered the end of it around the magnet so it would slip into place easily and not have to be jammed into the hole. I tapered the back of the Volcano Cannon tip as well so it would slip into either the main barrel or the barrel mount. I fit tested this thing, then sanded it a little, then fit tested it again so when I was done it would fit in snugly but not have to be forced in either. This could have been magnetized but it didn’t seem necessary to me.
The variants all come together just like they are supposed to in the kit with the exception of the Banesword. It’s Quake Cannon fits into the left side of the Vulcan Mega-Bolter mount and holds the little door I made snugly against the back as well with super duper magnet power!
That’s about it! Someday I’ll actually finish the stubber mounts and get the thing painted. When I do I’ll update this article with the finished pics too.
Thanks for reading!
