Scenario Background: A small force is besieged by a swarm of unbalanced individuals. The protagonist has to take shelter in a fortified building and defend against the hordes of lunatics storming their location.
Armies:
50 crazies in 5 squads of 10 plus extras verse 400 points of squads which may include a low level IC (total points must be under 75 points) held up in a barn, house, temple, or other fortified location. Squads may use less models then allowed in their codex. An independent character from a codex can be reduced - see below.
Reduced Characters:
Some armies do not possess the flexibility to field independent characters below 75 points. In consideration for those armies the option of fielding a reduce character is available. Independent characters can offer to take one point off their weapon skill, ballistic skill, wounds, and attacks in order to drop their base cost by 50%. Example a reduced Space Marine Captain would have the following stats and base point cost:
WS 5 BS 4 S 4 T 4 W 2 I 5 A 2 Ld 10 Armor 3+/4++ cost 50 points.
The character would still pay for weapons and upgrades in the typical manner.
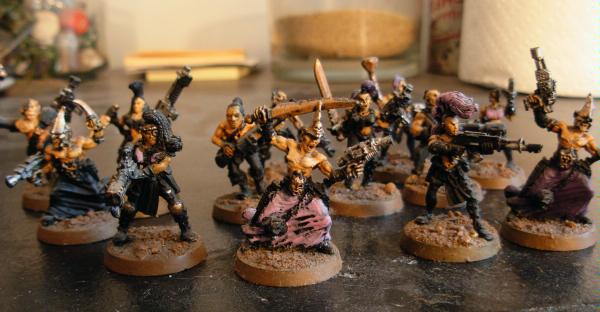
Crazies:
WS 3 BS 3 S 3 T 3 W 1 I 3 A 1 Ld 7 Armor 6+
Stubborn, mob weapons
Mob weapons: this is a mixed assortment of weapons that the crazies use. Models with mob weapons count as possessing a close combat weapon and a laspistol.
(Crazies could be represented by use of counters, coins, spare models, etc)
Game Play:
The crazies come in waves in which would be represented as 3 games/assaults that end on turn 5, results from previous games carry through to the next game/assault- see Casualties. When the first and second game ends it is assumed that the good guys rally and finish off the remaining crazies in dramatic movie fashion. The last game is played to completion. The crazies’ numbers are replenished after each game. Deploy all of the crazy units first followed by the defender - protagonist always gets the first turn.
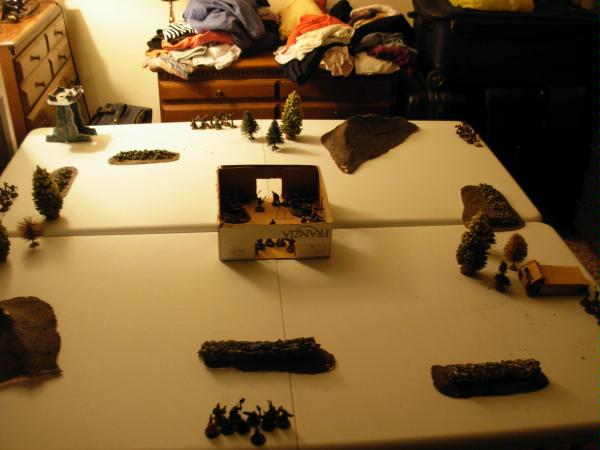
Table:
Table should be approximately 4’ by 4’ if not a little larger. Center the fort on the table and place a tower to one side and a jeep on another side of the table. Scatter terrain throughout the table. Crazies are placed emerging from the table edges. The player controlling the crazies should attempt to have his units coming in from all directions. Place Mad Eye in his tower. Once the crazy player has placed all his models the defender then gets to place his forces.
Fort:
The defenders are held up in a fortified location that provides a 3+ cover save to the models inside who are shielded by a wall or door. Note that a door that has been destroyed will no longer provide cover. The fort should be approximately 12” by 12”. Each side has a door, consider the walls to be impervious to the crazies. Models standing within 2 inches of a wall are assumed to be making use of windows or fire holes when firing upon the crazies even if such features does not exist on the fort, the crazies are assume to be firing through the same openings at the team. Within the fort mark an addition door on the floor, this door leads to the basement. In the event that the door is broken by an unit, place the crazies on top of the door marker. They are not destroyed if they deployed within one inch of the protagonist’s models simply move the player’s models to make room for the crazies. All defenders flee towards the fort if broken. They will stay at the center of the fort cowering until they regain their nerve or are assaulted and removed by the crazies.
Doors:
The doors have an armor value of 9. The crazies must break down the doors to access the people within. Each wall of the fort has one door that crazies must break in order to enter. Any glancing or penetrating hit destroys the door. Doors that are broken in one assault remain broken in the next assaults. Doors do not prevent the defenders from leaving or entering the fort just the antagonist.
CASUALTIES:
Squad models “killed” during game play are not necessarily dead. Models killed in a previous assault roll a D6. Multi wound characters regain their lost wounds as they have time to patch themselves up between assaults.
1-3 Dead – model is removed from further games
4-6 Alive and well - The model completely recovers and is able to fight.
JEEP:
A civilian vehicle converted by the crazies to engage in mayhem, it has a heavy-studder mounted on its frame. It has a transport capacity of 12 but one model must be designated the driver, and one model can be designated a gunner for the heavy-studder.
Heavy-Studder: Range 24 strength 4 AP6 Heavy 3
9/9/9 transport (12), fast, open – topped
The jeep starts the game stationed near a table edge. The vehicle can be used by either player. When the jeep is unoccupied it can be boarded by either party and used as their own until they vacate the jeep, in which case it is up for grabs again.
If the jeep did not or could not move the crew can be assault instead of the vehicle, combat on the Jeep is worked out as if jeep was cover. If the jeep is destroyed the crew is not immediately killed if they can’t safely disembark from the vehicle. Instead leave the models on the wreck and have them fight their way free. When firing at the jeep the passengers can be targeted instead of the vehicle itself in which case it provides a 4+ cover save to those on-board.
Run down:
Crazies don’t know to get out of the jeep’s way when it comes baring down on them, and in fact they tend to run into the vehicle. When the vehicle moves through a crazy unit move the crazies to the side to free a path for the vehicle. The driver gets to decide if he is attempting to avoid the crazies or plow down as many as he can. When the vehicle is driven by the crazies the protagonist use the normal rules for tank shock. When an assault ends leave the jeep at its current location for the next assault, it does not return to its starting location.
Evades: D6 crazies are hit by the vehicle, they take a strength 5 power weapon hit.
Plows: 2D6 crazies are hit by the vehicle, they take a strength 5 power weapon hit.
Every model hit inflicts a strength 3 hit on the vehicle, making the procedure of running down crazies dangerous for the jeep and crew.
Addition Forces:
The Leader: This individual is the alpha dog in the pack of lunatics. He arrives on the third assault play him solo or have him use one of the mobs of crazies as a retinue.
The Leader: WS 4 BS 4 S 3 T 3 W 3 I 4 A 3 Ld 10 Armor 4+
Fearless, feel no pain, furious charge
Power weapon and bolt pistol
The leader may start the game joined to a unit of crazies which will than become his retinue. The unit will then benefit from fearless, feel no pain, and furious charge as long as leader is alive.
Mad Eye: One of the crazies has a sniper rifle and stationed himself on the tower. The tower gives him a 4+ cover save. He is an independent character who may not join other units. He will remain in the game until slain.
Mad Eye: WS 3 BS 4 S 3 T 3 W 2 I 3 A 2 Ld 10 Sv. +5 Sniper rifle, laspistol
Attack dogs: This is a unit of one handler and 5 dogs. This is a one use only unit that is set up along with the crazies. The unit maybe used during any assault decided by the player, but can only be used once.
Handler: WS 3 BS 0 S 3 T 3 W 1 I 3 A 2 Ld 7 Armor: 6+
Stubborn (is given to dogs), independent character
Mob weapons
Dogs: WS 3 BS 0 S 3 T 3 W 1 I 4 A 2 Ld 5
Beast
The handler is an independent character that starts the game joined to the pack of dogs. As long as he is joined to the dogs lose the movement benefits of being beast but receive the leadership benefits of the character.
Infiltrators: a small group of 5 crazies has managed to use an underground means to breach the basement of the fort. They arrive as reserves and must first break down the basement door before they are able to assault the defenders. They may only be used once during the game at an assault of their controlling player’s choosing.
Special Equipment: The antagonist player rolls a D3 and adds 2 this is how many pieces of special equipment that is available to his forces. Once assigned the equipment is exhausted it is not renewable as the crazies are. Special equipment can be assigned to any crazy model during the setup of any assault. They can be spread out through multiple assaults if desired. Special equipment is the following: flamer, plasma rifle, grenade launcher, melta-gun, heavy-bolter, demo charge, power weapon, and power first.
Battle Reports
Horror Scenario Battle Reports