Intro
Hello everyone, this will be my attempt to provide a tutorial of how to paint blood angels from begin to end.
Things specifically covered will be:
1. Zenithal Airbrushing
2. OSL (object source lighting), mainly with the airbrush.
My idea is to show you my way of painting and what works for me. However please feel free to experiment with different techniques and colours to achieve the results you want. This is by no means the only way, or "the" way.
To demonstrate this I will be using a blood angel space marine from an assault squad. The idea is to paint it from start to finish and make it look something like this.

Originally, my intent was to do a brighter and more cartoonish version of a blood angels. However it ended up being quite dark red in the end, but I am pleased with it none the less. A lot of people also feel this is more realistic so it is really a question of personal preference. I did not take pictures during the painting of this one so I will instead be using a new model to demonstrate how to get to that final result.
Basecoating
Zenithal Lighting - The basics
Zenithal lighting consists in the creation of a painting gradient, from darker to lighter, giving the sensation to the eye of a light source being projected into the mini. Normally this fake light is placed above the mini, but top side is also a popular choice. By creating a high satured, bright colour closer to the light source and fading into a dark, shaded colour away from it the viewer is tricked to believe there is a real source of light.
There are several ways to achieve this. One can simply undercoat using a combination from black, grey and finally white to create shade or many hours of paint blending with a brush will also work. There is however an easier and better way of achieving this by simplying using an airbrush as it allows a finer control over the colour fading. You can choose the direction of the hitting light and by spraying always from the same direction with lighter colours the highlight is created. As you are spraying highlights, the areas occluded by other objects will remain dark, and so automatically become shadowed recreating very realistic lighting.
This is better seen than read so let's jump into action.
Step 1: Priming

This is the simplest step. Cut your mini from the sprues, remove mould lines and glue it together. Then stuck it to a base, since I normally use resin bases that I prefer to paint separately, I pin the model to it's base without gluing it, but then move it to a cork base for easy of painting. It is however important that you keep the same pose on the temporary base.
Normally you prime the model black. However to save time I started by priming with a dark/brown red. I used Vallejo primer 605- Ger. Red Brown, which I can use on the airbrush allowing me to avoid to the British summer variations and primer whenever I want. If you prime black, you can do a first coat with a very dark red (scab red or equivalent) spraying from front and top of the model leaving the black still showing on the surfaces facing the bottom.
Step 2: Zenithal coat 1
For the first coat, I used Vallejo Model Air Fire red. I put a few drops in the feed cup, added a few drops of thinner (about 1 for every 2/3 drops of paint) and mixed it in the cup with an old brush. If you are just doing one mini you don't need to fill the cup, a little goes a heck of a long way!
Then holding the model on my left hand, protected by a latex glove, start spraying from the top and sides of the model in a 40-45 degree 'cone'. Always start spraying away from the model and then move the paint flow to the mini. Keep long and even strokes, you want the effect not be apparent with just one passage, but instead build the coat with time. Keep your airbrush about 10 to 20 cm from the model and use the hand holding the model to rotate the mini and move the paint flow vertically maintaining the same angle of spraying. Try to also it the lower portion of the model by spraying under the elements blocking the light but make sure you keep the airbrushed angled at 40 to 45 degrees. You want some paint to reach this areas since this is a first coat but it is important to maintain those shadows.
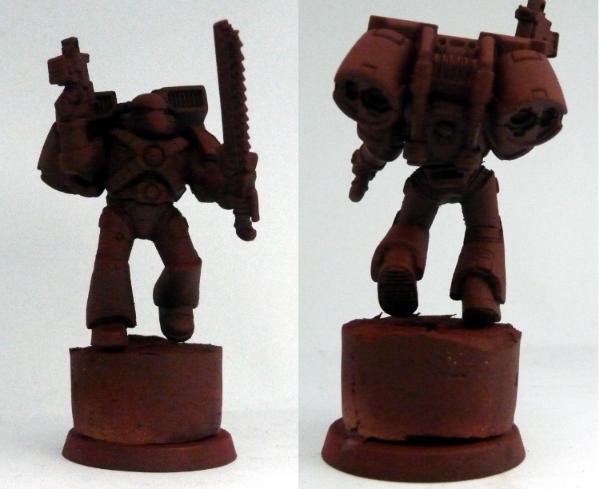
This is far from a great picture but it should be notorious that the bottom part of the legs is lighter than the upper leg and that the top of the jet pack is also a become more illuminated. Had a taken a picture from the bottom and this effect would even more notorious but hopefully you get the idea.
Step 3: Zenithal coat 2
The next step is apply a lighter shade of red. I am using Italian red for this. The only difference from the previous step is you constrict the angle of spraying to around 30 degrees maximum. Start again lightly building up the colour and then slowly start to tighten your cone until you are only spraying from the top of the model. The Zenithal lighting is more realistic if the torso and front is lighter. Anything below the knees (with the exception of the any advance feet) should probably have received no paint at this step.
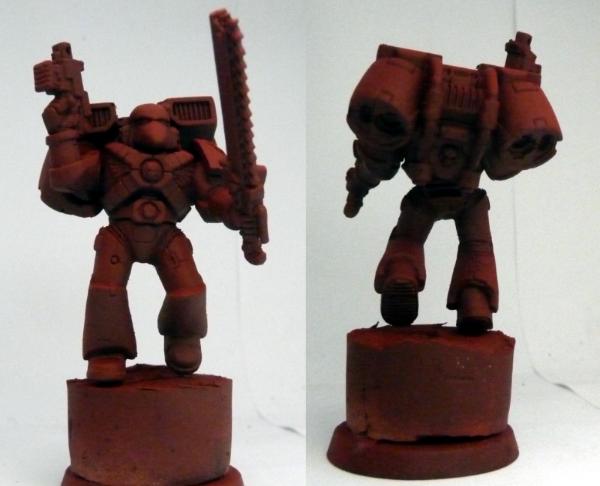
By now it should be clearly evident the lighter coat. You can notice brighter red on the front of the model, concentrating specially on areas facing the "fake" source of light. While the bottom part of the legs, because they are facing down, are still dark. On the back of the model, due to the massive size of the jet pack pretty much anything below it is shadowed.
Step 4: Zenithal coat 3
For most people the previous steps will be enough. However we can go the extra mile. The flat surface on the jet pack looks a bit boring. So in order to try and break some of the flatness I go back and shade and re highlight some of the details. First start with Vallejo model air burnt umber slightly shade the top of the jet pack vents (Bottom part of the jet pack facing up). You can imagine fumes giving some discolouration in here so this will give it a more realistic look. After that I do some "line" highlights with using Vallejo model air light red (this is more an orange than really a red) still using the airbrush. Using small burst draw a line around the front edges of the jet pack. Then with small burst from the airbrush re-highlight the top of vents. Finally sparsely spray orange only on the most raised surfaces, like the top of the shoulders, highest points on the arms and so on. Go lightly and you just want a very subtle effect.
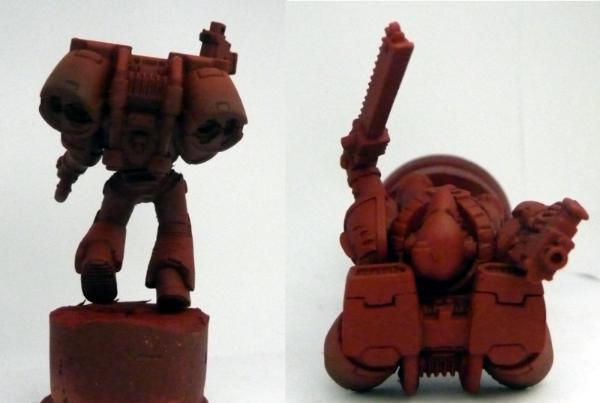
As you can see, the effect is very subtle. You will notice the darker brown on the top of the air vents which lightens towards the top. Looking from the top you can also see the slight lighter spots on the left shoulder and the lighter red on the left of the jetpack. This completes the Zenithal painting so you should now have a lighter model when looking from above but quite dark when looking from the bottom.

This finishes the airbrush steps. So to protect your painting so far and create a surface with less tension for the washes I coat the model with gloss varnish.
Step 5: Washes
Most people are happy with just a zenithal coat. However since I primed the model with red when looking from the bottom of the model the colours will look rather flat. In order to solve this I apply a wash of Secret weapons miniatures drying blood. This is diluted with a drop of matte medium in a 1:5 proportion. This helps giving a longer drying time, which combined with the previous coat of gloss varnish will make your wash running into the crevices leaving no marks on the surfaces. Once this is finished a pin wash with a dark colours is applied directly to the recesses. You can use a black wash. That is what I used on the model above (Secretweapon heavy black wash) or a blue/purple if you want a richer shadow. Again diluting with matte medium will make it more controllable, plus the gloss coat will allow you to go over any mistakes immediately with a damp cotton bud.
Step 6: To be continued
