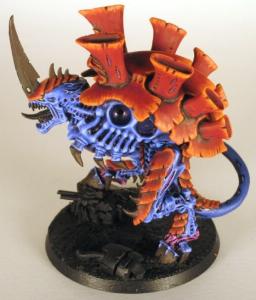
Model conversion by Insaniak
Model painted by yakface
The original WIP thread can be found HERE, although some of the pictures may no longer be functioning.
If you’d like to comment on or discuss this article, please click HERE.
Converting the Model
For a description of how this model was created, please click here.
The Color Scheme
The color scheme behind my hivefleet is essentially a reverse on the red skin/blue carapace Hive-fleet Behemoth color scheme that Games Workshop used. The thing is, most Tyranid color schemes have the skin as the brighter color and the Carapace as the darker color (there are plenty of exceptions, but in general this is true).
I didn't like this idea so I wanted to go with a scheme that would really accentuate the Carapace over the skin. Therefore, rather than using a very bright blue as my highest skin highlight, I stuck with Space Wolves grey which gives a much more 'greyish' (muted) blue as the final highlight. In contrast, I really wanted the red to pop, so I went with a pretty bright orange as the final red highlight.
I decided to paint the arms separately from the body because the weapon arms aren't permanent anyway (they're magnetized) and the wing arms cover so much of the body of the model it would have been impossible to reach many important areas.
All painting was done with Games Workshop paints. You can click on all the pictures below to see bigger versions of them.
Painting the Skin Tone
Note: All of the skin tone for the whole model (including the arms) was painted at the same time to maintain consistency.
Step 1 (not pictured): Black undercoat.
Step 2 - Regal blue basecoat
Step 3 - blue ink
Steps 4 & 5 involve painting the squishy interior pink fleshy bits in between the Tyrant's joints. This was done so that any screw-ups made while painting interior fleshy bits was then easily corrected by the next step (Step 6) of painting the Regal blue base-coat everywhere except the crevices.
Step 6 - Regal blue highlight over all the skin-tone except for the crevices
Step 7 - highlight skin with 50/50% Regal blue & Ultramarine blue
Steps 8-11 again involve painting the squishy interior pink fleshy bits in between the Tyrant's joints, this time highlighting them to their final level. Although greater care was taken this time to pain these interior squishy bits they were still painted before I got too far into highlighting the main skin tone so any crazy pink paint mistakes wouldn't be ruining the most time-consuming highlighting (the skin).
Step 12 - Ultramarines blue highlight
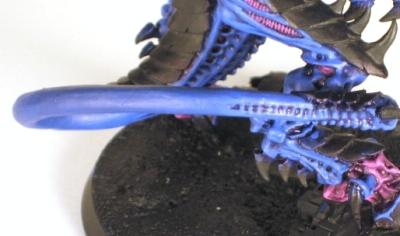
Step 13 - (just the tail) wet blending from Regal blue up to Ultramarine blue
Steps 14-23 & Steps 24-27 involve painting the Carapace and the eyes of the model. Just as before, these two areas were done before the final skin highlight was completed because there was a much greater chance that I would make a mistake onto the skin area when trying to paint the carapace and the eyes than making a mistake with the final skin highlights into the eyes or onto the Carapace.
In short, I never like to paint an area of a model to completion if I'm at all concerned that painting another area might cause a mistake onto that finished area.
Step 28 - 50/50% Ultramarine blue/Space Wolves grey highlight
Step 29 - 25/75% Ultramarine blue/Space Wolves grey highlight
Step 30 - Space Wolves grey final skin highlight
Painting the Interior Fleshy Bits
Note: The instructions for painting these pink squishy areas apply to all parts of the model that ended up being painted pink. The pictures below only show a small portion of the pink areas being painted.
These areas were painted as some of the first steps, right after putting on the blue base-coat and inking the model. This was done because these areas tend to be all located in tough to reach crevices so I wanted to completely finish them before moving onto other areas of the model. That way, if I made any mistakes painting them they would be easily erased when I started painting the other areas of the model.
Step 4 (not pictured): Liche purple.
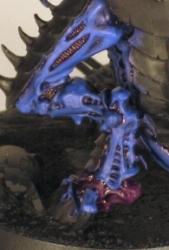
Step 5 - Purple ink over the Liche purple
Steps 6-7 involved a couple more steps of painting the blue skin tone.
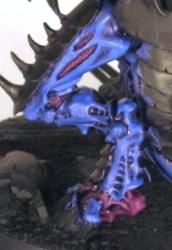
Step 8 - 50/50% Liche purple/Warlock purple highlight
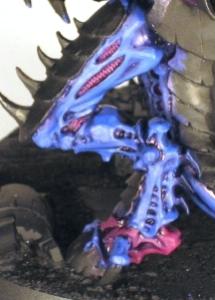
Step 9 - Warlock purple highlight

Step 10 - 50/50% Warlock purple/Tentacle pink highlight

Step 11 - Tentacle pink final highlight
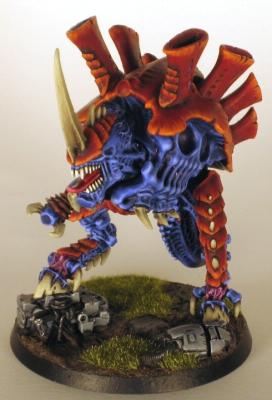
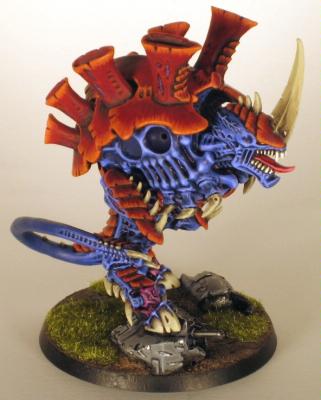
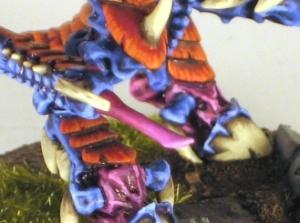
Painting the Carapace
Note: painting the "Carapace" means the carapace all over the model including the carapace found on the weapon arms. The pictures below show only the back Carapace being painted.
Steps 1-13 involved painting the blue skin tone and painting the squishy interior pink fleshy bits in between the Tyrant's joints.
Step 14 - Scorched brown basecoat
Step 15 - 75/25% Scab red/Scorched brown highlight
Step 16 - Scab red highlight
Step 17 - 50/50% Scab red/Red gore highlight
Step 18 - 50/50% Red gore/Blood red highlight
Step 19 - Blood red highlight

Step 20 - 50/50% Blood red/Blazing orange highlight
Step 21 - 50/50% Blazing orange/Fiery orange final carapace highlight
Step 22 & 23 (pictured below) is a two part process. First, a black wash was added to all the crevices/nicks found in the Carapace all over the model (Step 23). Then a 50/50% Red gore/Scab red mix was used in very select touches to 'break up' the orange edging and make it look more like a natural edging for plates (Step 24).
Step 22&23 - 50/50% Blazing orange/Fiery orange final carapace highlight
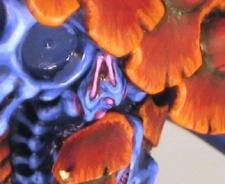
Painting the Eyes
The eyes, like the interior squishy bits were painted before the skin was fully completed so that any screw-ups on the skin could be easily corrected.
Steps 1-23 involved painting the blue skin tone, painting the squishy interior pink fleshy bits in between the Tyrant's joints and painting the Carapace.
The eyes started out just with the normal black undercoat, Regal blue basecoat and then blue ink (pictured below).
The eyes before any yellow paint is applied
Step 24 - Golden yellow basecoat
Step 25 (not pictured): yellow ink.
Step 26 - Sunburst yellow highlight
Step 27 - 50/50% Sunburst yellow/Skull white final eye highlight
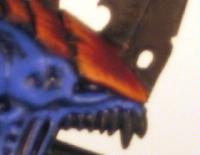
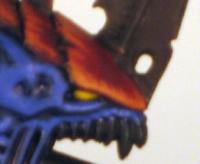
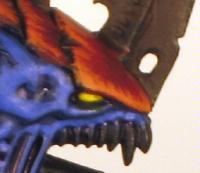
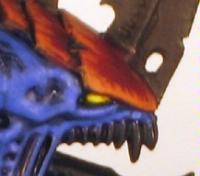
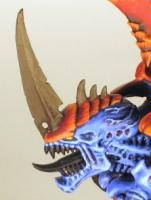
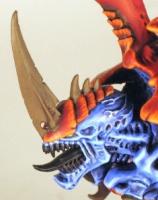
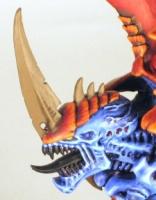
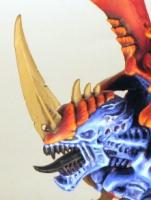
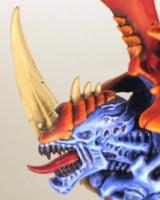
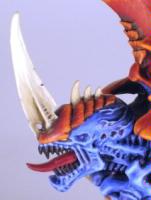
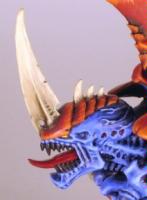
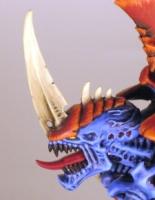
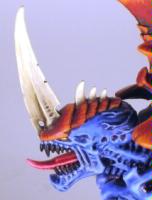
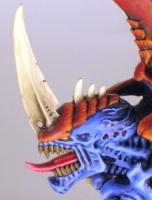
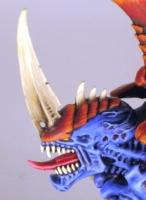
Painting the Claws and Spikes
Note: painting the "Claws and Spikes" means all of the claws and spikes over the entire model, including the feet (hooves) and Scything Talon weapon arms. The pictures below show only the model's "head spikes" being painted as a representation of the rest of the Claws and Spikes on the model. I had a few problems with the white balance in these pictures, so the hue of the colors may change a little from shot to shot.
Steps 1-30 involved painting the blue skin tone, painting the squishy interior pink fleshy bits in between the Tyrant's joints, painting the Carapace and painting the eyes.
Step 31 - 50/50% Scorched brown/Graveyard earth basecoat
Step 32 - Graveyard earth highlight
Step 33 - 50/50% Graveyard earth/Kommando Khaki highlight
Step 34 - Kommando khaki highlight
Step 35 - 50/50% Kommando khaki/Bleached bone highlight
Step 36 - (big head spike only) wet blending between Kommando khaki, Bleached bone and Skull white
Step 37 - (small spikes only) Bleached bone highlight
Step 38 - (small spikes only) 75/25% Bleached bone/Skull white final highlight
Painting the Tongue and Teeth
Steps 1-38 involved painting the blue skin tone, painting the squishy interior pink fleshy bits in between the Tyrant's joints, painting the Carapace, painting the eyes and painting the claws and spikes.
Step 39 (not pictured): Tongue: Red Gore basecoat.
Step 39 - Tongue: Red Ink
Step 40 - Tongue: Blood red highlight
Step 41 - Tongue: 50/50% Blood red/Tentacle pink highlight
Step 42 - Tongue: 25/75% Blood red/Tentacle pink highlight
Step 43 - Tongue: Tentacle pink highlight
Step 44 - Tongue: light red ink (to mute the pink and create a 'wet' look for the tongue)
Step 45 - Teeth: Graveyard Earth basecoat
Step 46 (not pictured): Teeth: black wash.

Step 47 - Teeth: Bleached bone highlight
Step 48 - Teeth: Skull white final highlight
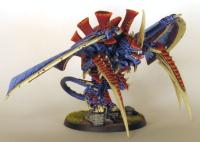
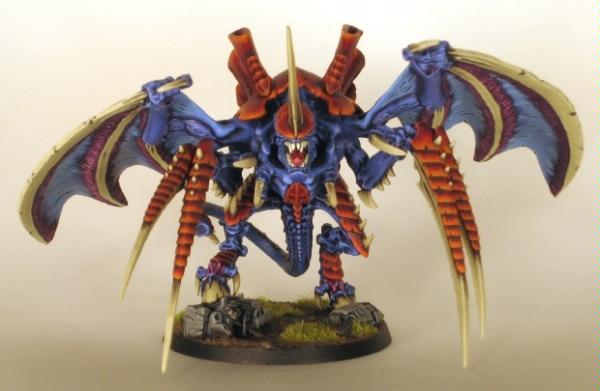
Painting the Wings
The wings, although painted in the same style as the blue skin (for the wing membrane), the claws (for the embedded sycthing talons) and the pink squishy bits (on the underside for the tissue that attaches the wing membrane to the claws), deserve a special mention because they were painted an intentionally brighter blue to represent the fact that the wing membrane is supposed to be very thin (pictured below).
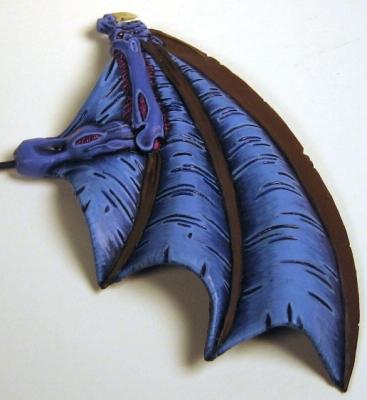
Wing WIP shot
This was accomplished by mixing Ice blue in with Space Wolves grey for the some of the final highlighting on the wing's skin tone.
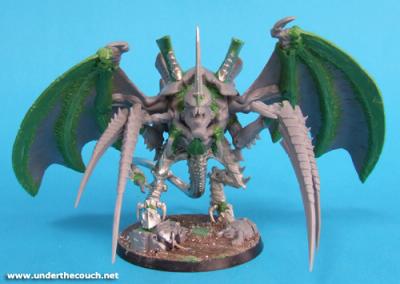
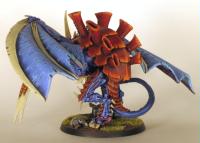
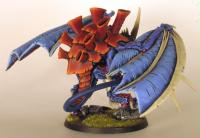
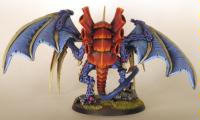
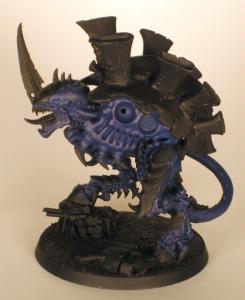
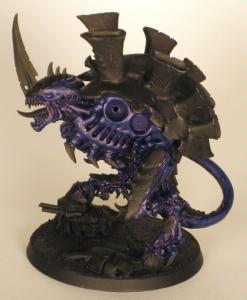
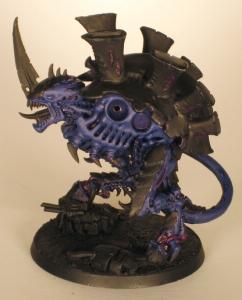
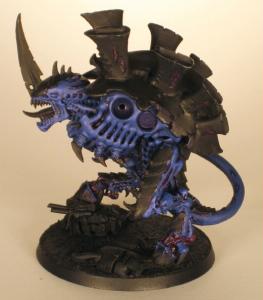
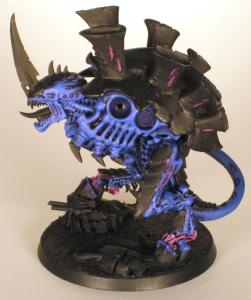
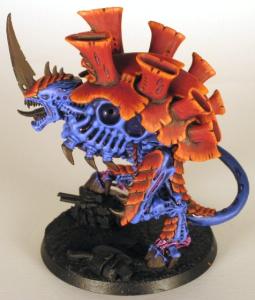
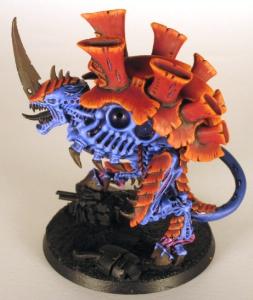
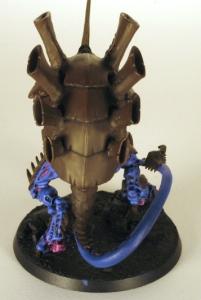
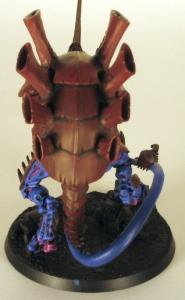
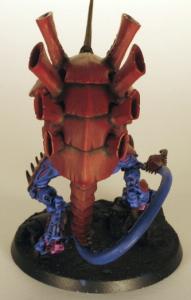
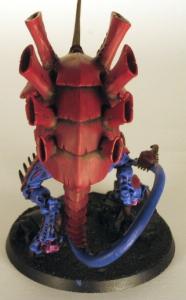
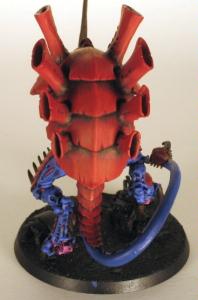
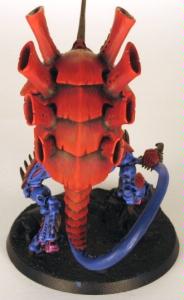
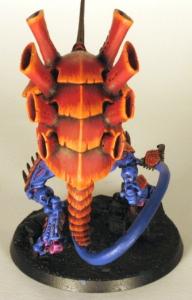
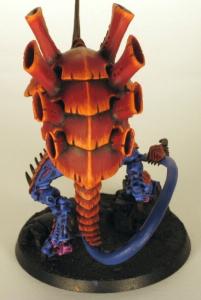
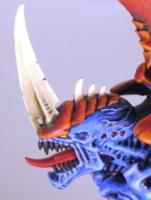
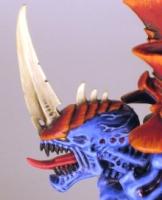
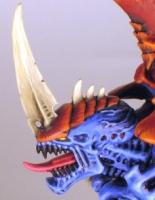
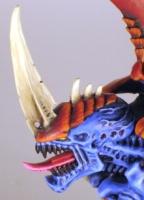
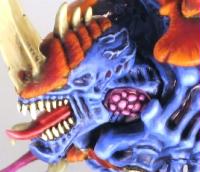
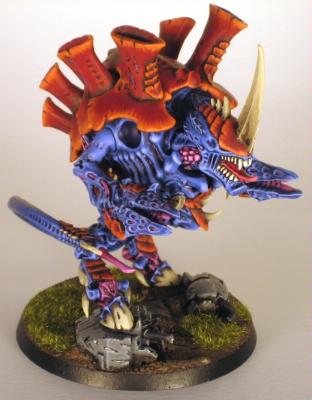
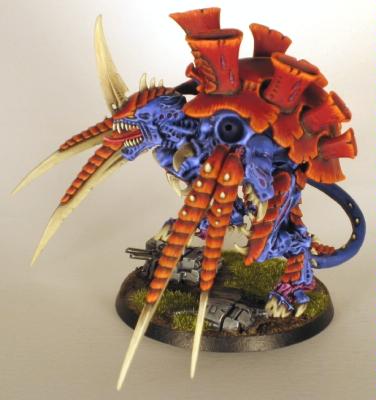
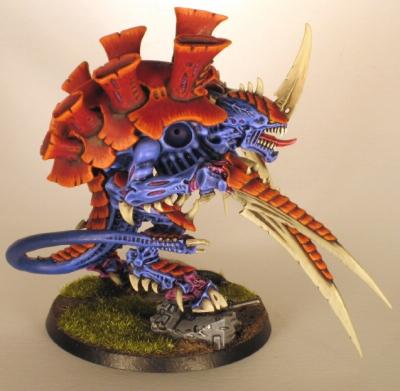
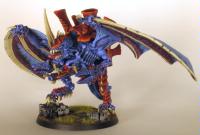
Finished Pictures
Some of the pictures below were taken before the wings were attached to the model to allow close-ups of some areas to be taken (like of the Biomorphs, for example).
Biomorphs
Adrenal Glands
Toxin Sacs
Implant Attack
The Base
Weapon Arms

Twin-Linked Devourer Arms
Twin-Linked Devourer Arms
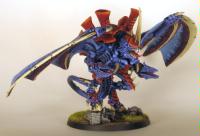
Scything Talon Arms
Scything Talon Arms
Finished Model
Scything Talons
Twin-Linked Devourers
Twin-Linked Devourers