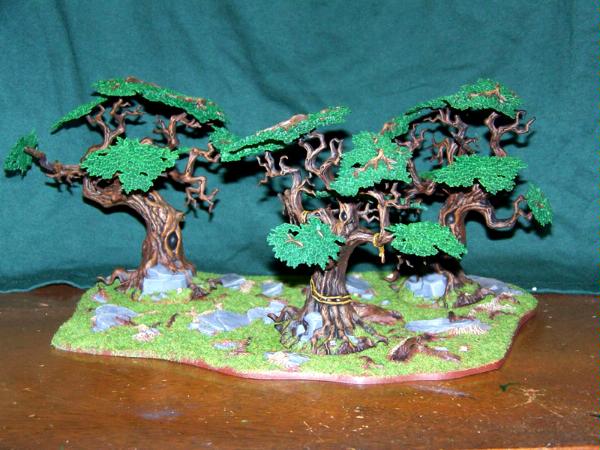
Trees are an important part of any Warhammer Fantasy or Warhammer 40,000 scenery collection. It just doesn't seem right to play a game of Fantasy without at least one grouping of trees to provide cover and force some thought of strategy into the minds of the players. There have been many ways to build trees for our hobby over the years, but it hasn't been until recently that Games Workshop has released a plastic box set that is purposefully built for Warhammer. These trees are easy to assemble and using a drybrushing technique, they are quite easy to paint. While some have been critical of the bonsai-like leaf structure, the plastic kit looks quite good with even basic modelling skills. Unfortunately, the Citadel Trees are brittle and the thin connection points between branch and leaves will result in many repairs and many busted twigs.
The reasonable price point and unusual look of the Citadel kit quickly caught my eye and it didn't take long to purchase a box. However, those that were a little faster in assembling and painting their trees had already complained about how easy it was to break off the leaves and stated that almost every time they used them, there would be a few repairs that were needed per game. This was frustrating and I didn't want to paint and assemble my trees if they would be so difficult to transport and break during basic gameplay. When I finally got around to assmebling them I decided I would use them as a 'dead forest' and not put any leaves on the tree. For months they sat assembled, but unpainted as I lost momentum on the project due to their brittle nature. Then, it occurred to me that I could use some of the smaller Rare Earth Magnets and convert the Citadel trees to withstand punishment and still look good.
Painting the Base
The first thing I did was paint the base of the trees. The entire top side of the base was coated with Dark Flesh. From there light drybrushing was done with Bestial, Vermin and Vomit Brown paints to provide a little texture to the dirt that would be visible through the flocking. The visible roots that were on the base were base coated with the darker Scorched Brown and then Dark Flesh, Bestial and Vermin brown was applied with drybrushing. A Badab Black washing was thrown over the painted roots to add some depth and have the pieces look more decayed. The rocks were base coated with Adeptus Battleship Grey foundation paint. Drybrushing was added with Codex Grey, Foundation Grey and then a very minor highlight of drybrushed Bleached Bone to provide a realistic look to the rocks. Some of the Citadel Glade Grass was added using Elmers Glue and skulls were painted with Bleached Bone and Skull White.

Preparing the Trees
They key to the project would be the three trees themselves. I spent a little time flashing the trees and then using Green Stuff to fill in the numerous gaps and smooth out areas where the plastic did not provide a perfect fit. The Citadel kit contains decent molds, but you can certainly see where the four pieces of the trees each come together. I did not add a large number of branches for each of the trees when I had built them because I was planning on making this a 'dead' forest. I decided to not add anymore to limit the number of magnets I was going to need. This was to be more of an exploratory exercise, but I still wanted them to look decent.

The next step was to add the magnets to the branches. I decided it would be best to forego the very small leaves and just place larger pieces onto the trees. I looked at each tree and determined where the best position where I could put a magnet and get decent coverage when assembled. One factor was checking the mounting points against the diameter of the magnet and then clipping the branches to maintain the same length with the magnet in place and trying to get the closest match in diameter to the magnet. Other areas I would fit the magnet to fit into a "Y" shaped area of branch. After the magnets were super glued into place I used Green Stuff around each magnet to smooth out the connection point and provide resistance so the magnet could not slide and break the glue bond.
Preparing the Leaves
The project started to take a little more time than I had hoped and it was about the time I reached the pile of leaves that I decided I could save a little time. After carving out the circular area that was intended to serve as a glue point for the branch to fit the magnets on three or four leaves I decided I could simply just lay the magnet flat and glue it in place. ON some leaves the circular connection point is visible, but after the leaves are placed onto the tree it is almost impossible to see. I used a very fluid super glue and poured it over the magnet so that it would run off and create a small pool around the magnet. This was done to help hold the magnet on so that the two Rare Earth magnets would not rip themselves away from the glue bond when the leaves are intentionally or accidentally removed from the tree.

The Final Steps Before Painting
At this point the tedious work was complete. However, I needed to add three of the larger Rare Earth Magnets under each tree and used six large 1.5" steel washers to provide a magnetic connection between the trees and the base. The trees tend to be quite easy to knock over and this provides just a little resistence to help make them sturdier and a little more survivable during game play. I used the very gap filling super glue again both under and between each of the six washers (you need to use two per tree to get the right height) and then poured the super glue into the center to make sure they would not life from the base. The washers were then painted with Dark Flesh and given three coats of Ard Coat to keep them from chipping. The glossy look of the Ard Coat is removed after the entire base was heavily coated with Matte Varnish spray. The trees and leaves were then primed with black spray paint. Please note the pictures of the trees were taken after the trees were painted.


Finishing by Painting the Trees and Leaves
After all of the assembly was done and the trees and leaves were primed, it was time to paint. The trees themselves were given a very heavy drybrush of Scorched Brown to provide the base color. I allowed a good deal of black to show through because I liked how it looked and it provided a very effective feel of depth. My standard 'wood' finish was applied with a drybrush of Dark Flesh and then Bestial Brown. Vermin Brown was added as a third drycoat and only areas I wanted to really pull focus to (knotholes and such) were given a final highlight drybrush of Vomit Brown. The leaves were heavily drybrushed with Dark Angels Green and then a moderate drybrush of Snot Green. I decided to add a little color and some leaves were given a final highlight of Goblin Green, while others were introduced to Scorpion Green. Each of the magnets on the trees and the leaves were heavily painted with Scorched Brown and then given three coats of Ard Coat. Finally, everything was heavily sprayed with a Matte Finish.

As a final note, all products used, except for the Rare Earth Magnets, Green Stuff, Elmers and Gap Filler were Games Workshop paints and glues. More pictures are located at my WIP Gallery and I hope some of you will find this helpful. I have tested the leaves and they do a great job of breaking off with ease during play, with no damage done. Feel free to contact me with any questions.