Switch Theme:

Mark V and VI Studded Shoulderpads  [RSS] Share on facebook Share on Twitter Submit to Reddit
»
Author Message
Advert


Forum adverts like this one are shown to any user who is not logged in. Join us by filling out a tiny 3 field form and you will get your own, free, dakka user account which gives a good range of benefits to you:
  • No adverts like this in the forums anymore.
  • Times and dates in your local timezone.
  • Full tracking of what you have read so you can skip to your first unread post, easily see what has changed since you last logged in, and easily see what is new at a glance.
  • Email notifications for threads you want to watch closely.
  • Being a part of the oldest wargaming community on the net.
If you are already a member then feel free to login now.


Made in us
Steadfast Grey Hunter


Austin, Tx

Like studded shoulderpads? Have a hard time getting any, because they only come in a couple of box sets and cost upwards of $3 a piece at an online bits shop? Maybe I can help.

Alright, here's what you need:
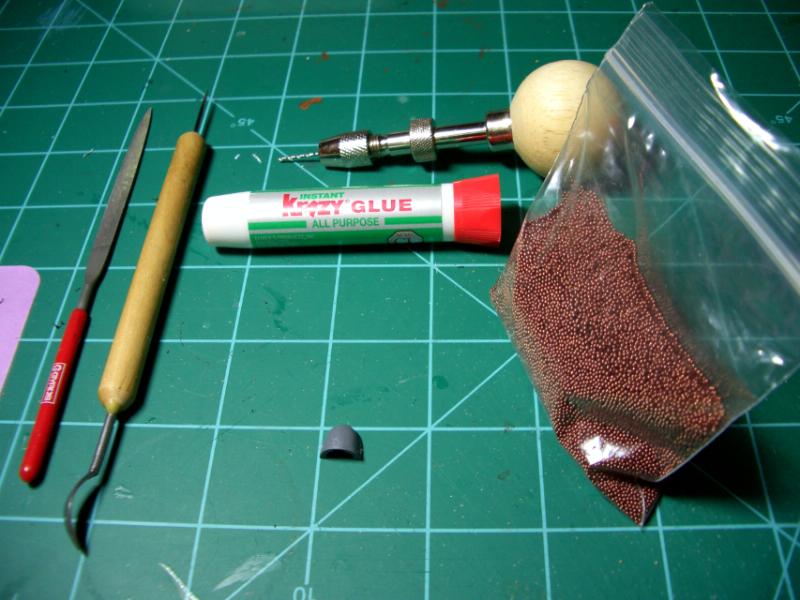

1. a file
2. a pokey thing ( a needle works, but I use the top end of the wooden tool on the left)
3. your super glue of choice
4. a pin vise, and the smallest bit that comes with it.
5. a standard SM shoulderpad
6. glass micro beads, 1mm

for the beads, here's a link to where I got mine. the cost is cheap, there's enough in the bag to do a whole company of pre-heresy marines if you wanted to, and shipping is more reasonable than anywhere else I could find. You do have to make a quick little account though, which is free.

http://www.etsy.com/view_listing.php?listing_id=30175008

if you find my link takes you to an out of stock listing, keep looking in that same shop and you should find what you need. color isn't important.
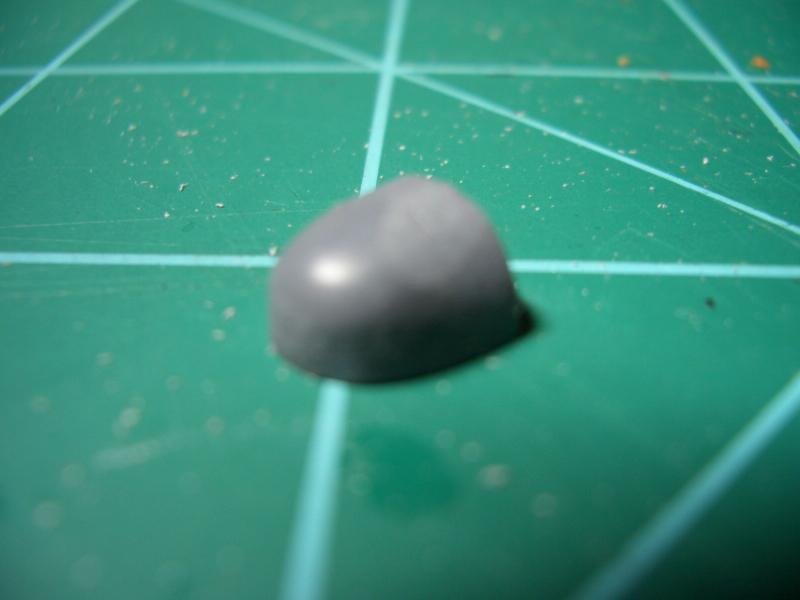

Step 1

File the trim from the shoulderpad like so.
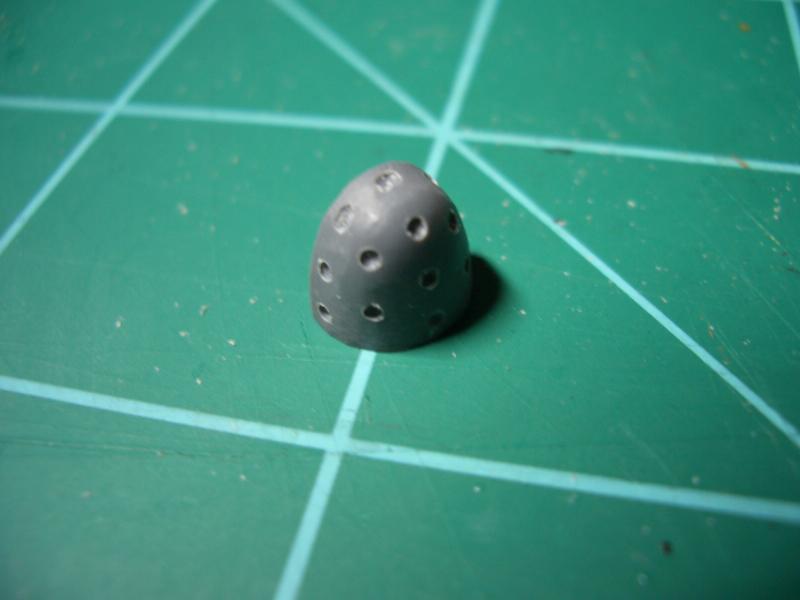


Step 2

Take your needle tool and poke guide holes. You might want to identically match existing studded shoulderpads in your army, or create a new design you like. I wanted a few more studs than what is on the plastic shoulderpad.


Step 3

Take you pin vise and drill into your guide holes. not clean through, but just maybe 1/3rd to half-way, like you're making an impact crater from a bolter. If you find a hole doesn't line up with the others, redrill where it looks right; you can come back at the end and clean it up with a tiny bit of greenstuff.
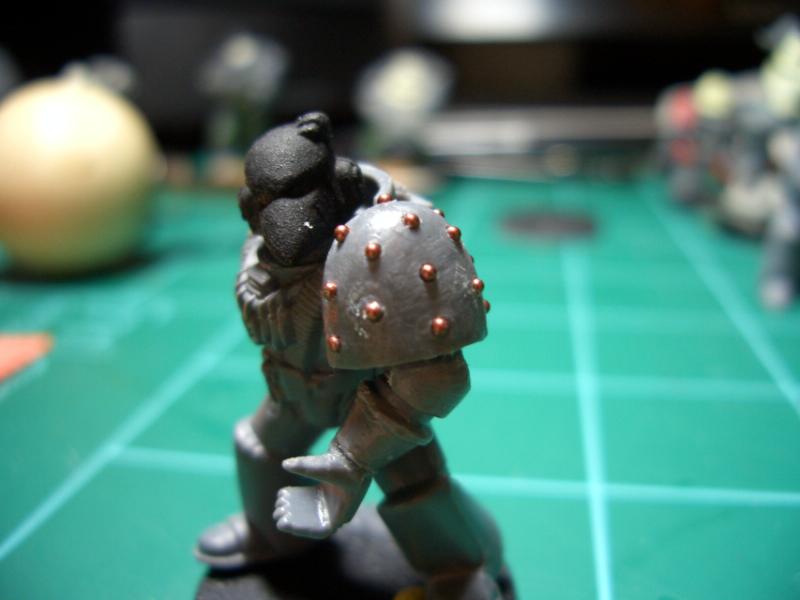


Step 4

Take your glass beads, put a tiny bit of glue in the hole, and drop a bead in it (they're so small, I find it best you lightly lick your finger, and touch one on your table to pick it up. just set it in the hole from there) wipe away any excess glue after each bead.


Step 5

Use greenstuff to fill in any bad spots, and use your file to smooth any areas that need it, and you're done! Repeat step one on the other shoulder pad, and you have a proper pair of Heresy or Corvus pattern shoulderpads.


Made in au
Member of the Malleus


Australia

Awsome, do you have any pictures of the completed marines? id love to see

"I am the hammer,
i am the right hand of my emperor,
the instrument of his will,
the tip of his spear, the edge of his sword"  
   
Made in us
Steadfast Grey Hunter


Austin, Tx

I can throw some up this evening. None painted yet, and they are all Mk VI, as I haven't gotten started on the 2 mk V marines that are in the unit yet.

   
Made in au
Member of the Malleus


Australia

that would be awsome

"I am the hammer,
i am the right hand of my emperor,
the instrument of his will,
the tip of his spear, the edge of his sword"  
   
Made in us
Stealthy Dark Angels Scout with Shotgun


Caliban

Great Technique

Dark Angels 10k+ pts 
   
Made in us
Guard Heavy Weapon Crewman


Ettrick WI

This will help alot with my Pre-Heresy Death Guard. Thanks
   
Made in au
Frightening Flamer of Tzeentch


It looks like alot of work to go to for a shoulder pad, but deffinitly looks great, and would be great for Veterans or somthing similar. About how long did it take you to do the group?

When you call an intimate moment with your partner "the Assault Phase"

Is that followed by a pile-in move?

That brings a whole new meaning to the term "Hit and Run"

Can that be following a deep strike, or do you have to wait until the next round? 
   
Made in us
Ruthless Rafkin


Glen Burnie, MD

Very nice. I might have to totally steal that.


-Loki- wrote:
40k is about slamming two slegdehammers together and hoping the other breaks first. Malifaux is about fighting with scalpels trying to hit select areas and hoping you connect more. 
   
Made in us
Steadfast Grey Hunter


Austin, Tx

Once you get into a rhythm, it's not so bad. I'd say maybe 20 minutes for the studded pad, and another 5 to file down the other pad. Since I'm doing a Heresy-era army going forward from the Siege of Terra, I'm mixing a lot of armor marks, so it's not horrible.

Most might find that they look good on their Vets, Sgts or HQ models, and it saves them $2.99 a pad.

It's really only mind-numbing if you decide you want to make mk 5 marines... especially as I've found you have to fudge the greaves a little, since they aren't identical in proportion.

   
Made in gb
Emboldened Warlock


Cool idea!

DC:80S++G++M+B++I+Pw40k99+D++A+++/mWD219R++T(T)DM+ 
   
Made in us
Dakka Veteran


I had never thought of using beads...now I will have to raid my wife's hobby cabinet.

   
Made in gb
Screamin' Stormboy


Oxfordshire

That looks great!


Automatically Appended Next Post:
That looks great!

This message was edited 1 time. Last update was at 2009/10/05 19:48:42


Made in us
Jinking Ravenwing Land Speeder Pilot


San Diego, CA USA

Genius! Thanks for sharing with links of where to buy and all!


Made in gb
Elite Tyranid Warrior


Thanks a lot! this will certainley help my wallet lol. Great tutorial.

"I hope they can fight without their commmander because he's lost his head."
Alatair, Vindicare Assassin of the Blood Dragons.

Emperors Faithful wrote:Assassin: One shot is all it takes...
Slaneesh: Bow chika wow wow!


Forum Index » Painting & Modeling Tutorials
Go to: