| Author |
Message |
 |
|
|
|
|
Advert
|
Forum adverts like this one are shown to any user who is not logged in. Join us by filling out a tiny 3 field form and you will get your own, free, dakka user account which gives a good range of benefits to you:
- No adverts like this in the forums anymore.
- Times and dates in your local timezone.
- Full tracking of what you have read so you can skip to your first unread post, easily see what has changed since you last logged in, and easily see what is new at a glance.
- Email notifications for threads you want to watch closely.
- Being a part of the oldest wargaming community on the net.
If you are already a member then feel free to login now. |
|
 |
2011/01/22 13:16:57
Subject: Making a Stencil out of Masking Tape
|
|

Decrepit Dakkanaut
|
This is a tutorial on how to make a simple stencil for things like chapter insignia using masking tape. Step 1: Take a piece of masking tape large enough to cover your area, then draw your design on it. **Suggestion from Ifurita: "For those of us, who are terrible at free hand, you can design simple templates in Power Point. You can print this, tape it to the top of your piece of masking tape, then cut it out with an Xacto knife, which should give you a very clean template." 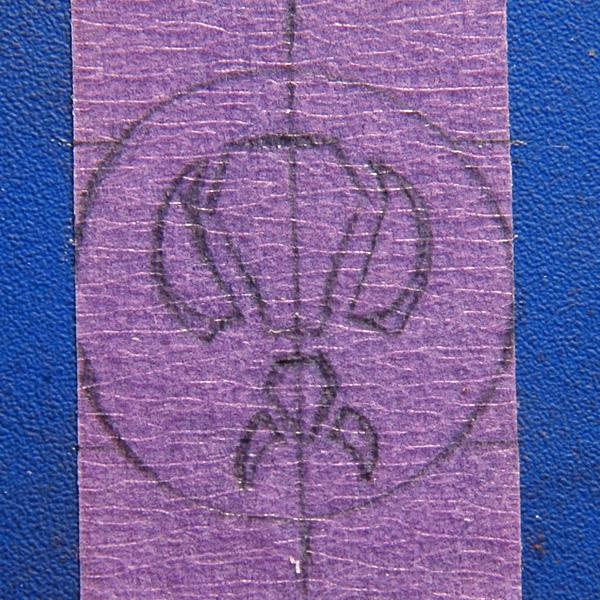 Step 2: Cut it out with a very sharp hobby knife... 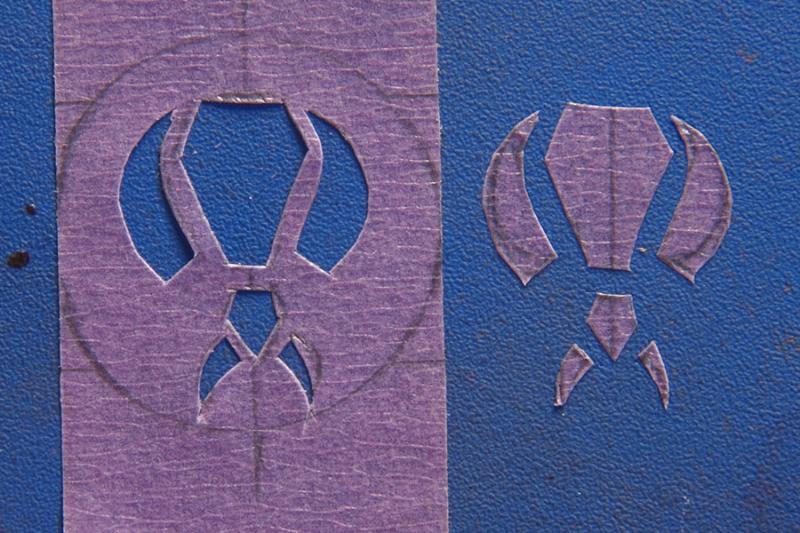 Step 3: Place your "stencil" on your surface and burnish the edges of the stencil so they adhere tightly to the surface. The extra tape here is to cover an error in the cut. 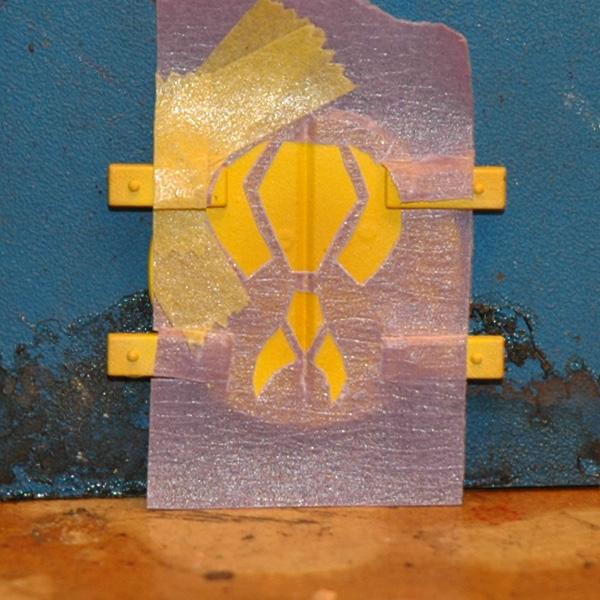 Step 4: Airbrush on your lightest color. Go slowly and with low pressure! If it takes you less than 5 coats to get up to full coverage you're putting on too much too fast and are likely to get bleed through! I should mention that the less you fiddle with your tape, the better off you'll be. In my first go-round I actually masked off the black when I painted the red, then removed that... masked off the red areas and painted the black. I think the removal of the masking over the black areas probably weakened the overall stencil adnerance which caused far more bleed through on the first try than on the second. I also applied my coats much heavier and faster, which kept the paint "liquid" longer allowing it to bleed more readily. If you spray lightly, the paint essentially dries on contact which greatly decreases the odds that you're going to get it moving beyond the tape edges. 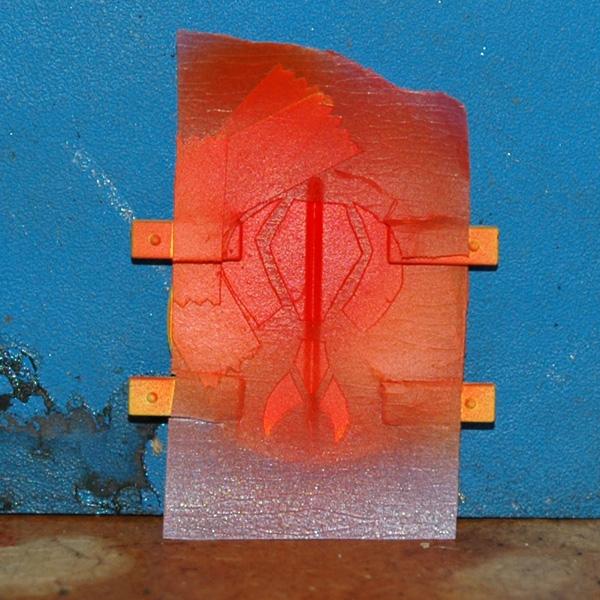 Step 5: Mask over those areas you want to remain the lightest color. 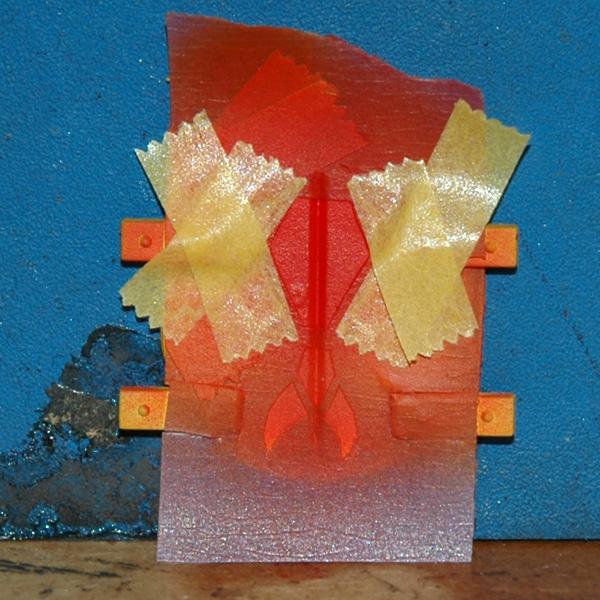 Step 6: Spray on your next darkest color, same rules apply as in step 2.  Step 7: When dry, carefully remove tape stencil and viola! Not too bad. 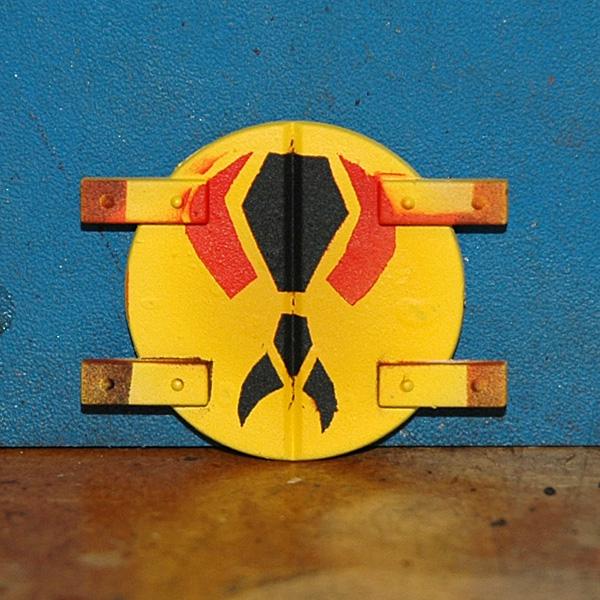 Step 8: Clean up the lines, cover the over-spray and bleed through (hopefully not too much) and you're all set! The less crap you have on your surface (these doors have a lot of extraneous crap on them) the easier this will be. 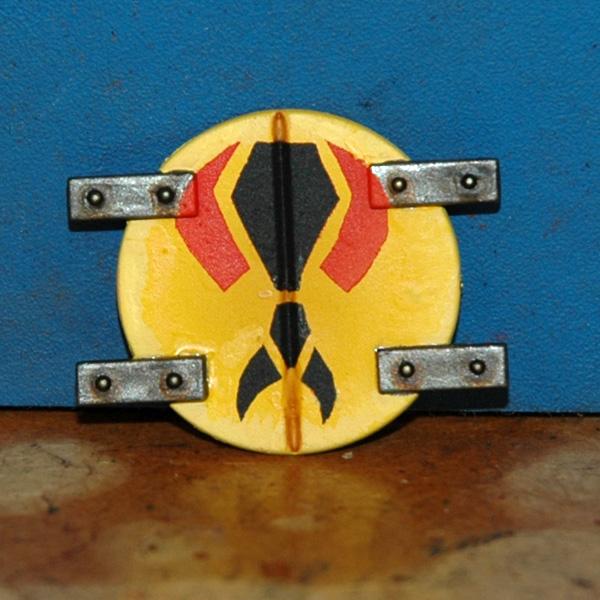 There you have it! Worst part is cutting the design cleanly into the tape. Figure that out and you've got it licked.
|
|
This message was edited 2 times. Last update was at 2011/01/22 21:53:45
|
|
|
 |
|
2011/01/22 13:33:56
Subject: Making a Stencil out of Masking Tape
|
|

Shroomin Brain Boy
|
cool idea, never thought about acualy using masking tape for this... nice of you to share!
vik
|
|
|
|
|
|
2011/01/22 13:34:56
Subject: Making a Stencil out of Masking Tape
|
|

Sinewy Scourge
|
Great tutorial. The advice regarding bleed through is particularly useful for someone trying this for the first time. What's the deal with the purple masking tape?
|
|
|
|
|
|
2011/01/22 15:33:48
Subject: Making a Stencil out of Masking Tape
|
|
[ARTICLE MOD]
Huge Hierodule
|
Nice tut. If I may supplement with another suggestion. For those of us, who are terrible at free hand, you can design simple templates in Power Point, for example, the Death Guard icon I used for my Rhinos
 .
You can print this, tape it to the top of your piece of masking tape, then cut it out with an Xacto knife, which should give you a very clean template.
The purple tape may just be the color of the low tack tape in his area. The low tack tape we use around the house for painting, etc, it blue.
|
|
This message was edited 1 time. Last update was at 2011/01/22 15:35:23
|
|
|
|
|
2011/01/22 17:43:55
Subject: Making a Stencil out of Masking Tape
|
|
Sinewy Scourge
|
Ahh, that explains it.
Also, nice tip Ifurita.
|
|
|
|
|
|
2011/01/22 21:49:40
Subject: Making a Stencil out of Masking Tape
|
|
Decrepit Dakkanaut
|
Thanks guys. Nice tip Ifurita, I'll add it to the tutorial. (credited of course)
The purple tape is just a type of very low adhesion masking tape you can get around here. There's the normal cream color, then blue which is a little less sticky, then the purple which is even less sticky. The narrow yellow stuff is Tamaya masking tape which is wonderful stuff as it's so thin that it's super easy to cut through (the other's are really for making windows and such, not for modeling). Wish I could get the Tamaya stuff in 1" widths just for this type of application.
|
|
This message was edited 2 times. Last update was at 2011/01/22 22:02:34
|
|
|
|
|
2011/01/22 21:56:07
Subject: Making a Stencil out of Masking Tape
|
|

Swift Swooping Hawk
|
Good work and advice guys.
Very useful.
|
 
"Now I am become Death, the destroyer of worlds." - J. Robert Oppenheimer - Exterminatus had it's roots way back in history. |
|
|
|
|
2011/01/31 21:49:01
Subject: Making a Stencil out of Masking Tape
|
|
Powerful Pegasus Knight
|
You get +1 internets for this! I needed something like this really bad.
|
 "That for all the Emperor's love of his space marines, his ultimate creation - he was in fact nearly killed by one of them, only to be saved by a mere mortal with a 5+ save and a flashlight." "That for all the Emperor's love of his space marines, his ultimate creation - he was in fact nearly killed by one of them, only to be saved by a mere mortal with a 5+ save and a flashlight."
|
|
|
|
|
2011/01/31 21:58:11
Subject: Making a Stencil out of Masking Tape
|
|
Decrepit Dakkanaut
|
I'll take all the internets I can get! :-) Thanks guys, glad you've found it useful. My cutting skills have never been good (even as a kid), I'm sure you'll get better results.
|
|
|
|
|
|
2011/01/31 22:19:03
Subject: Making a Stencil out of Masking Tape
|
|
Flashy Flashgitz
|
Hey Gits, nice tutorial. =-)
|
|
|
|
|
2011/02/01 02:53:21
Subject: Making a Stencil out of Masking Tape
|
|

Scarred Ultramarine Tyrannic War Veteran
|
I have used this technique for my orks before, it works really well.
|
 "Whilst we stand, we fight. Whilst we fight, we prevail. Nothing shall stay our wrath" "Whilst we stand, we fight. Whilst we fight, we prevail. Nothing shall stay our wrath"
 Guilliman and the Ultramarines are like Manchester United, everyone hates them because they are so awesome! Guilliman and the Ultramarines are like Manchester United, everyone hates them because they are so awesome!
|
|
|
|
|
2011/02/01 03:11:07
Subject: Making a Stencil out of Masking Tape
|
|
Noble of the Alter Kindred
United Kingdom
|
When cutting masking tape I find it better to put the tape down on some waxy paper first. (such as the paper that address labels or stickers come on, that you peel the label/sticker off) As a thought, you could print the design on the address label, peel off, place the tape on the waxy paper, stick the addy label onto the tape and cut out the design. There is also a thing called frisket that I have seen used for this purpose but never known where to get it from. A quick google sorts that out http://www.amazon.co.uk/FRISKET-FINISH-PROFESSIONAL-SPRAY-PAINTER/dp/B001F6J18K/ref=sr_1_1?ie=UTF8&qid=1296529956&sr=8-1 Downside is it ain't cheap :(There maybe alternatives available but not sure. Also always use a new scalpel blade
|
|
This message was edited 2 times. Last update was at 2011/02/01 03:27:10
|
|
|
|
|
2011/02/01 04:05:49
Subject: Making a Stencil out of Masking Tape
|
|
Decrepit Dakkanaut
|
Thanks CBB, that sounds like excellent advice!
|
|
|
|
|
|
2011/02/03 07:45:01
Subject: Making a Stencil out of Masking Tape
|
|
Tail-spinning Tomb Blade Pilot
|
This is just a theory but you could spray the model the colour of the emblem let it dry and then put a masking tape in the shape of the emblem were you want it to be then spray it the colour of the tank and you should end up with the base colour showing through.
|
|
|
|
|
2011/02/03 12:05:35
Subject: Making a Stencil out of Masking Tape
|
|
Decrepit Dakkanaut
|
Certainly. but you're limited to a one-color stencil that way. Might not be an issue for a lot of designs though.
|
|
|
|
|
|
|
|


