Forum adverts like this one are shown to any user who is not logged in. Join us by filling out a tiny 3 field form and you will get your own, free, dakka user account which gives a good range of benefits to you:
No adverts like this in the forums anymore.
Times and dates in your local timezone.
Full tracking of what you have read so you can skip to your first unread post, easily see what has changed since you last logged in, and easily see what is new at a glance.
Email notifications for threads you want to watch closely.
Being a part of the oldest wargaming community on the net.
If you are already a member then feel free to login now.
2011/12/21 04:51:55
Subject: VASSAL Bootcamp - Training the Blood Angels
So recently I started a Deathwatch campaign, and when I was looking for players I decided to ask one of my old friends (we'll call him Atlas). I know he likes RPGs, and has an interest in GW and 40k - he's played both Dawn of War games, and danced around getting a CSM army years ago. Anyway, he took to it rather enthusiastically, especially the Blood Angels. As I predicted, they're right up his alley. Pretty soon, he decided that he wanted to get himself a Blood Angels army, but at the moment he doesn't have the funds for one. On top of that, he and I live approximately 1,200+ kilometers away from each other. That's 2 really big obstacles, but I had a solution - VASSAL to the rescue! I'd never used it for an online game, so it was fun to try out and ran very smoothly (although I obviously prefer the real thing, but it is a great alternate system).
It should go without saying that I decided to go a little easy on him to help show him the ropes. I played my Nids (using the models I actually owned) while he took Blood Angels. And to be extra-nice, I didn't use my Fandex, although I think I'll try to playtest it with him when we get a little more even and he discovers the joys of heavy weapons...
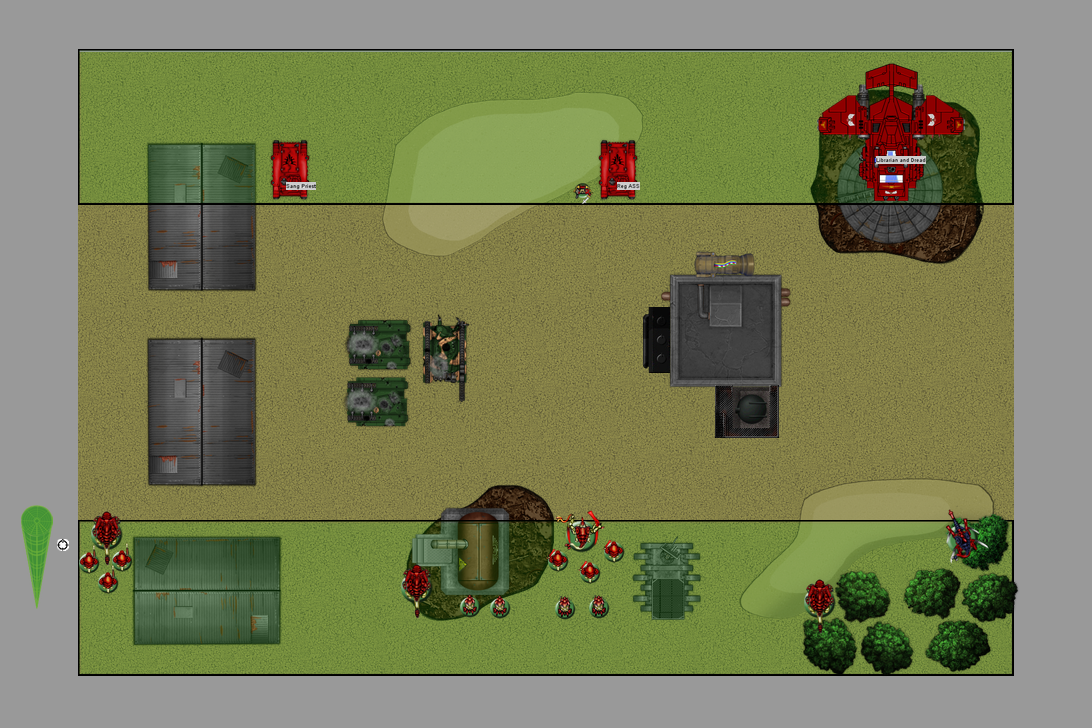
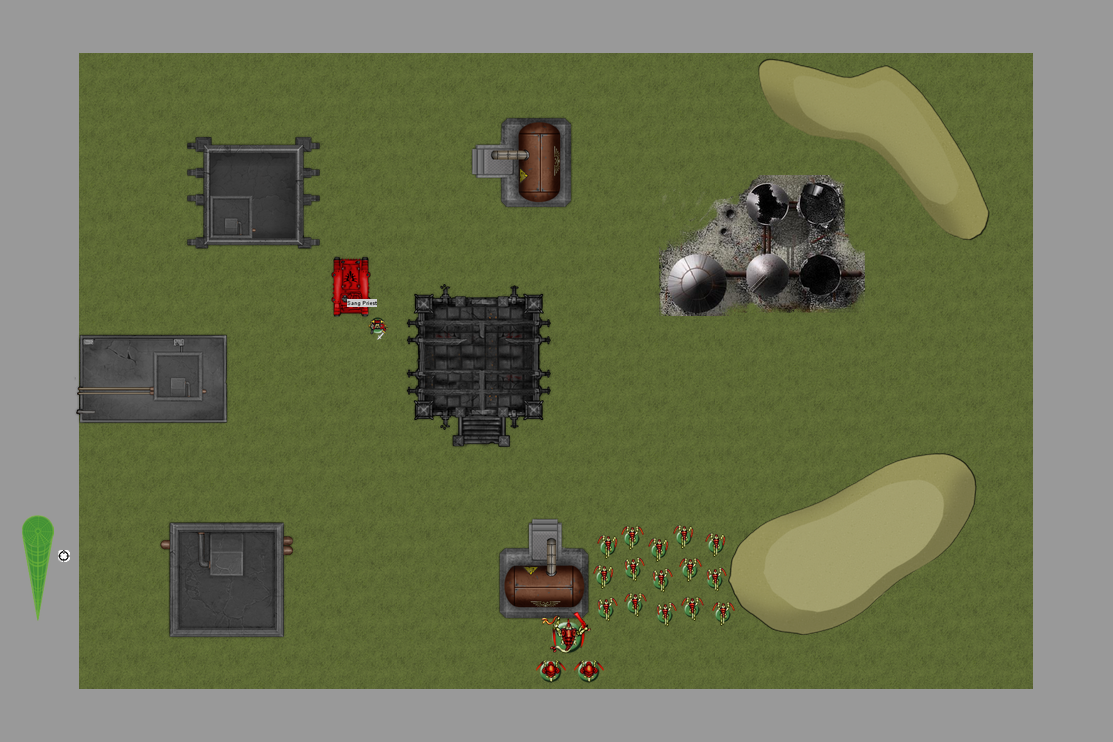
Round 1 - 750 Points I was a little hesitant about taking a big Hive Tyrant at such a low points value, but then Atlas caught sight of the Stormraven... so I figured it'd be fair for us both to splurge a bit.
We rolled for deployment and got Pitched Battle, and rolled for mission and got Capture and Control. Atlas got the first turn.
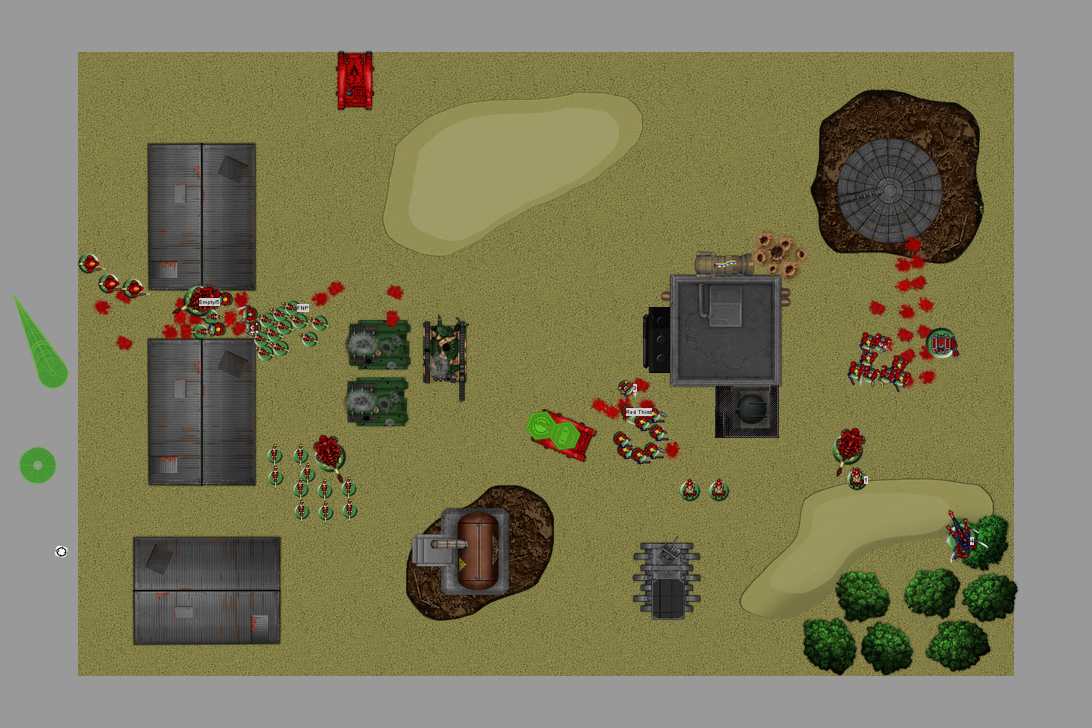
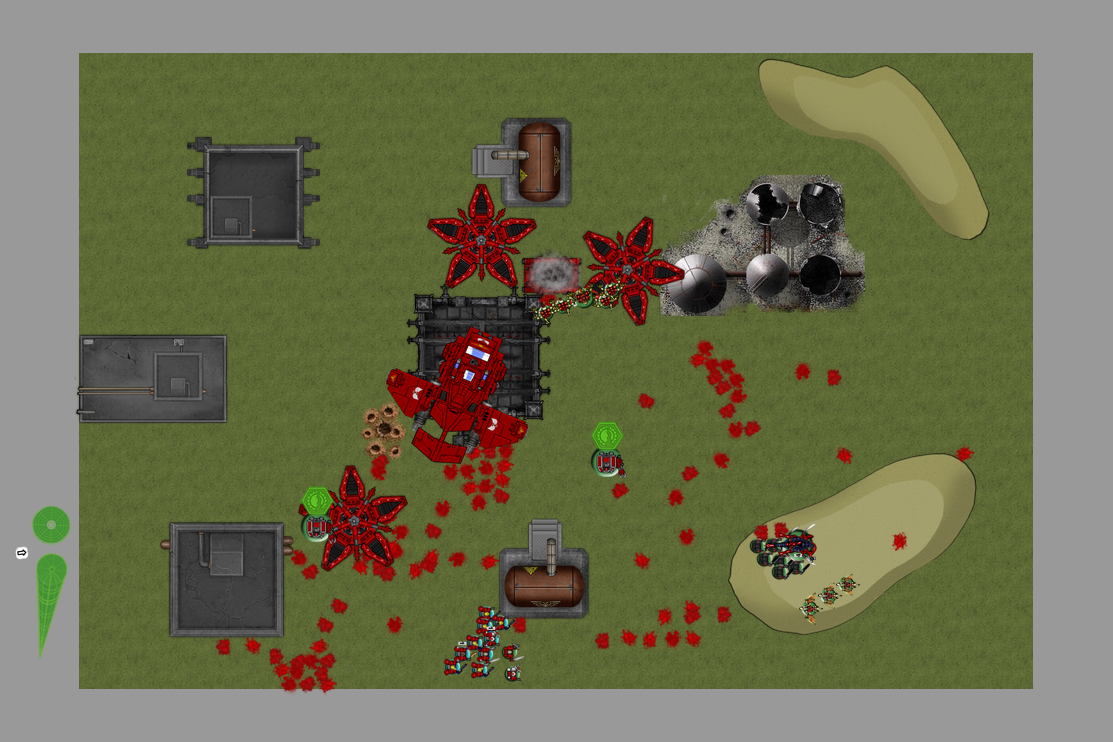
Turn 1 Atlas infiltrated his scouts close to the Termagaunts. When his turn started, he advanced them towards cover, and moved the Stormraven forward. He then fired a pair of Bloodstrike Missiles at the Hive Tyrant's unit, causing 1 wound which I allocated to one of the Tyrant Guard. Pretty straightforward first turn.
I realized that all my units were out of Synapse range, and in true Tyranid form, they all failed their Leadership checks and ran for cover. The Tyrant face-palmed and then ran towards the Stormraven to kill its occupants. The Hive Guards fired at the Stormraven, but only shook it (so it would fire only 1 gun next turn due to the Machine Spirit).
Turn 2 The Scouts moved forward to kill the Termagaunts, while Atlas and his Assault Squad disembarked from the Stormraven to attack the Tyrant. In the shooting phase, the Stormraven fired at the Tyrant's squad, but didn't do any damage. Meanwhile, the Scouts fired at the Termagaunts, killing half of them (they passed their Leadership check surprisingly!), and then wiped them out in the assault phase. Elsewhere, Atlas charged the Tyrant and his squad, killing 1 of the Guards and wounding the other, and putting 1 wound on the Tyrant. Meanwhile, the Tyrant scythed down 3 of the Assault Marines.
There wasn't much moving I could do, so we went straight into shooting. The Hive Guard fired on the Stormraven, but rolled poorly - I didn't do any damage. In the assault phase, the Tyrant wiped out the rest of the Assault Squad and their Sanguinary Priest, but Atlas killed the last Tyrant Guard in response.
Turn 3 Atlas moved his Stormraven and Scouts in a hope to wipe out the Tyranids on their objectives and force a draw at worst. The Stormraven fired its assault cannon and heavy bolter, killing 6 Termagaunts (they were Fearless in Synapse range now). In the Assault Phase, Atlas continued to endure, suffering 1 wound and wounding the Tyrant once in return.
The Genestealers showed up this turn, arriving just beside the Tac Squad - unfortunately they landed just short of assaulting them! Meanwhile the Hive Guard fired at the Stormraven again and failed to hit it. The surviving Termagaunts ran into area terrain to get a cover save as well. Meanwhile, the Tyrant caused 1 more wound to Atlas, dropping him down to his last.
Turn 4 Hoping to save Atlas or contest an objective, the Scouts moved closer. Meanwhile the Stormraven circled the Gaunts to get a shot in on them. Elsewhere, the Tac Marines moved to get a better position on the Genestealers and opened fire, killing 4 of them. The Stormraven concentrated its fire on the Hive Guard, killing 1. Sadly, Atlas was finally killed by the Tyrant, but wounded it once more before being killed.
The Tyrant was going to go after the Stormraven, but realized it was more beneficial to go after the Scouts and use leech essence on them to get back wounds. It successfully cast it, killing 2 (and getting back 2 wounds), and then wiped out the last 2 in assault. Meanwhile, the Hive Guard wrecked the Stormraven. Surprisingly, the Genestealer vs Tac Marines fight was fought to a draw with no wounds on either side (thanks to the Sanguinary Priest)!!
Turn 5 The game was basically over now, but we kept it going to see what would happen. In the assault phase, the Genestealers wrecked the Tac Squad, and then caught the Sanguinary Priest in a sweeping advance, killing him with No Retreat! wounds. With no models left on the, er, table the Tyranids were declared the victors.
Afterthoughts Atlas performed pretty well this game, considering it was his first. I was actually somewhat surprised that Captain Atlas didn't do so well, but then Atlas informed me that he was only rerolling 1 to wound roll per turn, instead of all them as should have been the case - if he had done this then he might have managed to kill the Tyrant afterall! He was also hampered by his small squad sizes (he didn't realize he could take more than 5 Assault Marines apparently), but he had a pretty good basis for a list in there. I think he's getting the hang of things though. Next game we're gonna double the points and get a game going for real!
Next battle report coming soon!
If you enjoyed this, be sure to check out my other battle reports!
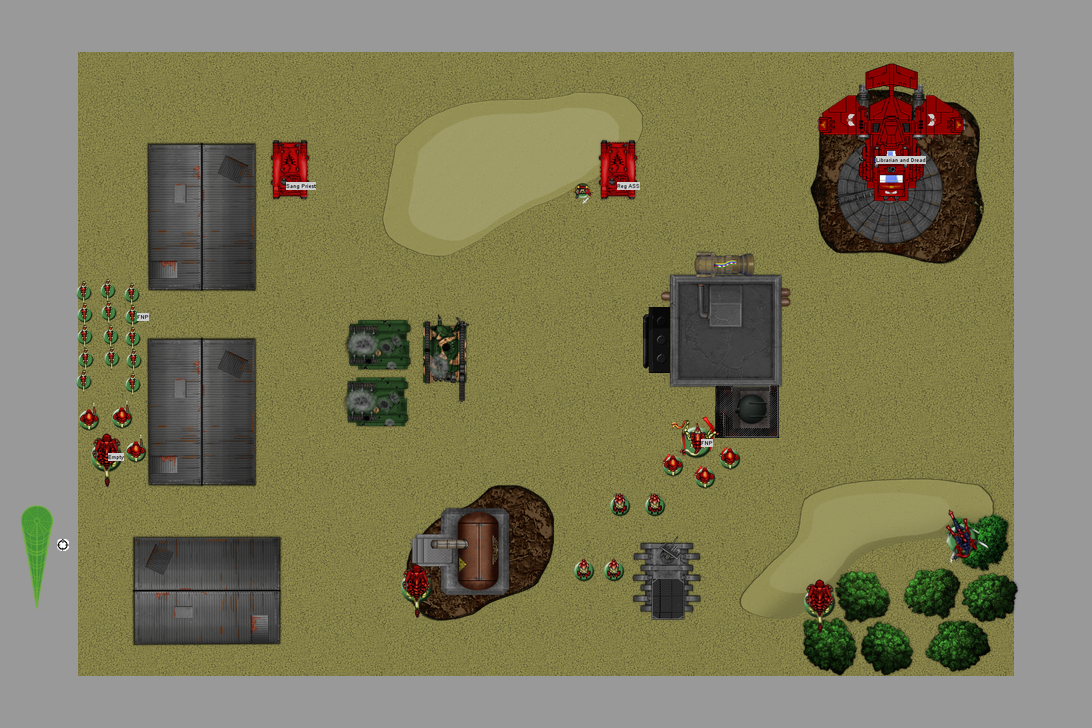
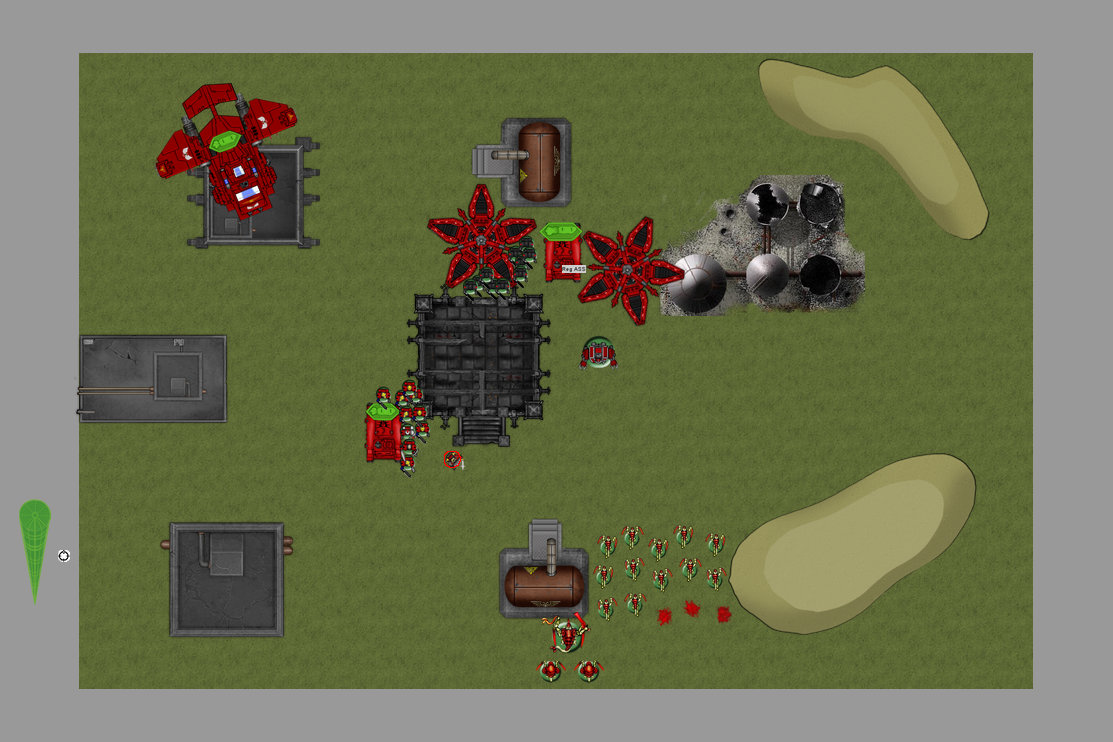
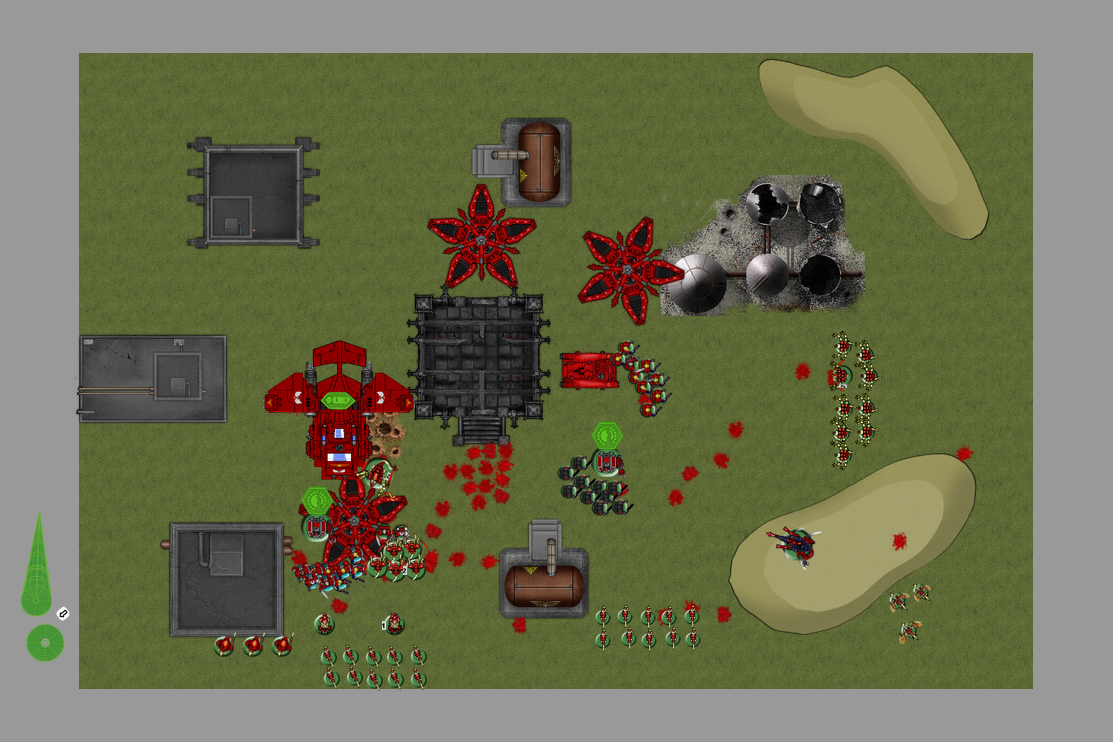
Round 2 - 1500pts We had a blast in the first game, and decided it was time to crank things up a notch. Atlas decided to be a crafty and found himself a netlist to face me with. I offered him some anti-Tyranid suggestions for it, since it was very psyker-reliant, and Shadows is so good at shutting them down. He changed it up a little bit, dropping the Librarians for Captain Atlas and some Sanguinary Guard. Meanwhile I decided to try out a dual-Tervigon Catalyst list - I've never actually tried one out in a game before so I wanted to see how it would do... and hey, Atlas is using a net-list so I think it's fair enough. Besides, he wants to fight a swarm, so I'll give him one! Once again, I used all the models I actually own, with the exception of 1 Hive Guard and the Trygon.
We rolled for mission and got Capture and Control. We got Dawn of War for deployment, but to keep things simple I decided to change it to Pitched Battle. Atlas won the roll to go first.
Deployment I had no idea that Assault Marines could Combat Squad. If I had, I probably would have suggested that Atlas do so... but then again, I had a Trygon tunneling its way through his lines, and Genestealers lurking in the fringes, so some extra security might be good for him...
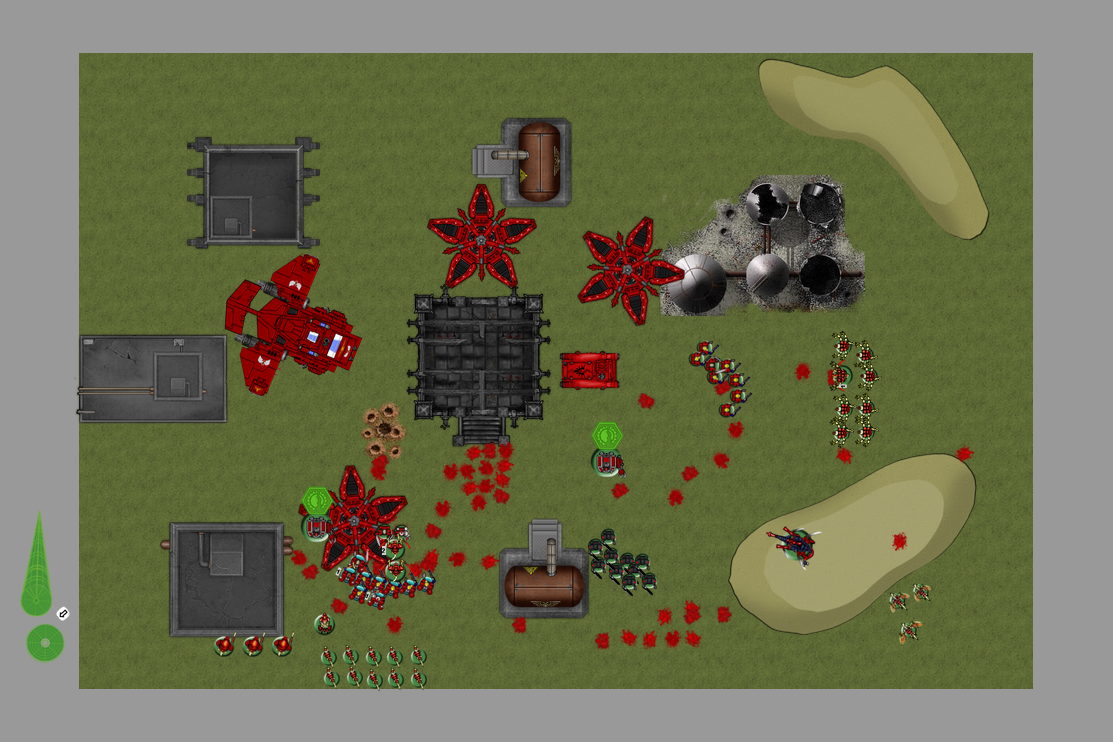
Turn 1 Atlas' forces shot forward, trying to keep within the Sanguinary Priest's 6" protective bubble. However, they also tried to stay far enough away from the Nids so as to be able to not be charged in the next turn. The shooting phase was over quick, the Typhoon Missile Launcher fired at the right Tervigon, wounding it once (the Venomthrope cover save stopped a 2nd wound), while the Multimelta on the Tornado wounded the other Tervigon once as well.
(I accidentally took the pic just after my Turn started)
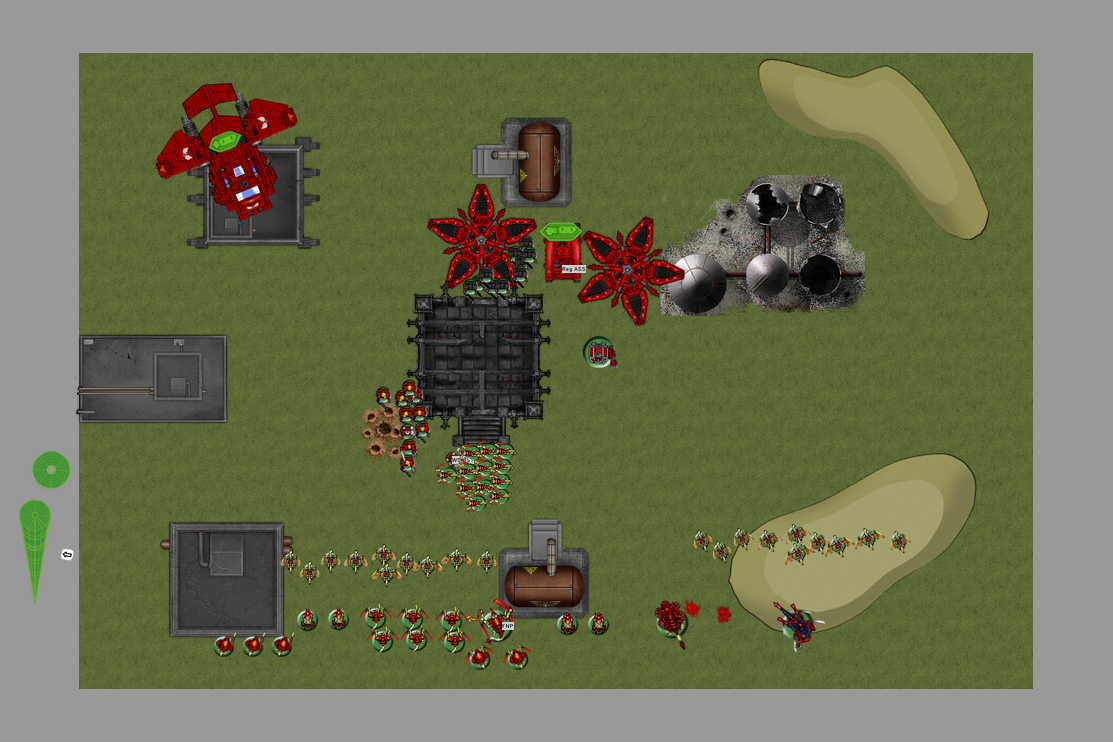
The Tyranids advanced aggressively. The left Tervigon spawned 6 Gaunts, while the right Tervigon spawned 16 and crapped out. These Gaunts headed straight towards the Assault Marine line. Meanwhile I was a little worried about Atlas' squad, and cast Paroxysm on them - much to Atlas' chagrin. Maybe next time I'll advise him to take a Librarian just for the Psychic Hood. Anyway, the Tervigons used Catalyst, casting it on the Tyrant and the 16 spawned Gaunts. The Hive Guard fired at the Land Speeder Tornado, blowing it up with ease.
In the Assault Phase, the FNP Termagaunts charged Assault Marines, hoping to tie them up for a little bit. Surprisingly, only 3 Termagaunts died due to FNP, and 1 FNP Assault Marine died in return. Honestly, that was a pretty even trade-off, and tying them down for a turn is an invaluable help to secure my line.
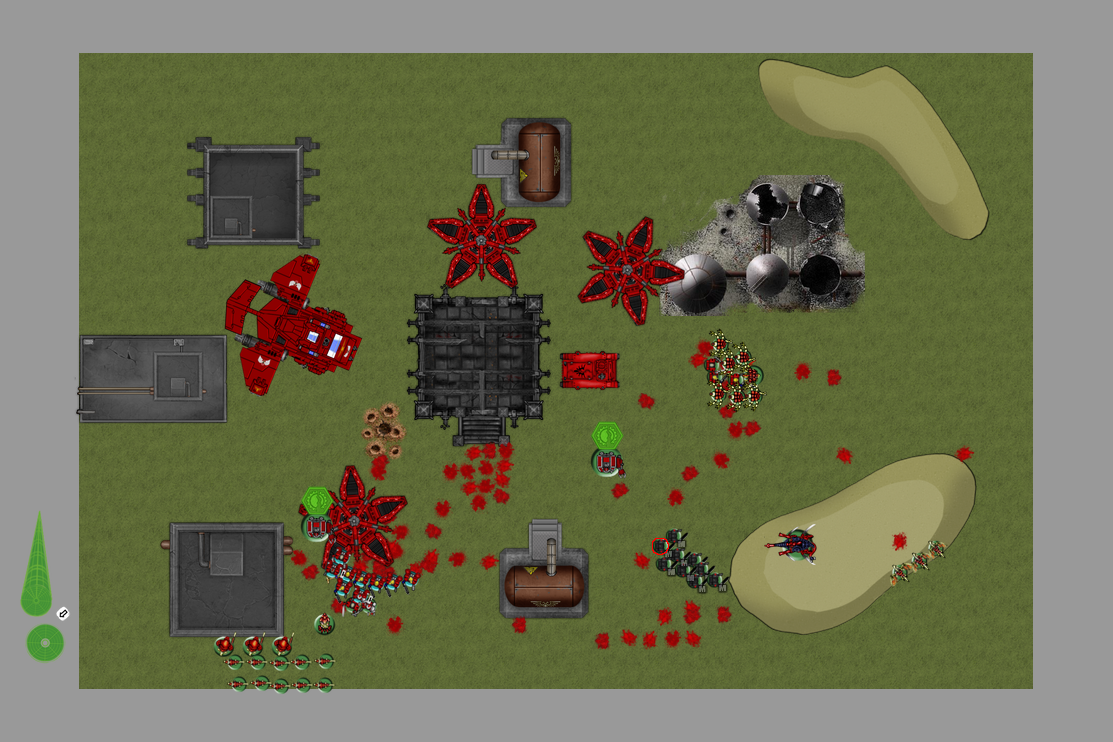
Turn 2 Worried about Captain Atlas' unit's safety due to being Paroxysm'ed, Atlas moved his squad back to move into position to provide a counter-attack. Meanwhile, the other Assault Marines moved forward to bring the pain. One moved to kill the 6 Gaunts on the left flank, while the other unit went to ensure that the large Gaunt unit was wiped out. In the Shooting Phase the Land Speeder Typhoon turned its sights to the Venomthropes, launching 2 missiles at them which insta-gibbed the squad with ease. The Assault Phase was a blood bath for the Assault Marines - both Gaunt squads were slaughtered without suffering a single casualty. The Blood Angels advanced confidently, the Tyranid lines completely wide open.
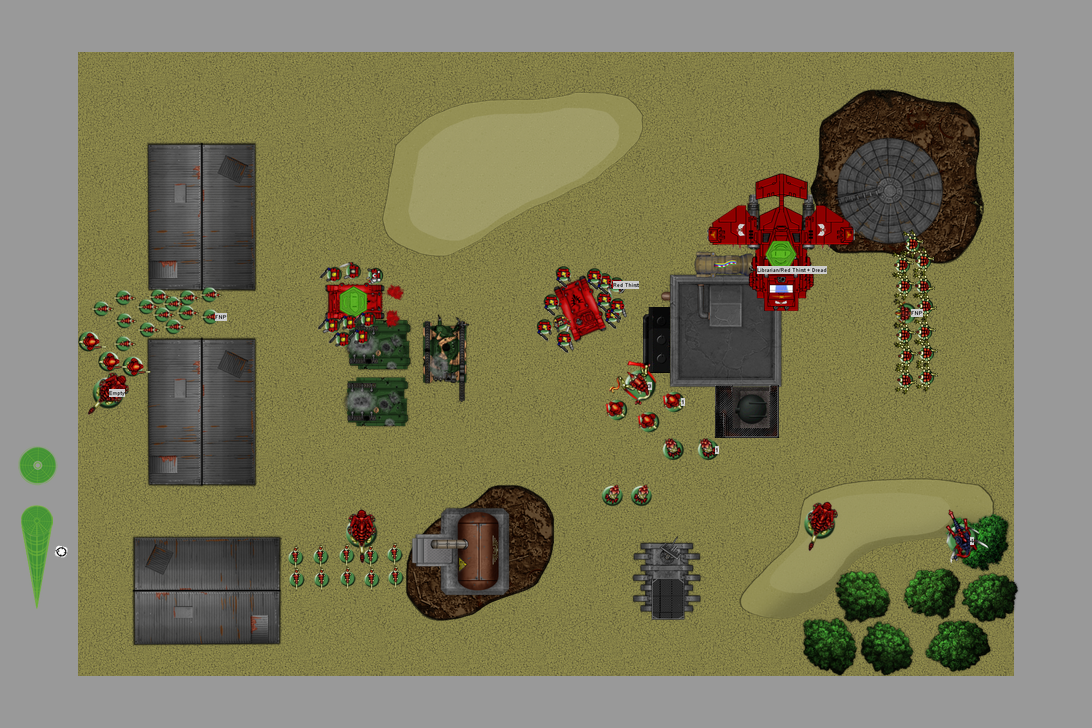
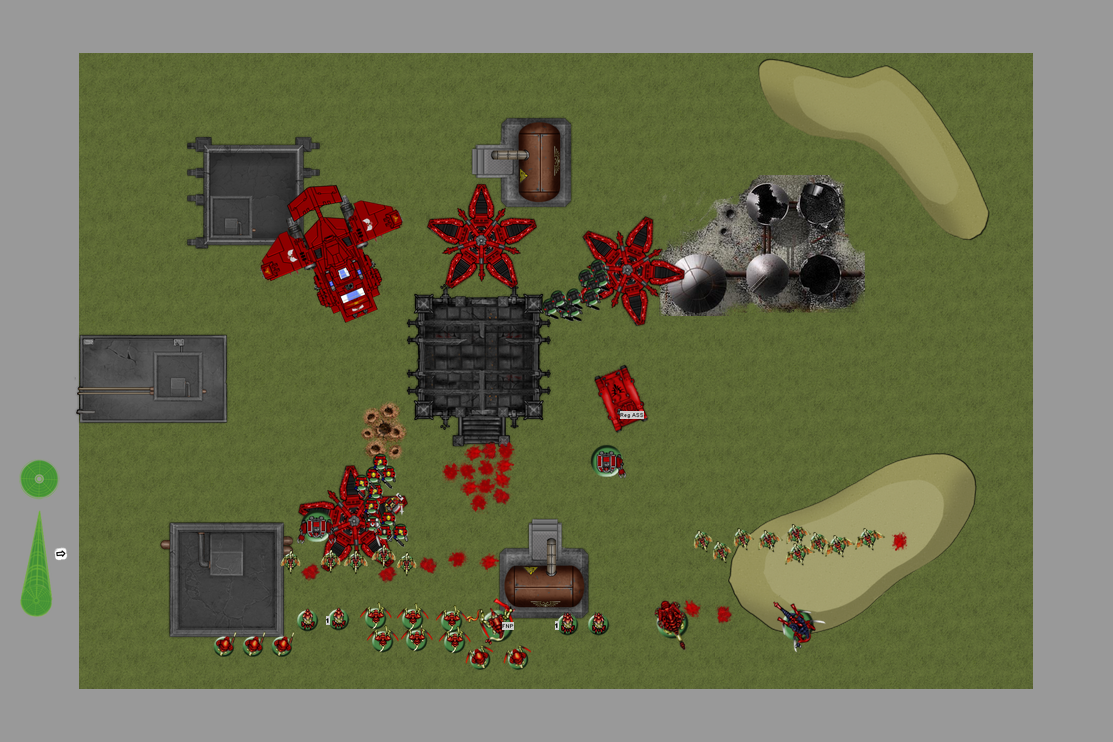
Uh oh, Atlas is actually doing pretty well thus far! My small Termagaunt unit arrived from reserves this turn. I moved them to my objective, so that the left Tervigon could move up to attack the Blood Angels. The Genestealers also arrived, and I sent them Atlas-hunting. Meanwhile, with a lack of options on my other front, I moved the Tyrant and the Tervigon forward to assault the pair of Assault Marine squads. The left Tervigon spawned about 7 more Termagaunts, which moved to slow down the Assault Marines.
In the Shooting Phase, the Hive Guard swat down the Typhoon Land Speeder. My Tervigons cast FNP on the Hive Guard and the Tyrant, and the Tyrant casts Paroxysm on the nearest Assault Squad, just to be a jerk. He and the Tervigon then assault them, killing all but 4 and remaining unscathed. The Genestealers also perform pretty poorly against Atlas and his Sanguinary Guard - they kill 2 Sanguinary Guard and wound Atlas once, but suffer 8 casualties in the process. Surprisingly, between shooting and assault, the left Termagaunts manage to kill 4 Assault Marines before being wiped out - holy crap!
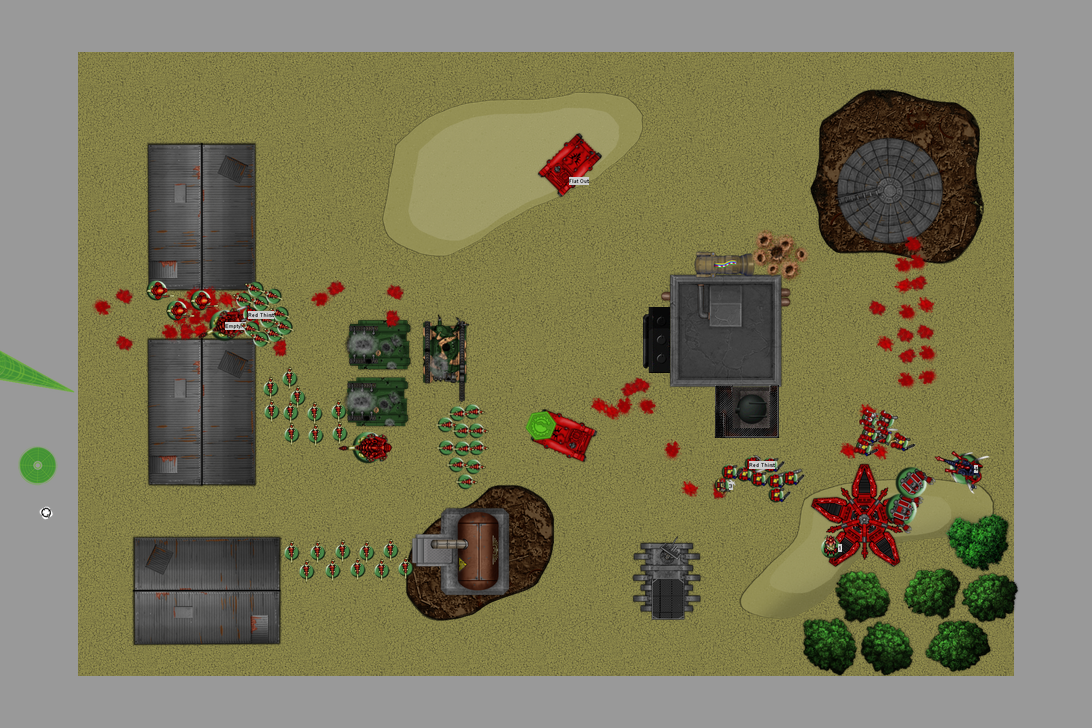
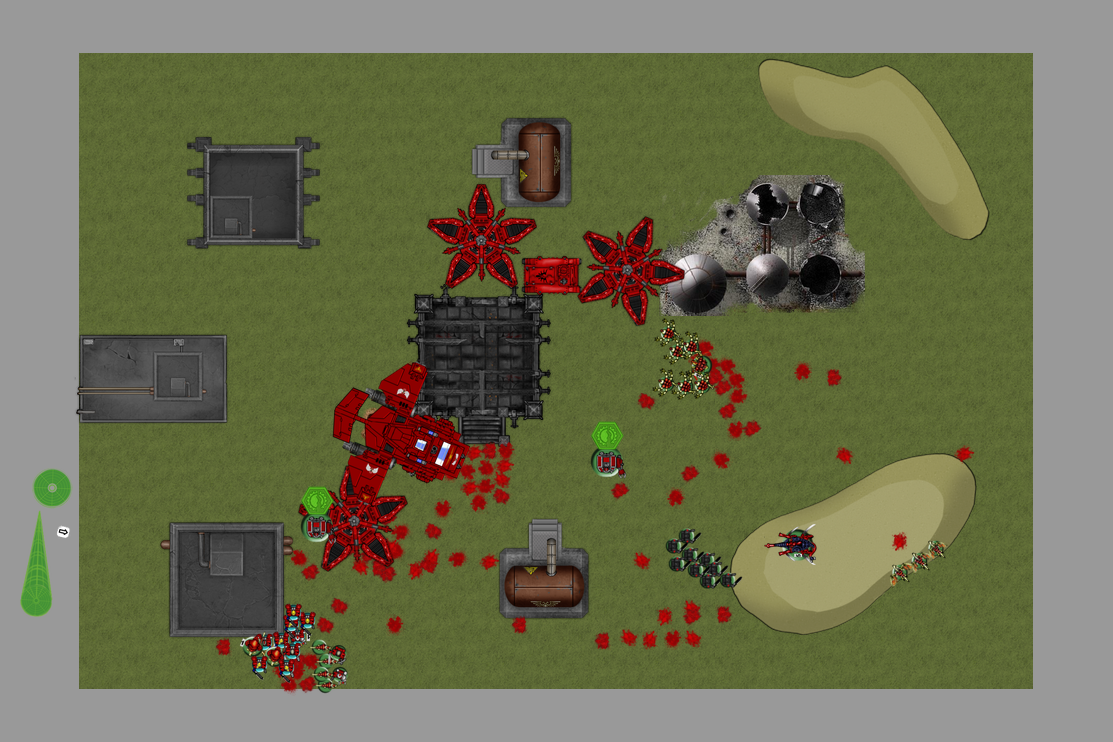
Turn 3 Atlas tried to keep the momentum up, charging straight into action. He attacked the left Tervigon with the survivors of his one Assault Squad, while his Sanguinary Priest's squad assaulted the other Tervigon. Meanwhile, Atlas moved into position to support them next turn. In the Assault Phase, the left Tervigon was badly wounded by the Assault Marines, suffering 3 wounds (it now had 2 left), while the Tyrant wiped out his opponents and then consolidated towards Atlas. I believe the right Tervigon suffered some wounds as well, but it also insta-killed a couple Assault Marines in return (this process would continue for the next couple turns).
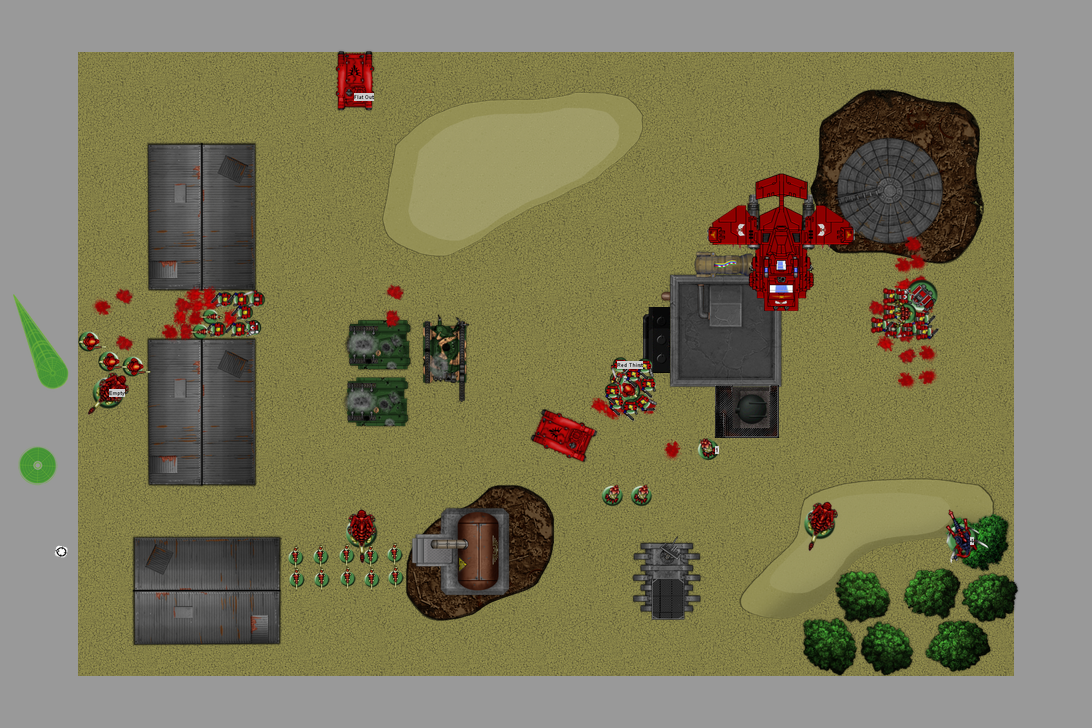
My 15 Termagaunts and Trygon arrived from reserves this turn. I sent my Trygon after the last Assault Squad - originally I was going to get the Genestealers to do this duty, but they arrived on the wrong side of the table. Oh well! My left Tervigon spawned 10 Termagaunts, which moved in to save their progenitor with the other Gaunt squad. In the Shooting Phase, I cast Paroxysm on Atlas' squad again, much to Atlas' annoyance. They were wiped out easily in the Assault Phase, although Atlas brought down a Tyrant Guard with him in the process. Meanwhile the left Tervigon was brought down by the Assault Squad, but 3 Marines died in the process from the Gaunts.
(I made a mistake here, I should have rolled wounds on all the Gaunts, but forgot to... not that it made a huge difference though)
Turn 4 It was now do or die for Atlas, he'd been getting gimped by bad rolls in the last turn or 2. His Assault Marines on the objective knew that their best chance against the Trygon Prime was to assault it. Unfortunately, they only managed to put a single wound on it, while it slaughtered 5 of them. The Assault Squad then failed its Morale check and ran off the board. Meanwhile, the Termagaunts finished off the left-most Assault Squad, suffering only 1 loss in return. Finally, the last survivors on the battlefield managed to wound the Tervigon again - Atlas knew the jig was up, but was hoping to wipe out the Tervigons before the game ended.
Atlas basically conceded at this point, but wanted to see if he could kill the Tervigon first. We rolled his attacks, and they were sufficient to kill the monstrous creature. He then surrendered.
Victory for the Tyranids!
Afterthoughts Wow, that actually could have gone either way up until the middle of the 3rd turn. In fact, when Atlas' Assault Squads wiped out my big Gaunt unit, I was in some trouble, I had very little in the way of defenses to hold my line at the time. In fact, a large reason why he lost was because his dice were rolling poorly. Atlas' list-building skills need a little refining, but he's definitely getting the hang of things.
On my end of things, I played this game pretty much perfectly to plan. The Tervigons performed well and I really managed to create a ton of threat saturation. This was actually my first game using Catalyst (believe it or not!), and it was awesome. I will definitely be trying that again! I'll have to relish this sort of thing until Atlas figures out the Nids' big weaknesses...
Anyway, we're gonna get another game in sometime soon, and it will be even bigger - and even closer I'm certain!
2011/12/23 02:33:02
Subject: VASSAL Bootcamp AKA To School a Noob (Tyranids vs Blood Angels)
Always appreciating the "How to school a Noob" part
But yes, I'm slowly putting together an army. Dusting off my old paint set from the LOTR days...and it was a good battle.
No one Provokes me with Impunity Atlas' Blood Oath - In progress, 22W 14L 4T (2012) - 14W 6L 0T (2013)
Craftworld Mymeara 440 points - in progress (....sort of a given ) - 4W 2L 0T (2013)
DQ:90S++G+M-B--IPw40k13++D++++A+/fWD-R++T(T)DM+ Where beautiful and brilliant people go to hang out - Lord Sanguinius' fb page
2011/12/23 02:37:03
Subject: VASSAL Bootcamp AKA To School a Noob (Tyranids vs Blood Angels)
Just a note - hanging the stormraven off the map like will destroy it - since the edge of the map is the edge of the world and all. And did the Tyrant fire off Paroxysm while in CC? Can't do that as it's a PSA.
Good batreps.
My beautiful wife wrote:Trucks = Carnifex snack, Tanks = meals.
2011/12/23 03:05:04
Subject: VASSAL Bootcamp AKA To School a Noob (Tyranids vs Blood Angels)
That was my first game ever, and I have since learned that (the part about stormravens hanging), but thanks for the point.
This message was edited 1 time. Last update was at 2011/12/23 03:05:28
No one Provokes me with Impunity Atlas' Blood Oath - In progress, 22W 14L 4T (2012) - 14W 6L 0T (2013)
Craftworld Mymeara 440 points - in progress (....sort of a given ) - 4W 2L 0T (2013)
DQ:90S++G+M-B--IPw40k13++D++++A+/fWD-R++T(T)DM+ Where beautiful and brilliant people go to hang out - Lord Sanguinius' fb page
2011/12/23 03:13:19
Subject: VASSAL Bootcamp AKA To School a Noob (Tyranids vs Blood Angels)
No worries man. As my ole buddy pointed out, we had a blast, and he made sure to keep me in check. haha, I was such a mess I was asking what I needed for a pass in rolls like, every time
No one Provokes me with Impunity Atlas' Blood Oath - In progress, 22W 14L 4T (2012) - 14W 6L 0T (2013)
Craftworld Mymeara 440 points - in progress (....sort of a given ) - 4W 2L 0T (2013)
DQ:90S++G+M-B--IPw40k13++D++++A+/fWD-R++T(T)DM+ Where beautiful and brilliant people go to hang out - Lord Sanguinius' fb page
2011/12/23 03:41:38
Subject: VASSAL Bootcamp AKA To School a Noob (Tyranids vs Blood Angels)
rigeld2 wrote:Just a note - hanging the stormraven off the map like will destroy it - since the edge of the map is the edge of the world and all. And did the Tyrant fire off Paroxysm while in CC? Can't do that as it's a PSA.
Good batreps.
Yeah I kinda figured that, but I let it slide. Hard to explain all the rules over Skype, I'd prefer to get a game in in person sometime to get things straightened out. And no, he didn't use it while in CC, although it might have looked at way because I'd take the pics at the end of each turn.
As for the "School a Noob" thing, I figured you'd see that sooner or later, and just thought it sounded funny.
I'll try to come over to Canada to sort that out. As for now, I've read the rulebook pretty much cover to cover several times, but will study it so that I don't have to refer to it constantly.
As for being a noob......this scrub won't be a scrub for long <_<
No one Provokes me with Impunity Atlas' Blood Oath - In progress, 22W 14L 4T (2012) - 14W 6L 0T (2013)
Craftworld Mymeara 440 points - in progress (....sort of a given ) - 4W 2L 0T (2013)
DQ:90S++G+M-B--IPw40k13++D++++A+/fWD-R++T(T)DM+ Where beautiful and brilliant people go to hang out - Lord Sanguinius' fb page
2012/01/04 23:17:57
Subject: Re:VASSAL Bootcamp AKA To School a Noob (Tyranids vs Blood Angels)
Round 3 - 1500 Points So Atlas got Assault on Black Reach for Christmas and has had a chance to flip through the rules. In any case, he has a much stronger grasp on how to play now - things should get interesting now! (Not that it wasn't beforehand of course )
Blood Angels (Similarly to the last battle, Atlas' list was a slightly modified netlist; Atlas made a mistake, he gave himself 1 extra Assault Marine in each squad for some reason)
Reclusiarch
Brother Corbulo
Sanguinary Priest
5x Death Company with TLLC Razorback
11x Assault Marines (Meltagun, Plasma Pistol, Sergeant with Power Weapon and Plasma Pistol)
11x Assault Marines (Meltagun, Plasma Pistol, Sergeant with Power Weapon and Plasma Pistol)
Death Company Dreadnought (2x Blood Talons, Drop Pod)
5x Vanguard Veterans (2 with 2x Lightning Claws, Sergeant with Power Fist and Plasma Pistol) with TLHB Razorback
Baal Predator (Heavy Flamer Sponsons)
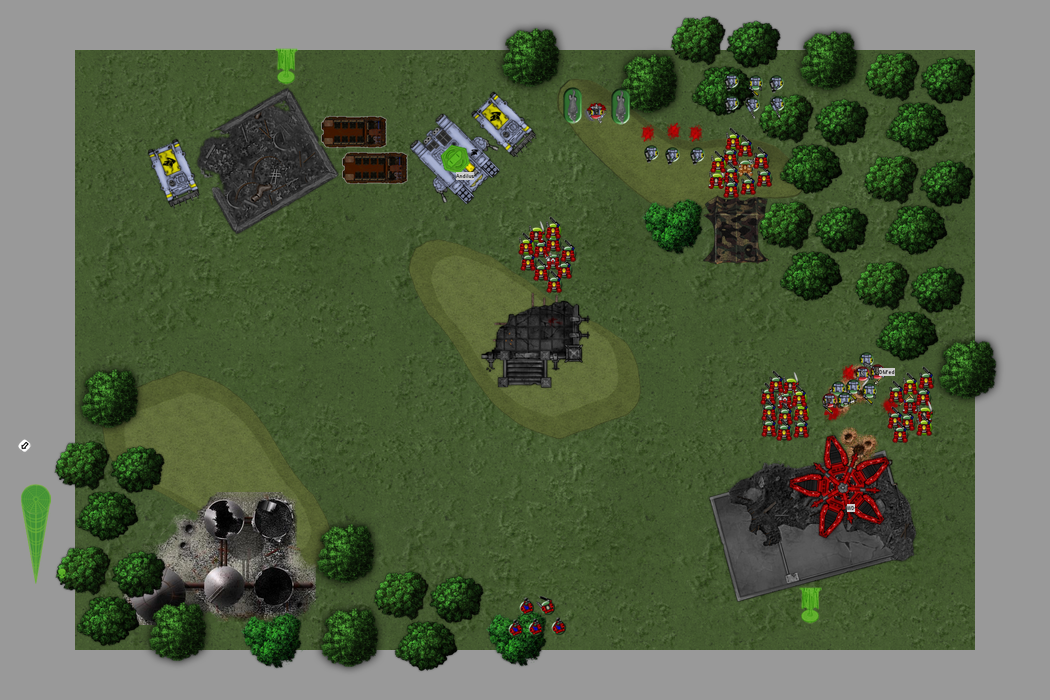
We rolled for deployment and got Spearhead, and rolled for mission and got Seize Ground. I got the first turn.
In the pic Brother Corbulo is deployed with the Assault Marines, but Atlas realized he forgot to get Jump Packs for his Priests so he stuck him with the Vanguard Vets and made the other Priest trail behind the other Assault Squad to buff them. Also, I left the Termagaunts and Genestealers in reserves.
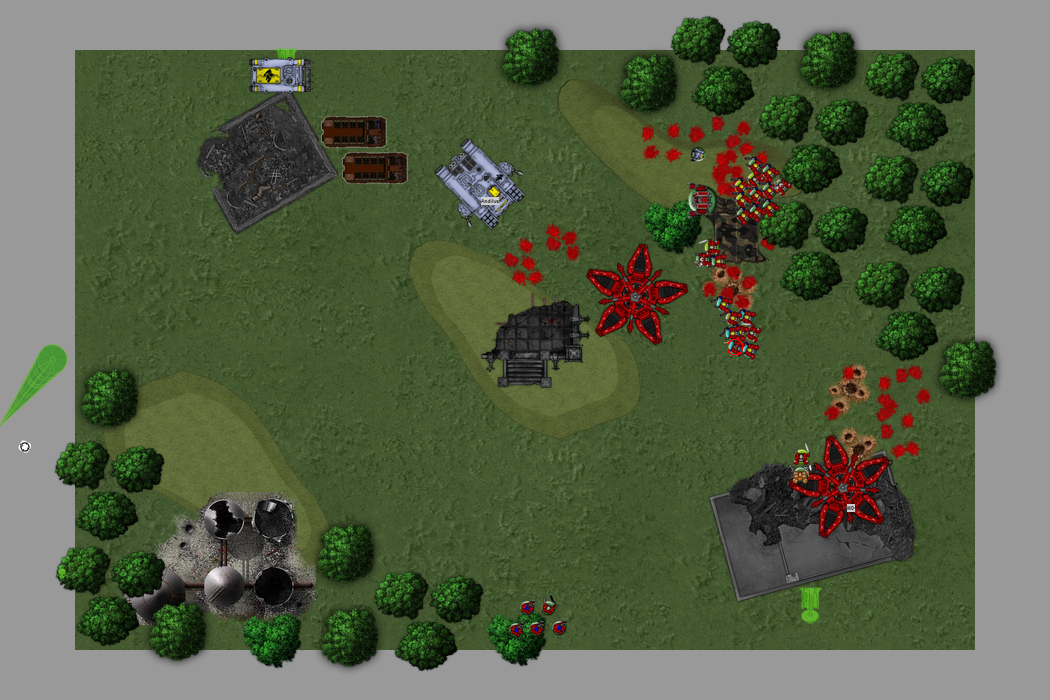
Turn 1 I don't usually like the first turn, but I figured I'd run with it this time. I began moving my forces forward in 2 packs - the Tervigons on one and the Tyrant on the other. Unluckily, I rolled doubles for both Tervigons right off the bat, spawning a grand total of 20 Gaunts. Uh oh, that's not good. In the Shooting Phase, my Biovores ended up being out of range to hit anything, but just in range enough that the Spore Mines blew up on open ground. More fortunately, the Hive Guard stunned the Baal Predator. Whew that could have been bad! The Tervigons also cast Catalyst on my Hive Guard and the small Gaunt unit.
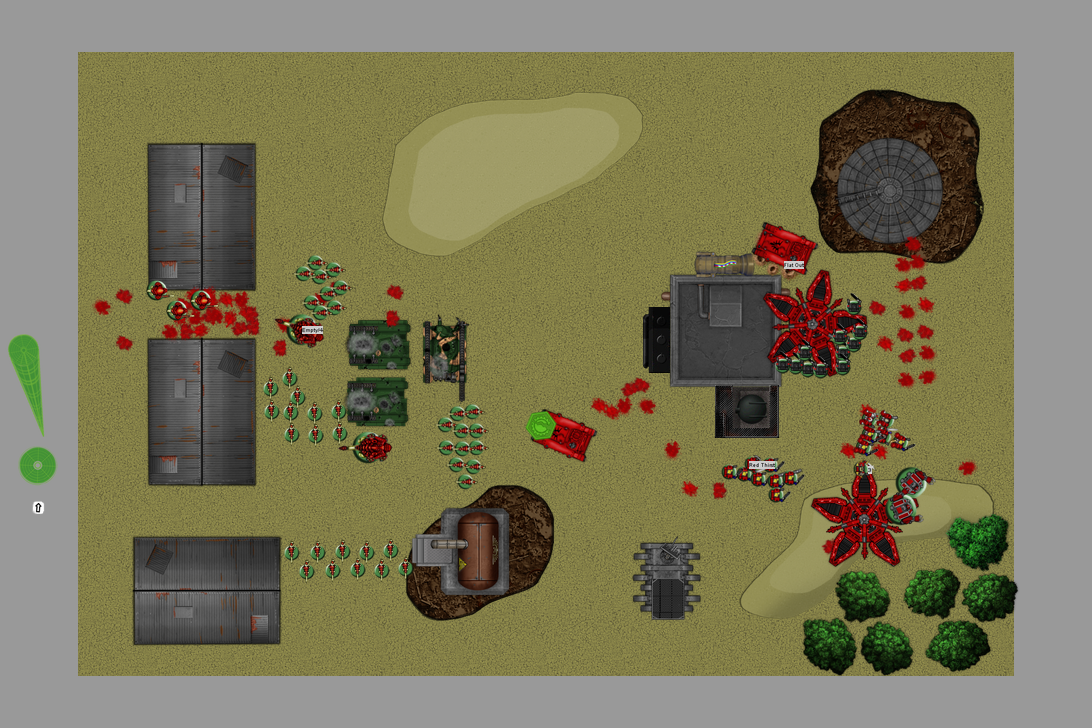
The Blood Angels surged forward as their Death Company Dreadnought dropped just ahead of the Hive Tyrant. Its meltagun and Storm Bolter put one wound on the Tyrant and one of the Tyrant Guard, while the Drop Pod's Storm Bolter wounds one of the Venomthropes. Elsewhere, the TLLC put a wound on one of the Tervigons, while the TLHB killed 3 Termagaunts.
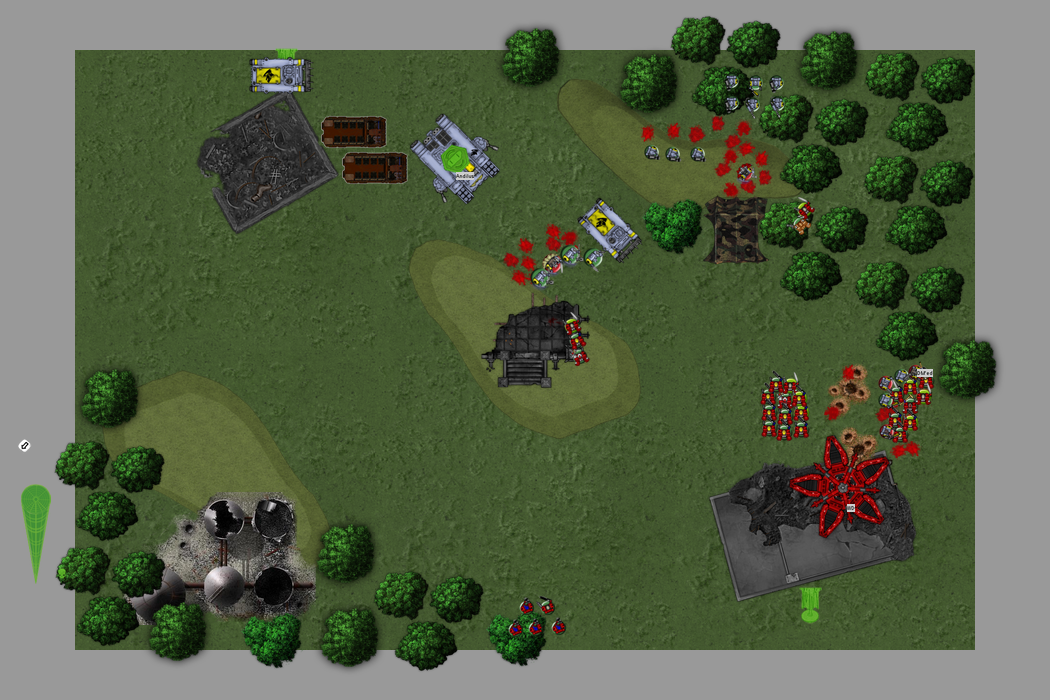
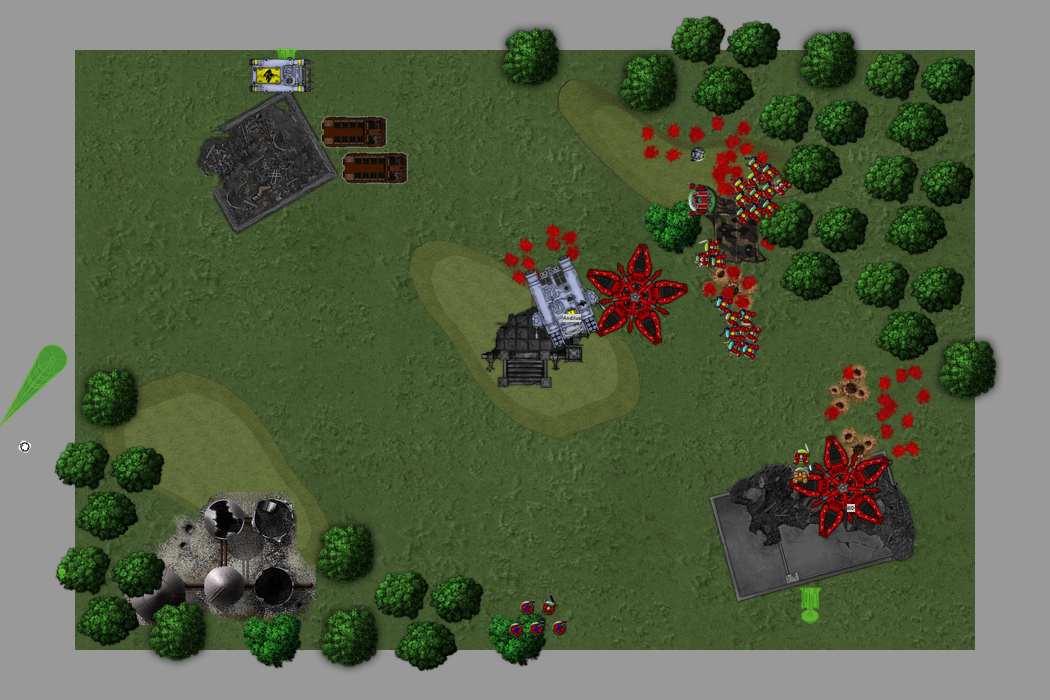
Turn 2 I rolled rather fortunately for my reserves, as a Termagaunt squad and Genestealers arrived. The Genestealers outflanked to the right, making a beeline right towards the hapless Baal Predator. The Tyrant and Venomthropes advanced, hoping to take out the Dreadnought before it could cause any damage, as the Termagaunts and Scything Tervigon moved ahead to defend against the Blood Angel assault line.
In the Shooting Phase, the Tervigons cast Catalyst on the same squads as before, while the Tyrant cast Paroxysm on the nearby Assault Marines. The Genestealers ran towards the Predator, ensuring an assault. The Biovores fired at the same Assault Marines, but missed again. Finally, the Hive Guard opened fire at the Dreadnought and got a break as it was immobilized! In the Assault Phase, the Genestealers (predictably) tore the Predator to shreds.
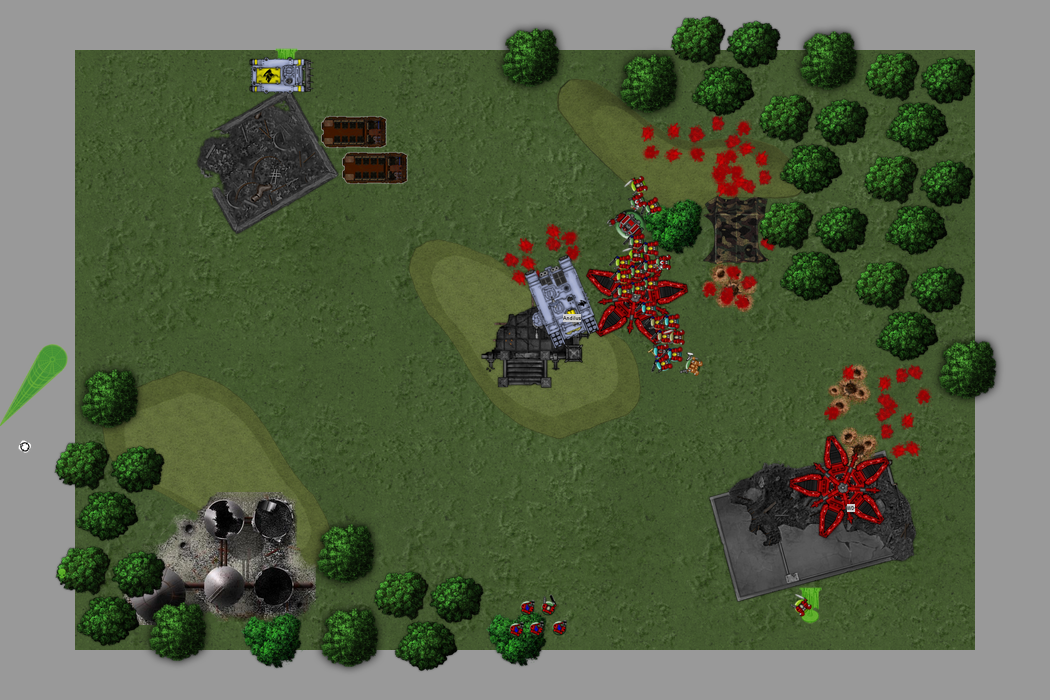
Atlas began his attack in earnest this turn. The Death Company and Vanguard Veterans split up to head after different targets. Meanwhile, the Assault Squads turned their attention to the Genestealers and Termagaunts near them. Atlas had an unfortunate Shooting Phase - his TLLC rolled a 1 to wound the Tervigon, as did his Dreadnought's meltagun to the Tyrant (his Storm Bolter killed a Tyrant Guard however)! Luckily his Assault Phase was a bit better. One squad of Assault Marines wiped out a unit of spawned Termagaunts, while the other squad held its own against the Genestealers (although the Genestealers had an exceedingly fortunate number of 6's when rolling to wound - even worse, I totally forgot that I had given the Genestealers Toxin Sacs until about Turn 5 so things would have been even worse in all likelihood).
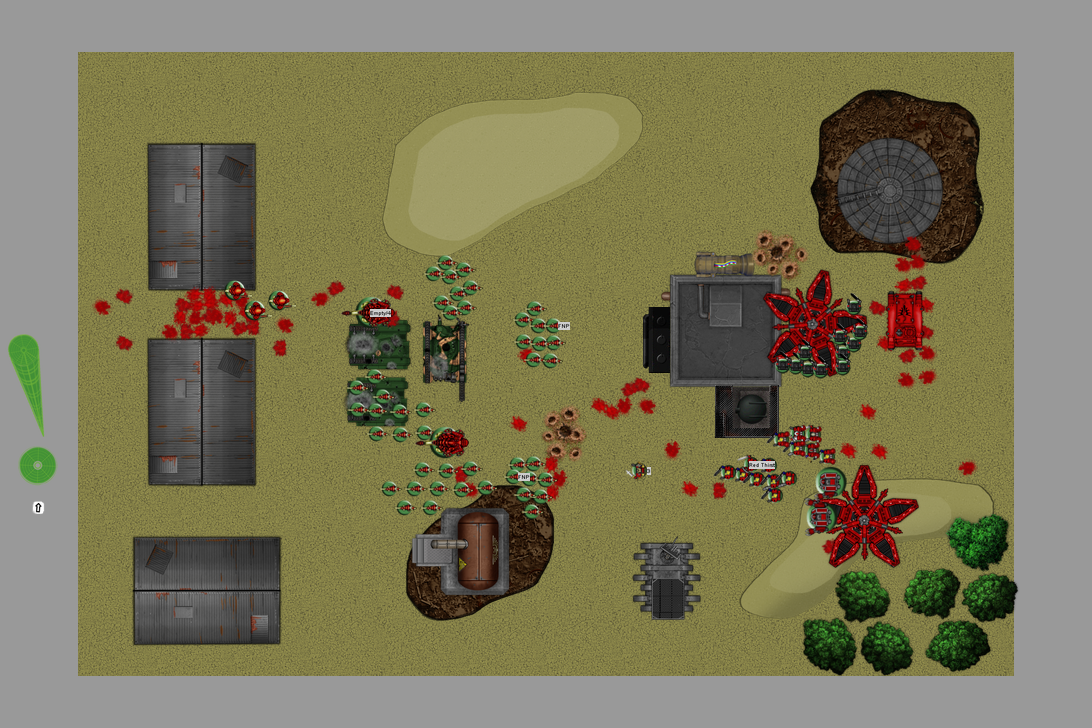
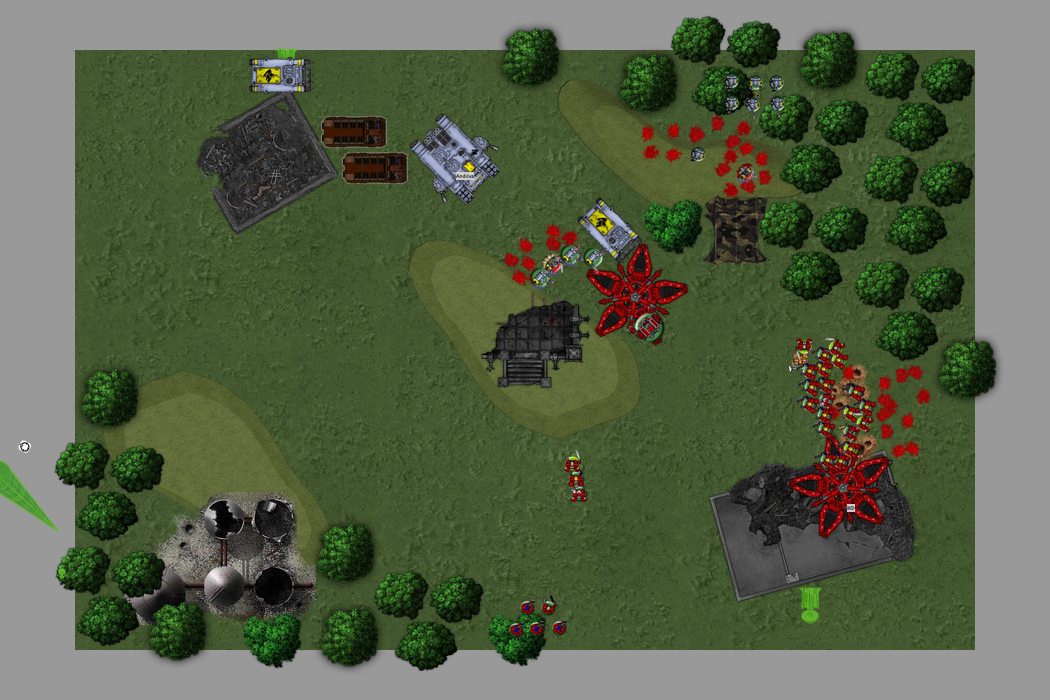
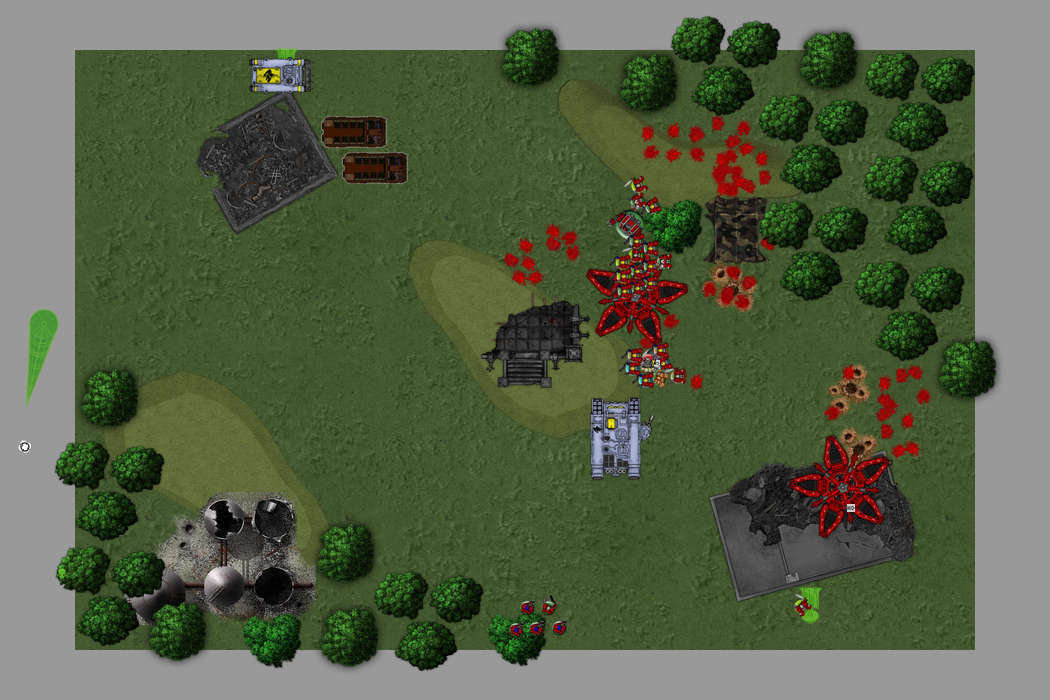
Turn 3 The rest of my reserves arrived this turn. I sent the Termagaunts towards my forward objective, while the Genestealers headed after the Assault Marines. I decided to try a hammer/anvil attack as my Tervigon attacked the same Assault Marines. Meanwhile, the Tyrant went after the Dreadnought, multi-assaulting it and the Drop Pod. My Hive Guard shot rather poorly this turn, not doing any damage. True to form, my Biovores hit some Assault Marines, but don't kill any.
The Assault Phase was rather packed this turn, as there were 3 separate assaults underway. In the Genestealer-Assault Marine fight, the Genestealers whiffed, killing only a single Marine, while they killed 2 Genestealers in return. In the Tyrant-Dreadnought assault, the Tyrant tore one of the Dreadnought's Blood Talons off while the Tyrant Guard wrecked the Drop Pod. In Turn, the Dreadnought caused a single wound to the Tyrant. Finally, in the Assault Marine-Tervigon brawl, the Tervigon took 1 wound, while 2 Assault Marines were scythed down.
The Movement Phase was relatively short this turn as Atlas moved his units ahead to support his assaults. His Shooting Phase was also relatively short as the TLLC whiffed again. Only the TLHB scored a kill, taking down a single Genestealer. In the Assault Phase, the Genestealers fared poorly again (thanks to the Sanguinary Priest), but only lost a single Stealer. The Tyrant whiffed as well, failing to destroy the Dreadnought, but not taking any damage in return. Finally, the Tervigon took 2 wounds and only killed 1 Assault Marine in return!
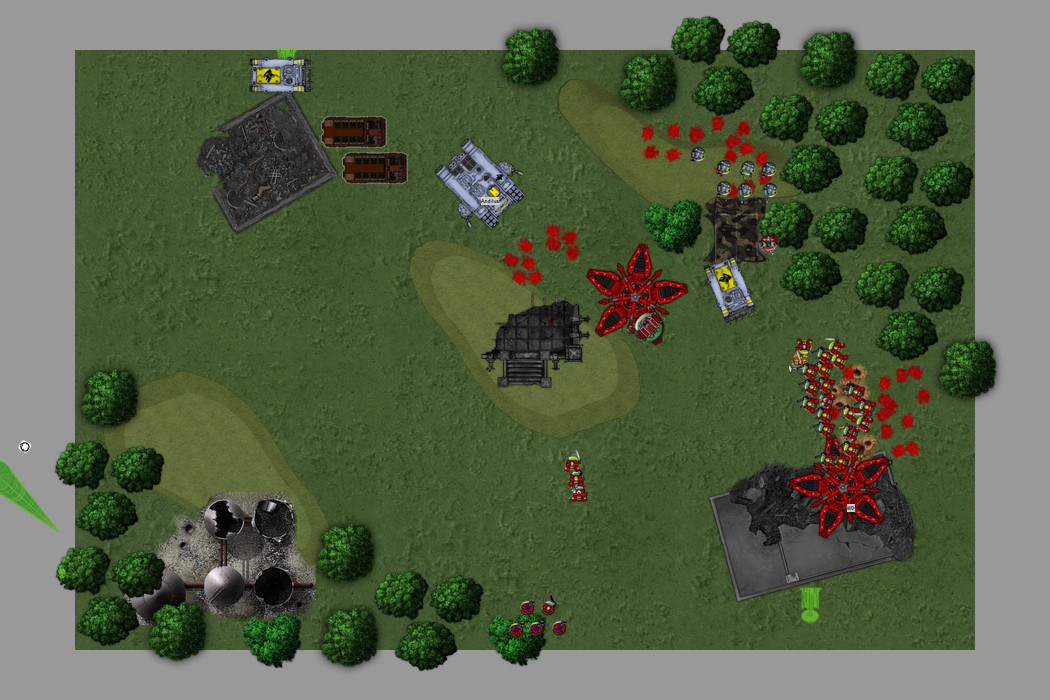
Turn 4 My Tervigon was in some serious trouble from an Assault Marine/Death Company one-two punch, so I sent some Gaunts and Genestealers that way to deal with them. In my Shooting Phase, my Hive Guard fired on the TLLC Razorback, blowing its weapon off and immobilizing it - it was now effectively neutralized. The Biovores fired on the Death Company and actually managed to kill one for once. In the Assault Phase, the Assault Marines finished off the last 3 Genestealers, consolidating back towards the Vanguard Veterans. The Tyrant finally managed to destroy the Dreadnought, causing it to Explode (surprisingly the explosion wounded the Tyrant Guard). In the Tervigon fight, the beast took another wound, but killed 2 Assault Marines in return.
The Death Company moved forward to engage the Tervigon, as the Vanguard Vets and Assault Marines presented a united opposition to the rampaging Tyrant. In the Shooting Phase, the TLHB killed 2 Genestealers. In the Assault Phase, the Death Company charged the Tervigon and the beast went down quickly to the Reclusiarch.
Turn 5 I moved my assault units in for the kill. The Tyrant cast Leech Essence on the Vanguard Vets, killing 1 and regaining a wound. The Hive Guard turned their fire to the TLHB Razorback, making it explode and leaving a lovely smoking crater. The Biovores also managed to kill another Death Company from their bombardments. In the Assault Phase, the Genestealers multi-assaulted the Assault Marines and Death Company, wiping out the Assault Squad. However, the Death Company struck back with a vengeance, killing the Genestealers to a man as if they were the PDF. Elsewhere, the Tyrant continued to wreak bloody havoc, wiping out all the Vanguard Veterans, leaving only Corbulo (who had 1 wound left). Luckily, his 2+ FNP roll kept him alive against a bunch of attacks from the Tyrant Guard and Venomthropes, or he would have been killed as well.
Atlas decided that he needed to help out poor Corbulo, sending in his Assault Squad for aid. Unfortunately it was too late, as the Tyrant cut down the venerable Sanguinary Priest. However, luckily for the Blood Angels, his retinue were unable to do any damage in return. Due to debuffing from the Venomthropes, the Assault Marines did little as well, but managed to kill the last Tyrant Guard. Meanwhile, the Reclusiarch killed the last Genestealer, but lost another Death Company member in return.
We rolled to see if there would be another turn and
Spoiler:
got a ! The Tyranids won, 2 objectives to 0.
Afterthoughts Another fun battle. Atlas made a few mistakes, but that's part of the learning process of course. First off, you want to keep your squads in transports until they're ready to assault - it keeps them protected and gives them mobility. You should also keep your mind on the objectives - the Blood Angels' Combat Squads rule is great for this purpose.
As for my end, I was pretty harsh on my Biovores, but I just kept getting bad rolls with them. I usually like them in real games, but they didn't perform this time. My Tyrant also continued to be a beast, and I was pretty floored when both Tervigons crapped out early on. They are not to be relied upon! Also, I'm totally not used to Venomthropes surviving long enough to get into assault. They always get sniped early on, so that was actually a new experience for me (they've only ever survived that long one other time for me). They're actually pretty good support units in assault with their 2+ poison rolls - doubly so when they're in an assault with an Old Adversary Tyrant!
This message was edited 1 time. Last update was at 2012/01/04 23:26:44
wtf is with VASSAL, it keeps throwing in phantom marines
No one Provokes me with Impunity Atlas' Blood Oath - In progress, 22W 14L 4T (2012) - 14W 6L 0T (2013)
Craftworld Mymeara 440 points - in progress (....sort of a given ) - 4W 2L 0T (2013)
DQ:90S++G+M-B--IPw40k13++D++++A+/fWD-R++T(T)DM+ Where beautiful and brilliant people go to hang out - Lord Sanguinius' fb page
2012/01/04 23:28:10
Subject: VASSAL Bootcamp AKA To School a Noob (Tyranids vs Blood Angels)
Well, I think next battle I'll avoid trying to be balanced in my units and instead go heavy mech or descent of angels, I like the idea of more attacks from more units so the latter might be the best choice, in which case I'll more heavily equip my fellows, power weapons and plasma weapons worked great.
Either that or get a massive mech army and blast with heavy weapons XD
Automatically Appended Next Post: I definitely made a greater number of tactical errors in this one, I was just a little paranoid about leaving my guys in the transports, you had some heavy hitters and I felt like I would lost some heavy hitters of my own :S
This message was edited 1 time. Last update was at 2012/01/04 23:35:14
No one Provokes me with Impunity Atlas' Blood Oath - In progress, 22W 14L 4T (2012) - 14W 6L 0T (2013)
Craftworld Mymeara 440 points - in progress (....sort of a given ) - 4W 2L 0T (2013)
DQ:90S++G+M-B--IPw40k13++D++++A+/fWD-R++T(T)DM+ Where beautiful and brilliant people go to hang out - Lord Sanguinius' fb page
2012/01/04 23:58:13
Subject: VASSAL Bootcamp AKA To School a Noob (Tyranids vs Blood Angels)
Yeah, looking back at it, I think you would have been best off sending the Death Company and Predator after the Tyrant, and then send everyone else on the other flank. The Tyrant tends to tear you to ribbons, I made it into an assault monster, so shooting or avoiding it would be good unless you can bring something bigger to the table. You also needed more scoring units, if I wipe out your 2 Assault Marine squads then I've basically won the game.
True. One less transport and then one more unit would have been good. Honestly, considering our aggressive conflicts so far the death company are not out of place, I just need to make sure they're well-placed in the beginning stages.
Automatically Appended Next Post: The vanguard was pretty disappointing though. Maybe that'd be good to kick.
This message was edited 1 time. Last update was at 2012/01/05 00:16:15
No one Provokes me with Impunity Atlas' Blood Oath - In progress, 22W 14L 4T (2012) - 14W 6L 0T (2013)
Craftworld Mymeara 440 points - in progress (....sort of a given ) - 4W 2L 0T (2013)
DQ:90S++G+M-B--IPw40k13++D++++A+/fWD-R++T(T)DM+ Where beautiful and brilliant people go to hang out - Lord Sanguinius' fb page
2012/01/15 00:40:45
Subject: VASSAL Bootcamp AKA To School a Noob (Tyranids vs Blood Angels)
Tonight shall be my first running of Mephiston (and holy gak I knew he was a beast but his psychic abilities are BADASS too.)
Iffy about Death Company, but I guess switching them out for a baal predator is risky as well due to the possibility of zerg-rushing so....I'm still a little shaky on that one. But still excited.
No one Provokes me with Impunity Atlas' Blood Oath - In progress, 22W 14L 4T (2012) - 14W 6L 0T (2013)
Craftworld Mymeara 440 points - in progress (....sort of a given ) - 4W 2L 0T (2013)
DQ:90S++G+M-B--IPw40k13++D++++A+/fWD-R++T(T)DM+ Where beautiful and brilliant people go to hang out - Lord Sanguinius' fb page
2012/01/15 07:19:09
Subject: Re:VASSAL Bootcamp AKA To School a Noob (Tyranids vs Blood Angels)
Round 4 - 1500 Points So for this battle, I wrote a list for Atlas to try out. I made it a risk vs rewards list - there's a degree of risk to pretty much all his units, but the payoff can be huge.
Blood Angels Librarian (The Sanguine Sword, Unleash Rage)
Mephiston, Lord of Death
Furioso Dreadnought (Blood Talons with Meltagun and Storm Bolter, Drop Pod)
2x Sanguinary Priests
8x Assault Marines (Hand Flamer, Rhino, Veteran Sergeant with Hand Flamer and Power Weapon)
9x Assault Marines (Plasma Gun, Rhino, Veteran Sergeant with Plasma Pistol and Power Weapon)
10x Assault Marines (2x Plasma Gun, Rhino, Veteran Sergeant with Plasma Pistol and Power Weapon)
7x Death Company Marine (Hand Flamer, Drop Pod)
We rolled for deployment and got Pitched Battle, and rolled for mission and got Seize Ground (5 objectives). Atlas got the first turn. Also, his 9-man Assault Squad succumbed to The Red Thirst.
Turn 1 Atlas moved his units straight forward in an aggressive maneuver. Meanwhile, the Assault Marines at the back (who had combat squadded) decided to move towards the middle objective just in case the Genestealers arrived. Atlas also decided to send in his Death Company's drop pod rather than the Furioso (to ensure it didn't get popped on Turn 1). Everyone ganged up on the Gargoyles this turn - the Death Company, Drop Pod and Rhino storm bolters gunned down 6 of them.
The Tervigons spawned 14 and 9 Termagaunts, and neither one crapped out luckily. I decided to send the remaining Gargoyles and the 9 Termagaunt squad after the Death Company, while the Hive Tyrant directed its attention to Mephiston - I figured I could take him on with my Tyrant Guard to keep me alive, and probably kill him with some luck. In the Shooting Phase, one Hive Guard brood blew the storm bolter off the Librarian's Rhino, the other immobilized the Combat Squad's Rhino, and the Tyrannofex wrecked the Red Thirst Marines' Rhino. The Hive Tyrant then cast Paroxysm on the disembarked unit. Unfortunately, I forgot to cast Catalyst this turn. Also, the Termagaunts and Gargoyles managed to kill 2 Death Company, but the Gargoyles were wiped out in the Assault Phase.
Turn 2 The Furioso Dread failed to come in, but the Blood Angels continued their advance regardless. The Librarian's squad shot forward 12" and then disembarked to fire on the Hive Guard. With their Rhino immobilized, the Combat Squad marched out to attack an objective. Finally, Mephiston made his move on the Hive Tyrant, successfully casting Wings of Sanguinius. The Shooting Phase was rather short, as the Librarian's squad managed to kill 1 of the Hive Guard, and Mephiston put 1 wound on the Tyrant Guard with his plasma pistol. Then, in the Assault Phase, he dished out 4 more wounds (with Sanguine Sword and Unleash Rage passing despite Shadow in the Warp), killing 1 Tyrant Guard and wounding the last Guard and the Tyrant twice. The Tyranids dished out just as much punishment, putting a whopping 4 wounds on him (he passed his Bone Sword test, unfortunately). Meanwhile, the Death Company destroyed the 9 Termagaunt squad with ease, consolidating towards the Tervigon.
This turn, 1 of my Gaunt squads arrived from reserves, as did my Genestealers, who outflanked on the left board edge... bye bye Assault Marines. The Tervigons also spawned 7 Gaunts each, although the right one crapped out this turn. I sent my Gaunts and Tyrannofex towards Mephiston and the Assault Marines, who were threatening to overwhelm my right objective if I wasn't careful. Meanwhile, the right Tervigon and its Gaunts ganged up on the Death Company, hoping to take them out. My shooting was rather weak this turn - my Hive Guard blew up the Librarian's Rhino, while the Tyrannofex killed an Assault Marine with its desiccator larvae (damn FNP). I also cast Catalyst on a pair of Gaunt units. The Assault Phase was particularly nasty - Mephiston killed both the Hive Tyrant and his Guard before either had a chance to swing back! Oh crap! Meanwhile, the Genestealers easily destroyed the Combat Squad and its Rhino, and the Tervigon and its Gaunts killed the Death Company to a man like the PDF.
Turn 3 The Furioso Dreadnought failed to come in again, but the Blood Angels didn't necessarily need it - Mephiston was a one-man wrecking ball. He and the Red Thrist Assault Marines went after the Tyrannofex, while the Librarian's squad made for the Tervigon and its remaining Termagaunts, who were especially vulnerable now that the Tervigon couldn't spawn any more Gaunts. They shot 1 Termagaunt down (they were buffed by FNP), but couldn't assault this turn. Meanwhile, Mephiston continued his rampage, putting a wound on the Tyrannofex with his plasma pistol, and then causing 5 wounds in close combat after Unleash Rage and The Sanguine Sword. The Tyrannofex was toppled before the Assault Marines could even swing! Not good at all!
My last reserves came in this turn, and I sent them to back up the empty Tervigon. Meanwhile, the 4 Termagaunts body-guarding it charged towards the Blood Angels. Meanwhile, my other Tervigon spawned 13 Gaunts (and still didn't crap out!!!). Thanks to the prolificacy of the Tervigon, I had almost 40 Guants in the area which I sent after Mephiston and the Assault Marines - they needed tarpitting, pronto! Meanwhile, the Genestealers hurried to assault the Marines from behind. In the Shooting Phase, the Hive Guard fired at the Drop Pod and actually managed to make it explode - however, it didn't take anyone with it. I also dedicated 23 of my Termagaunts to killing Mephiston, putting a load of shots into him... however, Mephiston was within 6" of a Sanguinary Priest, so not only was he T6 with a 2+ save, but he also had FNP... crap... I'm gonna need some accursed good rolling here...
Spoiler:
Holy , Mephiston's dead!
My remaining Gaunts and Genestealers then went after the Assault Marines, but they were torn to shreds by the Genestealers before anyone had a chance to swing back. Well things just went from bad to manageable! Anyway, I decided not to assault the Librarian with my 4 Termagaunts since they would be screwed, so why should I give my opponent a free consolidation? Instead, they stood their ground and created a living wall for the Librarian and his squad to have to walk around.
Turn 4 Well I basically just crushed Atlas' best chance to win the game, but he could still pull a draw with some ease. First thing's first, the Furioso Dreadnought arrived this turn, landing just in front of the Tervigon. It whiffed its shooting at the Tervigon, but the Drop Pod shot a Termagaunt to death. The Librarian and his squad then steamrolled the 4 Gaunts in front of them.
My left Tervigon spawned yet another wave of Gaunts (9 this time), while I spread out for objectives - with any luck, the game would go past Turn 5 and I'd win with a fair bit of certainty. Otherwise, it was gonna end in a draw, with victory a slight possibility for Atlas. A squad of Gaunts headed straight for the south-western objective, while the Genestealers went for the Combat Squad. Fearing for my right Tervigon, I hid it behind a wall of Termagaunts. Shooting was relatively light, but I managed to immobilize Atlas' poor Furioso Dreadnought with the lone Hive Guard.
Turn 5 Atlas charged his Librarian's squad forward, wiping out the Termagaunts, wounding the Tervigon once and suffering 1 casualty in return. The right Tervigon had FNP so it managed to make all its No Retreat saves, but the game would now end in a draw if the game ended on Turn 5 (assuming that the Tervigon survived the next Assault Phase too). Also, the Combat Squad tried to fire its plasma gun at the Genestealers, but got a 1 and the bearer killed himself...
I moved most of my units forward, but none of them were able to reach an objective or the Librarian's squad in time - my only hope to win the game was for the game to go on for another turn (and if it did, there was an extremely good chance that I would win it). Anyway, the Librarian cast The Sanguine Sword, allowing it to wound the Tervigon once, while the Tervigon killed 2 Marines in retaliation.
We rolled to see if there would be a Turn 6 and...
Spoiler:
We rolled a 3 - Turn 6, here we come!
Turn 6 Atlas figured that he would try to hide his Combat Squad and hope that he could stay out of the Genestealer's charge range, rather than risk shooting them. Meanwhile, the Furioso Dreadnought turned its attention to the troublesome Hive Guard, but whiffed its shooting yet again! In the Assault Phase, the Tervigon continued to fight on, suffering 1 wound (from the Sanguine Sword Librarian) and causing 1 in return.
My units were able to reach their objectives this turn, so the game was pretty much in the bag. To make matters worse, my Genestealers got a mighty for their run move. Not content to merely wipe out half the squad and its Rhino, they decided to finish off the 2nd half of the Combat Squad and call it a day. In addition, in the Shooting Phase, the lone Hive Guard continued to reap a toll, wrecking the Furioso Dreadnought. In the Assault Phase, the Librarian Perils'ed due to Shadow in the Warp, suffering a wound. The Tervigon also managed to kill one of the Marines, but Atlas still managed to put 2 wounds on it due to his squad's power weapons. Finally, the Genestealers easily wiped out the Combat Squad, taking their objective in the process.
The game was pretty much over, but we rolled to see if there would be a Turn 7 anyway...
Spoiler:
...and there was. Let's see if the Librarian can't kill off the Tervigon...
Turn 7 In the Shooting Phase, the Drop Pod gunned down 1 of the nearby Termagaunts. In the Assault Phase, the Librarian cast The Sanguine Sword again, and slew the Tervigon. 1 more Termagaunt died because of Brood Progenitor.
I wanted to see if I couldn't kill off the last of the Blood Angels, so I sent my closest units in. The Hive Guard whiffed for the first time all game, failing to do any real damage to the Drop Pod (I Stunned it, whoop-dee-do). Meanwhile, 21 Termagaunts ganged up on the last Blood Angels, inflicting 2 casualties. However, 8 of them were killed and wiped out as the game came to a close.
With the game over, the final score was Tyranids - 3, Blood Angels - 1.
Afterthoughts With a more focused list, and a character who easily solved his Hive Tyrant problems, Atlas really gave me a run for my money. In fact, I was in some serious trouble until the end of Turn 3, and even then I only got on top because of some serious luck - wounding Mephiston 4 times was very unlikely, his manner of death was surprising, my left Tervigon was a baby-factory (it spawned 64 Termagaunts during the game) and Atlas was rolling very poorly to wound during the latter half of the game. But yeah, killing Mephiston was the turning point - if I hadn't, he would have ravaged my left battleline, although the Genestealers *might* have dragged him down when they finished with the Assault Marines. In any case, Atlas is definitely figuring out how to maximize his units and to work around mine. I think that our next game will be even closer than this one... and we're upping the points. 2000 here we come!
This message was edited 1 time. Last update was at 2012/01/15 07:20:36
Automatically Appended Next Post: Also, I noticed you counted these battles for real as 4 wins.......<_< grr.....
This message was edited 1 time. Last update was at 2012/01/15 16:58:51
No one Provokes me with Impunity Atlas' Blood Oath - In progress, 22W 14L 4T (2012) - 14W 6L 0T (2013)
Craftworld Mymeara 440 points - in progress (....sort of a given ) - 4W 2L 0T (2013)
DQ:90S++G+M-B--IPw40k13++D++++A+/fWD-R++T(T)DM+ Where beautiful and brilliant people go to hang out - Lord Sanguinius' fb page
2012/01/15 18:10:31
Subject: VASSAL Bootcamp AKA To School a Noob (Tyranids vs Blood Angels)
haha well it's still my army either way. And I try to use models I have for the most part, although I'd have to proxy some of them in a real game that I don't have to in Vassal.
Indeed. I have...5 death company, 5 assault marines, 25 tac marines (that I could realistically call assault guys and throw some wargear onto,) termies, a captain, a dreadnought (not furioso unfortunately ) a rhino and possibly Mephiston. I don't have all the guys yet but I'm getting there. I should actually count up my points, come to think of it.
No one Provokes me with Impunity Atlas' Blood Oath - In progress, 22W 14L 4T (2012) - 14W 6L 0T (2013)
Craftworld Mymeara 440 points - in progress (....sort of a given ) - 4W 2L 0T (2013)
DQ:90S++G+M-B--IPw40k13++D++++A+/fWD-R++T(T)DM+ Where beautiful and brilliant people go to hang out - Lord Sanguinius' fb page
2012/01/15 18:42:16
Subject: VASSAL Bootcamp AKA To School a Noob (Tyranids vs Blood Angels)
Yeah, it's okay. But I'll definitely want more assault guys, and I guess I could call some tac marines assault marines (heh....reg ass) for the purpose of the game. I'll definitely want to get some powerful mechs like a furioso and ultimately a stormraven, as well as a librarian. I'll only consider including a captain when I've got a very strong infantry build, cause then I can throw him in with some lightning claws and be very good anti-infantry.
Automatically Appended Next Post: But then again I'm thinking psykers are better choices for a Blood Angels battleforce at the moment.
Automatically Appended Next Post: My goal, however, is to at least get a tie for the next game. I want to be as successful as I was early on in the last one.
This message was edited 2 times. Last update was at 2012/01/15 18:47:23
No one Provokes me with Impunity Atlas' Blood Oath - In progress, 22W 14L 4T (2012) - 14W 6L 0T (2013)
Craftworld Mymeara 440 points - in progress (....sort of a given ) - 4W 2L 0T (2013)
DQ:90S++G+M-B--IPw40k13++D++++A+/fWD-R++T(T)DM+ Where beautiful and brilliant people go to hang out - Lord Sanguinius' fb page
2012/01/16 17:44:11
Subject: Re:VASSAL Bootcamp AKA To School a Noob (Tyranids vs Blood Angels)
Round 5 – 2000pts Alright, we've entered the big leagues now – we upped our lists to 2000 points. I helped Atlas write his list, and must admit that I was getting a little unsure about how I was going to beat it. We shall see how it goes...
Blood Angels Mephiston, Lord of Death
Librarian (The Sanguine Sword, Unleash Rage)
2x Sanguinary Priests (1x Jump Pack)
Furioso Dreadnought (Meltagun, Heavy Flamer)
Furioso Dreadnought (Meltagun, Heavy Flamer, Drop Pod)
10x Death Company (Bolt Pistol, Chainsword, Drop Pod)
10x Assault Marines (2x Plasma Guns, Veteran Sergeant with Power Weapon and Combat Shield, Rhino)
9x Assault Marines (Plasma Pistol, Veteran Sergeant with Power Weapon and Plasma Pistol, Rhino)
8x Assault Marines (Plasma Pistol, Veteran Sergeant with Power Weapon and Plasma Pistol)
Stormraven Gunship (Twin-Linked Plasma Cannon, Hurricane Bolter Sponsons)
We rolled for deployment and mission and got Pitched Battle and... Annihilation. Craaaaaaap... Atlas and I bartered to see if we'd switch the mission type, but in the end I relented – this was going to be a very up-hill battle for me though.
We rolled off to see who would get the first turn, which I won. Normally I like to go second, but in this game I decided to go first instead in order to get the best positions on the field. As usual, I reserved my Termagaunts and Genestealers. Also, the 10-man Assault Marines succumbed to The Red Thirst, as did the Librarian's squad.
Turn 1 I advanced my Tyrant and his unit to get a swing at Mephiston – with any luck, I could neutralize him early on. One of my Tervigons also spawned Gaunts (rolling doubles in the process) and then advanced up the left flank with the Hive Guard to attack the lone Rhino. I then cast FNP on the Gaunts and Hive Tyrant. Also, the Tyrannofex fired a pair of shots at the Stormraven, but failed to shoot it down.
Atlas' first Drop Pod (carrying the Furioso Dreadnought) arrived to the south, but scattered off the board – luckily for him, it was merely delayed. The Blood Angels battle line advanced towards the Tyranids, as both Rhinos disembarked to bring maximum firepower at the Nids. Meanwhile, the Stormraven moved ahead 12” to fire its guns at the Tyrannofex. In the Shooting Phase, it fired its Plasma Cannon, Hurricane Bolters and a Bloodstrike Missile, wounding the Tyrannofex twice. The 10-man Assault Squad also fired their plasma guns at the Hive Tyrant's squad, causing 2 wounds (which were allocated to the Tyrant and 1 of the Guards). Finally, the 10-man Assault Squad's Rhino fired on the Venomthropes, causing 1 wound to them.
Turn 2 A unit of Termagaunts arrived this turn, as did the (ever-reliable) Genestealers, which arrived on the right flank. I decided to risk sending them after the Stormraven, but I was going to need a good Fleet movement if I wanted to reach it, or one of my units was going to have to shoot it down...
Meanwhile, the rest of my units moved in for the kill – the Hive Tyrant moved to attack Mephiston, but irritatingly he was shielded by the Assault Marines. Even worse, I mistakenly tried to cast Paroxysm on Mephiston, forgetting that I couldn't assault him since he was shielded by the Assault Marines (even worse, he Hooded the attack) – crap! Turning my attention to the Stormraven, the Tyrannofex fired its rupture cannon, stunning it. The Zoanthropes couldn't get off a Warp Lance on the Stormraven, as Mephiston Hooded both of them. The Tervigons also cast Catalyst, but one of them was Hooded as well. However, they still managed to give FNP to the Termagaunts and Genestealers (who only ran 3” – a couple inches short of the Stormraven). In the most fortunate shooting of the turn, the Termagaunts managed to kill 2 Assault Marines, despite having FNP. Finally, the Hive Guard fired all their shots at the left Rhino, but whiffed, getting a single glancing hit and only managing to shake it.
Well that was a disappointing turn. Depending on how I do in the next turn, this might be the end of the line for me...
Atlas rolled for his reserves this turn, but neither of them arrived. The Librarian's squad and Furioso Dreadnought disembarked, heading after the Genestealers. Mephiston and the 10-man Assault Squad went after the Tyrant's squad, while the last Assault Squad went after the Termagaunts. Finally, the shaken Rhino blasted off to escape the Hive Guard's impaler cannons. In the Shooting Phase, the Blood Angels gunned down one of the Venomthropes, a handful of Termagaunts and Genestealers and wounded the Hive Tyrant before launching a massive assault.
Mephiston and the Assault Marines attacked the Hive Tyrant and his squad, but luckily the Tyrant's lash whips reduced Mephiston to I1 (I had completely forgotten about this last time we played). The Tyrant directed its attacks to Mephiston, causing 2 wounds (unfortunately, Mephiston survived his leadership check). I then directed the Tyrant Guards' attacks at the Assault Squad, but only killed 2 unfortunately. Mephiston then went on a killing spree, killing 2 of the Tyrant Guard and reducing the Tyrant to 1 wound. Luckily, the Assault Marines whiffed, but the Tyrant died due to No Retreat saves. (Even worse, I completely forgot about the nearby Venomthrope, which should have made this fight much, much more survivable for my Tyrant)
In the Genestealer fight, 4 Genestealers directed their attacks at the Furioso Dreadnought, tearing one of its Blood Talons off before it could strike (THANK GOD). The Broodlord and another Genestealer directed their attacks at the Assault Marines, killing 2 of them. The Blood Angels then attacked, killing all the Genestealers, except for the Broodlord himself. Finally, the last Assault Squad attacked the Termagaunts, killing all but 2 of them (after No Retreat saves), but lost one of their number in the process.
Well... that was disastrous. Even worse – can't shoot at his units, as they are still locked in assault.
Turn 3 My 2nd unit of Termagaunts fails to arrive again this turn. However, I spawn 13 more Termagaunts from my middle Tervigon and send them after the nearby Assault Marines. I also sent the Zoanthropes after the Stormraven and hurried the Venomthrope away to hide behind the closest Tervigon – my right flank was absolutely collapsing, so I needed as much cover there as I could get.
In the Shooting Phase, only 1 Hive Guard was in range of the Rhino, hitting with both shots, but due to the Rhino's Flat Out cover save he nullified both hits – dammit! Mephiston Hooded one of the Zoanthropes, but the other one missed his shot anyway. Luckily, the Tyrannofex was covering for them, hitting with both of its Rupture Cannon shots. The Stormraven was blown out of the sky, leaving nothing but a crater in its wake. Also, in a really lucky shot, one of my Tervigons fired its Stinger Salvo at the rear armour of a nearby Rhino, immobilizing and shaking it! That was unexpected!
In the Assault Phase, the Broodlord went after the Furioso Dreadnought, but completely whiffed every single one of his 4 attacks... He was quickly killed by the Librarian. Mephiston also quickly chopped down the last Tyrant Guard. Meanwhile, on the left flank another unit of Termagaunts and a Tervigon attacked the Blood Angels, killing 3 of them. The Blood Angels killed 2 of the attacking Termagaunts, and put a wound on the Tervigon as well.
Atlas' Furioso Dreadnought finally arrived, landing just between the Tyrannofex and Tervigon (the Death Company stayed in reserves yet again). His Blood Angels moved to secure the right flank, while the last mobile Rhino moved out of the Hive Guard's range for good.
In a rare bright moment for me, Atlas' shooting phase was hilariously awful, as unit after unit rolled 1's and 2's and caused very, very little damage. Not that they needed it – in the Assault Phase, Mephiston steamrolled the Zoanthropes and the damaged Furioso and the Librarian's squad killed one of the Tervigons. Meanwhile, in the other assault, the Sanguinary Priest killed the last 2 Termagaunts from one squad, while the Sergeant put another wound on the Tervigon and the rest of the squad killed 1 more Termagaunt. In return, the Tervigon killed 2 Assault Marines.
Turn 4 Ok, it's pretty obvious that I'm screwed, but I could try to shorten the gap. My Venomthrope ran for cover, while the Tyrannofex moved to spray the Librarian and his squad with Desiccator Larvae. I also began to spawn more Termagaunts, creating a wall of bodies between my Tervigons and Mephiston.
My shooting was characteristically crappy, as my Tervigon and Gaunts failed to destroy the immobilized Rhino. To make matters worse, the Tyrannofex only managed to kill 1 Assault Marine, despite pouring all its firepower into them (in retrospect, I probably should have assaulted them as well). The Assault Phase was rather underwhelming as well, as I killed the Assault Squad's Sanguinary Priest with no losses, but the squad's Sergeant was still alive to fight on another turn.
The Death Company finally arrived, but Atlas stuck them out of line of sight of the Nids so that they wouldn't go commit suicide from Rage. Atlas also moved a couple units closer to the right flank so that he could castle up. In the Shooting Phase, he killed the Venomthrope and the Tyrannofex. In the Assault Phase, the Assault Sergeant killed a Termagaunt, but was finally dragged down himself.
Turn 5 Wanting some revenge, I sent all my units out to destroy as much as they could in 1-3 turns. Dozens of Termagaunts skittered across the field, making a beeline for the immobilized Rhino. The Tervigon blew it up with its Stinger Salvo, but the result was rather embarrassing – it Exploded and hit 24 Termagaunts! Luckily, due to FNP, it only killed 4 but still.
The game in the bag, the Blood Angels went after the Termagaunt wall that was steadily approaching. Mephiston led the charge, casting Wings of Sanguinius to get to the forefront. Luckily, most of Atlas' units were out of range, so only 3 Termagaunts were killed in the Shooting Phase.
Atlas had basically won now, but I needed to avenge the death of my Hive Tyrant – he was 2 days away from retirement!
Tyrant: Aw, damn damn damn... Hive Mind...
Hive Mind: Yes?
Tyrant: I'm not gonna make it.
Hive Mind: Oh stop talking crazy.
Tyrant: No no no no. Just do one thing for me – get... Mephiston...
(Tyrant dies)
Hive Mind: MEPHISTOOOOOOOOOOOOOOOON!!!
Uh... anyways, we rolled and there would be a Turn 6!
Turn 6 My Tyranid swarm moved in, all with the express desire to kill Mephiston. About 40 Fleshborer shots streaked towards the Lord of Death, and he actually managed to suffer a wound. Then the Termagaunts assaulted him, taking another wound off of him. Only 7 Termagaunts died (after no Retreat saves) – not bad!
Atlas moved some troops in closer, but for the most part he wanted to leave Mephiston to take out the Termagaunts by himself. However, he moved his last Sanguinary Priest into range to give Mephiston FNP. This pretty much sealed the deal – the Gaunts failed to damage him and Mephiston killed 5 (after no Retreat saves). We rolled to see if there would be another turn, and got a 3 – the game was now over. (Damn you Mephiston, I would have killed you if the game had continued!)
The score was:
Blood Angels – 8
Tyranids – 3
Victory for the Blood Angels!
Afterthoughts Oh man did I ever get smoked. Atlas played this one very well, but on top of that I made some dumb mistakes that might have cost me the game. Still, the fact that Atlas put up on overwhelming offensive on my one flank allowed him to break my resistance and sweep through my lines. In addition, I don't really like Kill Point games, so that affected my performance somewhat, but regardless Atlas gave me a run for my money.
You have done well my young apprentice...
Anyways, it's time to graduate to the next level – in our next game, Atlas has to face my main army: Andilus Greatsword's Great Company!
This message was edited 1 time. Last update was at 2012/01/16 17:44:38
Automatically Appended Next Post: ^Oh dear being about your great company.
This message was edited 1 time. Last update was at 2012/01/16 18:29:39
No one Provokes me with Impunity Atlas' Blood Oath - In progress, 22W 14L 4T (2012) - 14W 6L 0T (2013)
Craftworld Mymeara 440 points - in progress (....sort of a given ) - 4W 2L 0T (2013)
DQ:90S++G+M-B--IPw40k13++D++++A+/fWD-R++T(T)DM+ Where beautiful and brilliant people go to hang out - Lord Sanguinius' fb page
2012/01/19 01:25:09
Subject: VASSAL Bootcamp AKA To School a Noob (Tyranids vs Blood Angels)
I look back at this and think maybe considering the bone sword, I should consider getting as many shots off at him before the assault, cause I had enough plasma weapons to at least do some serious damage.
Automatically Appended Next Post: ^the main concern would remain that the tyrant still could reduce my initiative to 1 but he would potentially have had less tyrant guards to also almost insta-kill Mephiston.
This message was edited 1 time. Last update was at 2012/01/19 01:26:20
No one Provokes me with Impunity Atlas' Blood Oath - In progress, 22W 14L 4T (2012) - 14W 6L 0T (2013)
Craftworld Mymeara 440 points - in progress (....sort of a given ) - 4W 2L 0T (2013)
DQ:90S++G+M-B--IPw40k13++D++++A+/fWD-R++T(T)DM+ Where beautiful and brilliant people go to hang out - Lord Sanguinius' fb page
2012/01/21 21:42:18
Subject: Re:VASSAL Bootcamp - Training the Blood Angels
Round 6 – 2000pts Well Atlas sure thumped me in our previous battle, so it was time to bust out my Space Wolves. Meanwhile, Atlas decided to try being more experimental, writing up a Descent of Angels list.
Space Wolves Wolf Lord Andilus Greatsword (Terminator Armour, Frost Blade, Storm Shield, Wolf Tooth Necklace, Wolf Tail Talisman, Saga of the Bear)
Rune Priest (Living Lightning, Murderous Hurricane)
4x Wolf Guard (3xTH/SS, 1x Assault Cannon/Chainfist)
Land Raider Redeemer (Multi-melta)
Lone Wolf (TH/SS, 2x Fenrisian Wolves)
9x Grey Hunters (Meltagun, Power Weapon, Mark of the Wulfen, Wolf Standard)
Wolf Guard (Combi-melta, Powerfist)
Rhino
9x Grey Hunters (Meltagun, Power Weapon, Mark of the Wulfen, Wolf Standard)
Wolf Guard (Combi-melta, Powerfist)
Rhino
8x Grey Hunters (Meltagun, Power Weapon, Mark of the Wulfen, Wolf Standard)
Wolf Guard (Combi-melta, Power Weapon)
Rhino
6x Long Fangs (5x Missile Launchers)
6x Long Fangs (3x Missile Launchers, 2x Lascannon)
Blood Angels Commander Dante
Librarian (Jump Pack, Unleash Rage, The Sanguine Sword)
Furioso Dreadnought (2x Blood Talons with Meltagun and Storm Bolter, Drop Pod with Locator Beacon)
Furioso Dreadnought (2x Blood Talons with Meltagun and Storm Bolter, Drop Pod with Locator Beacon)
2x Sanguinary Priests (Power Weapons, Jump Packs)
10x Assault Marines (2x Infernus Pistols, Sergeant with Power Weapon and Infernus Pistol)
10x Assault Marines (2x Infernus Pistols, Sergeant with Power Weapon and Infernus Pistol)
10x Assault Marines (2x Infernus Pistols, Sergeant with Power Weapon and Infernus Pistol)
10x Assault Marines (2x Infernus Pistols, Sergeant with Power Weapon and Infernus Pistol)
5x Devastators (4x Missile Launcher, Sergeant with Boltgun and CCW)
We rolled for mission and deployment and got Capture and Control and Dawn of War. Atlas then won the roll to go first, but since he was doing all reserves he didn't have anything to place. I declined to seize the initiative.
Also, Atlas decided to use Dante's Death Mask of Sanguinius debuff on my Rune Priest in order to make him easier to kill.
(Ignore the Devastators in the pic, they weren't placed)
Turn 1 The Blood Angels could only bring in the Devastators and a Drop Pod this turn, so the Devastators camped in the trees while the Drop Pod landed in the ruins of a building. Humorously, it rolled a 1 when it landed (since Atlas had chosen to place it directly in difficult terrain), so its Storm Bolter got blown off. The Dreadnought then tried to shoot at the Rhino, but missed.
I decided to bring in my whole army on Turn 1, so they hurried in towards the center of the board. My Long Fangs footslogged through the jungle, but unfortunately only one of them reached the hill so the other one was going to have to have another turn of movement before it would get to shoot... crap. Meanwhile, the Rune Priest's Rhino moved in to do a drive-by Melta on the Furioso Dreadnought, blowing it sky-high.
Turn 2 Atlas rolled for his reserves, and luckily for him they all arrived except for the other Furioso (including Descent of Angels rerolls). His Librarian's squad and one with a Sanguinary Priest landed within 6” of the Locator Beacon, surrounding the Rune Priest' Rhino. Dante's squad went Long Fang hunting by virtue of his Tactical Precision rule. Finally, the last squad landed in front of my Land Raider, hoping to pop it with their Infernus Pistols.
In the Shooting Phase, the Rune Priest's Rhino exploded from 3 point-blank Infernus Pistol shots, and then 2 more squad members were killed by the Librarian's squad's shooting. The other Sanguinary Priest' squad was less successful, failing to scratch the Land Raider's armour. Luckily for them, the Devastators managed to stun it. Dante's squad also managed to kill 3 Long Fangs.
The Space Wolves then moved to pounce on the Blood Angels. Andilus and his squad exited their Land Raider to wipe out the squad ahead of them, while the Long Fangs and Lone Wolf all turned their attention to Dante's squad. The Rune Priest also decided to try his luck against the Librarian's squad. The Shooting Phase was rather nasty as Dante's squad lost more than half of its numbers before being assaulted by the Lone Wolf.
In the Assault Phase, the Lone Wolf's Fenrisian Wolves were slain by Dante, but the Lone Wolf killed 3 Assault Marines in return. Dante's squad broke and ran. Meanwhile, Andilus and his squad attacked the Sanguinary Priest's unit, killing 8 of them and losing a Thunder Hammer in return. This squad also broke and ran. Finally, the Rune Priest's squad assaulted the Librarian, losing 3 Grey Hunters to 2 Assault Marines (thanks to Unleash Rage) – luckily, they did not break.
Turn 3 The Furioso Dreadnought arrived this turn, and I suggested that Atlas drop it right in front of my Rhino and Andilus – it would be risky, but it blocked my units' advance, and he could hide the Dreadnought behind the Drop Pod for cover. Meanwhile, his Assault Squads ganged up on my Rune Priest and destroyed the squad with ease. The pairs consolidated and moved to renew their attack on my lines.
I believe I made a pretty major mistake here – I wanted to move Andilus and his squad back to the Land Raider so that they could all embark and then the Land Raider could move 12” ahead. Unfortunately, 1 of the squad members was out of this range, so he could not do so and the Land Raider had to come pick them up and stop movement. I should have just moved the squad forward, or consolidated them towards the Land Raider... oh hindsight.
Anyways, they did that and my Rhino moved ahead to attack the Assault Marines (again, I should probably have held them back for a turn). I fired all my Missile Launchers and the Land Raider's weapons at the Furioso, but amazingly every single shot failed to penetrate its armour. Wow...
Turn 4 Atlas moved his Assault Marines in for the kill. He dedicated his newly rallied Sanguinary Priest's squad and the Librarian's to the Rhino and its occupants, while the Furioso and other Sanguinary Priest's squad went after the Long Fangs. The Rhino exploded with ease, and surprisingly it killed 4 Grey Hunters in the blast... The Devastators also directed their fire at the Missile Long Fangs, killing 2. The Assault Phase was equally devastating as the Assault Marines and Dreadnought wiped out the Lone Wolf, a full squad of Long Fangs and the entire Grey Hunter squad. Well it looks like I underestimated the Blood Angels!
There was now a really, really good chance that Atlas could tie this game – I needed to make some desperate manoeuvres if I was going to clinch the victory (also, if I could make the game go for another turn or 2 that would be ideal). All I did this turn was move my Land Raider towards his objective, firing the last Missile Launcher and the Multi-melta at the Furioso, but both shots failed to damage it...
Turn 5 Atlas sent his entire force (barring the 3-man Assault Squad) at my Land Raider, while Dante finally rallied and went to join them. Meanwhile, the last Assault Marine he was with moved to secure Atlas' objective. In the Shooting Phase, Atlas poured 4 Melta shots into my Land Raider, but amazingly he only managed to get a single Weapon Destroyed result (he blew off my left Flamestorm Cannon)! If I could get the game to go on for just 1 more turn I would have this one...
I drove the Land Raider closer to Atlas' objective and disembarked my Terminators to attack the Librarian and Dante's squad. My remaining Flamestorm Cannon hit the unit dead-on, but amazingly the squad rolled ridiculously well on their FNP and only 2 of them died! In the Assault Phase, Andilus charged the Librarian and chopped him down to prevent him from further buffing the squad. Unfortunately, the rest of the Wolf Guard were cut down before they could do any damage, and Andilus was wounded once. If the game went on 1 more turn I could take it still...
Spoiler:
However, we rolled a 2! The game ends in a draw with 1 objective each!
Afterthoughts I'll admit, I figured I had this game in the bag so I started getting lazy on the 3rd turn – big mistake! Atlas did an amazing job turning it around, and with a list he'd never tried to-boot. All-in-all it was an excitingly close battle, even if the outcome could have been better for me.
Automatically Appended Next Post: If only it were kill points....I mean, your army would easily hold its own on that, then again if I did this well, maaaybe I could pull out a win, but considering you wouldn't be as distracted with taking objectives it'd certainly be an interesting challenge.
So we can do more of these battles, or we could switch up, maybe try team battles at some point...
This message was edited 1 time. Last update was at 2012/01/21 22:01:56
No one Provokes me with Impunity Atlas' Blood Oath - In progress, 22W 14L 4T (2012) - 14W 6L 0T (2013)
Craftworld Mymeara 440 points - in progress (....sort of a given ) - 4W 2L 0T (2013)
DQ:90S++G+M-B--IPw40k13++D++++A+/fWD-R++T(T)DM+ Where beautiful and brilliant people go to hang out - Lord Sanguinius' fb page
2012/01/22 16:45:57
Subject: Re:VASSAL Bootcamp - Training the Blood Angels
I for one would read them, I like vassal batreps for being so easy to follow. Pics aren't blurry or taken at weird angles so you don't know what's going on.
Nice reps too. Nid swarm lists tend to make dynamic games!
2012/01/22 17:03:43
Subject: VASSAL Bootcamp - Training the Blood Angels
They were, it was interesting for sure lol, started coming into my own right around game 4 and 5, with game 6 really boosting my confidence being able to hold against Andilus' best army
No one Provokes me with Impunity Atlas' Blood Oath - In progress, 22W 14L 4T (2012) - 14W 6L 0T (2013)
Craftworld Mymeara 440 points - in progress (....sort of a given ) - 4W 2L 0T (2013)
DQ:90S++G+M-B--IPw40k13++D++++A+/fWD-R++T(T)DM+ Where beautiful and brilliant people go to hang out - Lord Sanguinius' fb page
2012/01/27 20:03:07
Subject: Re:VASSAL Bootcamp - Training the Blood Angels
Blood Angels Librarian (The Sanguine Sword, Unleash Rage, Jump Pack)
Mephiston, Lord of Death
Furioso Dreadnought (Blood Talons with Meltagun and Heavy Flamer, Drop Pod)
Furioso Dreadnought (Blood Talons with Meltagun and Heavy Flamer, Drop Pod)
2x Sanguinary Priests (1x Jump Pack)
8x Assault Squad (Jump Packs, 1x Plasma Pistol, Veteran Sergeant with Plasma Pistol, Power Weapon and Combat Shield)
9x Assault Squad (Rhino, 1x Plasma Pistol, Veteran Sergeant with Plasma Pistol and Power Weapon)
10x Assault Squad (Rhino, 2x Plasma Guns, Veteran Sergeant with Bolt Pistol, Combat Shield and Power Weapon)
10x Death Company (Bolt Pistol, Chainsword, Drop Pod)
Stormraven Gunship (Hurricane Bolter Sponsons, Twin Linked Heavy Bolters, Twin Linked Plasma Cannon)
We rolled for deployment and got Dawn of War, and rolled for mission and got... Annihilation. I won the roll-off, but gave Atlas the first turn. None of his units succumbed to The Red Thirst. Atlas deployed Mephiston and the Rhino with his Assault Squad and Sanguinary Priest (...come to think of it, he couldn't do this since Sanguinary Priests are Elites... oh well). I placed my Hive Tyrant and the Hormagaunts and left everyone else off the table.
Turn 1 Atlas sent in his whole army (except for his 2nd Furioso, which had to stay in reserves), deploying his Deep Strikers fairly conservatively. Meanwhile, he moved Mephiston and the Sanguinary Priest's squad (which disembarked) forward to attack the Tyranids. Thankfully, most of my units were out of line of sight (one of the main reasons why I went 2nd) so he had no targets for his Stormraven. He could only fire a couple weapons at the Hormagaunts, killing 3 of them... and like that, it was my turn.
I brought in my whole army, except for the Genestealers and Termagaunts, who I kept in reserves. I used the Gargoyles to screen my valuable units and provide them with cover saves - somewhat risky in a Kill Points game, but I need to keep my good units intact if I want to win this. In the Shooting Phase, my Hive Tyrant successfully cast Paroxysm on Mephiston (YESSSSSS!) and the Tervigon cast Catalyst on the Tyrant. Mephiston only managed to Hood one of my Zoanthropes, but the other one missed his shot anyway. The Hive Guard blew up the Sanguinary Priest squad's Rhino and the Tyrannofex blew the Heavy Flamer arm off of the Furioso Dreadnought. Everything else fired at Mephiston, managing to take 1 wound off of him, despite his 2+ save and FNP from the Sanguinary Priest nearby. In the Assault Phase, my Hormagaunts attacked Mephiston and put another wound on him. Amazingly, Mephiston only managed to kill a single Hormagaunt in return (due to Paroxysm and failing his Unleash Rage from Shadow in the Warp).
Turn 2 Atlas' 2nd Furioso arrived from reserves, landing right in front of the left Gargoyle squad. His squads continued their advance, while the Sanguinary Priest's squad and de-armed Furioso went to help out Mephiston. Atlas' shooting phase was pretty weak, only killing 6 Gargyoles and wounding a Zoanthrope and a Venomthrope (when his Plasma Cannon shot scattered onto it). In the Assault Phase, the Hormagaunts were finished off quite handily, and everyone consolidated towards the Tyranids.
One of the Termagaunt squads and Genestealers arrived. I rolled to see where the Genestealers would pop up and... they got the right flank. CRAP. Annoyed, I moved the Gargoyles up to screen them from incoming fire. Meanwhile, the rest of my forces moved forward to destroy Mephiston and the Sanguinary Priest's squad. In the Shooting Phase, my Hive Guard got 3 penetrating hits on the nearby Furioso, Stunning, Immobilizing it and blowing its Heavy Flamer off. My Zoanthropes both fired at the Dreadnought to finish it off, but 1 Perils'ed and killed himself, and Mephiston Hooded the other. In the Assault Phase, my Tervigon charged the Furioso and managed to both Stun and Immobilize it. Meanwhile, my Gargoyles and Warriors charged the Sanguinary Priest's squad, killing 3. In return, 2 Gargoyles were killed an a Warrior was wounded twice. Finally, the Tyrant charged Mephiston after failing to Paroxysm him, scoring another wound. In return, Mephiston killed one of the Guards and wounded the Tyrant once.
Turn 3 Atlas moved his Stormraven forward and disembarked the Librarian's squad to help the Sanguinary Priest's squad versus the Warriors. Unfortunately, due to the Drop Pod being in the way, they were forced to charge the Gargoyles instead. Meanwhile, his Death Company went after the Tervigon (and Fleeted 6 inches to assault him!) and the Assault Squad disembarked to shoot at the Gargoyles. In the Shooting Phase, the Gargoyles were reduced to 3 survivors (which fell back), and 1 Genestealer was killed and the Broodlord took 1 wound. Hilariously, one of the Assault Squad's Plasma Guns overheated and killed its owner. The Stormraven also managed to kill 1 Venomthrope. In the Assault Phase, the Hive Tyrant wounded Mephiston again, but his Guard was killed and he was wounded once. Meanwhile, the Warriors continued to do a number on the Sanguinary Priest's squad, killing 3 of them and losing a single Warrior. Meanwhile, the Death Company Assaulted the Tervigon and wounded it 4 times. The Tervigon, in return, failed to do any damage to the Furioso Dreadnought.
(I actually forgot to take a picture for this turn)
My Gargoyles regrouped due to the nearby Tervigon, and went to hide behind the Tyrannofex. Meanwhile, my 2nd unit of Termagaunts arrived, while my Genestealers continued to advance to reach the Assault Squad... unfortunately they were too far out to do so this turn. Meanwhile, my Shooting Phase was horrendous - 6 Hive Guard and a Zoanthrope failed to even scratch the paint of the Stormraven and my Tyrannofex couldn't even hit a Rhino. Just plain awful!
In the Assault Phase, my Tyrant killed Mephiston (woot) and consolidated close to the Stormraven. My Warriors killed 2 more Assault Marines while they were only wounded once. Finally, the Death Company managed to finish off the Tervigon...
Turn 4 Atlas sent his Librarian's squad after the Warriors to finish them off while his Assault Squad went to shoot the Genestealers down. They managed to wound the Broodlord once and kill one other, but Atlas' units had awful luck hitting the Genestealer brood, and actually managed to kill his other Plasma Gun from Gets Hot. However, the Stormraven managed to kill the Venomthrope with its Hurricane Bolter sponson and annihilated the Tyrant with 2 Bloodstrike Missiles. Also, the Death Company fired at the nearby Termagaunt squad, and actually managed to make them run off the table. In the Assault Phase, the Warriors failed to kill the last 2 troops in the Sanguinary Priest's squad, and were whittled down to 2 units in return. Wowwwww...
Ok I was doing very well until around the end of turn 3, and now things were crumbling. I moved my Termagaunts to hide from the soon-to-be-incoming Blood Angels. My Genestealers reached the Assault Squad this turn and prepared to clean house. Finally, my Tyrannofex and Gargoyles both failed their Instinctive Behaviour checks. In the Shooting Phase, my Tyrannofex had to fire at the Death Company with its Rupture Cannon and Stinger Salvo, killing 1 of them. For the 2nd turn in a row, my Hive Guard managed to do absolutely nothing to the Storm Raven! Anyway, the Warriors got wiped out (failing to kill the Assault Sergeant after inflicting him with 6 wounds!) and the Genestealers killed 4 Assault Marines, losing 1 Genestealer in the process - they Marines broke, but we run down and lost 1 more Marine to No Retreat saves.
Turn 5 Atlas moved to finish things off. He sent his Sanguinary Priest and Librarian's squads after the Zoanthrope, Termagaunts and Hive Guard, while the Death Company went after the Tyrannofex. In the Shooting Phase, the Stormraven's Plasma Cannon put 1 wound on the Tyrannofex and the Librarian's squad kill 1 Hive Guard. In the Assault Phase, the Death Comapny rolled really bad on their difficult terrain check, and failed to reach the Tyrannofex. The Librarian's squad killed the Zoanthrope and wounded one of the Hive Guards. Meanwhile, the Sanguinary Priest's squad assaulted the Termagaunts, killing 6 after No Retreat saves. Finally, the Genestealers wiped out the last of the Assault Marines.
My Genestealers went to assault the Blood Angels' Rhino and Drop Pods to get some quick and dirty kill points before the game ended. Meanwhile, my Tyrannofex failed his Instinctive Behaviour check so he had to stand still and fire at the Death Company. He managed to kill 1 with his Desiccator Larvae. Meanwhile, in the Assault Phase, Atlas wiped out the last units on my left flank, and consolidated back towards me. The Genestealers managed to wreck the Rhino, but that was it.
We rolled to see if there would be another turn and...
Spoiler:
...there was... not that it mattered at this point.
Turn 6 Atlas sent his Death Comany after my Tyrannofex and his Stormraven moved to kill some Genestealers. His Plasma Cannon put a wound on my Tyrannofex again, and he managed to kill 2 Genestealers. In the Assault Phase, the Death Company whiffed against the Tyrannofex, which killed 2 of them in return. (I forgot my vehicle assault rules, so my Genestealers should have attacked the Drop Pod again)
My Genestealers moved to multi-assault the Drop Pods, but only managed to Stun one of them (big whup). My Tyrannofex took another wound, but killed another Death Company in return. We rolled to see if there would be another turn and...
Spoiler:
...there wasn't. Blood Angels win, 10KP to 4.
Afterthoughts So my Tyranids officially hate Kill Points... I actually wasn't doing too bad until Turn 3 though. And even then, I had some major bouts of unluckiness (I should have had at least 4 more kill points from the Dreadnoughts, Storm Raven and Sanguinary Priest's squad). Ah well, Atlas continues to do well, I need to figure out a way to beat again. Next battle he wants to try out his Orks versus my Space Wolves... I love the smell of payback in the morning.


 That's 2 really big obstacles, but I had a solution - VASSAL to the rescue! I'd never used it for an online game, so it was fun to try out and ran very smoothly (although I obviously prefer the real thing, but it is a great alternate system).


 and found himself a netlist to face me with. I offered him some anti-Tyranid suggestions for it, since it was very psyker-reliant, and Shadows is so good at shutting them down. He changed it up a little bit, dropping the Librarians for Captain Atlas and some Sanguinary Guard. Meanwhile I decided to try out a dual-Tervigon Catalyst list - I've never actually tried one out in a game before so I wanted to see how it would do... and hey, Atlas is using a net-list so I think it's fair enough. Besides, he wants to fight a swarm, so I'll give him one! Once again, I used all the models I actually own, with the exception of 1 Hive Guard and the Trygon.
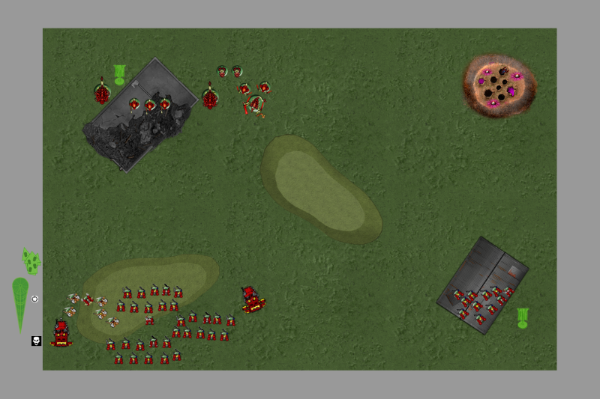
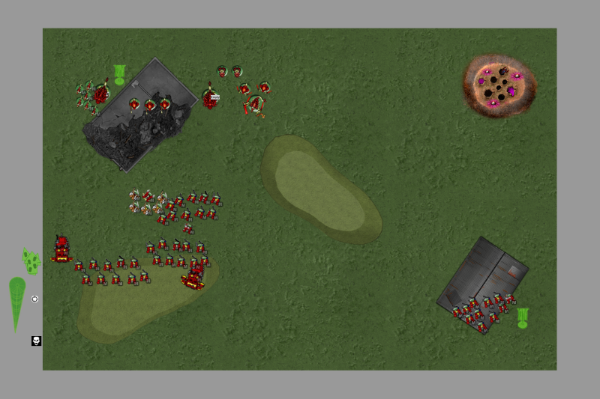
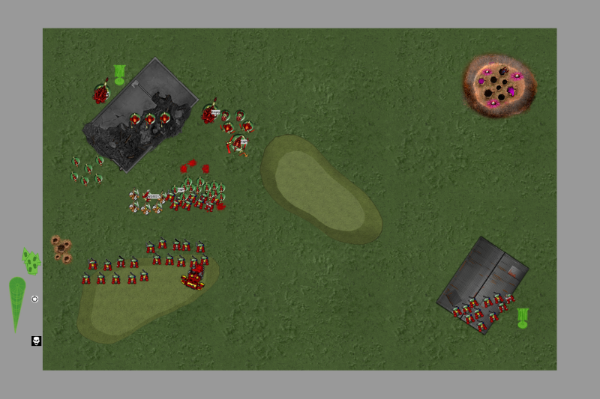
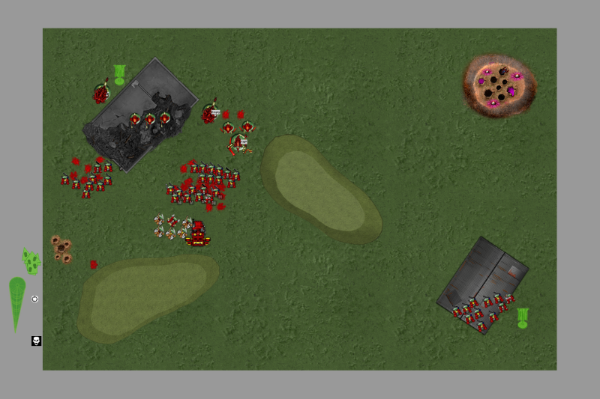

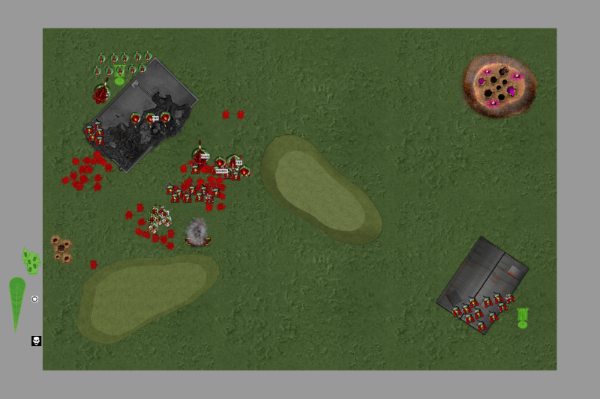

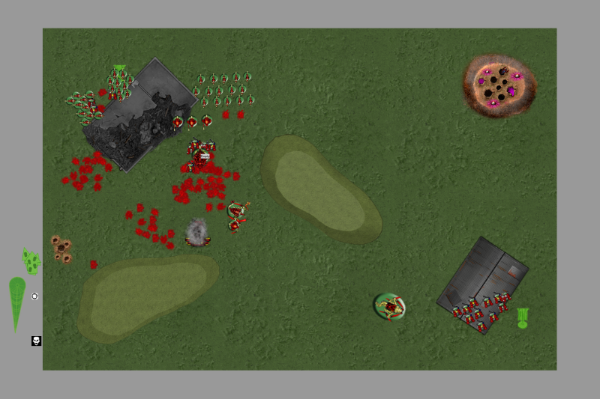
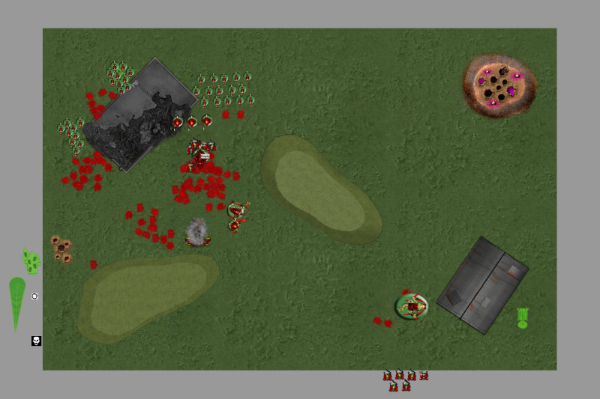
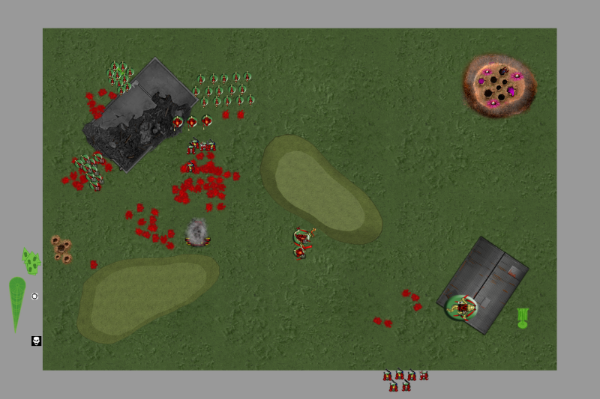
 No one Provokes me with Impunity
 Craftworld Mymeara
 440 points - in progress (....sort of a given

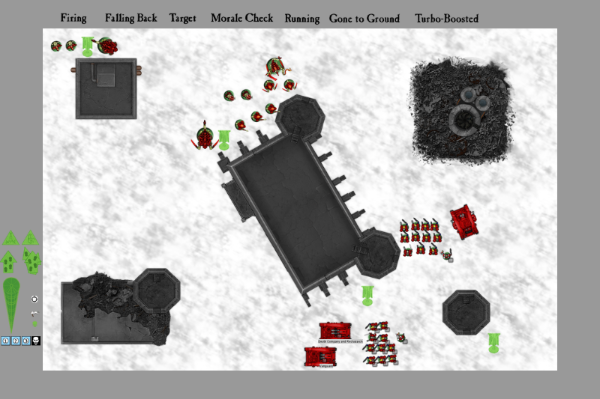
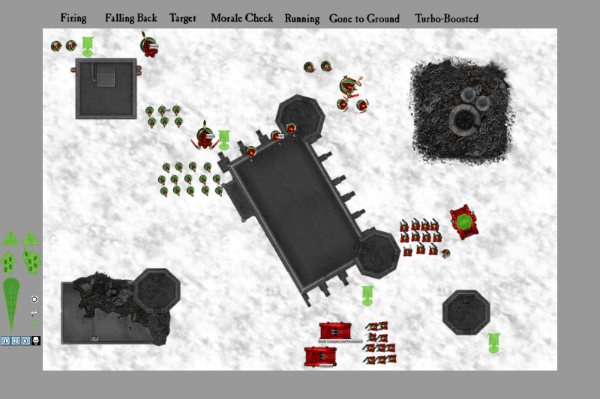
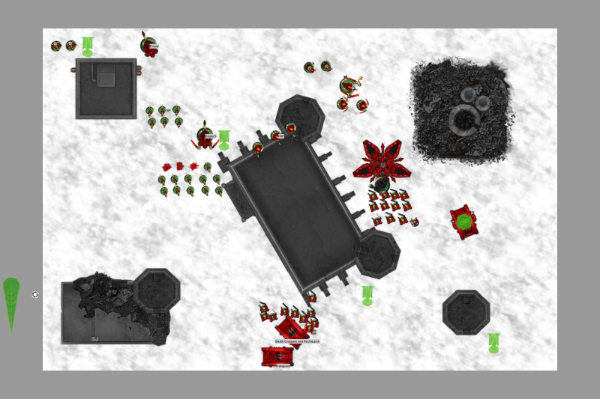
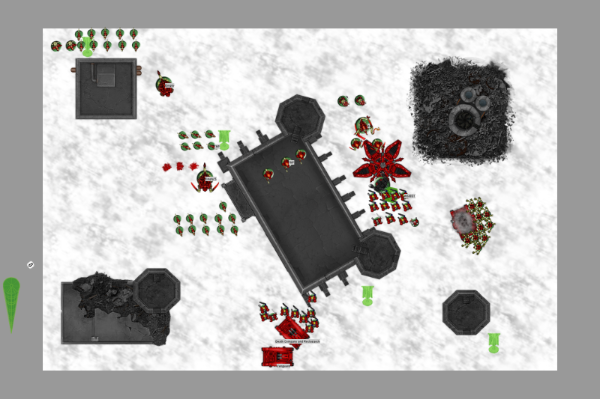
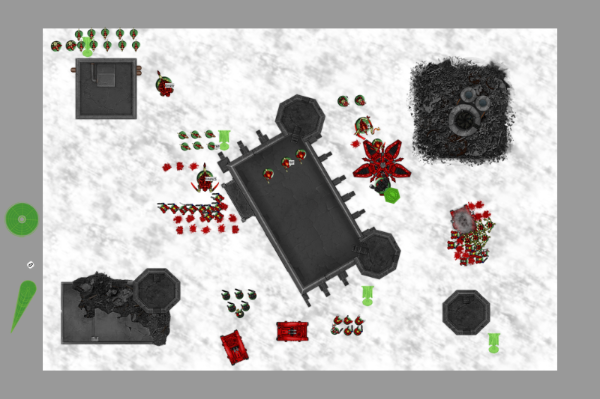
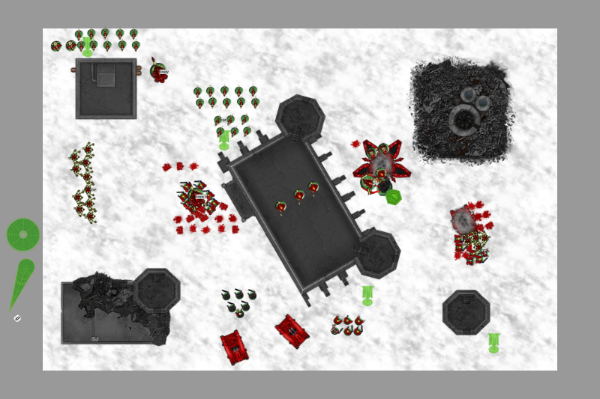
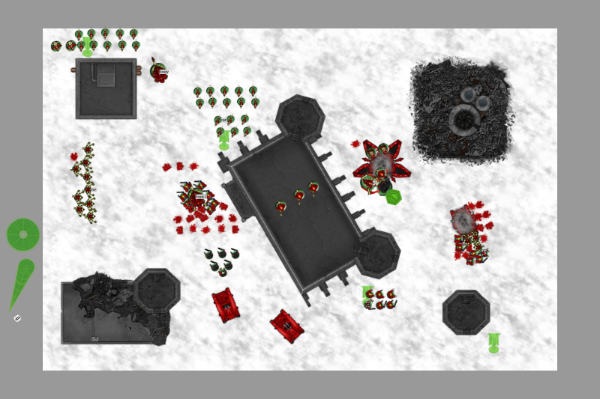
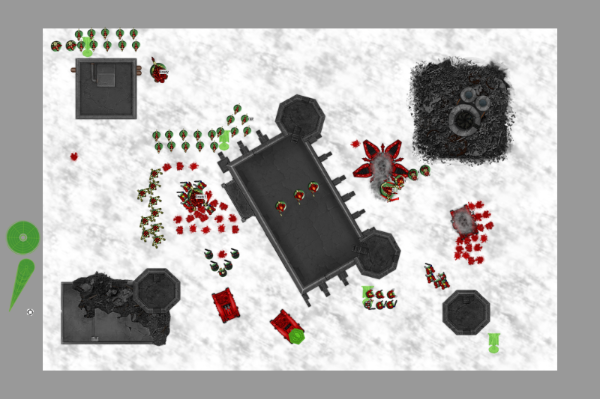
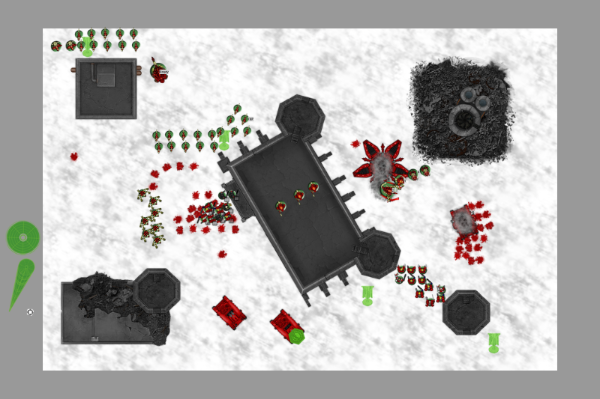
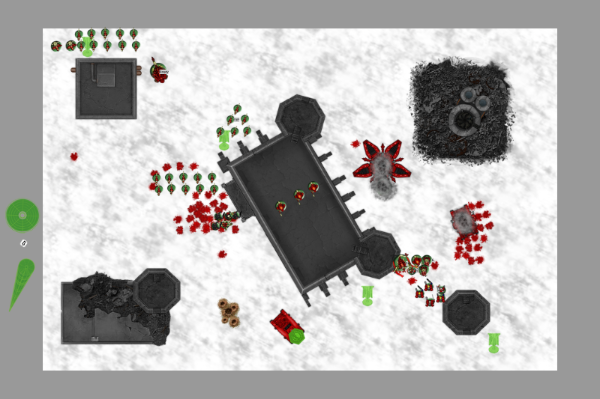
 !
!  The Tyranids won, 2 objectives to 0.
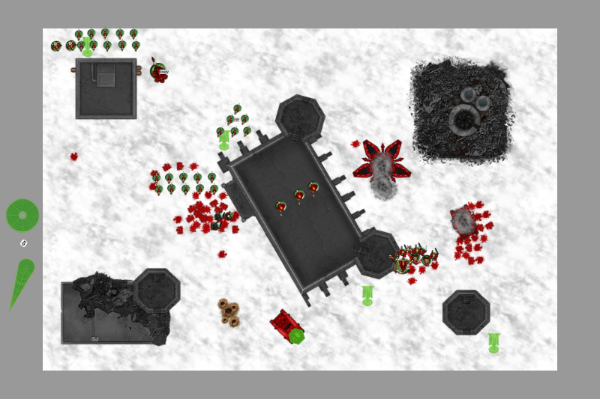
 so....I'm still a little shaky on that one. But still excited.
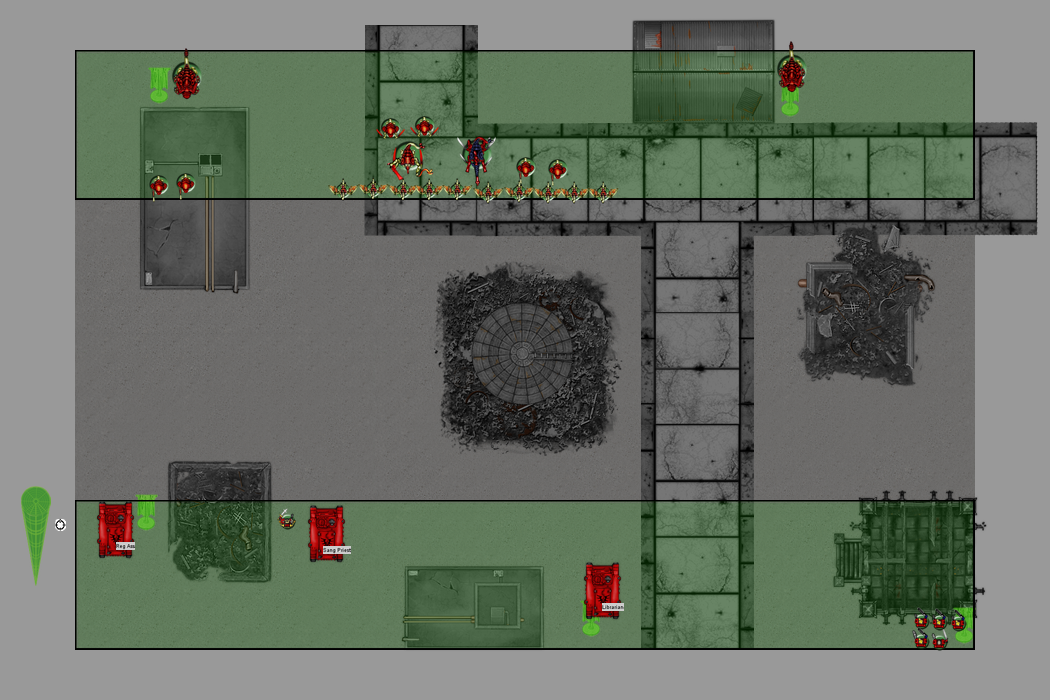
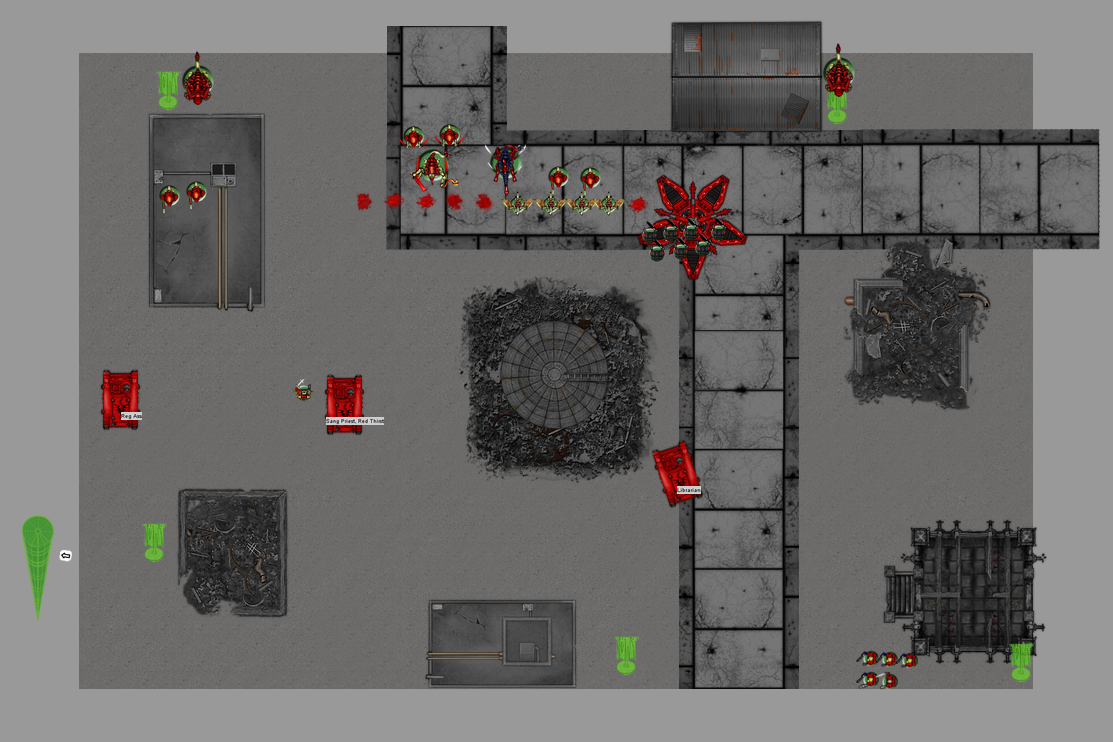
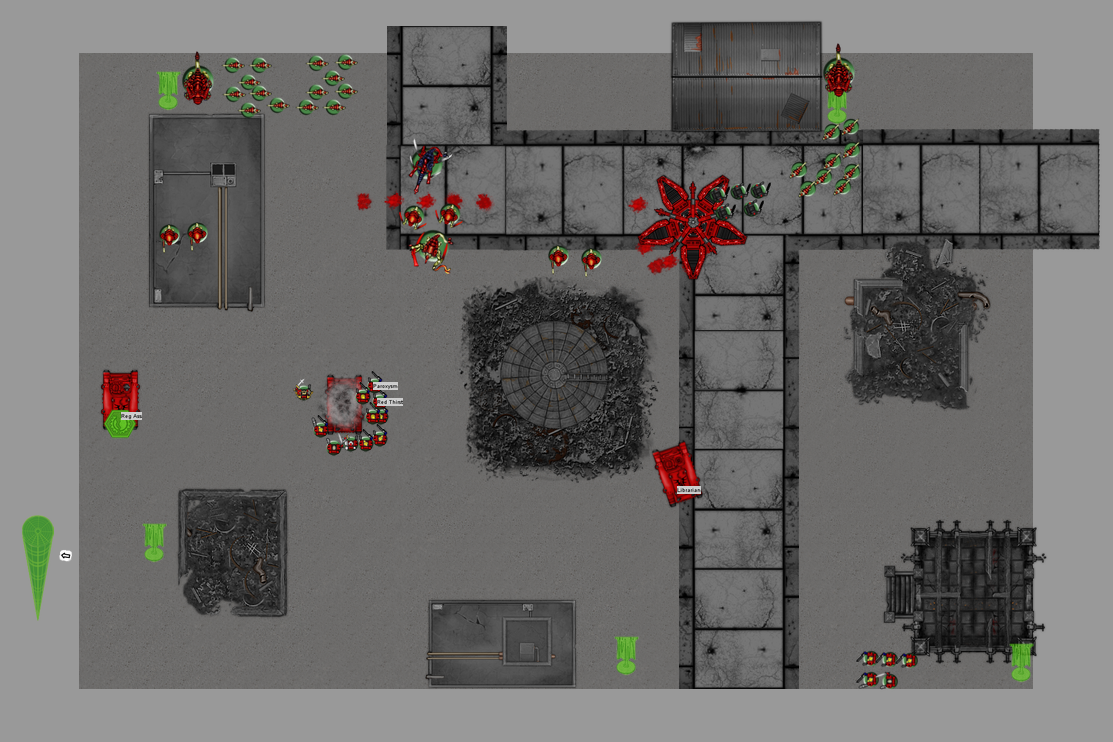
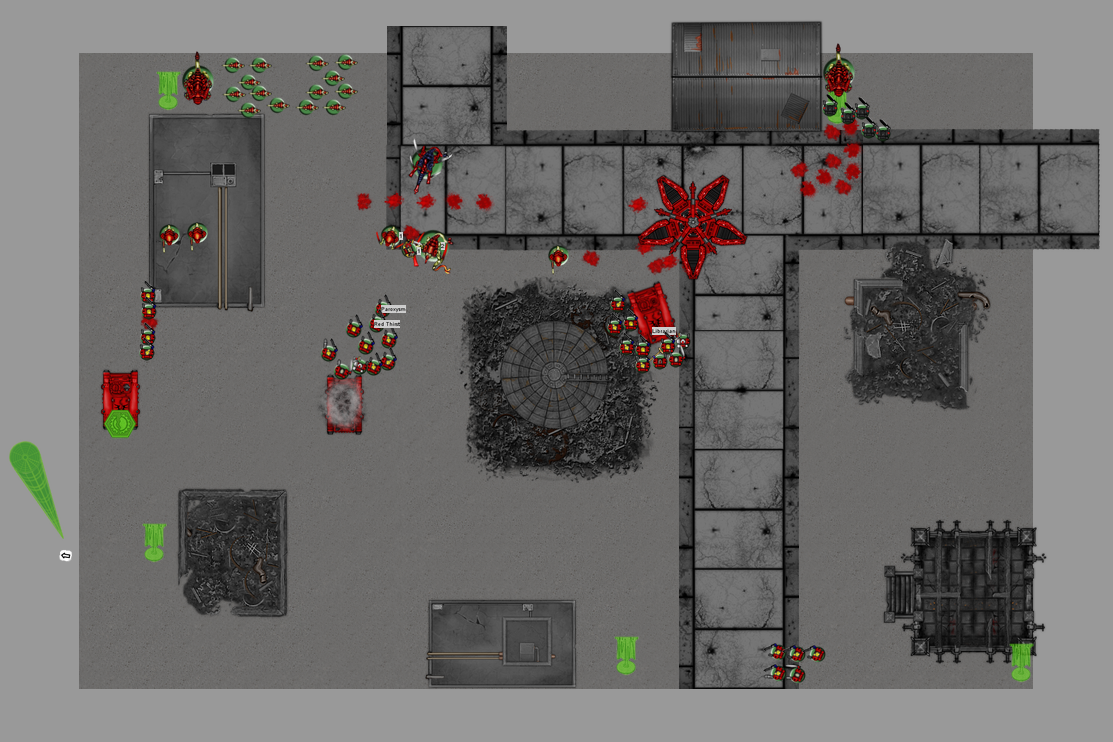

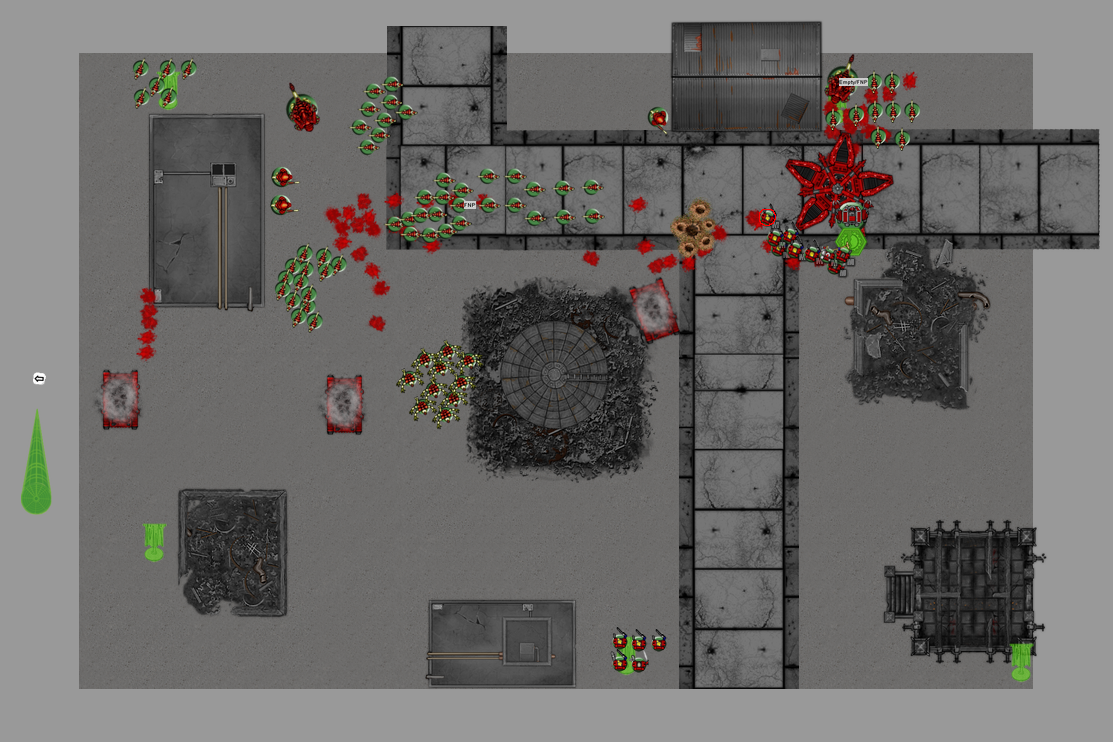

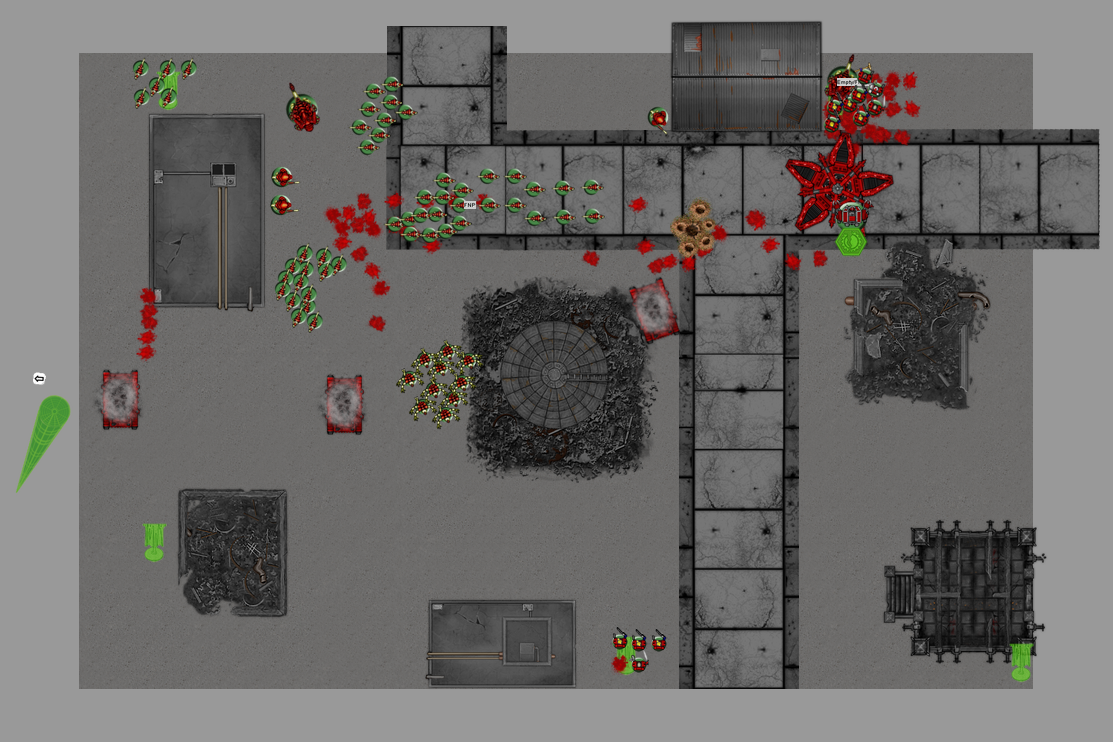


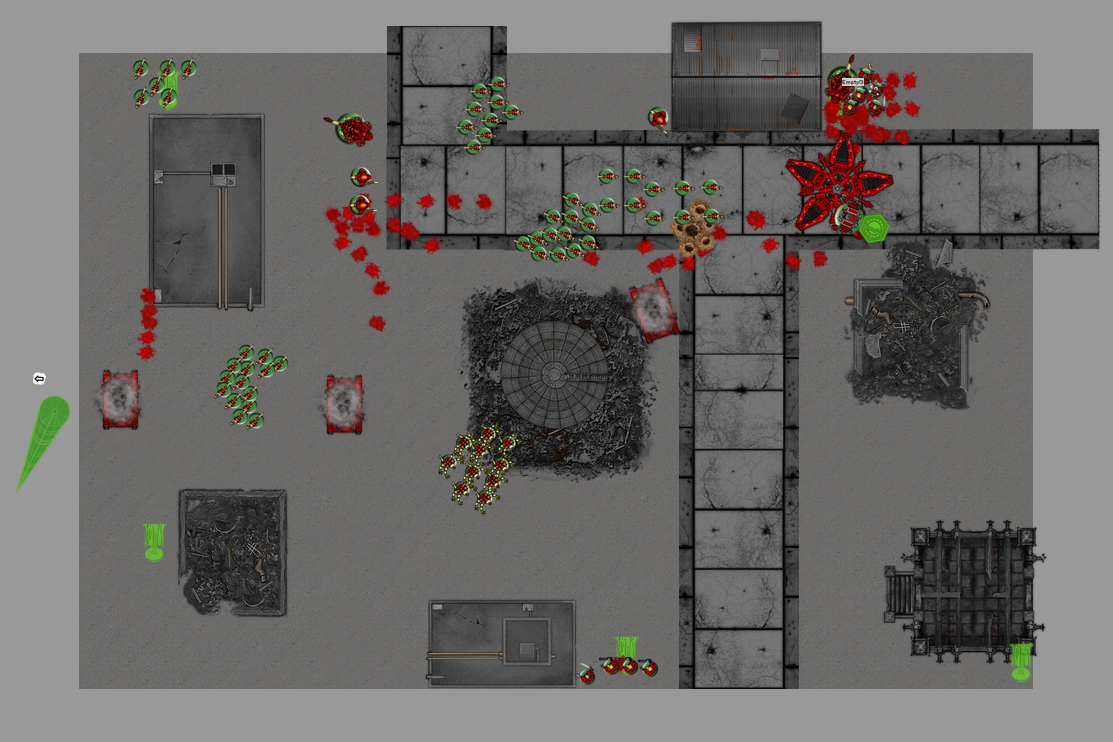
 for their run move. Not content to merely wipe out half the squad and its Rhino, they decided to finish off the 2nd half of the Combat Squad and call it a day. In addition, in the Shooting Phase, the lone Hive Guard continued to reap a toll, wrecking the Furioso Dreadnought. In the Assault Phase, the Librarian Perils'ed due to Shadow in the Warp, suffering a wound. The Tervigon also managed to kill one of the Marines, but Atlas still managed to put 2 wounds on it due to his squad's power weapons. Finally, the Genestealers easily wiped out the Combat Squad, taking their objective in the process.
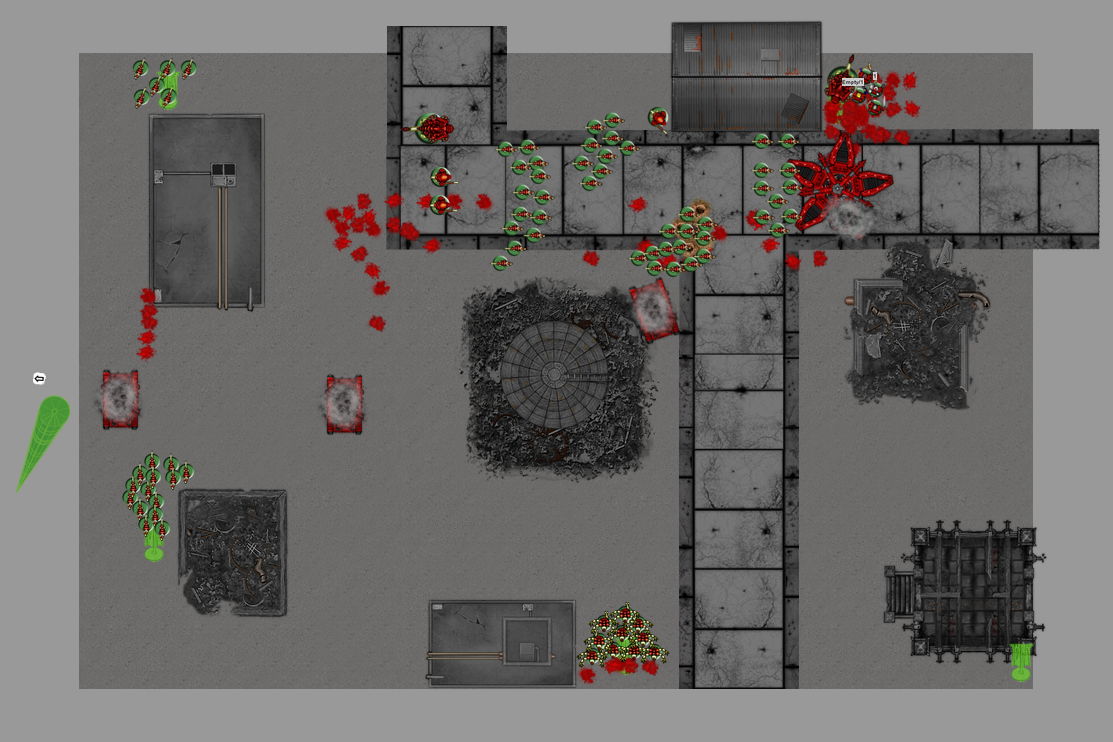
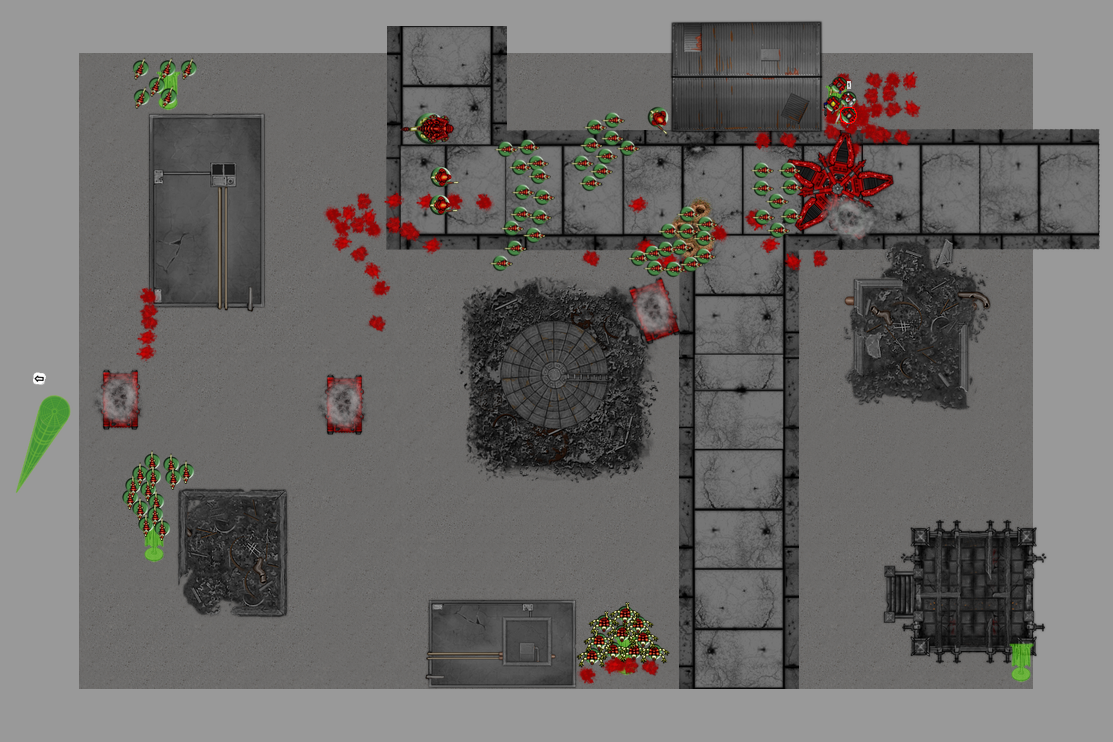
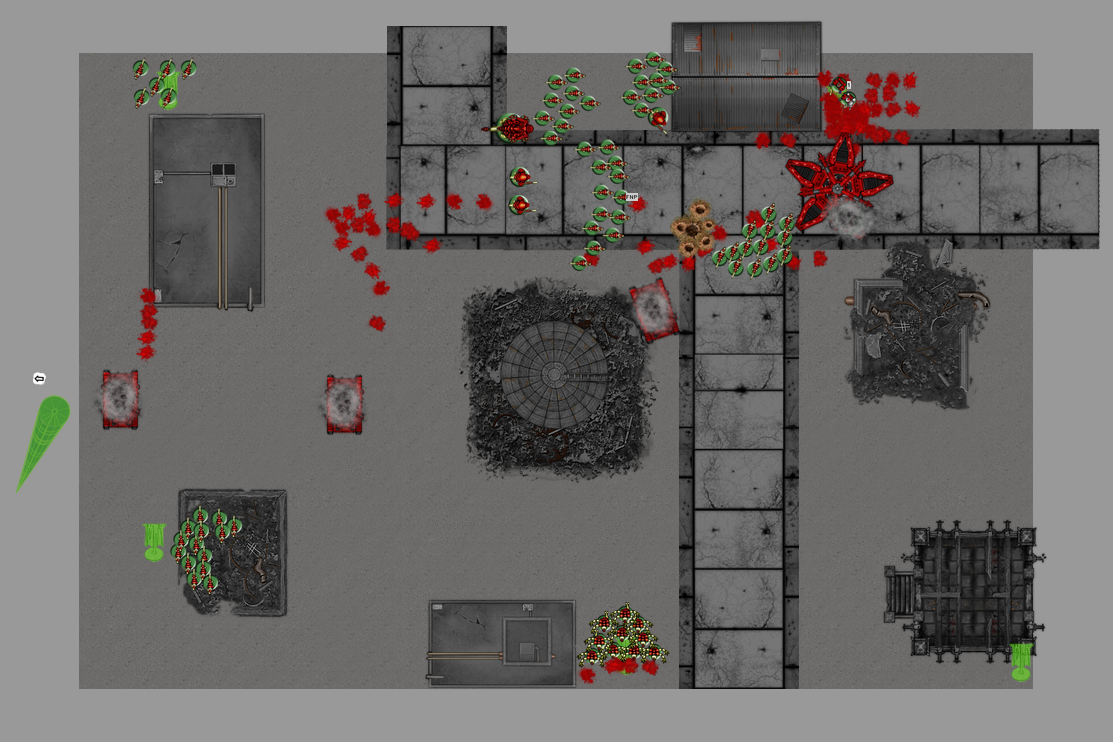

 ) a rhino and possibly Mephiston. I don't have all the guys yet but I'm getting there. I should actually count up my points, come to think of it.